
9 Unexpected Yet Highly Effective Cleaning Hacks for a Sparkling Home
Are you constantly searching for ingenious ways to streamline your home cleaning routine? Look no further! We’ve curated a list of nine truly unconventional yet incredibly effective cleaning hacks, inspired by the renowned organization expert, Clutterbug on YouTube. These clever methods might initially sound a bit unusual, but rest assured, they deliver remarkable results. Having personally tested and integrated several of these tips into my own cleaning regimen, I can attest to their efficiency. They are not only significant time-savers but also transform the chore of cleaning into a far more enjoyable experience. Prepare to revolutionize your approach to household cleanliness as we dive into these surprisingly effective hacks!
Transform Your Cleaning Routine with These Smart Hacks
Get ready to tackle dirt, grime, and stubborn messes with newfound ease. These hacks leverage common household items in ways you might never have imagined, providing powerful solutions for various cleaning challenges around your home.
#1 Multi-Purpose Magic: Toilet Bowl Cleaner with Bleach for More Than Just Toilets
While designed for your toilet, a good toilet bowl cleaner, particularly one containing bleach, holds surprising power beyond the porcelain. Its thick, clinging formula is perfect for tackling other challenging areas in your bathroom. This potent solution excels at deep cleaning grout lines and effectively removing unsightly mold and mildew. The bleach acts as a powerful disinfectant and whitener, while the gel consistency allows it to adhere to vertical surfaces, giving it ample time to break down grime.
- Application for Grout: Squeeze a small amount of the toilet bowl cleaner directly onto dirty grout lines. Let it sit for 5-10 minutes, allowing the active ingredients to penetrate.
- Scrub and Rinse: Use an old toothbrush or a stiff-bristled brush to scrub the treated areas vigorously. You’ll notice the grime lifting away. Rinse thoroughly with water, and watch your grout transform from dingy to dazzling.
- Mold Removal: For stubborn mold, apply directly to the affected area, let it sit for a bit longer (up to 30 minutes in severe cases), then scrub and rinse. Ensure good ventilation when working with bleach.
- Safety First: Always ensure adequate ventilation when using bleach-based products. Wear gloves to protect your hands, and never mix bleach with ammonia or other harsh chemicals, as this can produce dangerous fumes.
#2 The Ultimate DIY Grout Cleaner: A Powerhouse Blend
Forget expensive specialized cleaners; you can create a highly effective grout cleaning solution right at home. This simple yet powerful concoction combines the cleaning prowess of laundry detergent with the sanitizing and whitening properties of bleach. The abrasive nature of powdered detergent helps scrub away embedded dirt, while bleach brightens and kills mildew.
- The Recipe: In a gallon of water, add 1 teaspoon of Tide powdered laundry detergent and 1/3 cup of bleach. Mix these ingredients thoroughly until the detergent is fully dissolved.
- Versatile Use: This powerful mixture isn’t just for grout! It can be safely used on a variety of surfaces that require a deep clean and brightening, such as tiled floors, shower walls, and even outdoor concrete patios.
- Application: Apply the solution generously to your grout lines or tiled surfaces. Allow it to sit for 5-10 minutes to let the solution work its magic.
- Scrub and Reveal: Use a stiff brush or an old toothbrush to scrub away the loosened dirt and grime. Rinse the area thoroughly with clean water, and witness the transformation as your grout lines become visibly cleaner and brighter.
- Important Note: Always test this solution on an inconspicuous area first to ensure it doesn’t discolor your specific tile or grout type. As with all bleach products, ensure adequate ventilation and wear protective gloves.
#3 Baking Soda + Peroxide: The Dynamic Duo for Brightening and Mold Removal
When you need a powerful yet gentle cleaner that can tackle both stubborn stains and mold, turn to a simple paste made from baking soda and hydrogen peroxide. This combination creates a fizzing action that helps lift dirt and grime, while the peroxide provides a mild bleaching effect, making surfaces bright and fresh. Baking soda acts as a gentle abrasive and deodorizer, while hydrogen peroxide is a natural disinfectant and whitener.
- Creating the Paste: Combine a few tablespoons of baking soda with just enough hydrogen peroxide (3% solution, commonly found in pharmacies) to form a thick, spreadable paste. The exact ratio isn’t critical; aim for a consistency similar to toothpaste.
- Mold Buster: Apply this paste directly onto moldy areas in your bathroom, kitchen, or any other damp spots. Let it sit for at least 30 minutes, or even a few hours for particularly stubborn mold.
- Brightening Power: This paste is excellent for brightening dingy sinks, bathtubs, ceramic surfaces, and even cutting boards. Apply, let it sit, then scrub with a sponge or brush.
- Benefits: It’s a non-toxic alternative to many harsh chemical cleaners, making it safer for use around the home, especially if you have children or pets. The natural scrubbing action of baking soda combined with peroxide’s oxidizing power makes it highly effective.
- Rinse Well: After letting the paste work, scrub gently and rinse the area thoroughly with water to reveal a sparkling clean and mold-free surface.
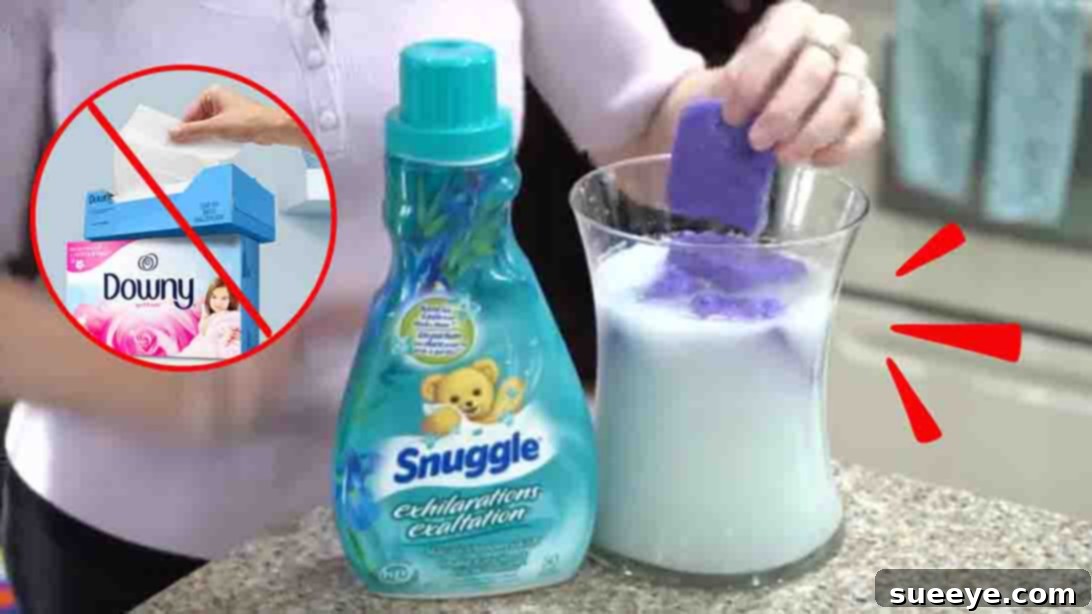
#4 Reusable Laundry Hack: Fabric Softener Sponges for the Dryer
Say goodbye to single-use dryer sheets and hello to a more economical and eco-friendly laundry solution. This clever hack allows you to create reusable fabric softener sponges that leave your clothes feeling soft, smelling fresh, and static-free.
- Preparation: In a container, mix 1 cup of liquid fabric softener with 6 cups of water. Stir well to combine.
- Sponge Saturation: Take a handful of inexpensive sponges, ideally from a dollar store, and toss them into the fabric softener solution. Let them soak for a while, ensuring they are fully saturated.
- Usage in Dryer: When you’re ready to dry a load of laundry, simply grab one of the saturated sponges, squeeze out any excess liquid (you want it damp, not dripping), and toss it into the dryer with your wet clothes.
- Benefits: The sponge acts just like a dryer sheet, reducing static cling, softening fabrics, and imparting a pleasant scent. Because the sponges are reusable, this hack significantly cuts down on waste and saves money over time.
- Reusing: Once the dryer cycle is complete, remove the sponge and place it back into the fabric softener solution in its container. It’s ready to be used again for your next load! This system ensures you always have a fresh, softening sponge ready to go.
#5 Stove Top Brilliance: Baking Soda and a Green Scrubber
Tackling burnt-on food and grease on your stove top can be one of the most frustrating cleaning tasks. This simple baking soda hack makes it surprisingly easy, leaving your stove sparkling without harsh chemicals or excessive scrubbing.
- The Method: Begin by sprinkling a generous amount of baking soda over the surface of your stove top, paying extra attention to areas with stubborn spills or dried food. For even more power, you can lightly dampen the baking soda with a little water to create a paste-like consistency.
- Scrubbing Power: Take a green-textured scrubbing sponge (the slightly abrasive side is perfect) and gently but firmly rub the baking soda onto the stove top. The baking soda acts as a mild abrasive, lifting away grime and burnt residue, while the sponge provides the necessary friction.
- Why it Works: Baking soda is a natural degreaser and mild abrasive, making it highly effective at breaking down cooked-on food and grease without scratching most stove top surfaces (always test in a small, hidden area first, especially on delicate finishes like glass stove tops).
- Final Touches: After scrubbing, wipe away the baking soda residue and loosened dirt with a damp cloth, then follow up with a dry cloth to buff the surface to a brilliant, super-clean shine.
- Frequency: Incorporating this quick clean-up into your routine after cooking can prevent major build-ups and keep your stove looking pristine with minimal effort.
#6 The Olive Oil Secret: Polishing Your Sink to Perfection
While olive oil is a kitchen staple for cooking, it’s also an unexpected hero for achieving a brilliantly clean and shiny sink. This method is particularly effective for stainless steel sinks, transforming them from dull and spotty to gleaming and spotless.
- Preparation: First, ensure your sink is thoroughly cleaned of any food debris and soap scum. Wipe it dry completely.
- Application: Pour a very small amount of olive oil (a few drops are usually sufficient) onto a clean, dry microfiber cloth.
- Rub and Buff: Using the microfiber cloth, rub the olive oil into the sink surface. Work in the direction of the grain for stainless steel sinks. You’ll notice water spots, fingerprints, and smudges disappear.
- Why it Works: The olive oil helps to dissolve any remaining grease, removes water stains, and leaves a protective, hydrophobic layer that repels water and prevents future water spots and fingerprints. It also enhances the natural shine of the stainless steel.
- Benefits: This hack not only makes your sink look brand new but also helps to protect it from future smudges and water marks, making subsequent cleaning easier. It’s a natural, inexpensive way to maintain a polished kitchen centerpiece.
#7 Furniture Polish for White Appliances: Repel Fingerprints and Restore Shine
White appliances, while classic, often show every smudge and fingerprint, quickly diminishing their clean appearance. A surprising solution lies in your furniture polish, which can not only restore their shine but also actively repel those annoying marks.
- The Trick: If you own white appliances such as refrigerators, dishwashers, or washing machines, apply a small amount of furniture polish (the kind you’d use for wood) to a clean, soft cloth.
- Polish to Perfection: Gently rub the polish over the surface of your white appliances. Buff it in until the surface gleams and looks brand new.
- Beyond Shine: The magic of this hack is two-fold. Firstly, the polish creates a beautiful, lustrous shine, making your appliances appear pristine. Secondly, and perhaps more importantly, it forms a protective barrier that actively helps to repel fingerprints and smudges, keeping your appliances cleaner for longer.
- Maintenance: By creating this protective layer, you’ll find yourself needing to wipe down your appliances less frequently, saving you time and effort in your daily cleaning routine. It’s a simple step that yields impressive and lasting results.
#8 Sparkling Jewelry with Toothpaste and an Old Brush
Your precious jewelry pieces can lose their luster over time, becoming dull from everyday wear and exposure to oils and dirt. Before reaching for harsh chemical cleaners, try this gentle and effective hack using a common bathroom item.
- The Method: Grab an old toothbrush and a dab of regular toothpaste (avoid gel or whitening toothpastes with abrasive crystals, as these can be too harsh).
- Gentle Scrub: Apply a small amount of toothpaste to the bristles of the toothbrush. Gently scrub your jewelry pieces, paying attention to crevices and detailed areas where dirt tends to accumulate. The mild abrasives in toothpaste, like calcium carbonate or silica, effectively lift away grime and polish the metal.
- Suitable Jewelry: This hack works wonderfully for silver, gold, and non-porous gemstones like diamonds.
- Caution: Avoid using this method on delicate or porous stones such as pearls, opals, or emeralds, as the abrasives can damage their surfaces. Always check the type of gemstone before cleaning.
- Rinse and Dry: After scrubbing, rinse your jewelry thoroughly under cool running water to remove all traces of toothpaste. Pat them dry with a soft, lint-free cloth to restore their brilliant shine. This simple, inexpensive trick will make your favorite pieces look like new again.
#9 Shaving Cream: The Ultimate Mirror Defogger and Streak-Free Shine
Steamy bathroom mirrors are a common annoyance after a hot shower, but a surprising product can keep them crystal clear and streak-free. This hack leverages the anti-fog properties found in ordinary shaving cream.
- Application: Dispense a small amount of shaving cream onto your bathroom mirror. It doesn’t need to be a thick layer, just enough to lightly coat the surface.
- Spread and Wipe: Using a clean, dry microfiber cloth, gently rub the shaving cream evenly across the entire surface of the mirror. Then, buff it off completely until no residue remains. The key is to wipe until the mirror is completely clear and streak-free.
- The Science: Shaving cream contains surfactants that create a thin, invisible film on the glass. This film reduces the surface tension of water, preventing it from condensing into tiny droplets that cause fog. Instead, water forms a uniform, clear sheet, allowing you to see through it.
- Lasting Results: This simple application helps repel steam, keeping your mirrors clear even after multiple hot showers. It also leaves behind a beautiful, streak-free shine that lasts much longer than traditional mirror cleaning methods.
- Bonus Use: This trick can also be applied to other glass surfaces prone to fogging, like car windows (on the inside) or even eyeglasses, though always test a small area first.
Embrace a Smarter, More Enjoyable Cleaning Experience
These nine “weird” cleaning hacks, inspired by Clutterbug, are truly game-changers. By incorporating these clever and often inexpensive solutions into your regular routine, you’ll discover that achieving a spotless home doesn’t have to be a daunting task. From conquering persistent grout grime with toilet bowl cleaner to banishing foggy mirrors with shaving cream, each tip offers a fresh perspective on common household challenges.
Not only do these methods prove incredibly effective, but they also promote efficiency, saving you valuable time and effort. Say goodbye to endless scrubbing and complicated products, and embrace a more simplified, enjoyable approach to home cleanliness. Give these hacks a try, and prepare to be amazed by the sparkling results and the newfound ease of your cleaning journey!