
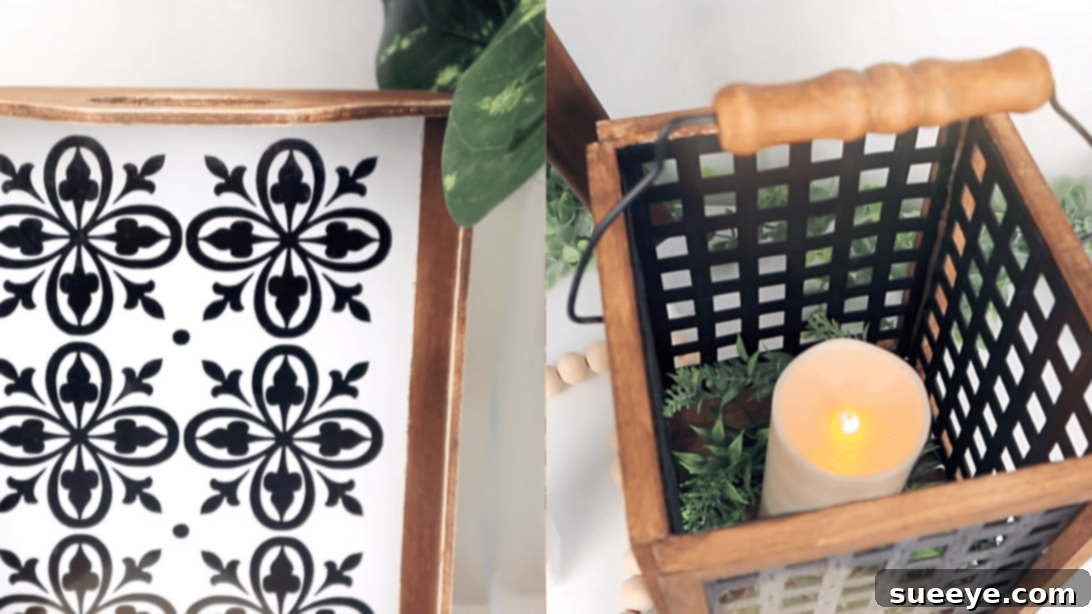
Are you eager to infuse your living space with a touch of elegance without breaking the bank? If you’re a connoisseur of clever and affordable craft projects, then prepare to be amazed by these four truly gorgeous home design DIYs. Unlike typical budget-friendly creations, these projects boast a remarkably classy and high-end aesthetic. You’ll be astonished to learn that most of the materials used are incredibly inexpensive, making them perfect for crafting unique pieces that will make your home or room distinctly stand out. These ingenious Dollar Tree home decor DIY ideas, inspired by the creative minds at DIY Home & Crafts, are both incredibly creative and impeccably executed. Dive into the world of smart decorating and start making these beautiful pieces today!
Elevate Your Space: The Magic of Dollar Tree DIY Decor
In today’s design-conscious world, achieving a stylish home often seems synonymous with a hefty budget. However, the rise of “Dollar Tree DIY” has revolutionized how we approach home decor. It proves that luxury and personalization don’t have to come with a premium price tag. The key lies in seeing potential in everyday, affordable items and transforming them with a touch of creativity and a few simple techniques. These projects are not just about saving money; they’re about the satisfaction of creating something beautiful with your own hands, tailoring your environment to your unique taste, and discovering the hidden gems within your local dollar store.
Why Choose Dollar Tree for Your Home Decor Projects?
- Unbeatable Affordability: Every item is just a dollar (or slightly more in some regions), making experimentation risk-free and accessible to everyone.
- Wide Variety of Materials: From glass jars and wooden items to canvas and craft supplies, Dollar Tree offers a surprising array of foundational materials.
- Creative Freedom: The low cost encourages you to think outside the box, mix and match, and customize without fear of costly mistakes.
- Sustainable Crafting: Repurposing and upcycling budget items can be a more environmentally conscious way to decorate your home.
- Instant Gratification: Many projects can be completed in a single afternoon, offering quick and satisfying results.
Essential Tips for Successful Dollar Tree DIYs
Before embarking on your crafting journey, consider these helpful tips to ensure your projects turn out perfectly:
- Quality Check: While everything is a dollar, quality can vary. Briefly inspect items for cracks, warping, or defects before purchasing.
- Stock Up on Basics: Items like craft glue, spray paint, brushes, and sandpaper are frequently used and worth keeping on hand.
- Prep is Key: Always clean surfaces thoroughly before painting or gluing. Lightly sanding smooth surfaces can also improve paint adhesion.
- Allow for Drying Time: Patience is a virtue in DIY. Rushing drying times can lead to smudges, uneven finishes, and longer overall project durations.
- Personalize: Don’t be afraid to deviate from the instructions slightly. Change colors, add different embellishments, or adapt designs to suit your personal style.
- Safety First: When using spray paints or heat tools, always ensure adequate ventilation and follow manufacturer safety guidelines.
Now, let’s delve into these four exquisite Dollar Tree DIY projects that promise to elevate your home decor!
1. Sophisticated Patterned Wood Tray
A beautifully crafted tray can serve multiple purposes: a decorative centerpiece on a coffee table, a stylish organizer for remote controls, or an elegant serving piece. This Dollar Tree project transforms a simple tray into a high-end accent piece that looks far more expensive than its components.
Materials:
- Dollar Tree plastic or wood tray
- Antique wax color paint (or dark brown acrylic paint)
- Paintbrush
- White acrylic paint
- Painter’s tape or masking tape
- Heat gun (optional, for faster drying)
- Patterned black vinyl sticker (optional, for intricate designs)
- Dollar Tree sanding sponge or fine-grit sandpaper
Instructions:
- Prepare the Tray: Begin by ensuring your Dollar Tree tray is clean and free of dust. If it’s a plastic tray, a light sanding can help paint adhere better.
- Accentuate the Edges: Using your paintbrush, apply an even coat of antique wax color paint to the edges of the tray. This creates a rich, aged look. Allow this first layer to dry completely. For a professional finish, you can apply a second coat if desired.
- Mask for Clean Lines: Once the edges are thoroughly dry, carefully apply painter’s tape along the inside perimeter of the painted edges. Press the tape down firmly to prevent any paint from seeping underneath, ensuring sharp, clean lines for the base.
- Paint the Base: Now, apply white acrylic paint to the bottom surface of the tray. For optimal coverage and a smooth finish, apply two thin, even coats. Allow each coat to dry completely before applying the next. If you’re in a hurry, a heat gun can significantly speed up the drying process, but always hold it at a safe distance to avoid blistering the paint.
- Add Your Pattern: Once the white paint is dry and you’ve carefully removed the painter’s tape, it’s time to add your chosen pattern. You can either apply a patterned black vinyl sticker for a precise, intricate design or, for a more hands-on approach, freehand paint a pattern using black acrylic paint. Consider geometric shapes, stripes, or a simple initial.
- Distress for Dimension (Optional but Recommended): To give your tray an added layer of character and dimension, use a Dollar Tree sanding sponge or fine-grit sandpaper. Lightly sand the painted edges and corners of the tray. This subtle distressing reveals glimpses of the original tray color or adds a gently aged texture, enhancing the overall “high-end” appearance.
2. Elegant Ginger Jar Vase Replica
Ginger jars are classic decorative elements that exude sophistication. Recreating their timeless appeal with Dollar Tree items is not only cost-effective but also incredibly rewarding. This DIY project allows you to craft a stunning vase that mimics expensive porcelain pieces.
Materials:
- Dollar Tree glass jar (a smooth, relatively wide jar works best)
- Dollar Tree small plastic bowl (for the lid)
- Small wooden handle or knob
- Hot glue gun and glue sticks
- Antique wax color paint (or dark brown acrylic paint)
- White spray paint (primer + paint in one is ideal)
- Black vinyl sticker (or black paint for details)
- Painter’s tape
- Paintbrush
Instructions:
- Prime and Paint the Base: Thoroughly clean both the glass jar and the small plastic bowl. In a well-ventilated area, apply several light, even coats of white spray paint to both items. Ensure full coverage, allowing each coat to dry completely before applying the next. The goal is a smooth, opaque white finish, mimicking porcelain. Let them dry exceptionally well.
- Define the Vase Body: Once the white paint is fully cured, carefully apply painter’s tape around the middle section of the glass jar. Ensure the tape creates a crisp, straight line. This will create a dividing line for your accent color.
- Add Antique Detail: Using your paintbrush, apply the antique wax color paint to the bottom part of the jar, below the painter’s tape. The brush strokes can be used to create a subtle wood-like texture, adding depth and character. While this section dries, paint your small wooden handle or knob with the same antique color, ensuring it matches the lower section of your vase.
- Assemble the “Lid”: Once all painted components are dry, carefully remove the painter’s tape from the jar. Take your small painted wooden handle and securely attach it to the center of the inverted small plastic bowl using your hot glue gun. Hold it firmly until the glue sets. This assembly will serve as the decorative lid for your ginger jar vase.
- Embellish with Design: For the finishing touch, cut two thin, rectangular strips from black vinyl sticker material. These strips can be carefully applied around the jar to mimic the classic banding often seen on traditional ginger jars. Alternatively, you can use black acrylic paint and a fine brush to hand-paint delicate designs or stripes, adding a personalized touch to your elegant new vase.
3. Chic Bamboo Frame with Faux Foliage
Bring a touch of natural, modern minimalism to your walls with this elegant bamboo frame project. It transforms a basic canvas into a sophisticated piece of art, perfect for adding a calming, organic vibe to any room.
Materials:
- Dollar Tree canvas (an 8 x 10 inch canvas is a good starting point, but other sizes work too)
- Black acrylic paint
- Paintbrush
- Dollar Tree bamboo skewers
- Hot glue gun and glue sticks
- Faux fern leaves or other small artificial foliage
Instructions:
- Prepare the Frame: The primary element you’ll need from the Dollar Tree canvas is its sturdy wooden frame. Carefully remove the canvas fabric from the wooden stretcher bars. You might need a utility knife or scissors to cut it away cleanly. Save the fabric for another project, or discard it responsibly.
- Paint the Frame: Give the exposed wooden frame a sleek, modern update by painting it entirely with black acrylic paint. Ensure all sides and edges are covered for a uniform finish. Allow the paint to dry thoroughly. Applying two thin coats can help achieve a deeper, more professional black.
- Prepare the Bamboo Skewers: Take your Dollar Tree bamboo skewers and carefully cut them to the precise length of your frame’s internal dimensions. You’ll want them to fit snugly across the opening. Use strong scissors or small wire cutters for a clean cut. The number of skewers you cut will depend on the size of your frame and how dense you want the bamboo arrangement to be.
- Attach the Bamboo: Using your hot glue gun, carefully glue the cut bamboo skewers to the back of the painted wooden frame. Arrange them evenly spaced across the opening, creating a grid or parallel pattern. Apply a small bead of hot glue to each end of the skewer where it meets the frame, holding it in place until the glue sets. Ensure they are straight and level.
- Decorate with Foliage: Now for the artistic touch! Select a few pieces of faux fern leaves or other artificial foliage. Gently arrange and glue them onto the bamboo skewers, allowing them to drape or weave naturally. You can experiment with different placements to create the most aesthetically pleasing composition. This step adds a vibrant, organic contrast to the dark frame and natural bamboo.
4. Contemporary Dollar Tree Lamp Design
Create a striking, modern lamp shade or decorative lamp housing using Dollar Tree finds. This project focuses on crafting the aesthetic shell for a lamp, which can then be paired with an existing lamp base or a simple puck light for a stunning accent piece. Please note: This DIY focuses on the non-electrical decorative housing. Always consult with an electrician for any actual wiring or lamp assembly that involves electricity.
Materials:
- Four pieces of Dollar Tree canvas (e.g., 6 x 8 inches or similar size for the panels)
- Black acrylic paint
- Antique wax color paint (or dark brown acrylic paint)
- Two Dollar Tree sink mats (rubber or plastic, often found in kitchenware)
- Dollar Tree popsicle sticks or craft sticks
- Super glue or strong craft adhesive
- Optional: Wooden craft cubes for added height
Instructions:
- Prepare Canvas Frames: For each of your four canvas pieces, carefully remove the fabric to expose the wooden frames, just as you did for the bamboo frame project. These four frames will form the structure of your lamp.
- Paint the Frames: Using the antique wax color paint, carefully paint the borders of all four wooden frames. This will give them a rich, warm, and sophisticated appearance. Allow these painted frames to dry completely before proceeding to the next step.
- Customize Sink Mats: Place one of the painted wooden frames onto a Dollar Tree sink mat. Carefully measure and mark the exact dimensions of the frame onto the mat. Cut out four rectangular pieces of the sink mat that precisely match the size of your wooden frames.
- Paint Sink Mat Panels: Take these four cut sink mat pieces and paint them completely black with acrylic paint. The textured surface of the sink mat will add a unique, modern dimension to your lamp. Ensure they are fully dry before assembly.
- Assemble the Lamp Structure: Now, attach the painted sink mat panels to the inside of your painted wooden frames. Use super glue or a strong craft adhesive to secure each black mat piece to its corresponding frame. Once these panels are prepared, carefully glue the four frame-and-mat assemblies together along their edges to form a rectangular or square lamp structure. Hold each joint firmly until the glue sets, ensuring the structure is stable and square.
- Construct the Base: For the lamp’s base, paint a collection of Dollar Tree popsicle sticks or craft sticks with your antique wax color paint to match the lamp’s borders. Once dry, arrange and glue them together to form a sturdy, flat base. Attach this base securely to the bottom of your lamp structure using super glue.
- Add Height and Stability (Optional): To give your lamp additional height and a more substantial feel, consider using wooden craft cubes. Paint these cubes with the same antique wax color paint. Once dry, glue four of these cubes strategically to the very bottom of your lamp base, elevating it elegantly.
- Final Touches (Optional): If you have a decorative wooden handle, you can attach it to one side of the lamp structure for an added design element, even if it’s purely ornamental.
Remember, these lamp designs are intended as decorative shells. For functional lighting, you can place a battery-operated LED puck light inside or position the shell over an existing small lamp base. This creates a beautiful ambient light source without dealing with electrical wiring yourself.
Your Journey to a Beautiful, Budget-Friendly Home Starts Now!
These four Dollar Tree DIY projects demonstrate just how achievable high-end home decor can be, even on the tightest budget. From a chic patterned tray to an elegant ginger jar, a minimalist bamboo frame, and a contemporary lamp design, each project offers a unique way to personalize and beautify your living space without compromise. The satisfaction of transforming simple, affordable items into stunning decorative pieces is truly rewarding.
Don’t let budget constraints limit your creative vision. Embrace the versatility and value offered by your local dollar store, and unleash your inner decorator. Experiment with colors, textures, and finishes to truly make these projects your own. We encourage you to try these fantastic Dollar Tree crafts and share your unique creations. Happy crafting, and enjoy your beautifully transformed home!