
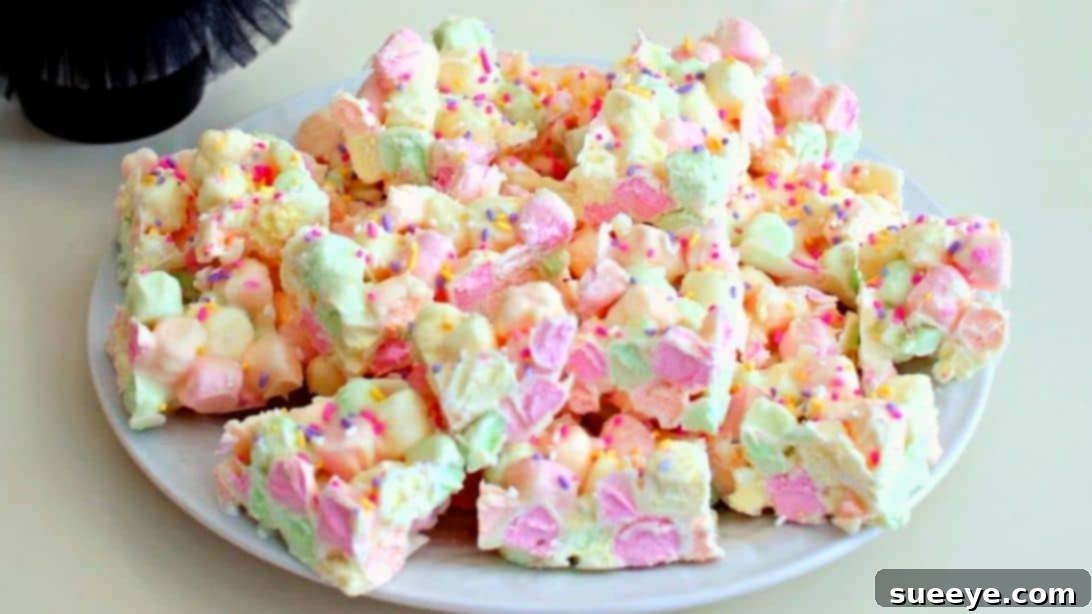
Easy 2-Ingredient Easter Marshmallow Bark: Your Go-To No-Bake Holiday Treat
As the vibrant colors of spring emerge and the anticipation of Easter celebrations fills the air, finding the perfect dessert that’s both festive and fuss-free can be a challenge. Look no further! We’ve got an incredibly easy and quick last-minute dessert idea that will be the star of your Easter party, spring gathering, or simply a delightful treat for your family. This sweet concoction, inspired by the brilliant recipe from sparklyblonde1 on YouTube, simplifies holiday baking to an absolute minimum. It requires little to no effort, and best of all, absolutely no baking!
Imagine a delicious, colorful candy bark that comes together in mere minutes, allowing you to focus on other holiday preparations. All you need to do is prepare this delightful treat in a sheet pan, pop it into the freezer, and let it set while you attend to your other errands. Whether you’re a seasoned baker or a kitchen novice, this recipe is designed for success and guarantees a mouth-watering result. If you’re ready to create a beautiful and delicious Easter treat that everyone will adore, then simply follow our detailed instructions below, and don’t forget to check out sparklyblonde1’s original video tutorial for a visual guide.
What Makes This Easter Marshmallow Bark So Special?
- Effortlessly Simple: With only two core ingredients and no baking required, this recipe is perfect for busy schedules.
- Quick Preparation: From start to finish, you can have this bark chilling in under 15 minutes.
- Crowd-Pleasing Taste: The delightful combination of creamy white chocolate and fluffy marshmallows is a universal favorite.
- Highly Customizable: While simple, it’s a blank canvas for various sprinkles, colors, and additional mix-ins to match any theme.
- Festive & Fun: A perfect activity for kids and adults alike, especially when decorating with colorful sprinkles.
Get ready to add a burst of sweetness and vibrant cheer to your Easter table with this fantastic white chocolate marshmallow bark!
Ingredients You’ll Need:
Crafting this delightful Easter Marshmallow Bark is incredibly straightforward, thanks to its minimal ingredient list. Quality ingredients will elevate the final taste and texture, so choose wisely!
- 1 bag (24 ounces) White Chocolate Chips: The foundation of our bark, white chocolate provides a creamy, sweet base. Opt for high-quality baking chips or a good quality white chocolate bar chopped into pieces for the best melting consistency and flavor. Compound white chocolate (often labeled “white confectionery coating”) can also be used for easier melting, but may have a slightly different flavor profile.
- 1 bag (10 ounces) Mini Marshmallows: These small, fluffy clouds add a wonderful chewiness and lightness to the bark. Their mini size ensures they distribute evenly and melt just enough to bind with the chocolate without disappearing completely.
- Colorful Sprinkles: Essential for that festive Easter look! Choose pastel-colored nonpareils, jimmies, or custom Easter-themed sprinkle mixes to add a vibrant pop of color and a delightful crunch.
Tips for Choosing Your Ingredients:
- White Chocolate: For optimal flavor, look for white chocolate that lists cocoa butter as an ingredient. This ensures a richer, smoother melt.
- Marshmallows: While mini marshmallows are recommended for their size and texture, you can experiment with slightly larger ones if you prefer a more pronounced marshmallow chew. Just ensure they are fresh and soft.
- Sprinkles: Don’t limit yourself! Consider different shapes like bunnies, eggs, or flowers for an extra festive touch.
Step-by-Step Instructions for Making Easter Marshmallow Bark:
Follow these simple steps to create your irresistibly delicious and visually stunning Easter Marshmallow Bark. Precision and patience are key for the perfect result!
Step 1: Melt the White Chocolate and Combine with Marshmallows
Begin by preparing your white chocolate. In a large, microwave-safe bowl, add the 24 ounces of white chocolate chips. Microwave the chocolate in short, controlled intervals to prevent burning and ensure a smooth, silky consistency. Start with 30-second bursts, stirring thoroughly after each interval. It’s crucial to stir even if the chocolate doesn’t appear fully melted, as residual heat will continue the melting process. Continue this method until the chocolate chips are completely melted and perfectly smooth, with no lumps remaining. Be careful not to overheat the chocolate, as this can cause it to seize or burn, making it unusable.
Once your white chocolate is beautifully melted, it’s time to introduce the mini marshmallows. Gently pour the entire 10-ounce bag of mini marshmallows directly onto the melted chocolate. Using a spatula, carefully fold and mix the marshmallows into the chocolate until they are evenly coated and well combined. Some marshmallows will soften and slightly melt, creating a wonderfully chewy texture, while others will retain their shape, adding delightful pockets of chewiness throughout the bark.
Prepare your baking sheet or sheet pan by lining it completely with a sheet of parchment paper. This step is vital for easy removal of the bark once it’s set and prevents sticking. Pour the warm marshmallow and chocolate mixture onto the center of the parchment-lined pan. Using an offset spatula or the back of a spoon, gently spread the mixture evenly across the pan. Aim for a consistent thickness, typically about 1/4 to 1/2 inch, to ensure uniform setting and easy cutting later on. The smoother and more even your layer, the more professional your bark will look.
Step 2: Decorate, Chill, and Serve Your Festive Bark
With your marshmallow and chocolate base spread out on the pan, it’s time for the fun part: decorating! Liberally sprinkle the top with the colorful sprinkles of your choice. This is where you can unleash your creativity and make your bark truly stand out. Whether you prefer a dense coating of pastel nonpareils or a scattering of shaped Easter sprinkles, ensure they adhere well to the still-warm chocolate mixture. Gently press them down if needed, but avoid pushing them too deep.
Once decorated, carefully transfer the sheet pan into the freezer. Leave it to chill for approximately 15 to 20 minutes, or until the bark is completely firm and set. The exact time may vary depending on the thickness of your bark and the temperature of your freezer. You’ll know it’s ready when it’s hard to the touch and no longer tacky.
After the bark is fully set, remove the pan from the freezer. Lift the entire piece of bark out of the pan by grasping the edges of the parchment paper. This makes for a clean and easy transfer. Place the bark on a clean cutting board. It’s recommended to let it sit at room temperature for a few minutes (about 5-10 minutes) before attempting to cut it. This slight warming will prevent the bark from cracking or shattering as you cut it, resulting in cleaner, more precise pieces.
Using a sharp knife, carefully cut the bark into desired squared pieces or irregular shards. For cleaner cuts, you can warm your knife slightly under hot water and wipe it dry between cuts. Transfer each beautiful piece into a festive serving bowl or arrange them on a decorative plate. Your homemade Easter Marshmallow Bark is now ready to be enjoyed! This delightful treat is perfect for sharing, gifting, or simply savoring yourself.
Expert Tips for the Perfect Marshmallow Bark:
- Don’t Overheat Chocolate: Microwave in short bursts and stir frequently. Overheated white chocolate can become thick, grainy, and unusable. If it seems too thick, a tiny bit of coconut oil or vegetable shortening (about 1 teaspoon per 24 oz) can sometimes help thin it out without seizing.
- Use Parchment Paper: Absolutely essential for easy removal and cleanup. Wax paper can work in a pinch, but parchment is superior for preventing sticking.
- Even Thickness: Try to spread the mixture to a consistent thickness (around 1/4 to 1/2 inch). This ensures even setting and makes for easier, more uniform pieces when cut.
- Press Sprinkles Gently: After sprinkling, a very light press with your hand can help ensure the sprinkles adhere well and don’t fall off once the bark is set.
- Chill Thoroughly: Don’t rush the chilling process. Ensure the bark is completely firm before attempting to cut it.
- Warm Knife for Clean Cuts: For perfectly clean edges, dip your knife in hot water and wipe it dry before each cut. This slight warmth helps melt through the chocolate smoothly.
Creative Variations and Customizations:
While this 2-ingredient recipe is fantastic as is, it’s also a superb base for endless creativity. Here are some ideas to customize your Easter Marshmallow Bark:
- Chocolate Alternatives:
- Milk or Dark Chocolate: Swap white chocolate for milk or dark chocolate chips for a richer flavor profile.
- Marble Effect: Melt small amounts of different chocolates (white, milk, dark) separately. Dollop them onto the pan and swirl gently with a skewer for a beautiful marbled look.
- Colored Chocolate: Use candy melts in various pastel Easter colors (pink, blue, yellow) instead of white chocolate for an even more vibrant bark.
- Flavor Enhancers:
- Extracts: A few drops of vanilla, almond, peppermint, or lemon extract can be stirred into the melted chocolate for an extra burst of flavor.
- Citrus Zest: Finely grated orange or lemon zest can add a refreshing zing.
- Delicious Add-ins:
- Crushed Cookies: Add crushed graham crackers, Oreos, or shortbread cookies for added texture and flavor.
- Nuts: Toasted almonds, pecans, or walnuts provide a delightful crunch.
- Dried Fruits: Dried cranberries, chopped apricots, or raisins can introduce a chewy, fruity element.
- Candies: Mini M&M’s, chopped gummy candies, or other small Easter candies can be folded into the mix or sprinkled on top.
- Coconut Flakes: Toasted coconut adds a tropical twist.
- Holiday Themes Beyond Easter:
- Christmas Bark: Use red and green sprinkles, crushed candy canes, or peppermint extract.
- Halloween Bark: Orange and black candy melts, spooky sprinkles, and gummy worms.
- Valentine’s Day Bark: Pink and red sprinkles, freeze-dried raspberries, or heart-shaped candies.
Storage and Serving Suggestions:
To keep your Easter Marshmallow Bark fresh and delicious, store it in an airtight container at room temperature for up to 1 week, or in the refrigerator for up to 2 weeks. If storing in layers, separate them with parchment paper to prevent sticking.
This bark is perfect for:
- Adding to an Easter dessert platter.
- Wrapping in decorative bags as homemade Easter gifts.
- Serving as a delightful snack for spring gatherings or tea parties.
- A fun activity for kids to help with decorating.
Frequently Asked Questions (FAQs):
- Q: Can I use large marshmallows instead of mini marshmallows?
- A: While mini marshmallows are preferred for even distribution and easier mixing, you can use large marshmallows if you cut them into smaller pieces (about 1/4 to 1/2 inch squares) before adding them to the chocolate. This will help them incorporate better.
- Q: Why did my white chocolate seize (become thick and grainy)?
- A: White chocolate is very sensitive to heat and moisture. Seizing usually occurs from overheating or if even a tiny drop of water gets into the chocolate. Always microwave in short intervals, stir frequently, and ensure your bowl and utensils are completely dry.
- Q: Can I melt the chocolate using a double boiler instead of a microwave?
- A: Absolutely! A double boiler is an excellent method for melting chocolate gently. Place a heat-proof bowl over a saucepan of simmering water, ensuring the bottom of the bowl doesn’t touch the water. Stir constantly until melted and smooth.
- Q: How long does Easter Marshmallow Bark last?
- A: When stored properly in an airtight container, the bark will stay fresh at room temperature for about 1 week, or in the refrigerator for up to 2 weeks. Freezing can extend its shelf life even further, though textures might change slightly.
- Q: Can I make this bark ahead of time for an Easter party?
- A: Yes, this recipe is perfect for making ahead! Prepare it a few days to a week in advance and store it as recommended. This allows you to tackle your holiday preparations stress-free.
- Q: What kind of sprinkles should I use for Easter?
- A: Pastel-colored nonpareils, jimmies, and shaped sprinkles (like bunnies, chicks, or eggs) are ideal for an Easter theme. You can also mix different types for a more dynamic look.
Conclusion: Your Easiest Easter Treat Awaits!
This Easy 2-Ingredient Easter Marshmallow Bark recipe is a testament to the fact that you don’t need complicated techniques or a long list of ingredients to create something truly special. It’s the ultimate no-bake solution for adding a festive, delicious touch to your holiday celebrations. Perfect for last-minute party preparations, a fun activity with the kids, or a delightful homemade gift, this bark promises smiles and satisfaction.
So, gather your simple ingredients, unleash your creativity with sprinkles, and get ready to enjoy one of the easiest, most delicious Easter treats you’ll ever make. We hope you and your loved ones enjoy this quick and charming recipe!
*A heartfelt thank you to sparklyblonde1 via YouTube for inspiring this wonderful recipe and for all the images used here. If you enjoyed creating this delicious bark, you’ll surely love her other creative videos too. We encourage you to visit her channel, subscribe for more fantastic ideas, and show your support!