
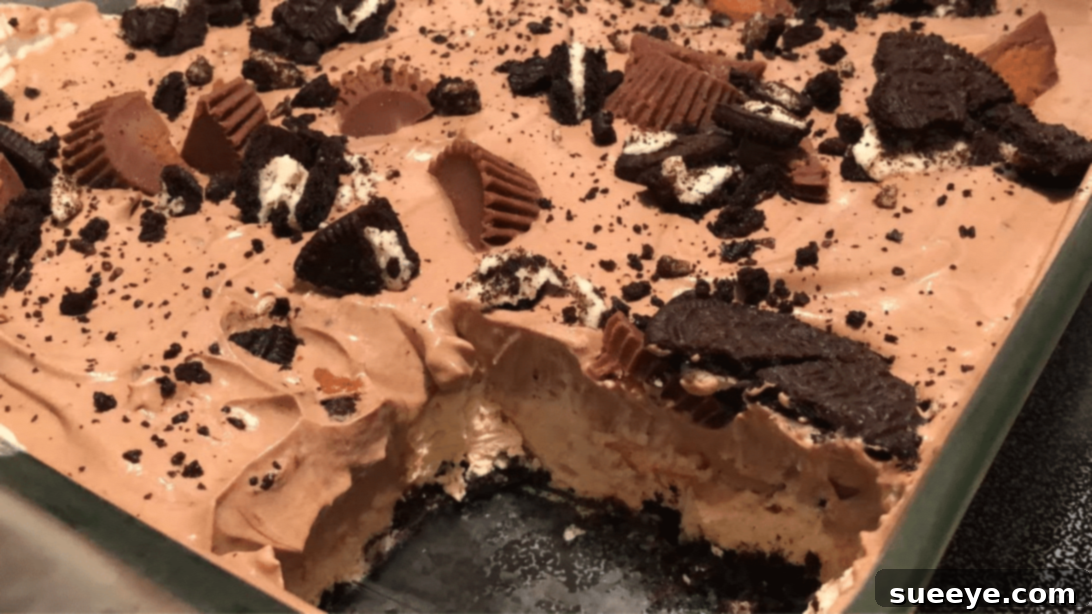
Prepare to impress with a dessert that’s as effortless as it is delectable! This incredible no-bake chocolate peanut butter dessert, championed by the beloved Southern Sassy Mama on YouTube, is set to become your new favorite go-to, especially as the warmer months approach. It’s a luscious, multi-layered treat that combines classic flavors in a way that’s surprisingly simple to assemble, requiring absolutely no oven time. You’ll love how the ingredients are straightforward and likely already nestled in your pantry or refrigerator, making this a spontaneous delight for any occasion.
In the realm of quick and satisfying sweets, few combinations rival the timeless pairing of chocolate and peanut butter. This particular recipe takes that iconic duo and elevates it into a show-stopping dessert that promises both ease and elegance. Whether you’re hosting a backyard barbecue, a casual family gathering, or simply craving a rich indulgence, this no-bake wonder delivers every time. It’s the perfect solution for those moments when you desire something truly special without spending hours in the kitchen. Get ready to create a memorable dessert that will have everyone asking for the recipe!
RELATED: Easy No-Bake Boston Cream Dessert Recipe
Easy No-Bake Chocolate Peanut Butter Dessert Recipe: Your Ultimate Summer Treat
Imagine a dessert with a perfectly crunchy Oreo crust, a velvety smooth peanut butter cream cheese layer, and a rich, decadent chocolate pudding topping, all crowned with delightful mini peanut butter cups and more crushed Oreos. This isn’t just a dream; it’s the reality you can create with this fantastic no-bake recipe. It’s designed to captivate your taste buds and impress your guests, making it an ideal centerpiece for any celebration or a comforting treat for a quiet evening at home. The beauty of this recipe lies in its simplicity and the flexibility it offers for personalization – feel free to load up on your favorite toppings to make each bite even more spectacular.
Let’s dive into the delicious details and learn how to bring this no-bake masterpiece to life. We’ll walk through each step, ensuring you have all the insights to create a flawless and unforgettable dessert that embodies the perfect balance of sweet, salty, and creamy textures.
Ingredients for the Irresistible Chocolate Peanut Butter Dessert:
Gathering your ingredients is the first exciting step towards creating this delightful dessert. Each component plays a crucial role in building the layers of flavor and texture that make this treat so special. For the best results, ensure all refrigerated ingredients like cream cheese are at room temperature before you begin mixing.
For the Crunchy Oreo Crust:
- 16 Oreos (standard size, approximately 1 pack): These classic chocolate sandwich cookies form the perfect base, offering a delightful crunch and rich cocoa flavor that complements the peanut butter and chocolate layers beautifully.
- 2 tbsp of unsalted butter, melted: The butter acts as a crucial binder, holding the crushed Oreos together to create a firm, yet tender, and delicious crust that won’t crumble apart when sliced.
For the Creamy Peanut Butter Layer:
- 1 (8oz) package of cream cheese, softened: Room temperature cream cheese is absolutely essential for a smooth, lump-free filling, providing a tangy richness that cuts through the sweetness and adds depth to the peanut butter flavor.
- ½ cup of creamy peanut butter: Choose your favorite brand of smooth peanut butter for that signature nutty flavor. Avoid natural peanut butter that separates, as it can alter the texture.
- 1 cup of powdered sugar (confectioners’ sugar): This finely milled sugar dissolves easily, ensuring a silky-smooth and perfectly sweet peanut butter filling without any grainy texture.
- 1 (8oz) tub of Cool Whip, thawed: This whipped topping adds incredible lightness and airiness to the peanut butter mixture, transforming it into an irresistibly fluffy and melt-in-your-mouth cream.
- 10 mini peanut butter cups, cut in half: These delightful little treats are folded into the peanut butter layer, adding delightful bursts of chocolate and peanut butter goodness and a pleasant chewy texture.
For the Decadent Chocolate Layer:
- 1 box of Jell-O chocolate fudge pudding mix (instant, 3.9 oz or similar size): Instant pudding is the secret to a quick-setting and wonderfully rich chocolate top layer, providing a deep, satisfying cocoa flavor.
- 2 cups of cold milk (whole milk recommended for richness): Cold milk is important for helping the instant pudding set properly and contributes to a smooth, creamy texture in the final chocolate layer.
- 1 (8oz) tub of Cool Whip, thawed: Similar to the peanut butter layer, Cool Whip is incorporated here to lighten the chocolate pudding, transforming it into a luxurious, mousse-like topping that’s airy and not overly dense.
For the Delicious Topping & Garnish:
- 5 Oreos, crushed: A generous sprinkle of extra crushed Oreos provides a pleasing textural contrast on top and reinforces the delicious chocolate flavor of the crust.
- 10 mini peanut butter cups, cut in half: These are generously scattered on top, making the dessert visually appealing and adding more delightful bursts of chocolate and peanut butter flavor to every bite.
How to Master the Easy No-Bake Chocolate Peanut Butter Dessert:
Creating this layered dessert is a straightforward and enjoyable process that yields spectacular results. Follow these detailed steps precisely to ensure each layer is perfectly prepared and set for an unforgettable treat that will surely be a crowd-pleaser.
Step 1: Preparing the Perfect Oreo Crust
Begin by making your delectable crust, the foundation of this amazing dessert. Take 16 Oreos and place them into a sturdy Ziploc bag. Using a rolling pin, a meat mallet, or even the bottom of a heavy glass, thoroughly crush the cookies until they resemble fine, uniform crumbs. For a quicker and more consistent result, you can also pulse them briefly in a food processor. Once finely crushed, pour these chocolatey crumbs into your chosen baking dish (a 9×13 inch rectangular dish works perfectly, or a 9-inch pie plate for a round dessert). Add the 2 tablespoons of melted unsalted butter and mix thoroughly with a fork or your hands until all crumbs are moistened and resemble wet sand. This ensures the crust will hold together beautifully. Press the mixture firmly and evenly into the bottom of the dish. A flat-bottomed glass, the back of a spoon, or even your knuckles can help you achieve a compact and level crust. Once pressed, set the dish aside; this layer does not require refrigeration before you proceed to the next step.
Step 2: Crafting the Creamy Peanut Butter Layer
Next, it’s time to create the star peanut butter filling. In a large mixing bowl, combine the softened cream cheese, ½ cup of creamy peanut butter, and 1 cup of powdered sugar. Using an electric mixer (either a handheld mixer or a stand mixer fitted with a paddle attachment), beat these ingredients together on medium speed until the mixture is wonderfully smooth, light, and creamy, with absolutely no lumps of cream cheese remaining. This usually takes about 2-3 minutes. Once the mixture is silky and well-combined, gently fold in one 8oz tub of thawed Cool Whip. Use a rubber spatula for this step, incorporating the Cool Whip with a light hand until it is just combined into the peanut butter mixture. It’s crucial not to overmix, as this can deflate the Cool Whip and reduce the desired airy texture. Finally, carefully stir in the 10 mini peanut butter cups, cut in half, ensuring they are evenly distributed throughout the luscious peanut butter cream.
Step 3: Assembling the Layers and Adding the Chocolate Decadence
Carefully spoon the creamy peanut butter mixture over the prepared Oreo crust in your baking dish. Use an offset spatula or the back of a spoon to spread it evenly from edge to edge, creating a smooth and appealing second layer. Once smoothed, sprinkle half of the remaining 10 mini peanut butter cup halves over this layer for an extra touch of flavor and texture. Now, prepare the rich chocolate topping. In a separate large bowl, combine the entire box of instant chocolate fudge pudding mix with 2 cups of cold milk. Whisk vigorously for about 2 minutes until the mixture thickens significantly and is smooth, with no dry pudding powder remaining. Immediately fold in the second 8oz tub of thawed Cool Whip until it’s fully incorporated and the mixture has a light, ethereal, mousse-like consistency. This creates a fluffy and irresistible chocolate layer that beautifully crowns the dessert.
Step 4: The Grand Finale and Chilling to Perfection
Gently pour the luscious chocolate pudding and Cool Whip mixture over the peanut butter layer, spreading it evenly across the entire surface of the dessert. For the finishing touch, generously sprinkle the 5 crushed Oreos and the remaining mini peanut butter cup halves over the top. The visual appeal is almost as delightful as the taste! Once garnished, cover the dish loosely but securely with plastic wrap to prevent any refrigerator odors from affecting the dessert. Place it in the refrigerator. Allow the dessert to chill for a minimum of 3 to 4 hours. This crucial chilling time allows the pudding to set completely and all the flavors to meld beautifully, ensuring firm, clean slices and an optimal eating experience. For the very best results, an overnight chill is often recommended. Once thoroughly chilled, your sensational no-bake chocolate peanut butter dessert is ready to be sliced, served, and savored. Enjoy every exquisite bite!
Tips for a Perfect No-Bake Chocolate Peanut Butter Dessert:
- Room Temperature Cream Cheese: This cannot be stressed enough! Softened cream cheese is the absolute key to a smooth, lump-free peanut butter layer. For best results, take it out of the fridge at least 30-60 minutes before you plan to start mixing.
- Don’t Overmix Cool Whip: When gently folding in Cool Whip, whether into the peanut butter mixture or the chocolate pudding, be very gentle. Overmixing can deflate the air incorporated into the whipped topping, leading to a denser, less airy texture in your final dessert.
- Quality Ingredients Matter: While the recipe calls for simple ingredients, using good quality creamy peanut butter and fresh cream cheese will make a noticeable difference in the richness and overall taste of your finished dessert.
- Chilling is Crucial: Resist the urge to cut into the dessert too soon! The minimum 3-4 hour chill time (or ideally, overnight) allows all the layers to firm up completely and gives the flavors ample time to fully develop and meld. This ensures beautiful, clean slices that hold their shape.
- For Clean Slices: To achieve perfectly neat and attractive portions, dip your knife in hot water and wipe it clean between each slice. This simple trick prevents the layers from sticking and smudging.
Creative Variations and Customizations:
While the classic recipe is absolutely divine, feel free to get creative and tailor this dessert to your specific taste preferences or the occasion. Personalizing it can add an extra layer of enjoyment!
- Crust Alternatives: Instead of Oreos, consider a Graham cracker crust for a slightly different flavor profile, Nilla wafer crust for a lighter vanilla note, or even a salty pretzel crust for an exciting sweet and salty twist that truly stands out.
- Nut Butter Swaps: Experiment with almond butter or cashew butter for a different nutty flavor profile. Just ensure they are smooth and creamy (not chunky or oily) for the best texture in your filling.
- Pudding Flavor Adventures: Explore other instant pudding flavors beyond chocolate fudge! Vanilla, butterscotch, or even white chocolate pudding could offer exciting and equally delicious variations to the chocolate layer.
- Topping Extravaganza: Beyond mini peanut butter cups and crushed Oreos, let your imagination run wild! Consider adding mini chocolate chips, a drizzle of warm caramel or hot fudge sauce, colorful sprinkles for a festive touch, or a generous layer of fresh homemade whipped cream just before serving.
- Individual Portions: For easy serving at parties, or simply for elegant presentation, prepare this dessert in individual ramekins, mason jars, or clear dessert cups. This also makes portion control a breeze and looks incredibly appealing.
Storage for Your Delicious Dessert:
This no-bake dessert is wonderfully convenient to make ahead, making it perfect for entertaining or enjoying throughout the week. Store any leftovers (if there are any!) covered tightly with plastic wrap or in an airtight container in the refrigerator for up to 3-4 days. The flavors often deepen and become even more harmonious overnight, making it just as delightful, if not more so, the next day. This makes it an excellent option for meal prepping your desserts or for ensuring you always have a sweet treat on hand.
With its simple ingredients, no-bake preparation, and utterly delightful combination of chocolate and peanut butter, this recipe is a true winner that’s sure to become a cherished favorite. It’s perfect for busy hosts, beginner bakers, or anyone seeking a delicious escape from the heat of the kitchen. So go ahead, whip up this amazing treat, and enjoy the appreciative smiles it brings to everyone’s faces!
Ready to try another fantastic no-bake creation? Be sure to check out the related recipe above for more culinary inspiration and delightful dessert ideas!
*All these beautiful images and the original recipe inspiration are gratefully credited to Southern Sassy Mama via YouTube. Be sure to visit her channel, show your support, and subscribe for more amazing culinary creations and easy-to-follow recipes!