
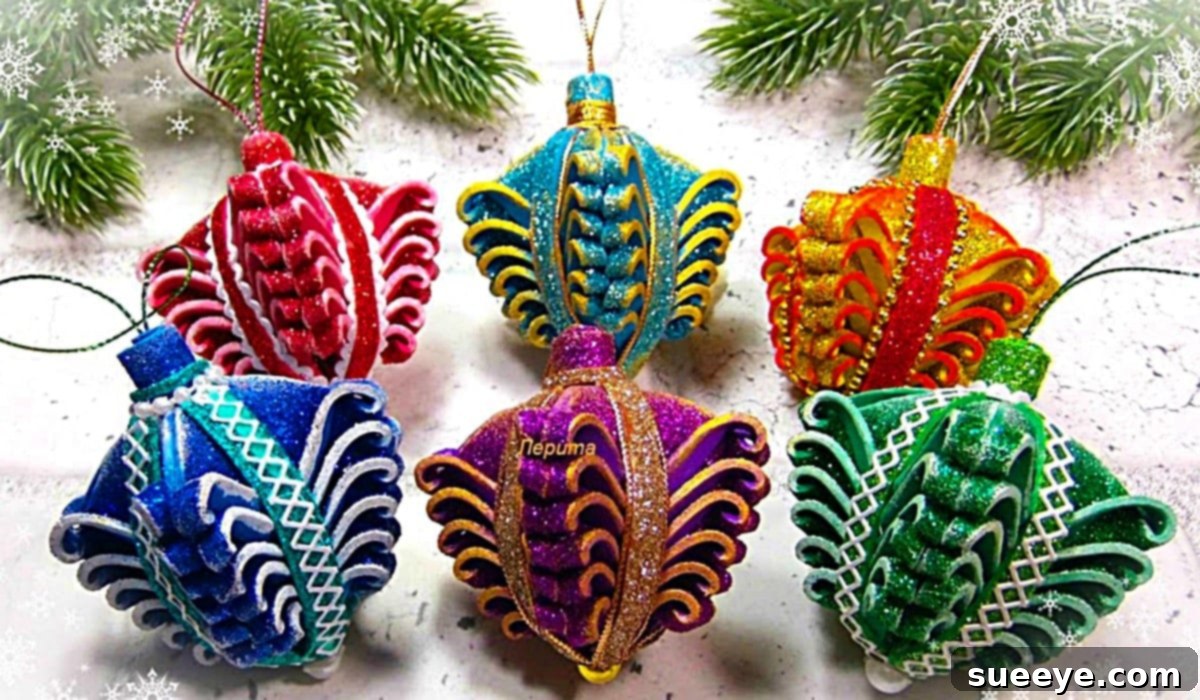
How to Make Stunning Glitter Foam Ornaments: A Step-by-Step DIY Guide
The holiday season is a magical time for crafting, and nothing adds a personal touch to your festive decor quite like handmade ornaments. If you’re looking for a project that’s both simple and visually spectacular, creating glitter foam ornaments is an absolute must-try. These dazzling 3D decorations bring an incredible sparkle and depth to any Christmas tree, mantlepiece, or festive display. What makes them truly special is their surprisingly easy construction, yielding professional-looking results that will impress all your holiday guests.
Inspired by an incredible video tutorial by Lorita VT Handiwork on YouTube, we’ve put together a comprehensive guide to help you recreate these stunning pieces. This tutorial focuses on using readily available materials to craft ornaments that boast an intricate 3D splendor, making them stand out among traditional decorations. Whether you’re a seasoned crafter or just starting, this project promises a rewarding experience and beautiful results. Gather your supplies, embrace your creativity, and let’s bring some extra glitter to your holiday season!
Why Choose Glitter Foam for Your Holiday Ornaments?
Glitter foam paper is an exceptional material for holiday crafting, offering numerous advantages that make it perfect for DIY ornaments. Its inherent sparkle eliminates the need for additional glitter application, saving time and mess, while instantly elevating the festive appeal of your creations. Beyond its aesthetic charm, glitter foam is incredibly lightweight, ensuring your ornaments won’t weigh down delicate tree branches. It’s also surprisingly durable, making these handmade treasures long-lasting additions to your holiday collection.
The flexibility and ease of cutting foam paper mean that even intricate designs can be achieved with precision and minimal effort. Unlike delicate glass or ceramic ornaments, foam is shatterproof, a significant benefit, especially in households with pets or small children. Furthermore, glitter foam is highly affordable and available in a vast array of colors, allowing for endless customization to match any holiday theme or personal preference. This combination of beauty, durability, and ease of use makes glitter foam the ideal choice for crafting spectacular, one-of-a-kind holiday ornaments that will shine year after year.
Materials You’ll Need for Your Glitter Foam Ornament Project
One of the best aspects of this DIY glitter foam ornament project is that it requires only a handful of inexpensive, easy-to-find materials. You can typically find everything you need at any major craft store like Michael’s, Hobby Lobby, or even online retailers. Be sure to check for coupons or sales to maximize your savings!
- Glitter Foam Paper: This is the star of our project! Look for sheets that are about 2-3mm thick. The glitter should be well-adhered to prevent excessive flaking. Choose your favorite festive colors – traditional reds and greens, classic gold and silver, winter blues, or even vibrant purples and pinks for a modern twist. One sheet is often enough to make several ornaments, depending on their size.
- A Pair of Sharp Scissors: Precision is key for clean cuts, so a good pair of craft scissors will make a big difference. If you have detail scissors, they can be particularly useful for intricate parts.
- A Pen or Fine-Tip Marker: For drawing your template lines and cutting guides on the back of the foam paper. A silver or white gel pen works well on dark foam, while a regular ballpoint pen is fine for lighter colors.
- A Ruler: Essential for drawing straight lines and ensuring accurate measurements, which are crucial for the 3D effect of the ornament.
- A Hot Glue Gun: A low-temperature glue gun is often recommended for foam projects as it reduces the risk of melting or warping the foam. Make sure it’s fully heated before use.
- Glue Sticks: Stock up on clear hot glue sticks. You’ll need a few to assemble your ornaments securely.
- Pearls, Rhinestones, or Other Jewels: These are for embellishing your ornament and adding that extra touch of elegance and sparkle. Consider self-adhesive jewels for an even easier application, or small beads that can be glued on.
- Shiny String, Ribbon, or Fishing Line: For creating a loop to hang your ornament. Satin ribbon, metallic string, or even clear fishing line (for an “invisible” hang) are excellent choices.
Optional but Recommended Materials:
- Craft Knife and Cutting Mat: For extremely precise cuts, especially if you plan to make many ornaments. Use with caution.
- Templates: Pre-made templates for arrow shapes or other designs can save time and ensure uniformity. You can find many printable templates online.
- Tweezers: Helpful for picking up and precisely placing small embellishments.
Step-by-Step Directions to Craft Your Glitter Foam Ornament
Creating these 3D glitter foam ornaments is a fun and straightforward process. Follow these detailed steps to bring your sparkling creations to life. Remember, the key to success lies in precision and patience!
Step 1: Preparing Your Foam – Cutting the Base Shape
Begin by turning your glitter foam paper over so the plain, non-glittered side is facing up. This is where you’ll draw your template. For this specific ornament, you’ll be creating an arrow-like shape. You can freehand it, but for consistent results, consider creating a simple cardboard template first. The arrow should be symmetrical and have a defined “head” and “tail.” Ensure the size is appropriate for your desired ornament; a length of about 6-8 inches often works well for a noticeable but not overwhelming ornament.
Carefully trace your arrow shape onto the back of the glitter foam with your pen. Once traced, use your sharp scissors to meticulously cut out the foam arrow. Take your time to ensure clean, smooth edges. Any jagged cuts here will be noticeable in the final product.
Step 2: Marking the Cutting Points for 3D Effect
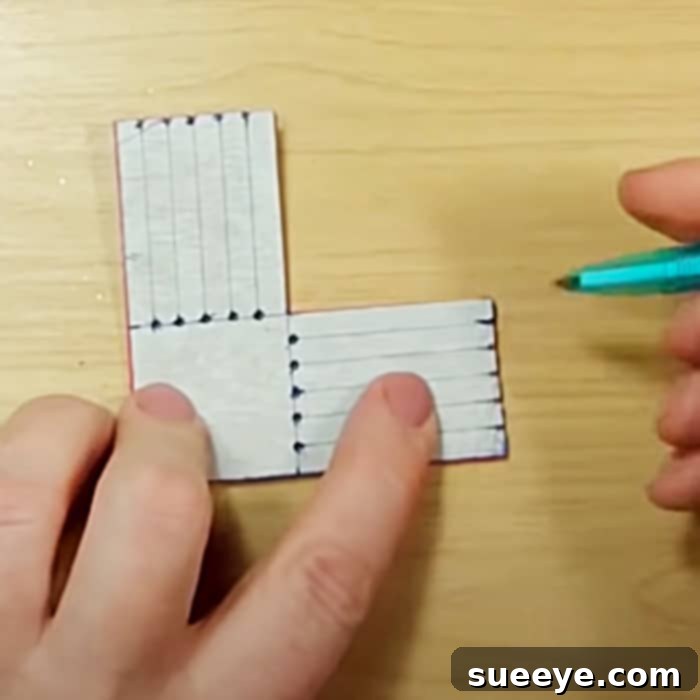
Now, with your foam arrow cut out, it’s time to mark the lines that will give your ornament its impressive 3D dimension. Still working on the non-glittered side, use your ruler and pen to draw a series of parallel lines across the entire arrow shape. These lines should run perpendicular to the length of the arrow (from one side to the other, creating a grid-like pattern). The spacing between these lines is crucial for the ornament’s appearance. Aim for consistent spacing, perhaps every 0.5 to 1 centimeter (or 1/4 to 3/8 inch), depending on the desired density of the 3D rolls.
These lines don’t extend all the way to the edge of the arrow. Instead, leave a small margin (about 0.5 cm or 1/4 inch) on both sides of the arrow where you *don’t* draw lines. This margin will serve as the uncut “spine” of the ornament, holding the strips together.
Step 3: Creating the Individual Foam Strips
With your lines drawn, carefully cut along each of these marked lines. *Important:* Do not cut all the way through to the edges of the arrow! You should only cut from the end of one drawn line to the end of the opposite drawn line, leaving the small margins on both sides of the arrow intact. This will create many thin strips of foam that are still attached at both ends. Think of it like cutting fringes, but with a solid backbone on either side. Take care not to accidentally cut into these “backbones,” as they are essential for holding the structure together.
Step 4: Rolling and Shaping the Strips for Dimension
This is where the magic happens! Gently take each individual foam strip and carefully roll it inwards towards the center of the arrow. You can roll them tightly for a more compact 3D effect or looser for a softer, more voluminous look. As you roll each strip, you’ll create a small loop or curl. You can apply a tiny dot of hot glue at the base of each rolled strip to secure it in place, especially if you find the foam wants to unroll. Work systematically, rolling alternate strips if that helps manage the process, until all the strips on one side of the arrow are rolled. Then repeat the process for the strips on the other side. This will create two distinct, symmetrical sets of rolled strips.
Step 5: Assembling the Ornament Halves
Once all your strips are rolled and secured, you should have two “halves” of a 3D ornament, each with a flat spine and a series of rolled loops. Now, you need to join these two halves together. Apply a thin, even bead of hot glue along the entire length of one of the flat “spines” of your foam piece. Carefully align the other flat spine directly on top of the glued one. Press firmly but gently to ensure a secure bond. Hold them together for a few seconds until the glue sets. You’ll now have a complete, symmetrical 3D glitter foam ornament base!
Step 6: Adding the Hanging Loop
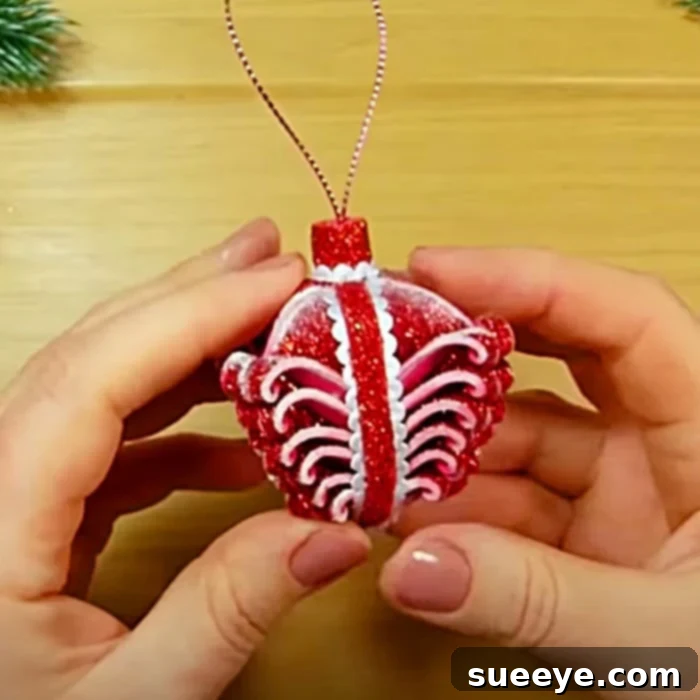
No ornament is complete without a way to hang it! Cut a piece of shiny string or ribbon to your desired length (typically 6-8 inches). Fold the string in half to create a loop. Apply a small dab of hot glue to the very top center of your assembled ornament, at the apex of one of the rolled strips. Press the knotted or joined ends of your string loop into the glue, holding it until it’s firmly set. Ensure the loop is strong enough to hold the ornament securely. For extra reinforcement, you can add another small dab of glue over the string ends once they’ve cooled.
Step 7: Embellishing Your Masterpiece
This is where your ornament truly comes to life and reflects your personal style! Using your hot glue gun (or the adhesive backing on your jewels), carefully attach pearls, rhinestones, sequins, or any other small embellishments to your ornament. You can place them strategically on the outer tips of the rolled strips, along the central spine, or anywhere you feel adds to its beauty. Experiment with patterns – a single pearl on each tip, a line of rhinestones, or a mix of different sizes and colors. Be sparing with the glue to avoid visible excess, and use tweezers if you’re working with very tiny pieces. Allow all glue to dry completely before handling extensively or hanging.
Tips for a Flawless Finish and Enhanced Durability
To ensure your glitter foam ornaments look their best and last for many holiday seasons, keep these additional tips in mind:
- Work on a Protected Surface: Hot glue can be messy. Lay down parchment paper or a silicone mat to protect your workspace from glue drips.
- Test Glue First: If you’re unsure how hot glue will react with your specific foam, test a small, inconspicuous spot first.
- Clean Cuts are Key: Always use sharp scissors. Dull blades can tear or fray the foam, making your ornament look less polished.
- Consistency in Spacing: For a uniform 3D look, try to keep the distance between your drawn lines and the depth of your cuts as consistent as possible.
- Allow Glue to Cool: Before moving or handling sections you’ve just glued, give the hot glue a moment to cool and set completely. This prevents accidental shifting or separation.
- Reinforce Hanging Loops: For heavier ornaments or for peace of mind, you can add a small piece of matching foam over the glued string ends on the ornament’s top, sandwiching the string for extra security.
- Storage: Store your finished ornaments carefully in individual tissue paper wraps or small boxes to prevent crushing or damage to the delicate 3D rolls during the off-season.
Unleash Your Creativity: Customization Ideas
While the basic glitter foam ornament design is stunning on its own, there’s ample room for personalization and creative expression. Here are a few ideas to spark your imagination:
- Color Combinations: Don’t stick to just one color! Use two different colored foam sheets for the two halves of the ornament, or even alternate colors for the rolled strips (though this requires more intricate cutting).
- Varying Sizes: Create a collection of ornaments in different sizes – small ones for filler, large ones as focal points. Simply scale your initial arrow template up or down.
- Different Shapes: While the arrow is classic, you can adapt this technique to other symmetrical shapes like hearts, stars, or even simple geometric forms.
- Themed Embellishments: Instead of just pearls, consider small themed charms, miniature pinecones, tiny bells, or even miniature bows made from thin ribbon to match a specific holiday theme.
- Add More Glitter (Carefully!): If you want an extra blinding sparkle, you can carefully brush a thin layer of Mod Podge onto select areas of the ornament and sprinkle fine glitter on top. Seal with another thin layer of Mod Podge once dry.
- Personalized Touches: Use a permanent marker to write a year or a name on the back of the ornament for a truly personal keepsake.
Beyond the Tree: Creative Uses for Your Glitter Foam Ornaments
These beautiful glitter foam ornaments aren’t just for hanging on your Christmas tree. Their versatility allows them to be incorporated into various aspects of your holiday decor and gifting:
- Gift Toppers: Attach a small ornament to a wrapped present instead of a traditional bow for a personalized and extra-special touch. The recipient gets two gifts in one!
- Garland Accents: String several ornaments together with ribbon or twine to create a unique, sparkling garland for a doorway, mantel, or staircase railing.
- Window or Door Displays: Hang them at varying heights in a window or on a front door wreath to catch the light and add festive cheer.
- Festive Centerpieces: Arrange a few ornaments in a decorative bowl or scattered around candles as part of a stunning holiday table centerpiece.
- Party Favors: If you’re hosting a holiday gathering, these handmade ornaments make charming and memorable party favors for your guests to take home.
- Tiered Tray Decor: Incorporate smaller versions of these ornaments into your holiday-themed tiered tray displays for added texture and sparkle.
Troubleshooting Common Issues
Even with careful planning, you might encounter a minor snag or two. Here are solutions to common problems:
- Glue is Visible: Use very small amounts of hot glue. If you have excess, try to gently peel it off once completely dry. For small, stubborn bits, a craft knife can carefully trim them, but be cautious not to cut the foam.
- Uneven Cuts: If your initial arrow or grid lines are a bit wobbly, don’t worry too much. The 3D rolling effect often camouflages minor imperfections. For future ornaments, use a ruler and practice your cuts.
- Foam Tears During Rolling: This usually happens if the foam is too thin or you’re rolling too aggressively. Try to be gentler, or if possible, use slightly thicker foam paper for your next project.
- Embellishments Fall Off: Ensure your glue gun is sufficiently hot and that you’re applying enough glue for a good bond. Press the embellishment firmly into the glue and hold until it sets.
- Ornament Doesn’t Look Symmetrical: Re-check your initial cutting and marking steps. The 3D effect relies on consistent spacing and rolling. Don’t be discouraged; practice makes perfect!
Conclusion: Crafting Joy, One Ornament at a Time
Crafting these glitter foam ornaments is more than just a DIY project; it’s an opportunity to infuse your holiday season with personal charm, creativity, and the joy of making something beautiful with your own hands. The process is straightforward, the materials are accessible, and the results are simply breathtaking. Whether you’re adorning your own tree, creating thoughtful handmade gifts, or simply enjoying a relaxing creative outlet, these 3D sparkling ornaments are sure to become a cherished part of your holiday traditions.
So, gather your supplies, put on some festive music, and let your imagination soar. We hope this detailed guide, inspired by the wonderful work of Lorita VT Handiwork, empowers you to create a collection of truly stunning glitter foam ornaments that will sparkle and delight for years to come. Happy crafting!