
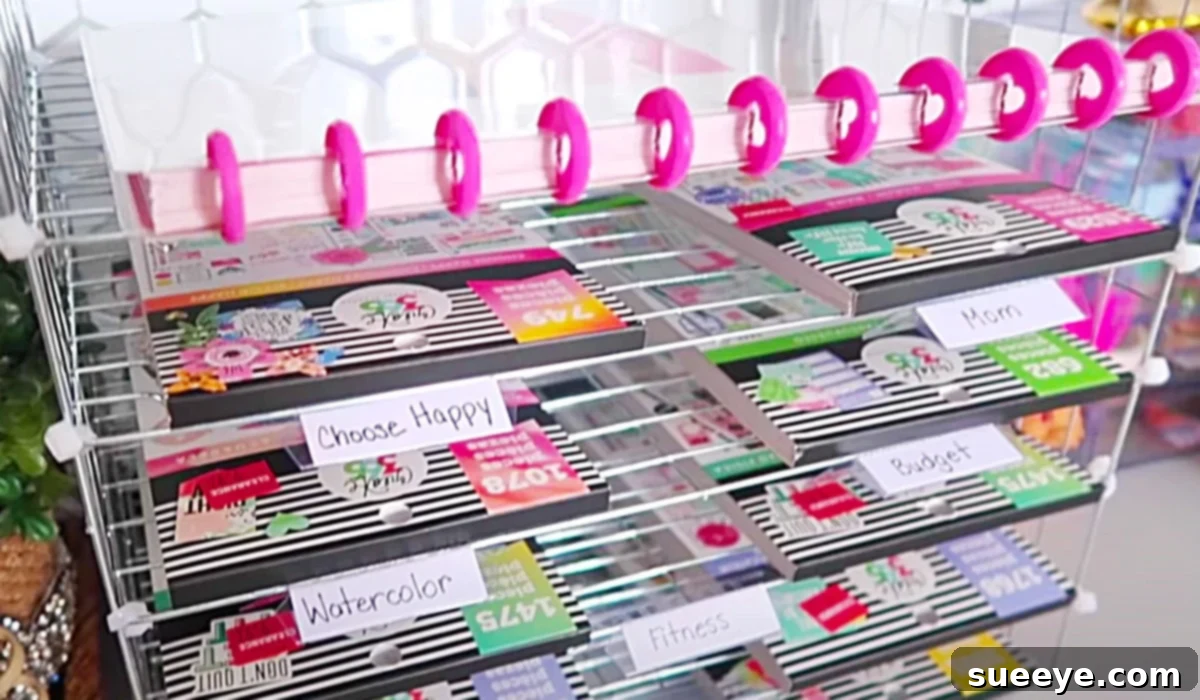
DIY Dollar Tree Cooling Rack Organizer: Transform Your Space on a Budget
Are you tired of cluttered countertops and overflowing drawers? Imagine a world where every item has its designated place, easily accessible and beautifully displayed, without costing a fortune. The idea of a wall-mounted organizer has always been appealing, offering a practical solution to reclaim valuable counter space that often becomes a dumping ground for odds and ends. While searching for an ingenious yet budget-friendly DIY project to tackle my own organizational woes, I stumbled upon an absolute gem: the Dollar Tree DIY cooling rack organizer by Thrifted Living on YouTube. This project immediately caught my eye as the perfect blend of simplicity, affordability, and stunning aesthetics, promising to transform my chaotic areas into perfectly ordered havens.
This brilliant hack takes everyday Dollar Tree cooling racks and, with the help of a few zip ties, converts them into a robust, multi-tiered shelving unit that can be mounted virtually anywhere. It’s a project that truly embodies the spirit of creative reuse and smart spending, proving that stylish and effective organization doesn’t require a hefty investment. The simplicity of using zip ties makes the assembly process incredibly straightforward, even for beginner DIY enthusiasts. What makes this organizer truly exceptional is its dual appeal: it’s unbelievably cheap to create, yet the final product looks so chic and purposeful, you’d never guess its humble origins. Let’s dive into how you can bring this fantastic organizational solution into your own home.
Why Wall-Mounted Organizers Are a Game-Changer for Any Home
The benefits of opting for wall-mounted storage over traditional counter space are manifold. First and foremost, they are incredible space-savers. In kitchens, bathrooms, craft rooms, or home offices, counter space is often at a premium. By utilizing vertical space, you free up horizontal surfaces for activities, leaving them clear and uncluttered. This not only makes your rooms look tidier and more expansive but also creates a more functional environment. No more rummaging through piles; everything is visible and within easy reach.
Beyond the practical advantages, wall organizers contribute significantly to the aesthetic appeal of a room. They can act as a decorative element, showcasing your organized items in an artful way. This particular cooling rack organizer, with its industrial-chic design, brings a modern and minimalist touch to any decor. It’s also incredibly versatile, adaptable to various rooms and purposes, which we’ll explore in more detail. Embracing wall-mounted solutions like this Dollar Tree cooling rack organizer is a smart move for anyone looking to maximize space, minimize clutter, and enhance their home’s functionality and style simultaneously.
The Magic of Dollar Tree DIYs: Budget-Friendly Creativity
Dollar Tree has become a beloved haven for DIY enthusiasts, offering an extensive array of items at an unbeatable price point. The beauty of Dollar Tree DIYs lies in their accessibility and affordability, making creative projects attainable for everyone regardless of budget or crafting experience. What might seem like an ordinary cooling rack, a simple household item, transforms into the cornerstone of an innovative storage solution with a little imagination and a few extra dollars.
Projects like this cooling rack organizer exemplify the potential of Dollar Tree items. They challenge us to look beyond the intended use of a product and see its potential for transformation. This approach not only saves money but also fosters a sense of accomplishment and personalizes your home with unique pieces. Engaging in Dollar Tree DIYs is more than just crafting; it’s a statement about smart living, sustainability, and the joy of creating something beautiful and functional from simple, inexpensive components. It encourages resourcefulness and proves that effective home organization doesn’t require high-end solutions; sometimes, the best ideas come from the most humble origins.
Essential Materials for Your Cooling Rack Organizer Project
One of the most appealing aspects of this DIY organizer is its minimal material list. You’ll be amazed at how such an impactful project requires so few, and such inexpensive, items. Here’s exactly what you’ll need to get started:
-
10 Cooling Racks: These are the stars of our project. Dollar Tree typically sells them in packs of one or two, so you’ll want to pick up enough to reach your desired count. The standard size found at Dollar Tree is usually perfect for creating shelves that are substantial enough to hold various items, yet light enough for wall mounting. The wire grid design is inherently versatile, allowing for air circulation and making it easy to attach items with clips or S-hooks later on if you choose.
-
A Package of Zip Ties: Often found in the hardware or craft section, a good-sized pack of zip ties is crucial. Choose a color that either blends with the racks (white or black are common) or offers a contrasting pop of color if you’re feeling adventurous. The key is their strength and ease of use. Zip ties provide a secure and stable fastening method that requires no special tools for assembly, making them perfect for this project. Ensure you have enough to connect multiple racks securely.
-
A Pair of Wire Cutters: While not strictly a Dollar Tree item, a pair of wire cutters or strong scissors will be indispensable for this project. Their primary use is to neatly snip off the excess ends of the zip ties once they’ve been tightened. This step is essential for giving your organizer a clean, professional, and snag-free finish, preventing sharp edges that could otherwise catch on items or skin.
That’s it! With these three simple items, you are ready to embark on a transformative organizational journey. Gather your supplies, clear a workspace, and let’s turn these humble cooling racks into a masterpiece of practical design.
Step-by-Step Guide to Crafting Your Dollar Tree Cooling Rack Organizer
Creating this beautiful and functional organizer is surprisingly straightforward, thanks to the clever method shared by Thrifted Living on YouTube. Follow these easy steps to construct your very own wall-mounted storage solution:
1. Gathering Your Supplies and Preparing Your Workspace
Before you begin assembling, ensure you have all 10 cooling racks, your package of zip ties, and your wire cutters readily at hand. Find a clean, flat surface to work on, such as a large table or the floor, where you have enough space to lay out your racks and maneuver them comfortably. This preparation step ensures a smooth and efficient crafting process, minimizing interruptions and allowing you to focus on the build.
2. Assembling Your Cooling Rack Structure with Zip Ties
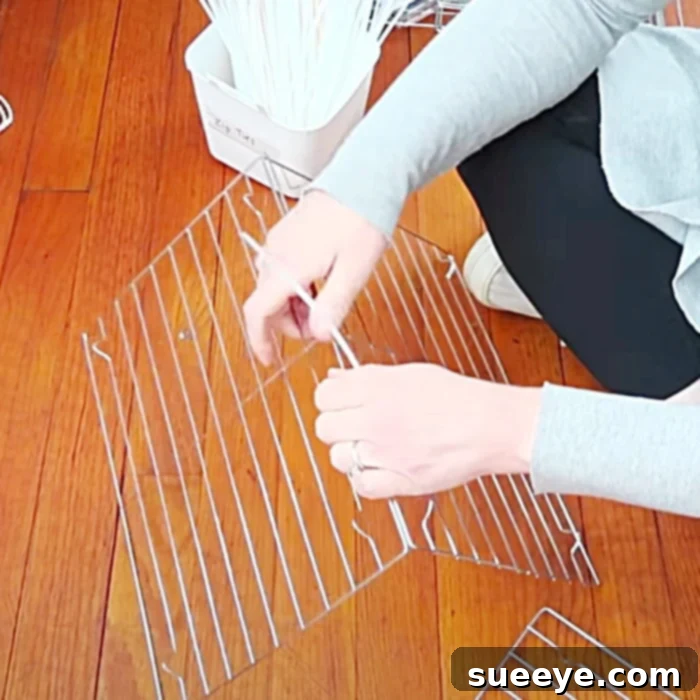
The core of this project involves fastening your cooling racks together using your trusty zip ties. You’ll essentially be stacking them to create a multi-tiered shelving unit. Begin by deciding on the configuration of your organizer. A common design involves creating two vertical columns, each made of five racks connected end-to-end, and then connecting these two columns side-by-side to form a wider unit. Alternatively, you could create a single tall column or even more compact, individual shelving units if desired.
To connect two racks, align their edges. Thread a zip tie through the grids of both racks, pull it tight, and secure it. For maximum stability, use at least two to three zip ties per connection point, especially along the longer edges where racks meet. Ensure that each connection is snug and firm to prevent wobbling once the organizer is complete. Work systematically, connecting one rack at a time, building your structure piece by piece until all your racks are integrated into your desired configuration. Pay attention to keeping the racks as flush as possible for a neat appearance.
3. Securing and Refining Your Organizer
Once all your cooling racks are securely fastened together and the overall structure of your shelving unit is in place, the final step for assembly is to refine its appearance. Take your wire cutters and carefully trim off the excess tails of every zip tie. Cut them as close to the locking mechanism as possible to ensure a smooth, professional finish. This not only makes the organizer look much neater but also prevents any sharp edges from snagging on items or hands.
Double-check all connections to ensure they are tight and secure. Gently test the stability of your newly constructed organizer. This project is truly that easy to execute, and the result is a surprisingly sturdy and incredibly versatile piece that looks absolutely amazing. With the basic structure complete, you’re now ready to consider how to customize and mount your new, budget-friendly storage solution.

Customization Ideas to Make It Truly Yours
The beauty of a DIY project is the opportunity to inject your personal style and adapt it to your specific needs. While the basic cooling rack organizer is fantastic on its own, here are some ideas to customize it and make it perfectly suited for your home:
Personalizing with Paint and Decor
The standard metallic finish of cooling racks offers a sleek, industrial look, but you can easily transform their appearance with a coat of spray paint. Consider matte black for a modern farmhouse vibe, bright white for a clean, minimalist aesthetic, or a vibrant color to add a pop of personality. Always use spray paint suitable for metal and apply several thin coats for an even, durable finish. You can also add decorative elements like small artificial plants, fairy lights woven through the grids, or even decorative paper backing for the shelves to match your room’s decor.
Adding Functional Enhancements
To maximize its utility, think about adding small hooks (S-hooks work perfectly with the grid design), clips, or tiny baskets to your organizer. These can be used to hang scissors, store small notepads, or keep tiny trinkets contained. You can find these accessories at Dollar Tree as well, making the entire project even more budget-friendly. Consider attaching small magnetic strips to the racks if you want to store metallic items like paper clips or small tools. The grid pattern of the cooling racks is incredibly versatile for various attachments.
Mounting Your Organizer
How you mount your organizer depends on its intended use and location. For lighter loads, heavy-duty Command Strips can offer a damage-free solution, ideal for renters. For heavier items or a more permanent fixture, you’ll want to use screws and wall anchors. You can thread zip ties through the top grids and loop them over existing wall hooks, or directly screw through the grid into the wall. Always ensure it’s securely fastened to prevent accidents, especially if placing it in an area where children might reach it.
Endless Possibilities: Where to Use Your New Organizer
One of the most impressive features of this Dollar Tree cooling rack organizer is its incredible versatility. Its simple, open design makes it suitable for almost any room in the house where you need extra storage or a dedicated display area. Here are just a few ideas to spark your imagination:
Craft Room and Art Studio Organization
This is where the organizer truly shines. Use it to neatly store yarn skeins, fabric scraps, spools of ribbon, paint tubes, brushes, glitter, and other craft essentials. Small containers can sit on the shelves, while S-hooks can hold scissors, rulers, or paint palettes. It keeps all your creative supplies visible and within easy reach, inspiring more frequent crafting sessions and making clean-up a breeze. Scrapbooking supplies like paper, stickers, and tools can also find a perfect home here.
Kitchen Pantry and Spice Rack Alternative
Free up valuable cabinet and counter space in your kitchen. This organizer is perfect for holding spice jars, small bottles of extracts, tea bags, coffee pods, or even recipe cards. You could hang lightweight kitchen utensils like whisks or spatulas from S-hooks. If you have a small kitchen, mounting one or two of these near your cooking area can significantly improve workflow and organization, ensuring your most-used ingredients are always at your fingertips.
Bathroom Essentials and Makeup Storage
Tame the chaos on your bathroom vanity! This organizer can hold toiletries like lotions, extra soaps, hand towels, and hair products. For makeup enthusiasts, it’s an ideal spot for palettes, brushes (in small cups), nail polish, and perfumes. The open design allows for air circulation, which is a bonus in humid bathroom environments, and helps prevent mildew build-up on certain items. It keeps your morning routine smooth and efficient.
Home Office and Desk Decluttering
Say goodbye to cluttered desks. Use the cooling rack organizer to keep pens, pencils, staplers, paper clips, sticky notes, and small notebooks tidy. It can even hold small electronic accessories like charging cables, flash drives, or earbuds. Mounting it above your desk provides vertical storage without encroaching on your working surface, promoting a more focused and productive environment. Important documents can be placed in magazine holders that sit neatly on the shelves.
Entryway and Mudroom Convenience
Create a functional drop zone near your front door. This organizer can hold keys, mail, sunglasses, small bags, dog leashes, or even hats and scarves. It helps keep entryways tidy and ensures that essential items are always where you can find them before heading out the door. You could even attach a small mirror to one of the panels for a quick last-minute check.
Kids’ Room and Play Area Solutions
In a child’s room or play area, this organizer is perfect for sorting small toys, art supplies like crayons and markers, picture books, or even small clothing items. Its open design makes it easy for children to access their belongings and learn to put them away. Plus, it’s durable enough to withstand the wear and tear of daily use, offering a practical and playful storage solution that grows with them.
The Unbeatable Value of DIY: Beyond Just Saving Money
While the monetary savings are a huge draw, the value of embarking on a DIY project like this Dollar Tree cooling rack organizer extends far beyond your wallet. There’s an immense sense of satisfaction that comes from creating something functional and beautiful with your own hands. It’s an opportunity to customize your living space with pieces that perfectly fit your needs and reflect your personal style, something off-the-shelf solutions often fail to do. Moreover, engaging in DIY encourages resourcefulness and creativity, transforming ordinary items into extraordinary solutions. It’s about building a home that feels uniquely yours, organized and inspired, all achieved through simple, accessible means.
Ready to Get Organized? Start Your Dollar Tree DIY Today!
No longer do you need to dream of an organized, clutter-free home; you can create it with this ingenious and inexpensive Dollar Tree cooling rack organizer. Whether you’re a seasoned DIYer or just starting your crafting journey, this project offers an accessible and rewarding experience. From transforming your craft room to decluttering your kitchen, the possibilities are truly endless. So, head to your nearest Dollar Tree, grab those cooling racks and zip ties, and prepare to be amazed at what you can achieve. Share your creations and inspire others to embrace the power of budget-friendly, beautiful organization. Your organized oasis awaits!