
Master the Invisible Stitch: A Comprehensive Guide to Seamless Sewing
The invisible stitch, known by many names such as the ladder stitch, slip stitch, blind stitch, or hidden stitch, is a fundamental hand-sewing technique that every enthusiast should master. It’s the ultimate secret to achieving perfectly neat, professional-looking seams that appear as if they were never sewn at all. Whether you’re meticulously closing an opening on a plush toy, mending a tear in upholstery, or finishing a garment lining, this versatile stitch ensures a flawless, undetectable finish. Despite its sophisticated results, the invisible stitch is surprisingly straightforward to learn, making it accessible even for beginners. This in-depth tutorial, drawing inspiration from the clear instructions provided by OnlineFabricStore, will guide you through each step, empowering you to create impeccable, hidden seams with confidence and ease.
Why the Invisible Stitch is Essential for Every Sewer
Beyond its aesthetic appeal, the invisible stitch offers significant practical advantages that make it an invaluable tool in your sewing kit. It provides a strong and durable closure, resilient enough for items that will endure frequent handling or washing. Its ability to blend seamlessly into the fabric makes it the go-to choice for visible areas where traditional stitches would detract from the overall design, such as closing the bottom of a pillow cover or attaching decorative elements. Learning this technique will elevate the quality of your handmade projects, granting them a polished, high-end finish that rivals store-bought items. From quick, emergency repairs to intricate crafting endeavors, the invisible stitch proves indispensable in a vast array of sewing scenarios, making your work look professionally done.
Essential Materials for a Flawless Invisible Stitch
Before embarking on your invisible stitch journey, gathering the correct tools and materials is crucial for ensuring a smooth, frustration-free, and successful sewing experience. While the technique requires only a few basic supplies, selecting quality items will significantly enhance your final result and ease of execution.
- Fabric: Select the fabric for your project. If you are new to the invisible stitch, it’s highly recommended to practice on a scrap piece of fabric that closely matches the weight and composition of your main project. This allows you to hone your technique without risking your final piece. The invisible stitch is suitable for a wide range of fabrics, from light cottons to heavier upholstery, but starting with a medium-weight, non-slippery woven fabric, like cotton broadcloth, is often the easiest for beginners.
- Hand-Sewing Needle: Choose a sharp hand-sewing needle that is appropriately sized for your fabric and thread. A finer needle will create smaller, less noticeable holes, contributing to the “invisible” aspect, especially on delicate materials. A universal “sharps” needle is an excellent choice for its sharpness and fine tip, making it easier to pick up minimal fabric threads.
- Matching Thread: This is arguably the most critical material. Opt for a high-quality thread that precisely matches the color of your fabric. If an exact match is elusive, it’s generally better to choose a shade slightly darker than your fabric, as darker threads tend to recede and disappear more effectively than lighter ones. Polyester thread is a popular choice for its strength and durability, preventing premature wear. Consider the thread’s weight; a finer thread will be less visible.
- Sharp Scissors or Thread Snips: A dedicated pair of sharp fabric shears or small thread snips is essential for making clean, precise cuts to your fabric and thread. Using dull scissors can fray fabric edges, making it harder to create neat folds and a clean seam.
- Iron and Ironing Board: While not a direct stitching tool, an iron is highly recommended, if not essential, for achieving the best results. Pressing the fabric edges inward before you begin stitching creates crisp, neat folds, which are fundamental for executing an even, straight, and truly invisible stitch. A pressing cloth can also be useful to protect delicate fabrics.
- Pins or Fabric Clips (Optional): For longer seams or fabrics that tend to shift, pins or fabric clips can be invaluable. They help hold the folded fabric edges together and perfectly aligned as you work, preventing frustration and ensuring a consistent seam.
- Thimble (Optional): A thimble can protect your finger from repeated needle pricks, particularly when working with denser or thicker fabrics. It also provides extra leverage for pushing the needle through, making the process more comfortable and efficient.
Step-by-Step Directions to Sew the Perfect Invisible Stitch
Follow these detailed, easy-to-understand instructions to create flawless, hidden seams on your projects. Remember, like any new skill, practice is key, so don’t be discouraged if your initial attempts aren’t perfectly invisible.
Step 1: Preparing Your Fabric and Initiating the Stitch
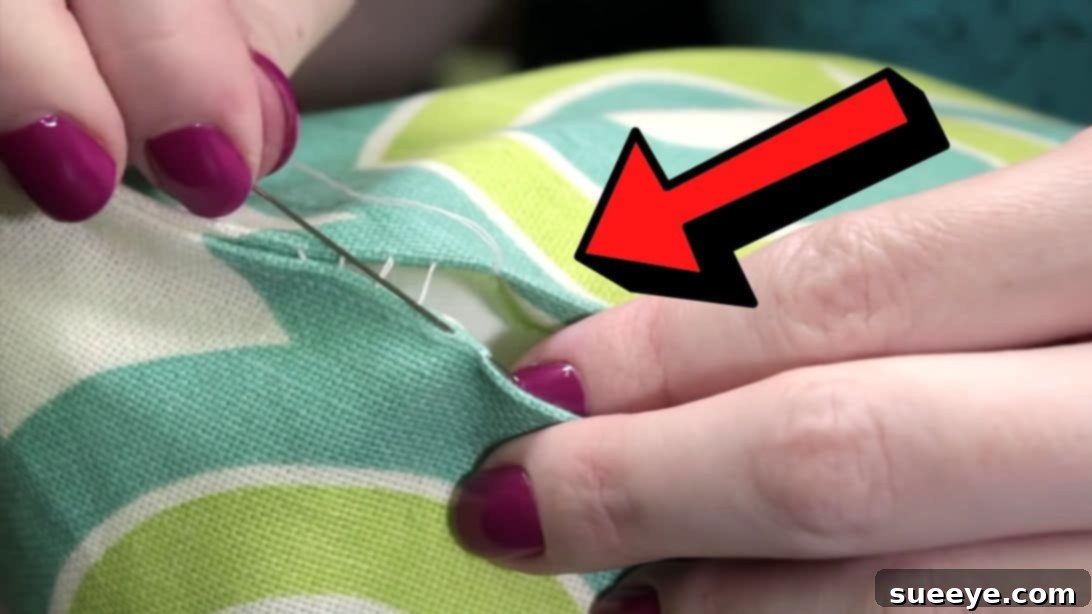
Your first crucial step involves preparing the edges of your fabric where the seam will be closed. Take the time to iron or hand-press these edges inward, creating sharp, crisp folds. This preparation is absolutely paramount for establishing a clean, straight guideline for your stitches. A well-defined crease makes it significantly easier to pick up uniform “bites” of fabric, which is the cornerstone of an undetectable stitch. Once your fabric edges are neatly pressed, thread your hand-sewing needle. For most applications requiring a robust and lasting seam, it is advisable to use a double strand of thread. This means pulling the thread through the needle’s eye, aligning both ends, and then knotting them together firmly. A sturdy knot, such as a surgeon’s knot or a simple double knot, will effectively secure your thread ends. To begin your invisible stitch in a way that truly conceals the starting point, insert your needle up from the inside of one of the folded edges. Guide the needle so that it emerges within the fold itself, ensuring the initial knot is completely hidden between the fabric layers. Gently pull the thread until the knot is snug against the fabric. Now, carefully move your needle directly across to the opposite folded edge. Insert your needle into the very top edge of this fold, picking up just a tiny “bite” of fabric – typically about 1/8 to 1/4 inch (3-6mm) in length – parallel to the fold. Critically, ensure you only catch a few threads of the fabric, rather than piercing all the way through to the front side. This small, precise bite is essential for keeping the stitch hidden. Next, return directly across to the first side, inserting your needle into the fold precisely opposite where your thread last emerged, and take another small, horizontal bite of fabric. Continue this alternating action, moving from side to side. The key to the invisible stitch is to consistently move straight across to the opposing fold, ensuring your working thread runs perpendicularly to the folded edges, creating a distinct “ladder-like” appearance between the two fabric edges.
Step 2: Continuing the Stitch, Achieving Invisibility, and Securely Finishing
Once you have created a series of small, consistent “rungs” in your ladder stitch, it’s time to reveal the magic. Gently pull the working thread taut. As you do, you will observe the gradual disappearance of the stitches into the fabric folds, drawing the two fabric edges together seamlessly, as if by magic. It’s crucial to continue this process down the entire length of your opening, consistently taking small, even bites from each folded edge and maintaining uniform tension. A helpful tip is to pull the thread taut every two to three stitches, rather than waiting until you’ve completed the entire seam. This incremental tightening helps to maintain even tension throughout and prevents the fabric from puckering, gathering, or creating visible tension lines. Consistency in both stitch length and thread tension is paramount for achieving a smooth, flat, and truly invisible seam.
When you arrive at the end of your seam or the desired point to close the opening, it’s time to secure your stitch for lasting durability. Take your final small bite of fabric, just as you have been doing. Then, without pulling the thread completely through, create a small loop with your working thread. Bring your needle through this loop, pulling gently to form a snug knot right at the base of your very last stitch. For enhanced security and peace of mind, repeat this knotting process once or twice more, passing the needle through the loop of the newly formed knot. This technique creates a small, robust knot that will effectively prevent your seam from unraveling over time. To achieve a truly invisible finish, the final step is to meticulously hide the tail of your thread. To do this, insert your needle directly into the secure knot you just made. Carefully run the needle horizontally for approximately one inch (about 2.5 cm) through the layers of fabric within the seam, ensuring the needle stays nestled between the fabric layers and does not pierce through to the front side of your project. Gently bring the needle out through the side of the fabric. Pull the thread taut one last time, then snip the remaining thread tail as close to the fabric surface as possible. The fabric’s natural retraction will then pull the tiny thread end completely inside the seam, leaving absolutely no visible evidence of the knot or the thread’s ending point. Congratulations, your beautifully finished, invisible seam is now complete and ready to impress!
Common Mistakes to Avoid When Sewing an Invisible Stitch
Even experienced sewers can encounter challenges. Being aware of these common pitfalls can significantly help you achieve a perfect invisible stitch every time:
- Taking Overly Large Bites of Fabric: This is the most frequent error. If your needle picks up too much fabric or your stitches are too long (exceeding 1/4 inch), they will inevitably show when the thread is pulled tight. Always aim for tiny, consistent bites, just catching a few threads from the fold.
- Inconsistent Tension: Pulling the thread too tightly in some sections and too loosely in others will result in puckering, gathering, or a visibly uneven seam. Practice maintaining steady, even tension throughout the entire stitching process for a smooth finish.
- Not Matching Thread Color: Using a thread color that noticeably contrasts with your fabric will compromise the “invisible” nature of the stitch. Always invest in thread that blends seamlessly with your fabric, or opt for a slightly darker shade if an exact match isn’t available.
- Skipping the Pressing Step: Unpressed, unruly fabric edges are significantly more challenging to work with and often lead to sloppy, visible stitches. Always take the crucial step of pressing your seams neatly beforehand to create crisp guidelines.
- Improper Knotting: If your starting or ending knots are not securely tied or properly hidden, the seam can unravel, or the knots can become visible, detracting from the invisible finish. Ensure all knots are firm and tucked away within the fabric layers.
- Rushing the Process: The invisible stitch demands patience and precision. Attempting to rush through the steps will almost certainly lead to visible stitches, an uneven seam, or frustration. Take your time, especially as you are learning and refining your technique.
Expert Tips for Achieving a Flawless Invisible Stitch
To truly master this essential hand-sewing technique and achieve the best possible results on all your projects, consider incorporating these expert tips into your practice:
- Practice on Scrap Fabric Extensively: Before tackling your main project, dedicate time to practice on a piece of scrap fabric similar in type and weight to your project material. This builds muscle memory, refines your technique, and boosts your confidence.
- Ensure Excellent Lighting: Work in a brightly lit area to clearly see your stitches and fabric folds. Good lighting allows you to take smaller, more precise bites of fabric, which is crucial for invisibility.
- Utilize a Thimble: Especially when working with denser or thicker fabrics, a thimble can protect your fingers from discomfort and pricks. It also provides extra force to push the needle through, making the stitching process more comfortable and efficient.
- Choose the Right Needle: A sharp, fine needle (such as a “sharps” needle or even an embroidery needle for certain fabrics) will glide through the fabric more easily and create minimal, less noticeable holes, contributing to the stitch’s invisibility.
- Consider Single Thread for Delicate Fabrics: While a double thread offers increased durability for most projects, a single strand of thread can be even less visible on very fine or delicate fabrics, provided the seam doesn’t require extreme strength.
- Invest in Quality Thread: Strong, smooth, and good-quality thread is less prone to tangling, knotting, or breaking during the stitching process. This leads to a smoother sewing experience and a more durable, cleaner finish.
- Aim for Short, Consistent Stitches: Strive for individual stitches that are no more than 1/8 to 1/4 inch (3-6mm) long. Shorter, more frequent stitches are significantly easier to hide and create a more secure seam than longer, sparse stitches.
Versatile Applications of the Invisible Stitch in Various Sewing Projects
The invisible stitch is remarkably versatile and can be applied to a wide array of sewing projects, providing a clean and professional finish where visible stitching would be undesirable. Here are some of its most common and effective applications:
- Closing Openings: It’s the go-to stitch for neatly closing the turning gaps found in pillows, cushions, plush toys, and garment linings after they’ve been turned right side out. This creates a completely seamless edge.
- Mending and Repair Work: Ideal for invisibly repairing torn seams on clothing, upholstery, or other fabric items. The repair becomes virtually undetectable, extending the life and appearance of your cherished possessions.
- Hemming Garments and Home Decor: Used to create a beautiful, unnoticeable hem on skirts, dresses, trousers, and curtains, where you want the hem to lie flat and look finished without any visible stitching from the right side.
- Attaching Appliques and Patches: Perfect for securely attaching appliques, patches, or decorative elements onto fabric without any visible stitching showing on the right side of the garment, giving them a professional, integrated look.
- Finishing Linings in Garments and Bags: Essential for hand-finishing the lining of jackets, coats, bags, or other accessories, providing a clean, crisp, and professional interior that enhances the overall quality.
- Craft Projects: Widely employed in various craft endeavors, such as doll making, quilting, and creating fabric sculptures, where a seamless and polished appearance is a key design element.
Conclusion: Achieve Seamless Perfection with the Invisible Stitch
The invisible stitch is more than just a sewing technique; it’s a fundamental skill that dramatically elevates the quality and professionalism of your handmade projects. By dedicating time to master the ladder stitch, slip stitch, or blind stitch – whatever terminology you prefer – you unlock the ability to create seams that are not only incredibly strong and durable but also impeccably neat and completely hidden. This comprehensive guide has meticulously walked you through every essential detail, from carefully selecting the right materials and preparing your fabric with precision, to executing each individual stitch, securely knotting your thread, and expertly concealing any thread tails. Always remember that patience, precision, and consistent practice are your most valuable allies in perfecting this skill. Do not hesitate to experiment on scrap fabric until you feel entirely confident in your ability. With a little dedication and attention to detail, you will soon be producing beautifully finished items that proudly showcase the professional touch of a truly invisible seam. Embrace the magic and versatility of the invisible stitch, and effortlessly elevate your sewing to new, seamless heights!
*The images featured in this tutorial are courtesy of OnlineFabricStore via YouTube. We encourage you to explore their channel for more valuable sewing tutorials and content!