
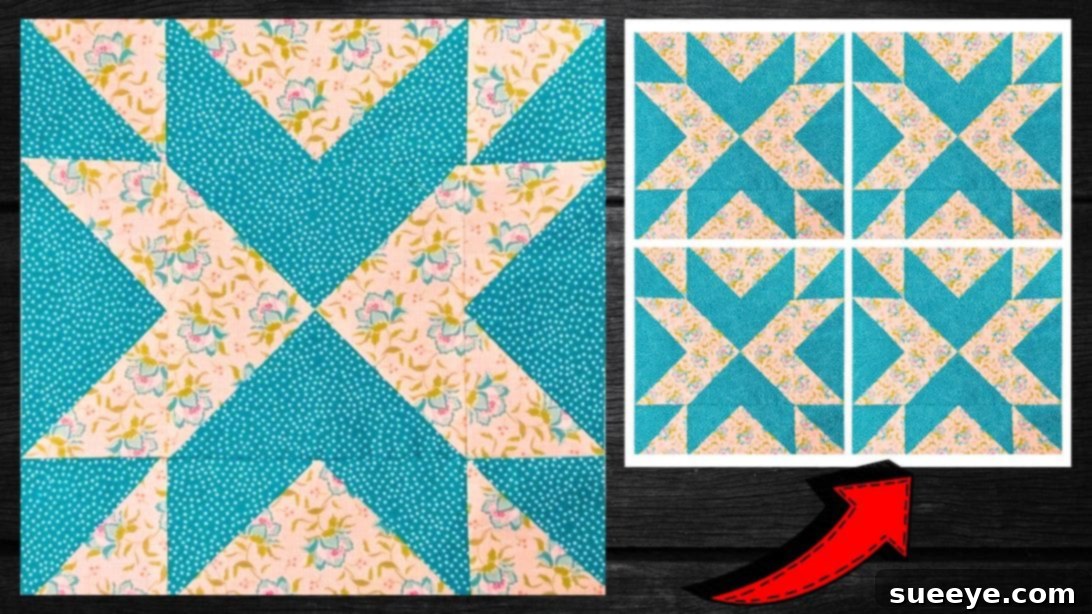
Embark on a delightful quilting journey with the captivating “Blazing Arrows Quilt Block,” a design masterfully presented by Teresa DownUnder on YouTube. This project stands out as an exceptionally easy and incredibly rewarding endeavor, making it an ideal choice for quilters of all skill levels, especially beginners. What makes this particular block so accessible is its reliance on just two fundamental quilting units: the versatile flying geese and the classic half-square triangle. If you’re new to the world of quilting or looking for a quick and satisfying project, there’s no need for intimidation. This tutorial will guide you through each step, ensuring a smooth and enjoyable experience as you craft a beautiful quilt block that boasts dynamic visual appeal.
The “Blazing Arrows” design, with its sharp angles and directional flow, creates a stunning visual impact that can elevate any quilting project. Its simplicity in construction belies the sophisticated look it achieves, making it a favorite among those who appreciate both efficiency and elegance in their crafting. Whether you envision a full-sized quilt, a decorative wall hanging, or unique placemats, mastering this block opens up a world of creative possibilities. Dive into the tutorial below and discover the joy of bringing this vibrant pattern to life with your own hands.
RELATED: How to Make Magic No-Scraps Herringbone Quilt!
We encourage you to watch the detailed video tutorial provided by Teresa DownUnder to gain a comprehensive understanding of each step. Visual learning can significantly enhance your quilting process, ensuring precision and confidence. You’ll find that one of the most exciting aspects of making the Blazing Arrows quilt block is the freedom it offers in fabric selection. Unleash your creativity by experimenting with various fabric prints, textures, and color combinations. From bold, contrasting hues to subtle, harmonious blends, your choices will truly make each block a unique reflection of your personal style. Imagine vibrant primary colors creating a playful design, or serene pastels forming a tranquil piece – the possibilities are endless and entirely up to your artistic vision.
Essential Materials for Crafting Your Blazing Arrows Quilt Block:
Before you begin sewing, gathering all necessary tools and materials will ensure a seamless and enjoyable crafting experience. High-quality tools not only make the process easier but also contribute to the overall precision and finish of your quilt block. Here’s a detailed list of what you’ll need:
- Light Print Fabric: Choose a fabric with a lighter pattern or solid color. This will serve as the background or contrasting element, allowing the “arrows” to truly stand out. Selecting a fabric that complements your darker choice is key to a cohesive design.
- A Darker Contrasting Fabric: This fabric will form the dynamic arrow shapes within your block. A strong contrast between your light and dark fabrics will maximize the visual impact of the Blazing Arrows design. Consider both color and print when making your selection.
- Marking Pen, Pencil, or Chalk: An essential tool for transferring patterns and drawing lines directly onto your fabric. Ensure your chosen marker is easily visible on both light and dark fabrics and can be removed or will disappear after use, preventing unwanted marks on your finished project.
- Ruler: A clear acrylic quilting ruler is highly recommended for precise measurements and accurate cutting. Look for one with clear markings and a non-slip surface to ensure straight cuts.
- Fabric Pins: These are indispensable for holding fabric layers together securely, preventing shifting while sewing. Investing in sharp, fine pins will help avoid damaging your fabric.
- Needle and Thread: While a sewing machine is used for the bulk of the stitching, a hand-sewing needle and coordinating thread are useful for any minor adjustments or securing loose ends.
- Scissors or Rotary Cutter and a Cutting Mat: For clean and accurate fabric cuts. A rotary cutter paired with a self-healing cutting mat offers superior precision and efficiency, especially for cutting multiple layers or long strips. Ensure your rotary blade is sharp for effortless cutting.
- Iron, for pressing: A good iron is crucial in quilting. Pressing seams correctly at each stage ensures your blocks lie flat, your points match up perfectly, and your finished quilt has a professional, crisp appearance.
- Sewing Machine: The heart of your quilting setup. A reliable sewing machine with a straight stitch capability and a ¼-inch presser foot will be your best friend for this project. Ensure it’s threaded correctly and in good working order before you start.
How to Master the Blazing Arrows Quilt Block: A Step-by-Step Guide:
Creating the Blazing Arrows quilt block is a journey of precision and patience, leading to a stunning geometric design. Follow these steps carefully to achieve beautiful, crisp results.
Step 1: Constructing Your First Half-Square Triangles (HSTs)
Begin by carefully cutting both your light and dark fabrics into squares, each measuring 7½ inches. Precision in this initial cut is paramount for accurate block construction. Take one light fabric square and one dark fabric square. Lay them together with their right sides facing each other, ensuring all edges are perfectly aligned. Using your marking tool, draw a diagonal line across the back of the lighter fabric square, from one corner to the opposite corner. This line will serve as your guide. Now, using your sewing machine, stitch a line on both sides of this drawn diagonal line, maintaining a consistent ¼ inch seam allowance. This technique allows you to create two half-square triangles efficiently. Once stitched, carefully cut along the original drawn diagonal line, separating the two units. Gently open each unit and press the seams towards the darker fabric. Pressing towards the darker fabric helps to reduce bulk and prevents the seam allowance from showing through the lighter fabric from the front. You should now have two perfectly formed half-square triangle units.
Next, take these two newly formed half-square triangles. Lay them together again with their right sides facing, but this time, ensure their fabric prints are opposing each other to create a balanced design. It is critical to align the seams perfectly where they meet in the middle, nesting them to reduce bulk and ensure your points match precisely. Pin them securely in place to prevent any shifting during the next sewing stage.
Step 2: Refining HSTs and Preparing for Flying Geese Units
With your pinned half-square triangle units from Step 1, draw a new diagonal line across the seam line, from one corner to the opposite corner. This line should intersect the previous seam. Again, stitch on either side of this newly drawn line, maintaining a ¼ inch seam allowance. Once stitched, cut along the marked diagonal line to separate your units. Open them up. At this point, you’ll want to address the seams. Rather than simply pressing open or to one side, consider “swirling” the seams. This technique involves carefully opening the intersection of the seams to create a small, flat pinwheel, which significantly reduces bulk where multiple seams meet. This is particularly useful in complex quilt blocks. Refer to Teresa DownUnder’s video for a clear demonstration of this technique. After swirling your seams, carefully trim each unit to a precise 6½ inch square. Accurate trimming is crucial for ensuring your final block components fit together perfectly and prevent distortion in your overall quilt design. Set these trimmed units aside as the core of your Blazing Arrows block.
Now, prepare the components for your Flying Geese units. Cut the darker contrasting fabric into a 3½ x 6½ inch rectangle. This will form the body of your flying geese. For the wings, cut the lighter fabric into 3½ inch squares. On the back of each 3½ inch lighter fabric square, draw a single diagonal line from corner to corner. These will be used to create the angled “wings” of your geese.
Step 3: Crafting the First Side of Your Flying Geese Units
Take one of your 3½ x 6½ inch darker fabric rectangles and one of your 3½ inch lighter fabric squares (with the diagonal line drawn on the back). Place the lighter square on top of one end of the rectangle, ensuring their right sides are facing and the edges are perfectly matched. The diagonal line on the square should run from the outer corner towards the center of the rectangle. Pin these two pieces together securely to prevent any movement. Now, for an efficient sewing technique, draw a second line ½ inch away from your original drawn diagonal line. This technique will help you create two units simultaneously. Sew along both of these drawn lines. Once stitched, carefully cut between both lines, ensuring your cut is ¼ inch away from each stitched line. This precision will leave you with a perfectly sized seam allowance on both pieces. Open up the fabric and press the seams nicely, preferably towards the darker fabric square to ensure a clean finish and reduce bulk.
Step 4: Completing Flying Geese and Assembling the Block
Repeat the process described in Step 3 for the remaining end of the darker fabric rectangle. This means you will take another 3½ inch lighter fabric square (with the diagonal line) and place it on the unsewn end of the rectangle. Again, pin, draw a second line ½ inch from the original diagonal, sew along both lines, and then cut between them ¼ inch away from each stitched line. Press the seams towards the darker fabric. You have now completed one Flying Geese unit, often referred to as a “no-waste” flying geese method due to its efficiency. To achieve the full “Blazing Arrows” effect, you will need to create a total of four flying geese blocks. To ensure symmetry and visual interest, repeat the same steps, but this time, consider inverting the fabric placement for two of your flying geese blocks. This means using the lighter fabric as the rectangle and the darker fabric squares for the wings, creating a mirror image or contrasting unit. This inversion is key to forming the dynamic arrow patterns.
Additionally, you will need to create several half-square triangle units, similar to those made in Step 1, but this time ensuring they finish at 3½ inches. These smaller HSTs will serve as the cornerstones or connecting pieces within your Blazing Arrows block, providing definition and structure.
Once all your flying geese units and 3½-inch finished half-square triangles are prepared, it’s time for the exciting part: assembling the block. Lay out all your individual units on a flat surface, following the design demonstrated in Teresa DownUnder’s video tutorial. The Blazing Arrows block typically consists of a 3×3 grid, with flying geese forming the directional “arrows” and HSTs and possibly plain squares filling the remaining spots. Arrange them carefully until you are satisfied with the design and all the points align as desired.
Begin stitching the units together per row. Sew the units within each horizontal row, paying close attention to your ¼ inch seam allowance and ensuring accurate alignment. As you complete each row, take it to your iron and press the seams. For the Blazing Arrows block, it’s often beneficial to press the seams of alternating rows in opposite directions. For example, press the seams of row 1 to the right, row 2 to the left, and row 3 to the right. This “nesting” technique allows the seams to interlock perfectly when you join the rows, reducing bulk and helping your points match up precisely.
After all rows are stitched and pressed, sew the rows to each other, again maintaining that consistent ¼ inch seam allowance. When joining rows, ensure the seam allowances you previously nested are interlocking. Pin generously at these intersections to prevent shifting. As you go, continue to press your seams. A final press of the completed block will help it lie perfectly flat and square, ready to be incorporated into a larger quilt project or stand alone as a beautiful accent piece. Congratulations, you’ve now created a striking Blazing Arrows quilt block!
Once you’ve mastered the Blazing Arrows quilt block, the creative possibilities are boundless. Consider making several blocks to assemble a stunning quilt top, perhaps alternating your color schemes for an even more dynamic effect. This block also works beautifully for smaller projects like table runners, placemats, tote bag panels, or decorative cushions. Its strong graphic quality makes it a fantastic focal point for any textile art piece. Don’t be afraid to experiment with fabric types – from cotton to linen blends, each choice will impart a different character to your finished block. Remember, the journey of quilting is as rewarding as the destination, so enjoy every stitch and celebrate your handcrafted creation!
*All these images are credited to Teresa DownUnder via YouTube. We highly recommend visiting her channel and subscribing for more inspiring and educational quilting tutorials! Her clear instructions and detailed demonstrations are an invaluable resource for both novice and experienced quilters alike.