
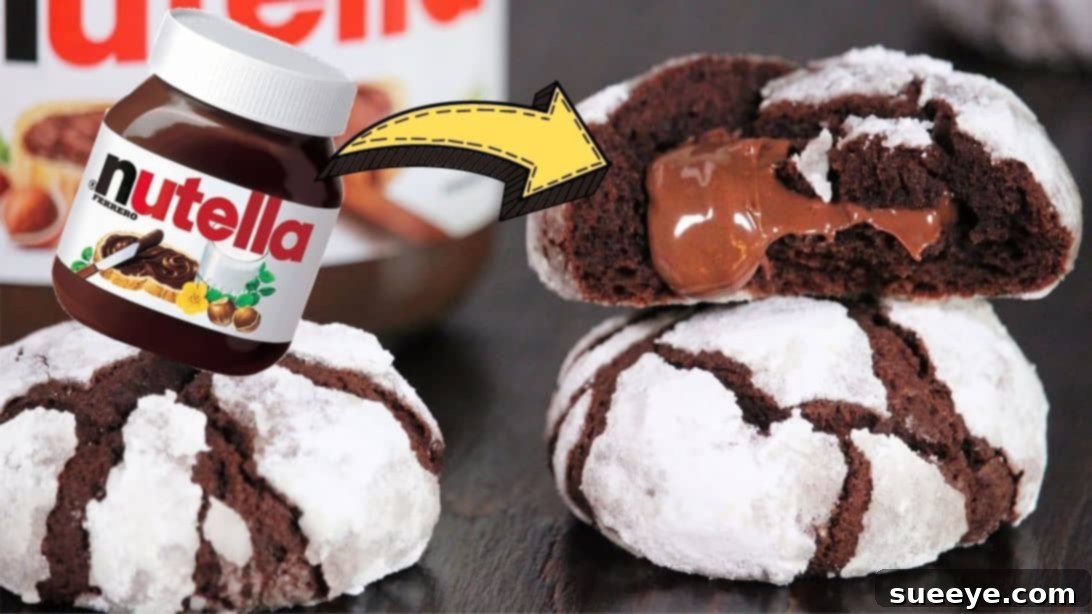
Irresistible Chocolate Crinkle Cookies with Nutella Filling: Your New Favorite Recipe
Are you ready to elevate your baking game and delight everyone with a truly special dessert? If you’re tired of the same old cookie recipes, it’s time to try something extraordinary. Prepare to embark on a delicious journey to create the most decadent, soft, and utterly irresistible Chocolate Crinkle Cookies with a luscious Nutella filling. This isn’t just any cookie; it’s a delightful culinary masterpiece that perfectly balances the rich, intense flavor of chocolate with the creamy, hazelnut perfection of Nutella, all encased in a beautiful, sugar-dusted crinkled exterior.
Inspired by the fantastic bakers at How Tasty on YouTube, this recipe transforms simple ingredients into an extraordinary sweet treat. Each bite promises a harmonious blend of textures and flavors: a slightly crisp, sweet shell giving way to a soft, fudge-like chocolate cookie, which then reveals a warm, molten Nutella core. Whether you’re a seasoned baker looking for a new challenge or a beginner eager to impress, our detailed, easy-to-follow guide will help you craft these show-stopping cookies with confidence. Get ready to fill your home with the enticing aroma of freshly baked goods and earn rave reviews with every single cookie!
Creating these delightful cookies is an incredibly rewarding experience, and the incredible results are truly worth every moment spent in the kitchen. Below, you’ll find everything you need to bake a perfect batch of these extraordinary treats. We’ve meticulously crafted the instructions to be clear, concise, and packed with useful tips to guarantee your baking success and ensure your cookies are nothing short of spectacular.
Gather Your Ingredients for Divine Chocolate Crinkle Nutella Cookies:
The foundation of any great cookie lies in its ingredients. For these heavenly chocolate crinkle cookies, it’s crucial to ensure your butter and eggs are at room temperature; this aids in creating a smoother, more uniform dough and a superior texture. Opting for high-quality cocoa powder will significantly enhance the chocolate flavor, making these cookies truly unforgettable. Here’s a comprehensive list of what you’ll need:
- ½ cup (113g) of unsalted butter, softened to perfect room temperature
- ½ cup (100g) of granulated white sugar
- 2 large eggs, also brought to room temperature
- 1½ cups (180g) of all-purpose flour
- 1/8 tsp of fine salt
- ½ cup (45g) of unsweetened cocoa powder (Dutch-processed cocoa powder is highly recommended for a richer, darker color and deeper, less bitter chocolate flavor)
- 1¼ tsp of baking powder
- Approximately ½ to ¾ cup of Nutella (you’ll need enough to precisely scoop out 15 large teaspoon-sized portions)
- 3 tbsp of additional granulated white sugar, reserved for the initial coating process
- 1/3 cup (40g) of powdered sugar (also known as confectioners’ sugar), for the final coating that creates the signature crinkles
Pro Tip for Bakers: Investing in good quality unsweetened cocoa powder, especially Dutch-processed, will elevate the flavor profile of your chocolate cookies dramatically, resulting in a deeper, more satisfying chocolate experience.
Step-by-Step Directions: Baking Your Perfect Nutella-Filled Crinkle Cookies
Follow these detailed instructions precisely to achieve beautifully crinkled, soft, and utterly delicious cookies, each with a molten Nutella surprise nestled inside. Remember, precision and a little patience are your best friends in the kitchen!
Step 1: Crafting the Chocolate Dough and Preparing the Frozen Nutella Cores
This initial phase is all about meticulously preparing the rich chocolate cookie dough and expertly freezing the Nutella centers that make these cookies so uniquely delightful. Be sure to account for the necessary chilling and freezing times.
- In a spacious mixing bowl, combine your perfectly softened unsalted butter with the first ½ cup of granulated sugar. Using a sturdy spatula or a stand mixer fitted with a paddle attachment, cream these two ingredients together until the mixture transforms into a light, fluffy, and notably creamy consistency. This crucial step incorporates air, which is vital for the cookies’ ultimate soft and tender texture.
- Incorporate the eggs into the creamed mixture, adding them one at a time. After each egg addition, mix thoroughly until it is fully integrated into the butter-sugar base. This technique ensures a smooth, emulsified batter, preventing any separation in the dough.
- Next, prepare your dry ingredients. Position a fine-mesh sieve directly over the mixing bowl containing the wet ingredients. Add the all-purpose flour, fine salt, unsweetened cocoa powder, and baking powder into the sieve. Gently whisk these dry components together as they sift down into your wet mixture. Sifting is paramount as it eliminates any lumps and aerates the dry ingredients, contributing to a more uniform and exceptionally tender cookie.
- Once all the dry ingredients have been sifted in, switch from your whisk or mixer to a flexible spatula. Gently fold the dry ingredients into the wet mixture, mixing just until they are combined. It is critically important not to overmix the dough at this stage, as excessive mixing will develop the gluten in the flour, resulting in tough, less desirable cookies. Stop mixing as soon as no visible streaks of flour remain.
- Cover the mixing bowl tightly with plastic wrap, ensuring an airtight seal, and refrigerate the cookie dough for approximately 60 to 90 minutes. This chilling period is indispensable; it firms up the dough, making it much easier to handle and shape, and allows the various flavors to meld together beautifully. Moreover, chilling helps prevent the cookies from spreading too thinly during baking.
- While your cookie dough is chilling, prepare the exquisite Nutella fillings. Line a small baking sheet or a flat plate with parchment paper. Using a teaspoon, scoop out about 15 generous teaspoon-sized dollops of Nutella onto the lined sheet. Each scoop should be roughly the size of a large marble or a small truffle.
- Carefully place the sheet with the Nutella scoops into the freezer for at least one full hour, or until each dollop is completely frozen solid and firm to the touch. This step is absolutely vital for ensuring the Nutella remains perfectly contained within the cookie dough during the baking process, preventing it from melting out too quickly and creating a messy situation.
Step 2: Assembling, Coating, and Baking Your Signature Crinkle Cookies
With your perfectly chilled dough and firmly frozen Nutella, it’s time for the most exciting part: assembling and baking these delightful treats. This is where the magic happens and the cookies develop their iconic crinkled appearance!
- Begin by preheating your fan oven to 350°F (175°C). Prepare a large baking sheet by lining it with parchment paper, ensuring it’s ready for the cookie balls.
- Retrieve the chilled cookie dough from the refrigerator. Using a 1.5-inch ice cream scooper (or measuring out approximately 2 tablespoons of dough per cookie), scoop out uniform portions of the rich chocolate cookie dough.
- Working efficiently with one cookie ball at a time, gently flatten the scooped dough in the palm of your hand to form a disc. Place one firmly frozen Nutella scoop directly in the center of this flattened dough.
- Carefully fold the edges of the chocolate dough upward and around the Nutella filling, meticulously enclosing it completely. Pinch the seams together firmly to seal the Nutella inside, then gently roll the dough between your palms to form a smooth, perfectly round ball. It is crucial to ensure there are no visible cracks or exposed Nutella, as this could lead to leakage during the baking process.
- Prepare two separate shallow bowls: one containing the 3 tablespoons of granulated white sugar and the other holding the 1/3 cup of powdered sugar.
- Generously roll each shaped cookie ball thoroughly in the granulated sugar first. This initial coating provides a crucial base, helping the subsequent layer of powdered sugar adhere more effectively and contributes to the stunning crinkle effect.
- Next, liberally coat each granulated sugar-rolled cookie ball in the powdered sugar. Ensure they are completely and thickly covered; the more powdered sugar applied, the more pronounced and visually appealing the crinkles will be after baking.
- Carefully place the coated cookie balls onto the prepared baking sheet, making sure they are spaced approximately 2 inches apart to allow for proper spreading without merging during baking.
- For an exceptionally pronounced crinkle and a beautiful, snowy white finish, give the cookies a second, equally generous dusting of powdered sugar just before you place them into the preheated oven. This additional coating truly enhances their visual charm.
- Bake in the preheated oven for approximately 10 to 12 minutes. The cookies are perfectly done when their edges appear set but their centers still look slightly soft and gooey. They will continue to set and firm up from residual heat after being removed from the oven. It’s important to avoid overbaking, as this can result in dry cookies and a less delightfully gooey Nutella center.
- Once baked, remove the baking sheet from the oven and allow the cookies to cool directly on the sheet for about 5-10 minutes before carefully transferring them to a wire rack to cool completely. Allowing them to cool on the sheet helps them firm up adequately without breaking apart.
Expert Tips for Achieving Perfectly Crinkled Nutella-Filled Cookies:
To ensure your chocolate crinkle cookies turn out beautifully and deliciously every single time, keep these expert tips in mind. They are essential for achieving that perfect texture and iconic crinkled look:
- Ensure Room Temperature Ingredients: This tip is paramount! Make sure your butter and eggs are truly at room temperature. This allows them to cream together seamlessly, creating a smooth, aerated batter that is crucial for the cookies’ soft, melt-in-your-mouth texture.
- Avoid Overmixing the Dough: Once you’ve added the dry ingredients, mix only until they are just combined and no streaks of flour are visible. Overmixing will develop the gluten in the flour, leading to tough, dense cookies instead of the desired soft and chewy ones.
- Chill Time is Crucial: The chilling period for the cookie dough is non-negotiable. It firms up the dough, making it much easier to handle and preventing excessive spreading during baking. It also allows the flavors to deepen and meld beautifully. Do not skip this step!
- Freeze Nutella Until Solid: Firmly frozen Nutella centers are absolutely vital for success. If the Nutella is too soft, it will melt too quickly and potentially leak out of the cookies before the surrounding dough has a chance to set, creating a sticky mess.
- Double Coat in Sugar for the Best Crinkles: This is the secret to the signature crinkle effect. Roll the dough balls thoroughly first in granulated sugar, then generously in powdered sugar. The granulated sugar helps the powdered sugar adhere effectively, creating a thick, white layer that will beautifully crack as the cookie expands in the oven. Be generous with the powdered sugar!
- Maintain Proper Oven Temperature: A consistent oven temperature is key. If the oven is too cool, the cookies will spread excessively without developing the desired crinkles. If it’s too hot, they might burn before cooking through or achieving the perfect soft texture.
- Do Not Overbake Your Cookies: Chocolate crinkle cookies are at their best when they are slightly soft and fudgy in the center. They will continue to set slightly from residual heat after being removed from the oven. Overbaked cookies will be dry and crumbly, and the Nutella center won’t be as wonderfully gooey.
- Allow for Proper Cooling: After baking, allow the cookies to cool on the baking sheet for a few minutes before attempting to transfer them to a wire rack. This critical step helps them firm up and prevents them from breaking apart prematurely.
Creative Variations and Serving Suggestions:
While these Nutella-filled chocolate crinkle cookies are undoubtedly perfect as they are, don’t hesitate to unleash your inner pastry chef and get creative with these delightful treats:
- Exciting Flavor Twists: Enhance the chocolate dough with a hint of espresso powder for a sophisticated mocha-like flavor, or add a touch of peppermint extract for a festive, refreshing twist. A whisper of orange zest can also beautifully brighten and complement the chocolate.
- Alternative Decadent Fillings: If Nutella isn’t your only love, try filling these cookies with a dollop of creamy peanut butter, a rich caramel sauce, or even a small square of your favorite dark or white chocolate for a different surprise center. Just remember to freeze these alternative fillings solid, just like the Nutella.
- Elegant Garnishes: A light dusting of unsweetened cocoa powder over the finished cookies, or a delicate sprinkle of flaky sea salt, can significantly enhance their flavor profile and presentation, adding a gourmet touch.
- Serving Suggestions: These cookies are absolutely divine on their own, but they also pair wonderfully with a tall glass of cold milk, a steaming hot cup of coffee or tea, or for an extra indulgent dessert experience, serve them warm with a scoop of premium vanilla bean ice cream.
Optimal Storage Guidelines for Lasting Freshness:
To ensure your delectable chocolate crinkle Nutella cookies remain fresh, soft, and flavorful for as long as possible:
- Store the baked cookies in an airtight container at room temperature for up to 3-4 days. This will help maintain their texture and prevent them from drying out.
- For extended storage, these cookies freeze exceptionally well. Place them in a single layer in an airtight freezer-safe container or bag for up to 2-3 months. When ready to enjoy, simply thaw them at room temperature, or gently warm them in the microwave for a few seconds to reactivate that irresistible gooey Nutella center.
There you have it – a comprehensive, step-by-step guide to baking the most delightful and impressive Chocolate Crinkle Cookies with a hidden Nutella heart. These cookies are more than just a sweet treat; they’re a visual delight, a burst of flavor, and a wonderful testament to the joy and satisfaction of homemade baking. With their fudgy interior, vibrant chocolate flavor, and the irresistible surprise of a warm, melted Nutella core, they are guaranteed to become a cherished and frequently requested recipe in your collection. So, gather your ingredients, follow our detailed instructions, and get ready to create some truly magical baking moments!
*All image credit belongs to How Tasty via YouTube. Follow and subscribe to their channel for more incredible recipes and endless baking inspiration!