
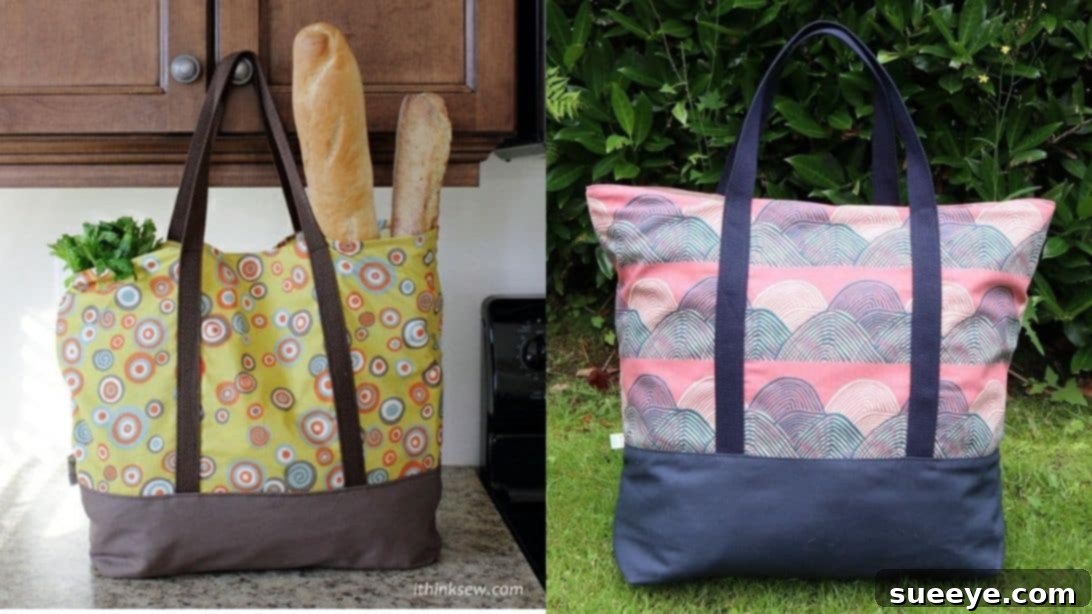
Transform your shopping routine with a stylish and sustainable solution: a handmade market bag! This comprehensive tutorial guides you through creating a durable, beautiful, and endlessly reusable market or grocery bag, perfect for any eco-conscious shopper. Forget flimsy plastic bags and embrace the satisfaction of carrying your groceries in a bag you made yourself. With the clear instructions provided, inspired by the excellent video tutorial by IThinkSew on YouTube, you’ll be able to sew a sturdy bag that’s not only practical but also a reflection of your personal style. It’s an inexpensive project that delivers immense value, reducing waste and adding a touch of handmade charm to your daily life. Dive in and discover the joy of crafting your very own essential accessory!
Why Sew Your Own Market Bag?
In an age where environmental consciousness is paramount, opting for reusable bags is a simple yet impactful way to reduce plastic waste. Crafting your own market bag offers numerous benefits beyond just sustainability:
- Eco-Friendly: Significantly cut down on single-use plastic bags that harm our planet.
- Cost-Effective: Save money in the long run by avoiding fees for disposable bags and creating a durable item that will last for years.
- Personalized Style: Choose fabrics that truly reflect your taste. From vibrant patterns to subtle textures, your bag can be as unique as you are.
- Durability: Handmade bags, especially when made with quality materials like heavyweight cotton and reinforced with interfacing, often outlast store-bought options.
- Learning Opportunity: It’s a fantastic project for both beginner and intermediate sewers to practice essential techniques like cutting, pinning, stitching, and boxing corners.
This tutorial is designed to make the process enjoyable and straightforward, ensuring you end up with a high-quality market bag that you’ll be proud to use for years to come.
Materials and Tools: What You’ll Need
Gathering all your materials and tools before you begin will ensure a smooth and enjoyable sewing experience. For this project, we recommend heavyweight home decorator or quilting weight cotton for its durability and aesthetic appeal. The interfacing adds crucial structure, making your bag strong enough to carry all your essentials.
Fabric Requirements:
- Heavyweight Home Decorator or Quilting Weight Cotton: This type of fabric is ideal for its strength and ability to hold shape, ensuring your market bag can withstand regular use and heavy loads.
- ½ yard for the Exterior Fabric: This will be the main patterned or primary color fabric for the upper front and back sections of your bag, making a statement about your style.
- ¼ yard for the Exterior Solid Fabric: Choose a complementary solid color for the lower front and back, which will add a professional touch and a sturdy base to your bag’s design.
- 1 yard for the Lining Fabric: The lining provides a clean finish and added durability to the interior of your bag. A slightly lighter weight cotton can be used here, but ensure it’s still robust.
Additional Notions and Tools:
- 2 yards of 22-inch wide Medium Weight Fusible Interfacing: This is a crucial component that provides stiffness and body to your fabric, giving the bag its sturdy structure. Fusible interfacing has adhesive on one side that bonds to your fabric when ironed, making it easy to apply.
- 78 inches of Webbing Strap: This will form the comfortable and strong handles for your bag. Look for cotton or polypropylene webbing that is about 1 to 1.5 inches wide for comfortable carrying.
- Sewing Ruler: Essential for accurate measurements and precise cutting, a clear acrylic ruler with grid lines is highly recommended.
- Marking Pen/Chalk: For transferring pattern markings onto your fabric without leaving permanent stains. Disappearing ink pens or tailor’s chalk are excellent choices.
- Fabric Scissors: Sharp scissors dedicated solely to fabric will ensure clean, precise cuts.
- Pins: To hold fabric layers together securely before sewing, preventing shifting and ensuring accurate seams.
- Sewing Machine: A reliable sewing machine is the heart of this project. Ensure it’s threaded properly and you have appropriate needles for heavyweight fabric.
- Iron and Ironing Board: Crucial for pressing seams, applying interfacing, and achieving a professional, crisp finish.
- Pattern and Exact Sizes: Access the specific measurements and pattern pieces for the “Martha Market Bag” by downloading the free PDF pattern here. This ensures all your fabric pieces are cut to the precise dimensions needed for a perfectly proportioned bag.
Step-by-Step Sewing Instructions
Follow these detailed steps to construct your beautiful and functional market bag. Precision in cutting and careful pressing will contribute significantly to the professional look of your finished project.
Step 1: Fabric Preparation and Handle Attachment
Begin by meticulously cutting your fabric pieces according to the downloaded pattern. Accuracy at this stage is vital for a well-proportioned bag.
- Cut two pieces of your exterior main fabric for the upper front and back of the bag.
- Cut two pieces of your exterior solid fabric for the lower front and back of the bag.
- Cut two pieces for the lining fabric.
- Cut two pieces of the interfacing fabric, ensuring they match the dimensions of your lining fabric.
- Cut two pieces of webbing straps, each 39 inches long, which will form the durable handles of your bag.
Now, let’s prepare the exterior upper pieces and attach the handles:
- Take one of your upper exterior fabric pieces. Fold it in half horizontally (across its width) and make a small notch at the upper midpoint. This marks the center of the top edge.
- From this notch, measure and mark 3 inches to each side. These marks indicate the exact placement for the inner edges of your bag handles, ensuring they are evenly spaced.
- Position one of your 39-inch webbing straps onto the right side of this upper exterior piece, aligning its ends with the 3-inch marks you just made. The strap will form a U-shape above the fabric. Pin the handle ends securely in place.
- Measure and mark a stitch line 1½ inches down from the top raw edge of the fabric, horizontally across the width. This line will serve as a guide for attaching the handles.
- Carefully sew the handle ends onto the upper fabric piece, stitching a box or an ‘X’ within a box for maximum durability. Stop your stitching precisely at the 1½-inch marked stitch line. Ensure the handle loop remains free.
- Repeat this entire process for the second upper exterior fabric piece and the remaining webbing strap.
- Once both upper pieces have their handles attached, fold each upper piece in half again (horizontally) and notch the bottom midpoint. This will help align it with the lower exterior piece later.
Step 2: Assembling the Exterior Bag and Boxing Corners
This step brings together the exterior fabric pieces and forms the structure of your bag, including its distinctive flat bottom.
- Take one of your lower exterior fabric pieces. Fold it in half horizontally and notch both its midpoints (top and bottom). Spread it open.
- Lay this lower exterior piece on top of one of your upper exterior pieces (with handles), ensuring their right sides are facing each other. Align the notched bottom midpoint of the upper piece with the notched top midpoint of the lower piece.
- Pin the bottom edge of the upper piece to the top edge of the lower piece, ensuring a perfect alignment.
- Stitch these two pieces together along the pinned edge with a ½-inch seam allowance.
- Press the seam open or towards the lower piece. Then, fold the lower piece down and topstitch along the seam line with a 1/8-inch seam allowance. This topstitching not only flattens the seam for a clean look but also adds strength.
- Repeat all the above steps for the other set of upper fabric, lower fabric, and the remaining webbing strap. You should now have two complete exterior panels (front and back) with handles attached.
- Place these two exterior panels together with their right sides facing each other. Align all raw edges and match the side seams where the upper and lower pieces join. Pin them securely all around the sides and bottom.
- Sew around the sides and the bottom edges with a ½-inch seam allowance. Remember to backstitch at the beginning and end of your seams for added security.
- Boxing the Corners: This technique creates a flat, structured bottom for your bag. At each of the two bottom corners, draw a 3×3-inch square. These squares define your stitch line for the boxed corners.
- To box a corner, pinch the bottom corner of the bag so that the side seam and the bottom seam are aligned and pulled apart, exposing a pointed corner. The raw edges should now be flat against each other, forming a straight line.
- Spread the seams at the bottom open and flat, pinning them in place along the newly formed straight line. Repeat this on the other bottom corner.
- Sew straight down across each corner, using the drawn 3×3-inch stitch lines as your guide. Backstitch at the beginning and end.
- Trim off the remaining excess fabric from the boxed corners, leaving approximately a ¼-inch seam allowance from your stitched line. This reduces bulk and gives a cleaner finish.
Step 3: Constructing the Lining and Final Assembly
The lining provides a neat interior finish and reinforces the bag’s structure. This step brings all the components together for the final product.
- Apply Interfacing: Take your two interfacing fabric pieces and carefully iron them onto the wrong side of your two lining fabric pieces, following the interfacing manufacturer’s instructions. Ensure a smooth, bubble-free application. This step is crucial for giving the lining, and thus the entire bag, added stiffness and durability.
- Place the two fused lining fabric pieces together with their right sides facing.
- Along the bottom edge of one lining piece, measure and mark a 5-inch gap in the center. This opening is essential for turning the bag right side out later.
- Pin the lining pieces together around the sides and bottom, making sure to leave the 5-inch gap unsewn and the entire top seam open.
- Stitch around the lining, leaving the marked 5-inch opening at the bottom and the entire top edge unsewn. Use a ½-inch seam allowance. Remember to backstitch firmly at the beginning and end of the gap to secure the stitches.
- Box the Lining Corners: Just as you did with the exterior bag, draw a 3×3-inch square on every bottom corner of the lining for the stitch line. Pinch and pull the bottom corners sideways, align the seams, and sew straight down along the marked lines. Trim off the excess fabric from the boxed corners, leaving ¼-inch seam allowance.
- Prepare for Assembly: Turn the exterior bag right side out. Keep the lining bag wrong side out.
- Carefully insert the exterior bag into the lining fabric so that their right sides are facing each other. This means the exterior bag should be tucked inside the lining bag.
- Align the side seams of the exterior bag perfectly with the side seams of the lining bag. Pin the top raw edges of the exterior and lining together all the way around.
- Sew the exterior and lining together along the top raw edge with a ½-inch seam allowance, creating a complete circle of stitching.
- Make small notches or clip curves (if applicable) along the seam allowance of the top seam. This helps the seam lie flat when turned.
- Reach into the 5-inch gap you left at the bottom of the lining fabric. Carefully pull the entire bag (both exterior and lining) right side out through this opening. Take your time to push out all corners and edges.
- Once the bag is right side out, gently press the entire upper edge of the bag to create a crisp finish. Tuck the raw edges of the 5-inch opening in the lining neatly inwards and press them flat.
- Sew the gap in the lining closed with a neat edge stitch or invisible stitch. You can hand-stitch for a truly invisible finish or machine stitch very close to the edge.
- Finally, insert the lining nicely inside the exterior bag, smoothing it out completely.
- Final Topstitching: To give your bag a professional finish and added durability, topstitch around the entire upper edge (mouth) of the bag, approximately 1/8 to ¼ inch from the folded edge. This secures the lining in place and provides a clean, crisp edge.
Tips for Success
- Pressing is Key: Don’t underestimate the power of an iron! Pressing seams as you go makes a huge difference in the final appearance of your bag.
- Accurate Cutting: Take your time cutting out pattern pieces. Precision here translates to perfectly aligned seams later.
- Use Good Quality Thread: A strong polyester thread will ensure your seams hold up to the weight of groceries.
- Backstitch at Start and End: Always backstitch at the beginning and end of your seams to secure them and prevent them from unraveling.
- Test Stitches: Before sewing on your final project, test your stitch length and tension on a scrap piece of fabric.
Customizing Your Market Bag
While the “Martha Market Bag” pattern provides a fantastic base, don’t hesitate to personalize it! Here are a few ideas:
- Add Pockets: Include an interior slip pocket or a zippered pocket for keys, phone, or wallet.
- Vary Strap Length: Adjust the webbing strap length to suit your preference – shorter for hand-carrying, longer for shoulder or cross-body wear.
- Fabric Play: Experiment with different fabric combinations, such as a denim exterior with a vibrant cotton print lining, or even incorporate patchwork elements.
- Embellishments: Consider adding embroidery, fabric paint, or decorative patches to truly make the bag your own.
Maintaining Your Handmade Bag
To ensure your market bag lasts for many shopping trips, proper care is important. Most cotton market bags can be machine washed on a gentle cycle with cold water and a mild detergent. Air drying is often recommended to prevent shrinking and preserve the fabric’s integrity. If you’ve used any special embellishments, check their care instructions before washing.
Conclusion: Enjoy Your New Reusable Market Bag!
Congratulations! You’ve successfully sewn a beautiful and highly functional market bag. Not only have you created a durable accessory that will serve you well for years, but you’ve also contributed to a more sustainable lifestyle by reducing the need for disposable bags. Each time you use your handmade bag, you’ll be reminded of your creativity and skill.
We hope you enjoyed this sewing journey. For more inspiring projects and tutorials, remember to visit IThinkSew on YouTube and explore her official website. Happy sewing, and happy shopping with your fantastic new market bag!
*All images are credited to IThinkSew via YouTube and her official website. Give her channel a visit and subscribe for more!