
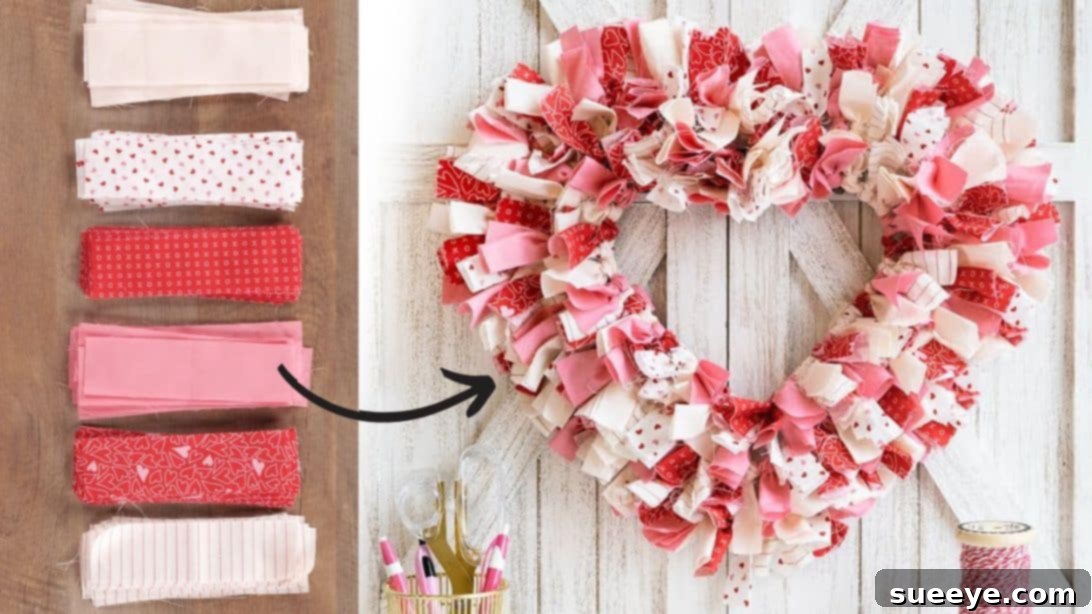
Are you searching for an enchanting, simple, and delightful craft project to infuse your home with the spirit of Valentine’s Day? Look no further! This “Blushing Heart Wreath” tutorial, inspired by the creative minds at Shabby Fabrics on YouTube, offers an absolutely charming way to celebrate love. This beautiful fabric wreath is more than just a decoration; it’s a statement piece, perfect for adorning your front door, brightening up a wall, or serving as a heartwarming centerpiece on your mantelpiece. The instructions provided are meticulously clear and incredibly straightforward, making this an ideal weekend project for crafters of all skill levels, even those just starting their DIY journey.
What makes this project truly special is its versatility. While traditional Valentine’s decor often features vibrant pinks and reds, you are entirely free to let your imagination soar. If bold pink isn’t quite your style, explore an array of deep crimson shades, subtle rose hues, or even a sophisticated palette of whites and creams. Conversely, if you adore pink, experiment with different tones and patterns to create a truly unique masterpiece. This tutorial guides you through every step, ensuring a fun and rewarding crafting experience that culminates in a stunning, handmade fabric wreath. Get ready to transform simple fabric strips into a lush, ‘blushing’ heart that will capture everyone’s attention.
Essential Materials for Your Blushing Heart Wreath:
Gathering your materials is the first exciting step in creating your personalized Blushing Heart Wreath. The beauty of this project lies in its simplicity and the ability to customize it with fabrics that speak to your style. Here’s a detailed look at what you’ll need:
- Assorted Fabrics: You’ll need a selection of pink, red, and white fabrics. Consider a mix of solid colors and various patterns such as florals, polka dots, stripes, or subtle geometric prints. This variety will add depth and visual interest to your wreath. Cotton or cotton-blend fabrics are highly recommended due to their ease of cutting, handling, and ability to hold shape when knotted. Aim for at least 3-5 different fabrics to achieve a rich, textured look.
- Wire Heart Wreath Frame: This forms the foundation of your project. Wire wreath frames are readily available at craft stores, especially around holidays like Valentine’s Day. They come in various sizes, so choose one that fits your desired display area. A standard 12-14 inch frame works wonderfully for a noticeable yet manageable decoration.
- Sharp Fabric Scissors: Precision is key for neat fabric strips. Invest in a good pair of sharp fabric scissors dedicated solely to fabric to ensure clean, crisp cuts.
- Ruler or Measuring Tape: Essential for accurate measurement of your fabric strips. A clear, flat ruler is ideal for cutting straight lines.
A Note on Fabric Selection:
For the original project, a specific combination was used: one solid white fabric, two patterned white fabrics, one solid pink fabric, and two patterned red fabrics. This combination creates a balanced yet dynamic visual effect. When choosing your fabrics, think about how the colors and patterns will interact. A good tip is to lay them out together before cutting to visualize the final blend. Consider variations like: all pastels for a softer look, bright primary reds and pinks for a bolder statement, or even ombré shades for a gradient effect. Don’t be afraid to mix and match; the more variety in your fabrics, the richer your wreath will appear.
Step-by-Step Guide to Crafting Your Blushing Heart Wreath:
Now that you have all your materials ready, let’s dive into the creative process. This detailed guide will walk you through each step, ensuring you achieve a beautifully full and vibrant fabric heart wreath.
Step 1: Preparing Your Fabric Strips
The foundation of your wreath’s lushness begins with perfectly cut fabric strips. Take all of your chosen fabrics and meticulously cut them into strips measuring 7 inches in length by 2 inches in width. This specific dimension ensures that once tied, the strips will create a full, ‘shaggy’ texture without being overly bulky or too short. For efficiency and accuracy, especially if you have many fabrics, consider stacking several layers of fabric and using a rotary cutter with a self-healing mat. This will significantly speed up the cutting process and result in consistently uniform strips. Once all your strips are cut, organize them by color or pattern. This preparatory step is crucial for maintaining your desired color scheme and creating an appealing visual flow as you attach them to the wreath frame.
Step 2: Folding Your Fabric Strips
This simple folding technique is what gives your fabric strips a neat, finished appearance and adds volume to the wreath. Pick up one of your fabric strips. First, fold it in half lengthwise, aligning the raw edges. This will create a strip that is approximately 7 inches long and 1 inch wide. Next, take this folded strip and fold it again in half crosswise. This final fold will result in a compact, four-layered fabric piece, approximately 3.5 inches long and 1 inch wide, with a small loop at one end. The purpose of these folds is to conceal the raw edges of the fabric once it’s tied to the wreath, giving your finished project a much cleaner and more professional look. Perform this folding process for all your fabric strips before moving on to the next step, ensuring consistency throughout your wreath.
Step 3: Attaching Your First Fabric Strip
Now it’s time to begin bringing your wreath to life! Take one of your neatly folded fabric strips. With the looped end facing away from you, position it underneath one of the wires of the heart wreath frame. Ensure the loop is prominent and accessible. Then, take the two free ends of the fabric strip and gently thread them through the loop you’ve just created. Once threaded, pull both ends firmly but gently. You want the fabric to be snug against the wire frame, creating a secure knot that won’t easily slip. The goal is a tight knot that effectively grips the wire without distorting the fabric. Pay attention to how the knot sits – you want it to appear full and consistent with the other knots you’ll be making. This initial knot sets the tone for the entire wreath.
Step 4: Continuing on the First Wire
With your first fabric strip securely in place, it’s time to fill the first wire of your heart wreath. Select your next fabric strip, perhaps a contrasting color or pattern, and repeat the exact procedure outlined in Step 3. Place the looped end under the wire, thread the free ends through the loop, and pull tightly. Position this new knot immediately adjacent to the previous one, ensuring there are no visible gaps between the fabric pieces. The key to a lush and full wreath is to pack these fabric strips closely together. Continue this repetitive process, moving around the entire length of the first wire of the heart frame. Maintain consistent tension with each knot to ensure an even texture across the wreath. Don’t worry about perfect alignment of the fabric ends at this stage; the “shaggy” look will come naturally as you add more strips. Take your time, enjoy the rhythm of knotting, and watch as your wreath begins to take shape.
Step 5: Completing Your Wreath for a Shaggy, Full Look
Once the first wire is completely covered, it’s time to move to the subsequent wires of your wreath frame. For the second wire, begin attaching fabric strips using the same knotting technique. However, to achieve the desired “scattered look” and prevent a striped appearance, make a conscious effort to ensure that the colors and patterns you’re placing on the second wire do not directly match or align with those on the first wire. This creates a more organic, blended, and visually dynamic effect. You’ll simply repeat the entire spectrum of colors and patterns you’ve chosen, making sure to distribute them randomly or in a staggered pattern. Crucially, leave no spaces between the knots. The tighter you pack the strips, the fuller and more luxurious your wreath will appear. Continue this process, filling every available space on the third wire (and any subsequent wires, depending on your frame) until the entire heart wreath frame is completely obscured by the fabric strips. The goal is to create a wonderfully dense, voluminous, and ‘shaggy’ look that truly embodies the “blushing” aesthetic. Step back periodically to assess the fullness and make any adjustments to ensure an even distribution of fabric and color. The more patience and attention you give to filling every nook and cranny, the more stunning your final Blushing Heart Wreath will be.
Tips for Success and Creative Customization:
Crafting your Blushing Heart Wreath is a fantastic creative outlet, and there are many ways to make it uniquely yours. Here are some extra tips to ensure your success and inspire further customization:
Choosing Your Color Palette:
- Beyond Valentine’s: While perfect for Valentine’s Day, consider adapting the colors for other holidays or seasons. Use reds, greens, and whites for Christmas; oranges, browns, and yellows for Fall; or pastels for Easter and Spring.
- Ombre Effect: Arrange your fabrics in a gradient from light to dark or vice versa for a sophisticated ombre look.
- Monochromatic Magic: Select various shades and patterns of a single color (e.g., all blues or all greens) for a stylish, modern aesthetic.
Adding Embellishments:
- Ribbons and Bows: Once the wreath is complete, tie a large satin bow at the top or bottom, or intertwine a festive ribbon through the fabric strips.
- Faux Flowers: Tuck small silk flowers (roses, peonies, hydrangeas) into the fabric for an added touch of romance and realism.
- Buttons and Beads: Sew on decorative buttons or glue small beads for extra sparkle and texture.
- Personalized Tags: Attach a small wooden or fabric tag with a handwritten message or initial for a truly custom gift.
Adapting the Wreath Frame:
- Different Shapes: This knotting technique works equally well on circular, square, or even letter-shaped wire frames. Adjust your fabric strip quantity based on the frame’s size.
- Upcycled Materials: Instead of new fabric, cut strips from old t-shirts, scarves, or other fabric scraps for an eco-friendly and unique ‘shabby chic’ wreath. T-shirt fabric, in particular, offers a soft, slightly stretchy texture that creates a different kind of fullness.
Care and Maintenance:
- Dusting: Gently dust your fabric wreath regularly with a soft brush or a hairdryer on a cool setting to keep it looking fresh.
- Storage: Store your wreath in a sturdy box or a garment bag in a cool, dry place to protect it from dust and damage when not on display.
Troubleshooting Common Issues:
- Gaps Appearing: If you notice gaps, simply push the existing fabric strips closer together. If that’s not enough, gently untie a few strips in the gappy area and add more fabric pieces to fill the space.
- Knots Slipping: Ensure you’re pulling the fabric strips tight enough. If a knot is persistently slipping, you can secure it with a tiny dab of fabric glue on the backside, but generally, a firm pull should be sufficient.
- Asymmetrical Fullness: Step back frequently to assess the overall shape and fullness. If one side looks thinner, add more strips in that area until it balances out.
Create Your Own Blushing Heart Wreath Today!
Embarking on this DIY Blushing Heart Wreath project is not just about making a decoration; it’s about creating something beautiful with your own hands, infusing it with personal charm, and adding a touch of heartfelt warmth to your home. This easy and fun craft delivers a stunning outcome that is sure to draw compliments and spread cheer. Whether you’re crafting it for Valentine’s Day, as a thoughtful gift, or simply to add a burst of color to your living space, this fabric wreath is a truly rewarding endeavor.
For even more inspiring and delightful decor and fabric projects, we highly recommend visiting and subscribing to the Shabby Fabrics YouTube channel. They are a treasure trove of amazing tutorials, offering endless creative possibilities for crafters of all levels. Their clear instructions and innovative ideas make complex projects accessible and fun. So, gather your materials, let your creativity flow, and prepare to adorn your home with this adorable, blushing symbol of love!