
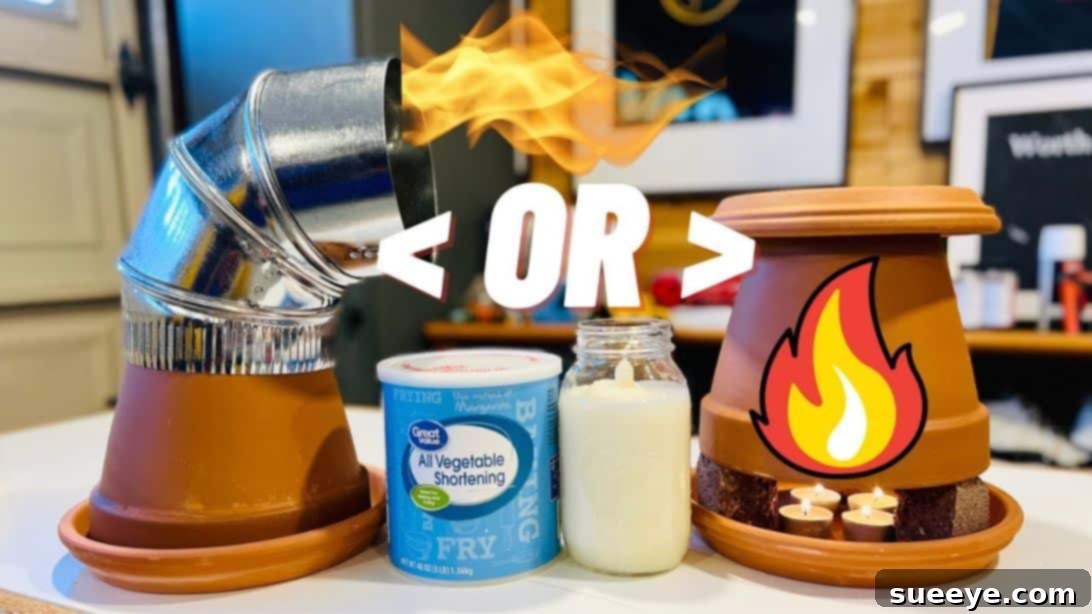
As the crisp days of fall draw to a close, the anticipation of colder temperatures sets in. Preparing for the chilly season doesn’t have to be expensive or complicated, especially when you can create your own effective heating solutions. This guide will walk you through crafting a versatile and eco-friendly DIY terra cotta pot heater, perfect for warming up a small room, a cozy corner, or even your greenhouse. Inspired by the ingenious methods shared by Don Wynn on YouTube, this project transforms simple, upcycled materials into a reliable heat source.
Embracing the principles of sustainable living and smart DIY, this terra cotta heater project stands out as one of the most practical and rewarding endeavors you can undertake. Not only is it incredibly useful, providing sustained warmth, but it’s also designed for longevity and ease of maintenance. The secret lies in a custom-made, long-lasting candle that serves as the heat source, which is simple to replace when it eventually runs out. Beyond its heating capabilities, the components of this heater offer surprising versatility; once the cold season passes, the terra cotta pots and saucers can be repurposed as charming planters or neatly stored away for future use. Dive into this guide to discover how to build your own efficient, low-cost heater and keep warm all winter long.
Why Choose a DIY Terra Cotta Pot Heater?
The concept behind a terra cotta pot heater is elegantly simple, yet remarkably effective. Terra cotta, a porous ceramic material, possesses excellent thermal mass properties, meaning it can absorb and radiate heat efficiently. When a candle burns beneath an inverted terra cotta pot, the pot gradually heats up, storing this thermal energy. Once heated, the pot acts like a small, radiant stove, slowly releasing warmth into the surrounding area even after the flame has been extinguished for a short period. This principle makes it an ideal choice for supplemental heating.
Beyond its scientific advantages, this DIY heater offers numerous practical benefits. It’s an exceptionally cost-effective heating solution, as it relies on affordable, readily available materials and inexpensive fuel. For those embracing sustainable living, it’s an excellent way to upcycle old pots or find new uses for common household items. Its small footprint and portability make it perfect for various applications – from a workshop or garage to a small bedroom, or even as an emergency heat source during power outages. For gardeners, it provides a gentle, consistent warmth for greenhouses, protecting delicate plants from frost without the high energy consumption of traditional heaters. Moreover, the process of building it is straightforward and requires no specialized tools or extensive experience.
Essential Materials for Your DIY Heater
Gathering the right materials is the first step towards building your efficient terra cotta pot heater. The beauty of this project lies in its simplicity and the common availability of its components. Many of these items can be found around your home, at local hardware stores, or even at thrift shops, making it an excellent upcycling project.
- Terra Cotta Saucer: This will serve as the base for your heater, providing a stable platform for the candle and a place for the pot to rest. Choose one that is sturdy and slightly larger than the base of your terra cotta pot.
- Terra Cotta Pot: The primary component for heat absorption and radiation. A standard-sized terra cotta pot (around 6-8 inches in diameter) works well, but you can experiment with larger sizes for potentially more heat, keeping in mind stability and safety.
- Stainless Steel Vent Pipe (Optional, for Design #1): A small section of a vent pipe or a metal tube. This is crucial for guiding the heat and creating a more directed warmth in one of our designs. Ensure it’s made of a heat-resistant material like stainless steel.
- Rocks, Wood, or Any Elevating Objects: For the second heater design, you’ll need small, non-flammable objects to create space between the saucer and the pot, allowing for air circulation and stable elevation. Small flat stones, ceramic tiles, or sturdy metal spacers are ideal.
- Mason Jar(s): These will be used to house your homemade, long-lasting candles. Standard pint or half-pint mason jars are perfect due to their heat resistance and wide mouth.
- Vegetable Shortening: The key ingredient for your DIY candle. Vegetable shortening burns slowly and cleanly, making it an ideal, cost-effective fuel source. Solid vegetable shortening (like Crisco) works best.
- Candle (or Candle Wicks): A simple tea light candle can be melted down for its wax and wick, or you can purchase candle wicks separately. If using a pre-made candle, ensure it’s small enough to fit comfortably within the mason jar and can be centered.
How to Make a Long-Lasting DIY Candle Jar
The efficiency of your terra cotta heater largely depends on a reliable, long-burning fuel source. Our DIY candle jar, made with vegetable shortening, is designed for extended burn times, ensuring sustained warmth without constant attention. Here’s how to create these economical and effective candles:
Step 1: Prepare the Shortening
Measure out a sufficient amount of vegetable shortening to fill your mason jar(s) at least up to the neck. For a standard pint mason jar, you’ll likely need about 1.5 to 2 cups of shortening. Place the shortening into a microwave-safe measuring cup or bowl. Heat it in the microwave in short bursts (30-60 seconds at a time), stirring in between, until it is completely melted into a clear liquid. Be careful not to overheat it, but ensure no solid chunks remain.
Step 2: Pour into Jars
Carefully pour the melted shortening into each mason jar, dividing it evenly if you’re making multiple candles. Ensure each jar is filled to a level that leaves about an inch or so of space from the rim, typically up to the neck of the jar. This prevents overflow when the candle is burning. Set the jars aside in a cool, stable place to begin cooling and setting. Do not move them until they have started to solidify, as this can cause uneven setting.
Step 3: Insert the Wick
As the shortening begins to cool and thicken slightly – it should be opaque but still pliable, not fully solid – it’s the perfect time to insert your wick. Gently place a candle wick right down the center of the shortening in each jar. If using a pre-made candle, place the entire candle in the center. The slightly thickened shortening will help hold the wick upright. You can use clothespins or wick holders across the top of the jar to keep the wick perfectly centered as it continues to set.
Step 4: Allow to Fully Set
Let the shortening continue to cool undisturbed at room temperature until it is completely solid and firm. This process can take several hours, or even overnight, depending on the ambient temperature. Once fully set, your long-lasting DIY candle jars are ready to be used in your terra cotta heater, providing hours of efficient warmth.
Building Your Terra Cotta Pot Heater: Two Versatile Designs
Now that you have your long-lasting candle jars prepared, it’s time to assemble your terra cotta heater. We will explore two effective designs, each offering unique benefits for different heating needs.
DIY Heater Design #1: The Simple Ventilated Heater
This design is celebrated for its straightforward construction and focused heat output, making it ideal for small, localized warming.
- Set the Base: Begin by placing a terra cotta saucer on a stable, heat-resistant surface. This saucer will catch any drips from the candle and provide a solid foundation for your heater.
- Position the Candle: Place one of your homemade candle jars securely in the center of the terra cotta saucer. Ensure it’s stable and won’t easily tip over.
- Cover with Pot: Carefully invert a terra cotta pot and place it over the candle jar, resting it firmly within the saucer. The drainage hole at the bottom of the inverted pot will now be at the top.
- Insert the Vent Pipe: Take your stainless steel vent pipe and insert it into the drainage hole of the inverted terra cotta pot. The pipe should extend a few inches above the pot. This vent pipe serves to direct the hot air and increase the convective heat flow, similar to a mini chimney.
- Light it Up: Once assembled, carefully light the wick of the candle within the jar. The heat will begin to accumulate inside the pot, and the terra cotta will gradually warm up, radiating heat outwards.
This ventilated design is excellent for directing heat upwards and outward, creating a small zone of warmth. It’s particularly useful in areas where you need a bit of focused heat.
DIY Heater Design #2: The Elevated Radiant Heater
This design offers a broader distribution of radiant heat and is especially popular for spaces like greenhouses, where gentle, sustained warmth over a larger area is beneficial.
- Establish the Foundation: Place a terra cotta saucer on your chosen stable, heat-resistant surface.
- Place the Candle: Position one of your DIY candle jars in the absolute center of the terra cotta saucer.
- Elevate the Pot: Around the candle jar, strategically place small, flat, non-flammable objects such as rocks, ceramic tiles, or metal spacers. These objects should be evenly spaced and high enough to create a gap of about 1-2 inches between the top of the candle jar and the rim of the inverted pot when placed over it. This elevation is crucial for allowing air circulation and efficient heat transfer.
- Cover with the Pot: Carefully invert the terra cotta pot and place it over the candle jar, resting its rim on the elevating objects. Ensure the pot is stable and well-supported by the elevating items. The drainage hole of the pot will now be facing upwards.
- Add the Top Saucer: To maximize heat retention and create a larger radiant surface, place another terra cotta saucer on top of the inverted pot, covering its drainage hole. This top saucer will also absorb heat and radiate it outwards, further enhancing the heater’s effectiveness.
- Ignite the Candle: With everything in place, light the wick of your candle. The elevated design allows for greater airflow around the pot, promoting more widespread heat distribution and utilizing the thermal mass of both the pot and the top saucer.
This elevated setup is fantastic for providing a more diffused, radiant heat, making it a favorite for maintaining consistent temperatures in small enclosed spaces like cold frames or compact greenhouses.
Safety First: Important Considerations for Your DIY Heater
While DIY terra cotta pot heaters offer a wonderful way to provide supplemental warmth, safety must always be your top priority. Remember that you are working with an open flame and heated materials. Adhering to these safety guidelines will help prevent accidents and ensure your heater operates effectively and securely.
- Never Leave Unattended: The most crucial rule for any open flame. Always supervise your heater while the candle is lit. Do not leave it burning when you leave the room, go to sleep, or step out of the house.
- Fire-Resistant Surface: Always place your heater on a sturdy, non-flammable surface. Concrete, ceramic tile, a metal tray, or a thick wooden board protected by foil are suitable options. Avoid placing it directly on carpeting, tablecloths, or any combustible materials.
- Clear Surrounding Area: Ensure there is ample clearance around the heater. Keep all flammable objects – such as curtains, paper, clothing, bedding, and furniture – at a safe distance. A minimum of 12-18 inches of clear space in all directions is recommended.
- Proper Ventilation: While the terra cotta heater does not produce significant amounts of carbon monoxide like a fuel-burning stove, any open flame consumes oxygen. Ensure the room or area where you’re using the heater has adequate ventilation. This is especially important if using it in an enclosed space like a greenhouse; make sure there’s some airflow. Consider installing a smoke detector in the room where the heater is used.
- Hot Surfaces Warning: The terra cotta pot and saucer will become extremely hot. Do not touch them directly when the heater is in operation or shortly after extinguishing the candle. Always allow ample time for the materials to cool completely before handling. Keep pets and children away from the operating heater.
- Stable Placement: Ensure the heater is placed on a level, stable surface where it cannot be easily knocked over by pets, children, or accidental bumps.
- Extinguish Properly: Have a plan for extinguishing the candle safely if needed. A candle snuffer or carefully covering the flame with a non-flammable lid (without touching the hot pot) are good options. Avoid blowing out the candle forcefully, which can splatter hot wax.
- Check for Cracks: Before each use, inspect your terra cotta pot and saucer for any cracks or damage. Heat can exacerbate existing cracks, potentially leading to breakage.
By following these safety precautions, you can enjoy the warmth and cost-saving benefits of your DIY terra cotta pot heater with peace of mind.
Maintenance, Longevity, and Creative Repurposing
One of the many advantages of this DIY terra cotta pot heater is its ease of maintenance and the potential for long-term use. By keeping a few tips in mind, you can ensure your heater continues to provide warmth for many seasons to come.
Effortless Candle Replacement
The beauty of the homemade vegetable shortening candle is its extended burn time. When your candle eventually runs out, replacing it is as simple as lighting a new store-bought candle or crafting another batch of your DIY shortening candles. Simply remove the old jar, clean any residue from the saucer, and place a fresh candle in its stead. This makes the heater a perpetually renewable heat source, significantly reducing ongoing costs.
Cleaning and Storage
Over time, you might notice a thin layer of soot accumulating on the inside of the terra cotta pot. This is normal and can be easily wiped away with a damp cloth once the pot has completely cooled. Regular cleaning ensures optimal heat transfer and keeps your heater looking its best. When the colder months are over and your heater is no longer needed, simply clean the components thoroughly and store them in a dry, safe place until the next cold season. Their compact size makes them easy to put away.
Beyond Heating: Repurposing Your Materials
The versatility of terra cotta is another fantastic aspect of this project. Once you’re done using your heater for warmth, the pots and saucers can embark on a new life! They make charming and rustic planters for herbs, flowers, or succulents. You can also use them for other craft projects, or even as decorative storage solutions. This dual-purpose functionality truly embodies the spirit of upcycling and sustainable living, ensuring that your materials are used to their fullest potential rather than being discarded.
Conclusion: Embrace Warmth and Sustainability
As the chill of winter approaches, the DIY terra cotta pot heater offers an ingenious and accessible solution for adding a touch of warmth to your home, greenhouse, or workspace. This project not only provides a practical means to combat the cold but also champions the principles of resourcefulness, sustainability, and personal empowerment. By transforming simple, often overlooked materials into an efficient heat source, you gain not just warmth but also the satisfaction of creating something truly valuable with your own hands.
Whether you opt for the focused heat of the ventilated design or the broader radiant warmth of the elevated version, you’re investing in an economical, eco-friendly alternative to conventional heating. Remember the crucial importance of safety, always using your heater responsibly and with proper supervision. With easy maintenance and the added benefit of repurposing your materials, this project is a gift that keeps on giving.
Inspired by the practical wisdom of creators like Don Wynn, we encourage you to gather your materials and embark on this rewarding DIY journey. Experience the cozy comfort and cost savings that a homemade terra cotta pot heater can bring to your life this winter. Happy crafting, and stay warm!