
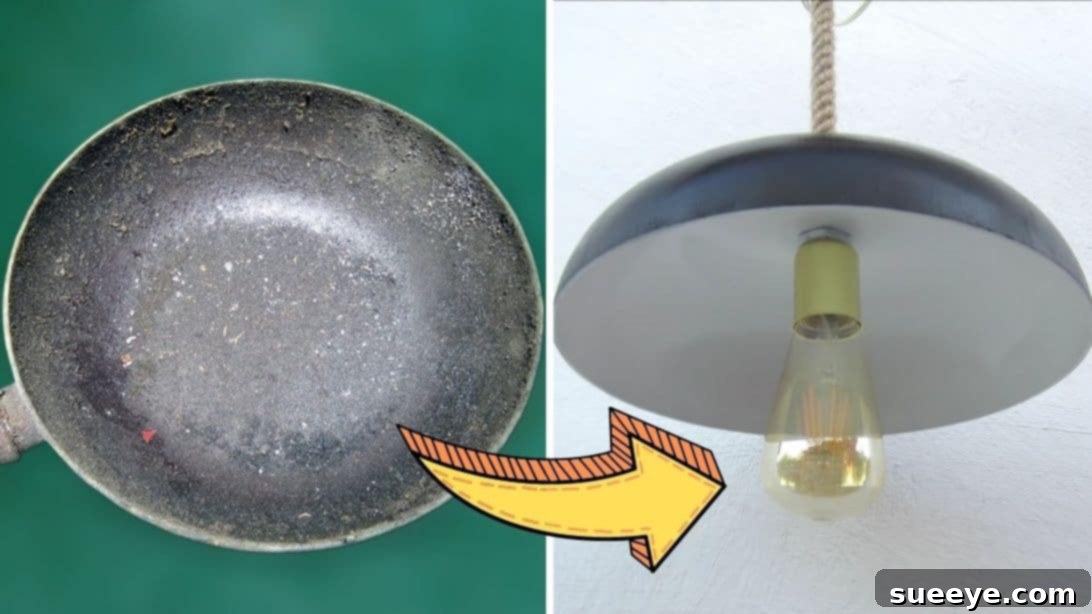
Before you consider tossing out that worn-out, old frying pan, pause for a moment. What if it could become a captivating centerpiece in your home, adding a touch of rustic charm and unique character? Thanks to the ingenious craft tutorial by Mr. Amazing Works on YouTube, transforming a forgotten kitchen item into a functional and stylish lighting fixture is not only possible but surprisingly straightforward. This comprehensive guide will walk you through each step, ensuring you can confidently create your own stunning, upcycled hanging lamp, breathing new life into an everyday object.
Materials You’ll Need:
Gathering the right tools and materials is the first step towards a successful DIY project. Most items are readily available, and many can be salvaged or found affordably. Here’s what you’ll need to create your rustic frying pan lamp:
- Old Frying Pan: The star of our project! Choose one with character, as dents and imperfections can add to the rustic appeal. Ensure it’s made of a sturdy material like cast iron or steel.
- Grinder with a Wire Brush Disc: Essential for removing rust, grime, and old coatings, preparing the pan for a fresh finish. Always wear appropriate safety gear when using power tools.
- Steel Wool: Perfect for tackling stubborn residue and providing a fine scrub after grinding.
- Sanding Paper (Various Grits): For smoothing the pan’s surface after grinding, ensuring proper paint adhesion. Start with a coarser grit (e.g., 80-120) and finish with a finer one (e.g., 180-220).
- Drill: To create the central hole for the electrical cable. Ensure you have a drill bit appropriate for metal and the desired hole size (approximately 1 inch).
- Spray Paint (Black, White, and Gold): These colors provide a classic, contrasting finish. Black for the exterior, white for the interior (to reflect light), and gold for a touch of elegance on the light bulb cap. Feel free to experiment with other colors to match your decor.
- Rope: A sturdy, decorative rope to suspend the lamp and house the electrical cable. Jute or sisal rope works well for a rustic aesthetic. Choose a length appropriate for your desired hanging height.
- Wire (Optional, for cable support): A thin steel wire can be used inside the rope to provide extra support and prevent the electrical cable from sagging.
- Electrical Cable: A two or three-conductor electrical cable suitable for lighting. Always ensure the cable is rated for the voltage and wattage of your light bulb.
- Light Bulb Socket (Fixture): A standard light bulb socket that can be securely attached to the electrical cable.
- Light Bulb: An Edison-style LED bulb can enhance the rustic look while being energy-efficient.
- Basic Cleaning Supplies: Dishwashing liquid, water, and a hard-bristled brush for initial cleaning.
- Safety Gear: Gloves, eye protection, and a dust mask are crucial when working with power tools, chemicals (spray paint), and dust.
Step-by-Step Guide to Crafting Your Rustic Frying Pan Lamp:
Embark on this rewarding DIY journey with confidence. Each step is designed to be clear and achievable, transforming your old pan into a stylish lighting fixture.
Step 1: Preparing Your Frying Pan for Transformation
The foundation of any great project is thorough preparation. Cleaning and treating your pan correctly will ensure a beautiful and durable finish.
- Handle Removal: Begin by carefully unscrewing and detaching the handle from your frying pan. Most handles are attached with one or two screws, making removal straightforward. Set the handle aside; it won’t be needed for this project.
- Initial Cleaning: Give the pan a good scrub. Spray it generously with a mixture of dishwashing liquid and water, allowing it to soak for a few minutes if there’s stubborn grime. Use a hard-bristled brush to remove loose dirt and grease from both the inside and outside surfaces. Rinse thoroughly with clean water.
- Deep Cleaning and Rust Removal: This is where your grinder with a wire brush disc comes in handy. While wearing safety glasses and gloves, carefully grind the entire exterior surface of the pan. This process will strip away old coatings, rust, and baked-on residue, revealing the bare metal underneath. Repeat this process on the inside of the pan until it’s clean and shiny. For particularly tough spots or intricate areas the grinder can’t reach, use steel wool to scrub away any remaining grime.
- Surface Smoothing: After grinding, the pan’s surface might be a bit rough. Use sanding paper to smooth both sides. Start with a medium-grit sandpaper (e.g., 100-120 grit) to even out the surface, then switch to a finer grit (e.g., 180-220 grit) for a smoother finish. This step is crucial for ensuring the paint adheres properly and looks professional.
- Final Wash and Dry: Once sanded, give the pan one last wash with soap and water to remove any sanding dust and debris. Rinse it meticulously with clean water and dry it completely. Any moisture left on the pan can cause rust or affect paint adhesion.
Step 2: Drilling, Painting, and Electrical Assembly
With a clean and prepped pan, it’s time to add the functional and aesthetic elements that will transform it into a stunning lamp. This step involves precision and careful handling of electrical components.
- Mark and Drill the Center Hole: Accurately measure and find the precise center of the pan. Mark this spot clearly. Using your drill and an appropriate drill bit (around 1 inch in diameter), carefully drill a hole through the center. This hole will be where the electrical cable passes through, so ensure it’s clean and free of burrs.
- Painting Your Pan:
- Interior: In a well-ventilated area, spray paint the inside surface of the pan with white paint. White is an excellent choice as it helps reflect the light from the bulb, maximizing illumination and brightness. Apply several light, even coats, allowing each coat to dry according to the manufacturer’s instructions to prevent drips and ensure a smooth finish.
- Exterior: Once the interior is dry, flip the pan over and spray paint the back (exterior) with black paint. Black provides a classic, rustic contrast and helps the pan blend seamlessly into various decor styles. Again, apply multiple thin coats for the best result. Allow both sides to dry completely before proceeding.
- Preparing the Rope and Cable Assembly:
- Rope Preparation: Take a long piece of your chosen decorative rope. To prevent fraying and make threading easier, securely tape each end of the rope with electrical tape or masking tape.
- Cable Stripping: Grab your electrical cable. Carefully strip about 1 to 2 inches of the outer insulation from both ends to expose the individual lead wires (usually live, neutral, and sometimes ground). Be careful not to nick the insulation of the inner wires.
- Cable Support (Optional): For added stability, especially with heavier bulbs or longer ropes, you can wrap a thin steel wire around the electrical cable. This helps reinforce the cable inside the rope and provides better support for the lamp’s weight.
- Threading the Cable: Insert one end of the prepared electrical cable into one end of the taped rope. Carefully push and pull the cable through the entire length of the rope until approximately 2 inches (or slightly longer) of the cable’s exposed lead wires emerge from each end of the rope.
- Connecting to the Socket: At one end of the rope, attach the light bulb socket. Connect the exposed lead wires from the cable to the corresponding terminals inside the socket, following the socket’s instructions (typically hot to brass screw, neutral to silver screw, and ground to green screw if present). Ensure all connections are secure and insulated.
- Gold Accent: Before attaching the light bulb cap to the socket, spray paint it with gold spray paint. This small detail adds a touch of elegance and complements the rustic aesthetic of the pan. Allow it to dry completely.
- Final Assembly to the Pan:
- Insert the electrical cable and the assembled light bulb socket (with the golden cap) through the central hole you drilled in the pan. The socket should sit snugly against the inside surface of the pan.
- Secure the socket to the pan according to its design. Some sockets have a threaded rod and nut system, while others might require an additional mounting bracket. Ensure it is firmly attached so the lamp hangs straight and securely.
- Screw in your chosen light bulb into the socket.
- Installation: Carefully hang your newly created frying pan lamp from your ceiling. Ensure you use appropriate ceiling hooks or mounting hardware capable of supporting the lamp’s weight. If you’re unsure about wiring it into your home’s electrical system, it’s highly recommended to consult a qualified electrician.
Why Repurpose? The Benefits of DIY and Upcycling
This project is more than just a craft; it’s a statement. Repurposing old items like a frying pan offers a multitude of benefits:
- Sustainability: By upcycling, you reduce waste and extend the lifespan of objects, lessening your environmental footprint. It’s a small step towards a more sustainable lifestyle.
- Unique Decor: Mass-produced items often lack character. A DIY frying pan lamp is inherently unique, offering a conversation piece that reflects your creativity and personal style. You won’t find this in any store!
- Cost-Effective: Creating your own decor often costs significantly less than buying designer pieces. You’re utilizing materials you might already own or can acquire cheaply.
- Personal Satisfaction: There’s immense pride in creating something beautiful and functional with your own hands. It’s a rewarding experience that boosts your creativity and sense of accomplishment.
- Customization: You have complete control over the final look. Choose paint colors, rope textures, and bulb styles that perfectly match your home’s aesthetic.
Safety First: Important Considerations for Your DIY Project
Working with power tools and electricity requires caution. Always prioritize safety:
- Eye and Hand Protection: Always wear safety glasses or goggles when grinding, drilling, or spray painting. Gloves are recommended to protect your hands.
- Ventilation: When spray painting, work in a well-ventilated area or outdoors to avoid inhaling fumes.
- Electrical Safety: If you are unfamiliar or uncomfortable with electrical wiring, consult a qualified electrician. Ensure all electrical connections are secure, insulated, and comply with local electrical codes. Never work with live electrical circuits. Always turn off power at the breaker before making any connections.
- Tool Handling: Follow manufacturer instructions for all power tools. Keep your workspace clean and free of clutter to prevent accidents.
- Weight Distribution: Ensure your ceiling mount can safely support the weight of the pan lamp and any additional decorative elements.
Tips for Customization and Enhancing Your Lamp
While the basic design is stunning, don’t hesitate to personalize your frying pan lamp:
- Paint Finishes: Instead of flat black, consider metallic spray paints (copper, bronze) for an industrial look, or distressed white for a shabby chic feel. You could even use chalk paint for a matte, vintage finish.
- Rope Variety: Experiment with different types of rope – thicker nautical rope, colorful braided cords, or even chains for a more industrial vibe.
- Light Bulb Choice: Edison-style bulbs with visible filaments enhance the rustic and vintage appeal. Smart LED bulbs can offer adjustable brightness and color temperature for modern functionality.
- Embellishments: Add small decorative elements like faux leaves, small metal charms, or beads along the rope to further personalize your lamp.
- Handle Reimagined: Instead of discarding the handle, perhaps you could repurpose it as a hook nearby, or even as part of a different, smaller decorative element.
Conclusion: Illuminate Your Home with Creativity
You’ve now successfully transformed an ordinary, discarded frying pan into an extraordinary piece of home decor. This DIY project is a testament to the power of repurposing, showcasing how creativity and a little effort can breathe new life into old objects. Your rustic frying pan lamp will undoubtedly become a unique focal point, radiating not just light, but also your personal touch and commitment to sustainable living. We extend our sincere thanks to Mr. Amazing Works via YouTube for sharing this brilliant and inspiring tutorial. If you enjoyed this project, we highly recommend visiting his channel for more innovative and imaginative DIY ideas. Subscribe to his channel to stay updated with incredible crafts that turn the mundane into magnificent!
How To Repurpose An Old Frying Pan Into A Hanging Lamp