
Decadent Delights: The Ultimate Guide to Easy Chocolate-Covered Mini Cakes
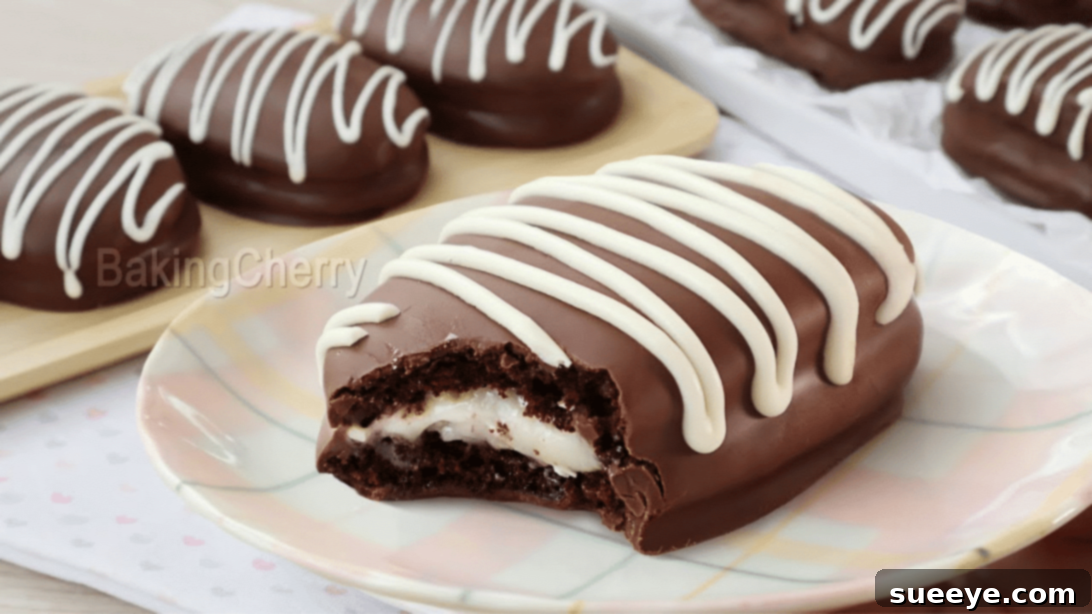
There’s an undeniable joy that comes with baking, and few desserts bring as much universal delight as a perfectly crafted cake. While a grand celebratory cake certainly has its place, there’s something uniquely charming and endlessly appealing about its miniature counterpart. Imagine indulging in a bite-sized piece of rich, moist chocolate cake, generously filled with a luscious cream, and enrobed in a smooth, decadent chocolate coating. These aren’t just any mini cakes; they are an experience, a little piece of edible art that promises to elevate any occasion, from an intimate gathering to a grand celebration, or simply a delightful treat for an ordinary day. This comprehensive guide, inspired by the wonderful creation from Baking Cherry on YouTube, will walk you through crafting these irresistible chocolate-covered mini cakes that are guaranteed to impress.
These mini cakes are not only aesthetically pleasing but also bursting with flavor. Each bite offers a harmonious blend of rich chocolate cake, a creamy, sweet filling, and a satisfying snap from the chocolate shell. They are incredibly versatile, serving as the perfect individual dessert for parties, a thoughtful homemade gift for special occasions or holidays, or even just a luxurious snack for yourself. Forget the struggle of slicing and serving; these individual portions are effortlessly elegant and perfectly satisfying. Prepare to receive an abundance of compliments when you present these delightful treats!
Why These Chocolate-Covered Mini Cakes Are Your Next Must-Bake
If you’re looking for a dessert that combines elegance with ease, look no further. These chocolate-covered mini cakes tick all the boxes:
- Perfect Portions: Each cake is a single-serving delight, making them ideal for parties and preventing overindulgence.
- Visually Stunning: Their miniature size and glossy chocolate coating make them incredibly appealing and perfect for dessert tables.
- Versatile for Any Occasion: From birthdays and anniversaries to baby showers or simply a cozy evening at home, these cakes fit right in.
- Thoughtful Edible Gifts: Beautifully packaged, they make heartfelt and delicious presents for friends, family, or colleagues.
- Incredible Flavor Profile: The combination of moist chocolate cake, a creamy white chocolate filling, and a semi-sweet chocolate shell creates an explosion of taste in every bite.
- Fun and Rewarding to Make: The process is enjoyable, and the end result is immensely satisfying.
The Essential Ingredients for Your Mini Cake Masterpiece
Creating these delightful mini cakes starts with gathering the right ingredients. Each component plays a crucial role in achieving the perfect texture and flavor. Pay attention to temperature recommendations, as they significantly impact the final consistency of your batter and filling.
For the Moist Chocolate Cake Base:
The foundation of our mini cakes is a tender and rich chocolate cake. Using high-quality cocoa powder will yield the best chocolate flavor.
- 2 cups of all-purpose flour
- 2/3 cup of unsweetened cocoa powder
- 1 tsp of baking powder
- 1 tsp of baking soda
- ¼ tsp of salt
- 1 cup of milk, at room temperature (Using room temperature milk helps create a smoother batter and better emulsion.)
- 1 tbsp of vinegar or lemon juice (This creates buttermilk, which reacts with baking soda for a tender crumb.)
- ½ cup of unsalted butter, at room temperature (Softened butter creams better with sugar, incorporating air for a light texture.)
- 1 cup of granulated sugar
- 1 large egg, at room temperature (Room temperature eggs emulsify better with the butter and sugar.)
- 1 tsp of vanilla extract (Enhances the overall flavor profile.)
For the Creamy White Chocolate Filling:
The surprise inside these mini cakes is a luxurious white chocolate cream filling. This adds another layer of sweetness and a delightful textural contrast.
- 1+2/3 cups of white chocolate, chopped or chips (High-quality white chocolate melts smoothly and provides excellent flavor.)
- 1/3 cup of heavy cream
- 3 tbsp of unsalted butter, chopped into small pieces (Butter adds richness and helps the filling set.)
For the Decadent Chocolate Topping:
The final touch is a crisp and shiny chocolate shell. You can choose between semi-sweet or milk chocolate for your main coating, and white chocolate for elegant decoration.
- 1¾ cups of semi-sweet or milk chocolate (Choose your preferred intensity of chocolate flavor for the coating.)
- ½ cup of white chocolate (For artistic drizzling and decoration.)
How to Make Chocolate-Covered Mini Cakes: A Step-by-Step Guide
Follow these detailed instructions to create your own batch of delicious chocolate-covered mini cakes. Precision and patience are key to achieving perfect results.
Step 1: Prepare the Dry and Wet Ingredients for the Cake Batter
In a spacious mixing bowl, meticulously sift together the all-purpose flour, unsweetened cocoa powder, baking powder, baking soda, and salt. Sifting is crucial as it removes any lumps and ensures these dry ingredients are evenly distributed, leading to a smooth, consistent cake crumb. Whisk them together thoroughly until well combined, then set this mixture aside. In a separate bowl or a large measuring cup, combine the room temperature milk with the vinegar or lemon juice. Stir gently and allow it to sit for approximately 5 minutes. This simple step creates a homemade buttermilk substitute, which adds a lovely tang and reacts with the baking soda to give the cake a light, tender texture.
Step 2: Cream the Butter and Sugar, Then Add Egg and Vanilla
Using a stand mixer fitted with a paddle attachment, or a hand mixer, beat the softened unsalted butter and granulated sugar together on medium speed. Continue mixing for about 5 minutes, or until the mixture becomes light, fluffy, and pale yellow. This creaming process incorporates air into the butter, which is vital for a tender cake. Next, add the large room-temperature egg and the vanilla extract. Beat again until everything is fully incorporated and the mixture is smooth, scraping down the sides of the bowl as needed to ensure even mixing.
Step 3: Combine Wet and Dry Ingredients for the Cake Batter
With the mixer on low speed, begin adding the sifted flour mixture to the butter mixture in three separate batches, alternating with the milk mixture. Start and end with the flour mixture. After each addition of flour and milk, beat just until combined. It’s absolutely essential to avoid overmixing at this stage, as overworking the gluten in the flour can lead to a tough cake. The goal is a thick and somewhat stiff batter that is just combined, not overly smooth. Gently fold in any remaining dry bits from the bottom and sides of the bowl with a spatula.
Step 4: Pipe and Bake the Mini Cake Bases
Carefully transfer the prepared cake batter into a piping bag. Snip off the tip to create an opening of appropriate size for piping your mini cakes. Line a large baking sheet with parchment paper. Pipe small, uniform circles or oval shapes onto the prepared baking sheet, ensuring they are nicely spaced apart to prevent them from merging during baking, as demonstrated in the original video. Preheat your oven to 350°F (175°C). Once preheated, place the baking sheet into the oven and allow the mini cakes to bake for approximately 12 to 15 minutes. Baking time may vary depending on your oven and the size of your cakes, so keep an eye on them; they should be lightly golden and spring back when gently touched. Once baked, remove them from the oven and let them cool completely on the baking sheet before handling. This prevents them from breaking and ensures they are firm enough for the next steps.
Step 5: Prepare the Decadent White Chocolate Filling
Once your cake bases are cooling, you can start on the luscious filling. In a heat-proof bowl, combine the chopped white chocolate (or white chocolate chips) with the heavy cream. Microwave these ingredients in short bursts, typically 30-second intervals, stirring consistently and thoroughly after each interval. Continue this process until the mixture is completely smooth and free of any lumps. Be careful not to overheat the chocolate, as it can seize. Once smooth, add the small pieces of unsalted butter to the mixture and stir well until the butter has completely melted and is fully incorporated. The heat from the chocolate mixture should be sufficient to melt the butter. Transfer the bowl to the refrigerator to begin chilling and thickening.
Step 6: Assemble the Mini Sandwich Cakes
Periodically stir the white chocolate filling every 10 to 15 minutes while it’s in the fridge to ensure it thickens evenly and achieves a spreadable consistency. It should be thick enough to hold its shape but still pliable. Once the filling has reached the desired thickness, gently remove the cooled mini cake bases from the parchment paper. Pair them up, selecting two similarly sized pieces for each sandwich cake. Spread a generous amount of the thickened white chocolate filling onto the flat side of one cake piece, then gently top it with the second cake piece, pressing lightly to form a mini sandwich. Arrange the assembled mini cakes on a plate or tray and return them to the refrigerator. Allow them to chill for at least 1 hour, or until the filling is firm and set. This step is crucial for stability before the final chocolate coating.
Step 7: Coat and Decorate Your Mini Masterpieces
In a separate heat-proof bowl, add your chosen semi-sweet or milk chocolate. Melt the chocolate using a microwave (in 30-second intervals, stirring) or a double boiler method until it’s smooth and fluid. Take the chilled mini cakes out of the refrigerator. Using a fork or a dipping tool, carefully dip each mini cake into the melted chocolate, ensuring it’s completely covered. Allow any excess chocolate to drip off before placing the coated cake onto a new parchment-lined baking sheet. Once all cakes are coated, melt the white chocolate in a small bowl. Transfer the melted white chocolate into a piping bag with a very small snip at the tip, or use a spoon to drizzle artistic patterns over each chocolate-covered mini cake. This adds a beautiful contrast and an extra touch of elegance. Let the chocolate coating set completely at room temperature or by refrigerating briefly before serving. Enjoy your homemade, decadent chocolate-covered mini cakes!
Pro Tips for Achieving Perfect Mini Cakes Every Time
To ensure your chocolate-covered mini cakes are nothing short of spectacular, consider these expert tips:
- Ingredient Temperature is Key: Always ensure butter, eggs, and milk are at room temperature for the cake batter. This promotes better emulsification, resulting in a smoother batter and a more tender, even crumb.
- Don’t Overmix: When combining wet and dry ingredients, mix only until just combined. Overmixing develops gluten, leading to a tough, dry cake.
- Piping Consistency: For uniform mini cakes, use a piping bag. If you don’t have one, a Ziploc bag with a corner snipped off works just as well. Aim for consistent size to ensure even baking.
- Cool Completely: Before filling or coating, your mini cake bases must be completely cool. Warm cakes will melt the filling and cause the chocolate coating to slide off.
- Chill Your Filling: Ensure the white chocolate filling is adequately chilled and firm before assembling the sandwich cakes. This prevents it from oozing out and makes the assembly process much cleaner.
- Tempering Chocolate (Optional but Recommended): For a truly professional, glossy, and snap-able chocolate coating, consider tempering your chocolate. If not tempering, melting gently and not overheating is crucial to avoid a dull or crumbly finish.
- Use a Dipping Fork: A chocolate dipping fork or a regular dinner fork will make coating the mini cakes much easier and less messy, allowing excess chocolate to drain off properly.
- Decorate Quickly: Once the main chocolate coating is applied and before it fully sets, you can add sprinkles, chopped nuts, or other decorative elements for extra flair.
Creative Customization and Flavor Variations
While the classic chocolate mini cake is undeniably delicious, don’t hesitate to experiment with different flavors and decorations to make these treats uniquely yours:
- Cake Flavor Swaps:
- Vanilla Mini Cakes: Replace cocoa powder with additional flour and increase vanilla extract for a classic vanilla base.
- Red Velvet: Add red food coloring and a touch of cocoa powder for a vibrant red velvet version, pairing perfectly with a cream cheese filling.
- Lemon Zest: Incorporate lemon zest into the cake batter for a refreshing citrus twist.
- Filling Adventures:
- Cream Cheese Filling: A tangy cream cheese frosting would complement chocolate cake beautifully.
- Nutella Swirl: Swirl Nutella into the white chocolate filling, or create a simple Nutella ganache.
- Fruit Curd: A raspberry or passion fruit curd could offer a delightful tart contrast to the sweet cake and chocolate.
- Peanut Butter: For peanut butter lovers, a smooth peanut butter cream would be a fantastic option.
- Chocolate Coating Alternatives:
- Dark Chocolate: For a more intense, less sweet experience, use dark chocolate for the main coating.
- Ruby Chocolate: Experiment with ruby chocolate for a naturally pink, fruity note and striking visual appeal.
- Compound Chocolate: If you’re looking for an easier melting and setting option that doesn’t require tempering, compound chocolate (candy melts) can be a good choice.
- Decorative Flair:
- Sprinkles and Jimmies: A classic and fun way to add color and texture.
- Chopped Nuts: Finely chopped almonds, pistachios, or hazelnuts add a sophisticated crunch.
- Toasted Coconut Flakes: For a tropical twist.
- Edible Glitter or Gold Dust: For an extra touch of glamour, perfect for special events.
Storage and Serving Suggestions
Proper storage ensures your mini cakes stay fresh and delicious:
- Storage: Store the finished chocolate-covered mini cakes in an airtight container at room temperature for up to 2-3 days, or in the refrigerator for up to 5-7 days. If stored in the fridge, allow them to come to room temperature for about 15-20 minutes before serving for the best texture and flavor.
- Freezing: These mini cakes freeze beautifully! Place them in a single layer on a baking sheet to freeze solid, then transfer them to an airtight freezer-safe container or bag. They can be frozen for up to 1-2 months. Thaw them in the refrigerator overnight or at room temperature for a few hours before enjoying.
- Serving: These mini cakes are perfect served alongside a cup of hot coffee, tea, or a glass of cold milk. They make an excellent addition to dessert buffets, party platters, or as a delightful end to any meal. Their individual size makes them incredibly convenient for guests to grab and enjoy.
*All image credit belongs to Baking Cherry via YouTube. Follow and subscribe to her channel for more inspiring recipes!
Indulge in Homemade Perfection
These easy chocolate-covered mini cakes are more than just a dessert; they are a testament to the joy of homemade treats. Combining the comforting familiarity of chocolate cake with a sophisticated presentation, they offer a delightful experience for both the baker and the consumer. Whether you’re a seasoned baker or just starting your culinary journey, this recipe provides a clear, enjoyable path to creating something truly special. So, gather your ingredients, follow these steps, and prepare to be amazed by the sheer delight of these mini masterpieces. Your friends and family will thank you for bringing such exquisite indulgence into their lives. Happy baking!