
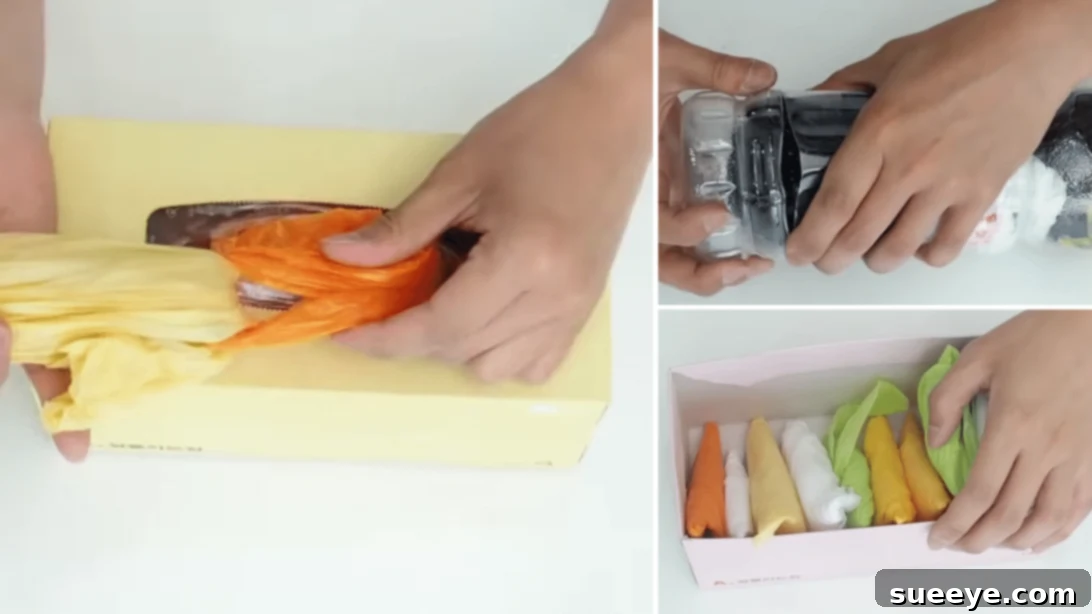
Are you tired of cluttered cabinets overflowing with plastic grocery bags? Do you dream of a kitchen where every item has its designated place, including those pesky plastic bags? You’re not alone! Plastic bags, while incredibly useful for various tasks beyond grocery shopping, can quickly become a disorganized mess, taking up valuable space and creating visual chaos. Fortunately, transforming this chaotic clutter into a neatly organized system is simpler than you think. Inspired by the ingenious ideas from ShareHows on YouTube, we’re here to guide you through practical, DIY solutions that not only save space but also encourage sustainable reuse.
Say goodbye to the days of wrestling with a tangled mess of bags under your sink or in your pantry. This comprehensive guide will show you how to collect, store, and reuse your plastic bags with remarkable ease, all while minimizing their footprint in your home. We’ll explore three brilliant methods, each offering unique advantages, ensuring there’s a perfect solution to fit your lifestyle and space. Not only will these tips enhance your kitchen’s organization, but they also promote a more eco-conscious approach to everyday living by giving these bags a second, third, or even fourth life.
RELATED: 4 Essential Kitchen Storage Tips & Hacks to Transform Your Space
Before diving into the detailed instructions, take a moment to consider which method best aligns with your needs and the resources you have available. For a visual demonstration and additional insights, we highly recommend watching the original video tutorial by ShareHows. Let’s embark on this journey to a more organized and sustainable home!
The Plastic Bag Dilemma: Why Organizing Your Grocery Bags is Crucial
Plastic grocery bags, a ubiquitous part of modern life, present a dual challenge: their environmental impact and their tendency to create household clutter. While many regions are moving towards reducing their use, a considerable number still enter our homes. Instead of discarding them after a single use, reusing them for waste disposal, pet cleanup, packing lunches, or even crafts is an excellent way to extend their lifespan and reduce waste.
However, the sheer volume of these bags can quickly overwhelm storage spaces. Unorganized bags can lead to:
- Wasted Space: They take up precious cabinet, drawer, or pantry space that could be used for other kitchen essentials.
- Frustration: Searching for a single bag amidst a chaotic pile is a common source of annoyance.
- Unsightly Clutter: Piles of plastic bags detract from the aesthetic appeal of an otherwise tidy home.
- Environmental Guilt: Knowing you have a mountain of bags contributes to the feeling of contributing to plastic pollution, even if you intend to reuse them.
By implementing an effective storage system, you not only solve these immediate problems but also contribute to a more sustainable household. Our goal is to make reusing plastic bags so effortless that it becomes a natural part of your routine.
Genius DIY Solutions for Plastic Bag Storage and Organization
Here are three innovative and easy-to-implement methods to store and organize your grocery bags, turning everyday items into clever storage solutions:
- Using an Empty Tissue Box
- Using an Empty Plastic Bottle
- Fold and Store in an Empty Box or Drawer
How to Store & Organize Grocery Bags: A Detailed Guide
#1: The Clever Tissue Box Dispenser: Effortless Access
This method brilliantly repurposes an everyday item – an empty tissue box – into a convenient, pull-out dispenser for plastic bags. It’s incredibly simple to set up and provides quick, single-bag access whenever you need it.
Materials Needed:
- An empty, clean tissue box (rectangular or square)
- A collection of plastic grocery bags
Step-by-Step Instructions:
- Prepare Your First Bag: Take one plastic bag and smooth it out, laying it flat. Pull it lengthwise, stretching it slightly to remove any air and make it as narrow as possible.
- Insert and Link: Push the body of this first plastic bag entirely inside the tissue box, making sure to leave only the handle exposed and accessible through the top opening of the box.
- Create the Chain: Now, take a second plastic bag. Fold it neatly, then thread its bottom through the handle loop of the first bag that is still exposed from the tissue box. This creates a continuous chain effect.
- Continue Filling: Push the second bag (except its handle) into the tissue box, allowing its handle to remain exposed, ready to link with the next bag. Repeat this process with the rest of your plastic bags. Continuously link each new bag through the handle of the previous one, pushing the main body of the bag into the box until it’s full.
- Dispense with Ease: When you need a bag, simply pull the exposed handle from the tissue box opening. As you pull one out, the next bag’s handle will automatically pop up, ready for its turn.
Benefits:
- Simplicity: Requires minimal effort and no special tools.
- Repurposing: Gives a new life to an item destined for recycling.
- Ease of Use: Offers a smooth, single-bag dispensing experience, just like tissues.
- Compact: Fits easily under sinks, in pantries, or on utility shelves.
#2: The Robust Plastic Bottle Dispenser: Durable & Portable
For a more durable and often more spacious storage solution, an empty plastic bottle (like a large soda bottle or milk jug) can be transformed into an excellent bag dispenser. This method is particularly good for those who want a sturdier option or need to store a larger volume of bags.
Materials Needed:
- An empty, clean plastic bottle (2-liter soda bottle, gallon milk jug, etc.)
- Sharp scissors or a utility knife (exercise caution!)
- Plastic grocery bags
Step-by-Step Instructions:
- Prepare the Bottle: Carefully cut off the bottom of the plastic bottle. Aim for a clean, straight cut, as this piece will be reattached later. Set the cut-off bottom aside.
- Prepare Your Bags for Insertion: Take one plastic bag and fold it lengthwise into a narrow strip. Then, thread its bottom end through the handle of another folded plastic bag. This creates a linked chain of bags. Repeat this linking process for all the bags you intend to store.
- Insert the Bag Chain: Starting with the first bag in your linked chain, begin pushing the entire chain of bags through the mouth (top opening) of the plastic bottle. Continue pushing and feeding the bags through until the handle of the last bag you inserted is fully exposed from the bottle’s mouth. This ensures easy retrieval.
- Seal the Dispenser: Gently squeeze the lower part of the bottle slightly if needed, then reinsert the bottom piece that you cut off earlier. This seals the dispenser, keeping the bags securely inside while allowing easy access from the top.
Benefits:
- Durability: Plastic bottles are sturdier than tissue boxes, making for a long-lasting dispenser.
- Portability: Easy to move around as needed.
- Visibility: If you use a clear bottle, you can easily see how many bags are left.
- Versatility: Can be decorated or painted to blend with your decor.
#3: The Art of Folding: Compact Storage in Any Empty Box
If you prefer a method that creates super-compact, individually folded bag packets, this technique is perfect. It works wonders for maximizing space in drawers, baskets, or any empty box. The key here is a precise folding technique that transforms bulky bags into neat, triangle-shaped parcels.
Materials Needed:
- Plastic grocery bags
- An empty box, drawer, or basket for storage
Step-by-Step Instructions:
- Flatten and Smooth: Lay a plastic bag flat on a clean surface. Press out as much air as possible to ensure it’s completely smooth and wrinkle-free.
- First Lengthwise Fold: Fold the bag in half lengthwise, bringing one side to meet the other.
- Second Lengthwise Fold: Fold it in half lengthwise again, creating a long, narrow strip. The width of this strip will determine the final size of your folded packet.
- Begin the Triangle Fold: Take the bottom corner of the folded strip and fold it upwards at an angle, creating a perfect triangle shape at one end.
- Continue Folding Triangles: Flip the triangle over. Then, continue folding the strip upwards, maintaining the triangle shape with each fold. Essentially, you’re repeatedly folding the triangle onto itself.
- Tuck and Seal: Keep folding until you reach the end of the bag, where the handles are. Take the remaining handles and tuck them securely into one of the folds of your compact triangle. This locks the fold in place, creating a neat, self-contained packet.
- Store Neatly: Repeat this process for all your plastic bags. Once folded, these compact triangles can be stored upright in an empty box, a drawer, a basket, or any container of your choice. Arrange them neatly to maximize space.
Benefits:
- Extreme Compactness: Reduces bags to their smallest possible footprint.
- Versatility: Can be stored in almost any container, drawer, or shelf.
- Neat Appearance: Creates a tidy and organized look.
- Easy Retrieval: Each bag is an individual packet, making it easy to grab just one without disturbing the others.
Choosing the Ideal Plastic Bag Storage Method for You
Each method offers unique advantages, and the best choice often depends on your specific needs, the amount of space you have, and your aesthetic preferences:
- For Quick Grab & Go: The Tissue Box Dispenser is excellent if you frequently use bags and want the quickest, most convenient access. It’s perfect for under-sink placement where bags are often needed for small waste bins.
- For Durability & Volume: The Plastic Bottle Dispenser is a robust option that can hold a significant number of bags. Its enclosed design keeps bags protected and makes it suitable for garages, utility rooms, or even back doors for pet walks.
- For Maximum Space Saving & Neatness: The Folding Method is unmatched if space is at a premium and you appreciate a perfectly organized drawer or box. It’s ideal for those who value extreme tidiness and can take a moment to fold each bag.
Consider trying out one or even a combination of these methods to see which works best in different areas of your home. You might find the tissue box under the kitchen sink, a bottle dispenser in the garage, and folded bags in a pantry drawer.
Pro Tips for Maintaining an Organized Plastic Bag System
- Sort by Size: If you collect different sizes of plastic bags (e.g., small produce bags vs. large grocery bags), consider having separate storage for each to make retrieval even easier.
- Regular Decluttering: Even with an organized system, it’s good practice to periodically review your bag collection. Keep only what you realistically expect to use.
- Consistent Application: Make it a habit to immediately process new bags using your chosen storage method. Consistency is key to preventing clutter from accumulating again.
- Educate the Household: Share your new organization system with everyone in your home to ensure everyone contributes to keeping it tidy.
- Consider Alternatives: While reusing plastic bags is great, also explore truly reusable cloth bags for shopping to further reduce your reliance on single-use plastics.
Transform Your Space and Embrace Eco-Friendly Habits
Organizing your plastic grocery bags might seem like a small task, but its impact on your home’s functionality and aesthetic can be surprisingly significant. By implementing these clever DIY solutions, you’re not just clearing clutter; you’re also taking a proactive step towards a more sustainable lifestyle. These methods prove that practical organization doesn’t have to be complicated or expensive – often, the best solutions come from repurposing what we already have.
We hope you find these tips as helpful and inspiring as we did. Give these methods a try, and enjoy the satisfaction of a more organized, eco-friendly home. Don’t forget to visit ShareHows’ YouTube channel and subscribe for more brilliant home organization and DIY ideas!
*All these images are credited to ShareHows via YouTube. Their channel is a fantastic resource for practical home hacks and DIY projects. Give them a visit and subscribe for more inspiring content!