
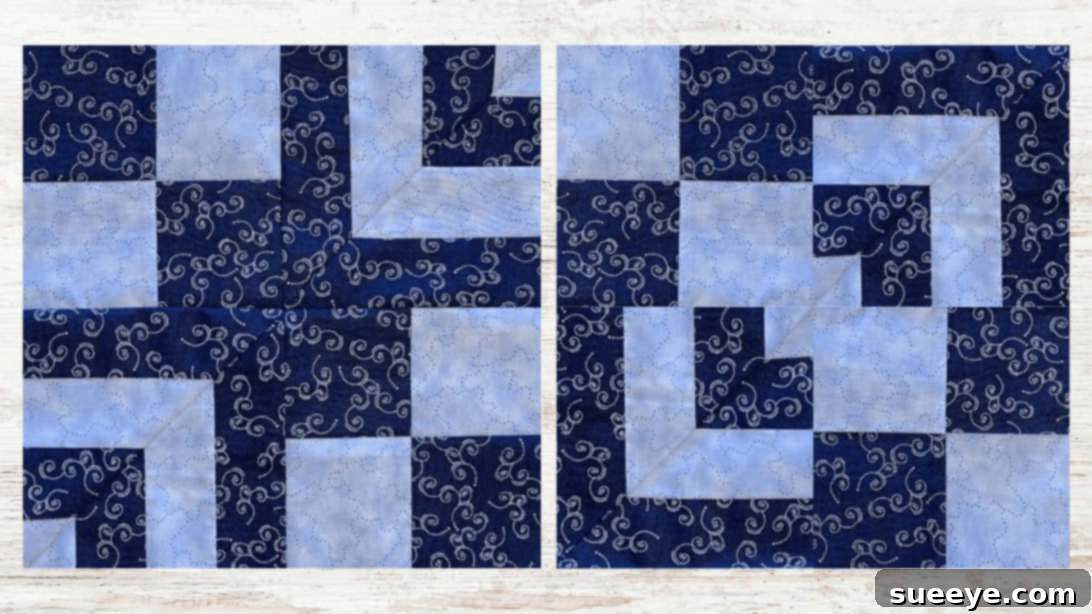
Welcome to the captivating world of quilting, where simple shapes transform into intricate masterpieces! While countless quilt block ideas abound online, the most rewarding designs are often those that offer incredible versatility and endless creative potential. Today, we’re diving into one such gem: the Carol’s Corners Quilt Block. This remarkable block, expertly demonstrated by Tulip Square on YouTube, stands out for its unique modularity, allowing you to assemble individual blocks in a myriad of ways to form entirely new and stunning quilt patterns. It’s truly a game-changer for anyone looking to add a touch of personal flair to their quilting projects.
This project is designed to be incredibly accessible, making it an ideal choice for both seasoned quilters seeking fresh inspiration and absolute beginners eager to dive into the craft. The beauty of Carol’s Corners lies not just in its ease of construction but also in its adaptability. You have complete freedom to experiment with any combination of fabric prints, solids, and colors, ensuring your finished quilt will be a unique reflection of your style. Whether you prefer vibrant hues, subtle pastels, or striking contrasts, this block is a perfect canvas for your textile artistry. To get started, follow our detailed written instructions below, and for an even clearer visual guide, be sure to watch the accompanying video tutorial from Tulip Square.
RELATED: If you’re looking for even more beginner-friendly projects, check out The Easiest Cutting Corners Quilt Tutorial for another fantastic way to build your quilting skills!
Discover the Charm of Carol’s Corners Quilt Block
The Carol’s Corners Quilt Block has quickly become a favorite among quilters for several compelling reasons. Its intuitive construction means you can achieve impressive results without feeling overwhelmed, even if you’re new to sewing. The magic truly happens when you start arranging the completed blocks. Each block, while simple on its own, acts like a puzzle piece, interlocking with others to create captivating secondary patterns. Imagine transforming a stack of fabric strips into a dynamic design that looks far more complex than the sum of its parts – that’s the power of Carol’s Corners.
Beyond its versatility, this block is also a fantastic way to utilize your fabric stash. Those smaller pieces of fabric you’ve been saving for “just the right project” can find a beautiful home here. It’s a sustainable approach to quilting that not only reduces waste but also infuses your quilt with a rich history of your favorite fabrics. Embrace the opportunity to mix and match, play with contrasting values, and watch as your fabric choices bring your quilt to life. This guide will walk you through every step, ensuring you have all the knowledge and confidence to create your own stunning Carol’s Corners quilt.
Your Essential Guide: What You’ll Need for Carol’s Corners Quilt Block
Before you embark on your quilting adventure, gathering the right materials and tools is key to a smooth and enjoyable process. While quilting can seem intimidating, the Carol’s Corners block uses fundamental tools common to most sewing projects. Here’s a detailed look at what you’ll need to create these beautiful blocks:
- Dark Print Fabric: Choose a fabric with a darker value or a bolder print. This will provide necessary contrast and help define the “corners” in your block. Consider high-quality quilting cotton for ease of sewing and durability.
- Light Print Fabric: Select a fabric with a lighter value or a more subtle print. This will complement your dark fabric and make the design elements pop. Ensure your light fabric contrasts well with your dark choice to create visual interest.
- Marking Pen, Pencil, or Chalk: An essential tool for transferring pattern lines onto your fabric. Choose a marking tool that is clearly visible on your chosen fabrics and disappears easily (e.g., wash-away marker, disappearing ink pen, tailor’s chalk).
- Ruler: A clear acrylic quilting ruler (typically 6″x24″ or a square ruler) is invaluable for accurate cutting and measuring. Precision is paramount in quilting, and a good ruler ensures your blocks fit together perfectly.
- Scissors or Rotary Cutter and a Cutting Mat: While sharp fabric scissors will work, a rotary cutter and a self-healing cutting mat are highly recommended for speed, accuracy, and efficiency, especially when cutting multiple fabric strips and squares. Always use a rotary cutter with care and keep fingers away from the blade.
- Needle and Thread: Opt for a good quality 100% cotton thread that matches your fabric or is a neutral color like white or light gray. A sharp needle appropriate for your fabric type will ensure smooth stitching.
- Iron, for pressing: An iron is non-negotiable in quilting. Proper pressing after each seam sets the stitches, flattens the fabric, and ensures your blocks lie perfectly flat. This prevents bulk and distortion, leading to more professional-looking results.
- Sewing Machine: A standard sewing machine capable of a straight stitch is all you need. Ensure it’s in good working order, with a fresh needle and properly wound bobbin. A consistent 1/4-inch seam allowance foot can be incredibly helpful for accuracy.
- Pattern: The downloadable PDF pattern is crucial for specific cutting dimensions and assembly guidance. Click here to download the pattern and print it before you begin.
Crafting Your Carol’s Corners Quilt Block: A Detailed Tutorial
Now that you have all your materials ready, let’s dive into the exciting process of creating your Carol’s Corners Quilt Block. Take your time with each step, focusing on accuracy, and remember that quilting is a journey to be enjoyed.
Step 1: Preparing Your Fabric Strips
Begin by downloading and printing the provided pattern, which will give you the precise cutting dimensions for your fabric. From your chosen fabrics, cut two strips of each fabric type (two dark print and two light print). Lay these strips out side-by-side, alternating between the dark and light fabrics. This initial arrangement helps visualize your final block and ensures you create the necessary contrast. Carefully stitch these strips together in pairs using a consistent 1/4-inch seam allowance. For instance, sew a dark strip to a light strip, and another light strip to a dark strip. Once stitched, press the seams. For strip piecing, it’s often beneficial to press seams towards the darker fabric to prevent shadow-through, but consistency is most important. After joining the initial pairs, join these pairs to each other, again pressing the seams as you go. Repeat this process with any remaining strips until you have completed your strip sets as indicated in the pattern.
Step 2: Creating the Corner Units
Next, you’ll work with squares to create the crucial “corner” elements of your block. Cut two squares from each fabric (two dark and two light), according to the pattern’s specifications. Assemble these alternately into a classic 4-patch block. For example, arrange them as dark-light, light-dark in a grid. Stitch these four squares together carefully, ensuring your seams are precise. Again, press your seams open or to one side for a flat finish. Now, take your previously created strip units (from Step 1) and cut them diagonally in half. The angle and exact cut will be detailed in your pattern. This diagonal cut is what gives the “corner” its distinctive shape. Once cut, you will have various triangular pieces. Begin to mix and match these diagonal pieces, assembling them into new block units. The goal is to create new blocks that incorporate these diagonally cut pieces, forming the dynamic “corner” appearance. Refer closely to the video tutorial or the pattern diagram for the exact arrangement. Stitch these new units together with precision, pressing all seams flat as you complete each connection.
Step 3: Assembling Your Carol’s Corners Quilt Top
With your individual Carol’s Corners units now complete, the real fun begins: assembly! This is where the versatility of this block truly shines. You can arrange these blocks in countless ways to create a unique overall quilt design. Refer to the provided pattern for several inspiring layout options. Perhaps you want a diagonal flow, a checkered pattern, or something entirely abstract. Experiment by rotating individual blocks – a simple 90-degree turn can dramatically change the visual impact of your quilt. Once you’ve settled on your desired layout, proceed to stitch all the blocks together, row by row or in a grid, carefully aligning all your seams. After stitching each section or the entire quilt top, give it a final, thorough press to ensure all seams are flat and the quilt top lies perfectly smooth. Continue to make as many blocks as needed to achieve your desired quilt size and finish your quilt with batting, backing, and binding.
Unleashing Creativity: Endless Design Possibilities with Carol’s Corners
One of the most exciting aspects of the Carol’s Corners Quilt Block is its incredible adaptability. This isn’t just a single pattern; it’s a modular system that empowers you to become a true quilt designer. By simply rotating the blocks or playing with different color placements, you can achieve a vast array of mesmerizing effects. Imagine a quilt where the “corners” create a dynamic pinwheel effect across the surface, or one where they form intricate interlocking chains. You could create illusions of depth, movement, or even secondary shapes like stars or diamonds, all from the same basic block.
Consider varying your fabric choices to amplify these effects. Using high-contrast fabrics will yield bold, graphic designs, while more subtle differences in value can create a softer, more blended look. Don’t be afraid to mix prints with solids, or incorporate a diverse palette of colors. Lay your completed blocks out on a design wall or even on the floor to experiment with different configurations before you commit to stitching. This visual planning stage is crucial for discovering hidden patterns and ensuring your final quilt design is exactly what you envision. The Carol’s Corners block truly encourages a playful and experimental approach to quilting, making every project a unique journey of discovery.
Expert Tips for a Flawless Carol’s Corners Quilt
To ensure your Carol’s Corners quilt project is as successful and enjoyable as possible, keep these expert tips in mind, especially if you’re a beginner:
- Accuracy is Key: In quilting, a precise 1/4-inch seam allowance is paramount. Even a slight deviation can lead to blocks that don’t fit together perfectly. Consider using a 1/4-inch quilting foot for your sewing machine to maintain consistency.
- Pressing Matters: Never underestimate the power of a good iron. Pressing your seams after each stitch rather than ironing them will result in flat, crisp blocks that lay beautifully. This is crucial for precise block assembly.
- Fabric Preparation: Pre-wash and iron your fabrics before cutting. This helps prevent future shrinking and color bleeding, ensuring your quilt looks pristine for years to come.
- Chain Piecing: For efficiency, especially when making many identical units, consider chain piecing. This involves sewing multiple units in a continuous chain without lifting the presser foot between pieces, saving time and thread.
- Visualizing Your Layout: Before sewing blocks together into rows or the full quilt top, lay them out on a design wall, floor, or even a large bedspread. This allows you to visualize the final design and make any adjustments to color placement or rotation.
- Don’t Fear Mistakes: Every quilter makes mistakes! If a seam isn’t perfect, grab your seam ripper and try again. It’s part of the learning process and leads to a more satisfying final product.
Armed with these tips and the detailed instructions, you are well on your way to creating a stunning Carol’s Corners quilt. This project is not just about making a quilt; it’s about developing your skills, expressing your creativity, and enjoying the mindful process of sewing. Happy quilting!
*All image credit belongs to Tulip Square via YouTube. We highly recommend you follow and subscribe to her channel for more incredible quilting tutorials and inspiration!
Mastering the Carol’s Corners Quilt Block: Your Next Creative Project
Embarking on a quilting project like the Carol’s Corners Quilt Block is a rewarding experience that combines creativity, precision, and the joy of working with beautiful fabrics. This tutorial has provided you with all the necessary steps and insights to confidently create a stunning quilt that’s uniquely yours. Remember, the true beauty of this block lies in its incredible versatility. Don’t hesitate to experiment with different fabric combinations, play with the rotation of your blocks, and allow your imagination to guide your design choices. Whether you’re making a cozy throw, a vibrant wall hanging, or a cherished gift, the Carol’s Corners block offers a fantastic foundation for a truly personalized textile art piece.