
DIY Lemonade Bombs: The Ultimate Refreshing Summer Drink Recipe
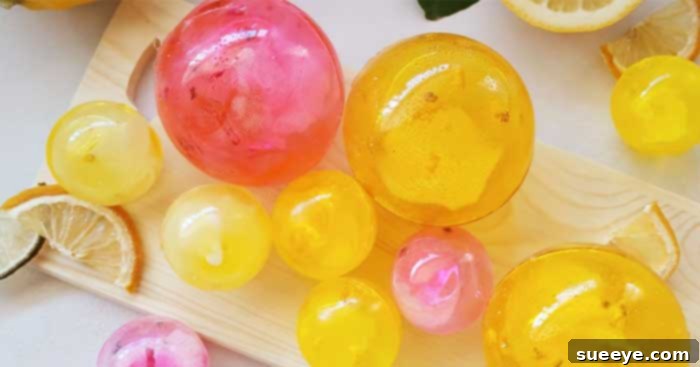
Prepare to elevate your summer refreshment game with the absolute coolest trend sweeping the internet: DIY Lemonade Bombs! These delightful creations, inspired by the ingenious recipe from Let’s Stella, are more than just a drink; they’re an experience. Imagine a beautifully crafted hard candy sphere, vibrant with color, dissolving into a delicious, effervescent lemonade right before your eyes. It’s a magical moment that transforms an ordinary drink into a captivating spectacle.
Lemonade bombs are quickly becoming the quintessential beverage of the summer, offering a unique blend of visual appeal and refreshing taste. They are the perfect addition to virtually any occasion – from a casual backyard barbecue, an elegant tea party, a fun-filled birthday celebration, to simply brightening up your everyday routine. Keeping a batch of these on hand means you’re always prepared to impress guests or treat yourself to an extraordinary, cooling beverage. Let’s dive into how you can create these show-stopping lemonade bombs and make your summer truly unforgettable!
Why You’ll Love Making Lemonade Bombs
Beyond their stunning appearance and refreshing taste, there are numerous reasons why lemonade bombs are a must-try DIY project this summer:
- Unforgettable Presentation: The dramatic melting of the candy shell in hot water is a delightful sensory experience that guests of all ages will adore.
- Customization Galore: Experiment with an array of colors, flavors, and even shapes for your candy shells. You can match them to any party theme or personal preference.
- Kid-Friendly Fun: This recipe is a fantastic way to engage kids in the kitchen, teaching them basic candy-making principles while creating a treat they’ll love to drink.
- Perfect for Parties: Serve them individually as a unique welcome drink or set up a “lemonade bomb bar” where guests can choose their shell color and watch the magic unfold.
- Unique Gift Idea: Pack a few beautifully made lemonade bombs in a decorative box for a thoughtful and distinctive homemade gift.
- A Refreshing Twist: Move beyond plain lemonade and enjoy a beverage that offers both an exciting visual and a burst of flavor.
Essential Ingredients for Your Lemonade Bombs
Crafting these delectable lemonade bombs requires a few key ingredients, most of which are readily available. Here’s what you’ll need to gather:
- Granulated Sugar: The foundation of our hard candy shell, providing sweetness and structure.
- Light Corn Syrup: Crucial for preventing sugar crystallization, ensuring a smooth, clear, and easy-to-mold candy shell.
- Water: Combines with sugar and corn syrup to create the syrup for the shells.
- Powdered Lemonade Mix: The heart of your bomb, delivering that zesty lemonade flavor when the shell melts. Choose your favorite brand or even experiment with different fruit-flavored drink mixes.
- Food Coloring: Optional, but highly recommended for adding vibrant hues to your candy shells. Gel food coloring often provides more intense and consistent colors.
- Isomalt (Optional, for advanced users): While the primary shell material will be sugar syrup, isomalt is a sugar substitute often used in professional candy making for its clarity and resistance to humidity. If you are experienced with isomalt, it can be used instead of or in combination with the sugar syrup for exceptionally clear and durable shells.
Key Equipment You’ll Need
Having the right tools will make the candy-making process smoother and more successful:
- Heavy-Bottomed Saucepan: For boiling the sugar syrup evenly.
- Candy Thermometer: Absolutely essential for reaching the precise temperature (300°F or hard crack stage) required for hard candy. Do not attempt this recipe without one!
- Silicone Sphere Molds: Half-sphere or full-sphere molds are perfect for creating the bomb shape. Ensure they are food-grade and heat-resistant.
- Heat-Resistant Spatula or Spoon: For carefully working with hot sugar.
- Measuring Cups and Spoons: For accurate ingredient proportions.
- Small Frying Pan or Warming Plate: For gently heating the edges of your candy shells to seal them.
- Baking Sheet Lined with Parchment Paper or Silicone Mat: For cooling your candy shells without sticking.
- Heat-Resistant Gloves (Recommended): To protect your hands when handling hot sugar and molds.
Step-by-Step Directions to Craft Your Lemonade Bombs
Step One: Prepare Your Candy Syrup
In a heavy-bottomed saucepan, combine the granulated sugar, light corn syrup, and water. Stir gently over medium heat until the sugar completely dissolves. Once dissolved, stop stirring. Insert your candy thermometer into the mixture, ensuring the tip doesn’t touch the bottom of the pan. Continue to boil the syrup without stirring until it reaches exactly 300°F (149°C), which is the “hard crack” stage. Reaching this precise temperature is critical for creating a stable, brittle candy shell that will dissolve perfectly. Watch the thermometer carefully, as the temperature can rise quickly towards the end. Remove from heat immediately once 300°F is reached.
Image by. Let’s Stella via YouTube video.
Step Two: Mold Your Candy Shells
Working quickly and carefully (the syrup is extremely hot!), pour a small amount of the hot sugar syrup into your silicone sphere molds. If you wish to add food coloring, now is the time to swirl a few drops into the syrup in each mold. Use the back of a spoon or a small brush to spread the syrup evenly up the sides of the mold, creating a thin, consistent shell. You’ll need to work fast as the syrup hardens very quickly. For thicker, more durable shells, you can add multiple thin layers, allowing each layer to set briefly before adding the next. Ensure you create enough half-shells to form your desired number of full bombs. Let them cool completely and harden in the molds.
Step Three: Remove and Fill the Shells
Once the candy shells are completely cool and firm, carefully remove them from the silicone molds. They should pop out easily if fully hardened. Place one half of a candy shell on a clean, dry surface. Using a spoon, pour approximately one to two tablespoons of your chosen powdered lemonade mix into the center of the shell. Adjust the amount based on the size of your molds and your desired lemonade strength.
Image by. Let’s Stella via YouTube video.
Step Four: Seal Your Lemonade Bombs
To seal the two halves together, gently heat the rim of an empty candy half-shell. You can do this by placing it briefly on a lightly warmed frying pan (over very low heat) or a warm, clean plate. The edges will melt slightly. Quickly and carefully place this warmed shell half onto the half containing the lemonade powder, pressing gently to create a secure seal. The melted edges will bond, forming a complete, sealed sphere. Repeat this process for all your lemonade bombs.
Step Five: Enjoy Your Refreshing Creation!
Finally, the moment of truth! Place one finished lemonade bomb into your favorite mug or glass. Carefully pour hot water (not boiling, but hot enough to melt candy) over the bomb. Watch in awe as the candy shell beautifully dissolves, releasing the lemonade powder into the water. Stir gently until the powder is fully dissolved, then add ice for a perfectly chilled and incredibly refreshing lemonade. Garnish with a fresh lemon slice or a sprig of mint for an extra touch of elegance and flavor. Sip, enjoy, and marvel at your DIY success!
Tips for Lemonade Bomb Success
To ensure your lemonade bombs turn out perfect every time, keep these helpful tips in mind:
- Safety First: Hot sugar can cause severe burns. Always exercise extreme caution when working with molten sugar syrup. Wear heat-resistant gloves if possible, and keep a bowl of ice water nearby for immediate cooling in case of accidental contact.
- Humidity is the Enemy: Sugar is hygroscopic, meaning it absorbs moisture from the air. High humidity can make your candy shells sticky. Try to make your bombs on a dry day, and store them in an airtight container immediately after they’ve cooled and sealed.
- Don’t Stir After Boiling: Once your sugar syrup starts boiling, avoid stirring. Stirring can cause sugar crystals to form, leading to a cloudy or grainy candy.
- Accurate Temperature is Key: A candy thermometer is non-negotiable. Reaching 300°F is critical for the “hard crack” stage, which ensures your shells are firm and brittle enough to dissolve properly without being chewy.
- Work Quickly: Molten sugar cools and hardens very fast. Have all your molds and tools ready before you start pouring.
- Clean Molds Thoroughly: Ensure your silicone molds are perfectly clean and dry before use to prevent any sticking or imperfections.
- Experiment with Flavors: Don’t limit yourself to classic lemonade! Try raspberry lemonade, strawberry, limeade, or even other powdered drink mixes for different flavor bombs.
- Storage: Store finished lemonade bombs in an airtight container at room temperature for up to two weeks, away from direct sunlight or humidity.
Creative Variations & Customization Ideas
The beauty of DIY projects like lemonade bombs lies in the endless possibilities for personalization:
- Fruity Twists: Beyond traditional lemonade, use powdered mixes for peach, mango, or berry lemonade. You could even add a tiny pinch of edible glitter to the lemonade powder for a dazzling effect.
- Layered Colors: Create stunning visual effects by pouring different colored syrup layers into your molds, allowing each layer to set briefly before adding the next. This creates multi-toned shells.
- Sparkling Sensations: Mix edible glitter directly into your hot syrup before molding for shimmery, magical shells.
- Garnish Galore: Offer a selection of garnishes for serving, such as fresh fruit slices (lemons, limes, berries), mint leaves, or even a fancy paper straw.
- Adult Versions: For an adult-friendly treat, substitute some of the water with sparkling wine or a splash of clear spirit (like vodka or gin) when serving, after the bomb has dissolved.
- Fun Shapes: If you can find silicone molds in other shapes (stars, hearts, cubes), try those for a unique presentation.
- Sugar-Free Options: For those monitoring sugar intake, consider using sugar-free drink mixes and experimenting with isomalt for the shell, though results may vary.
Final Thoughts: Your Summer Hydration Awaits!
These DIY Lemonade Bombs are truly a delightful invention, bringing a touch of whimsy and excitement to your beverage routine. They are refreshingly delicious, endlessly customizable, and surprisingly simple to make once you master the basics of hard candy. Whether you’re hosting a grand garden party or simply enjoying a quiet afternoon on the porch, these bombs promise to add a burst of flavor and a spark of joy to your summer days.
So, gather your ingredients, embrace your inner candy maker, and get ready to create some magic. Your taste buds, and your guests, will thank you! Share your colorful creations with us – we’d love to see the innovative ways you bring these DIY Lemonade Bombs to life.