
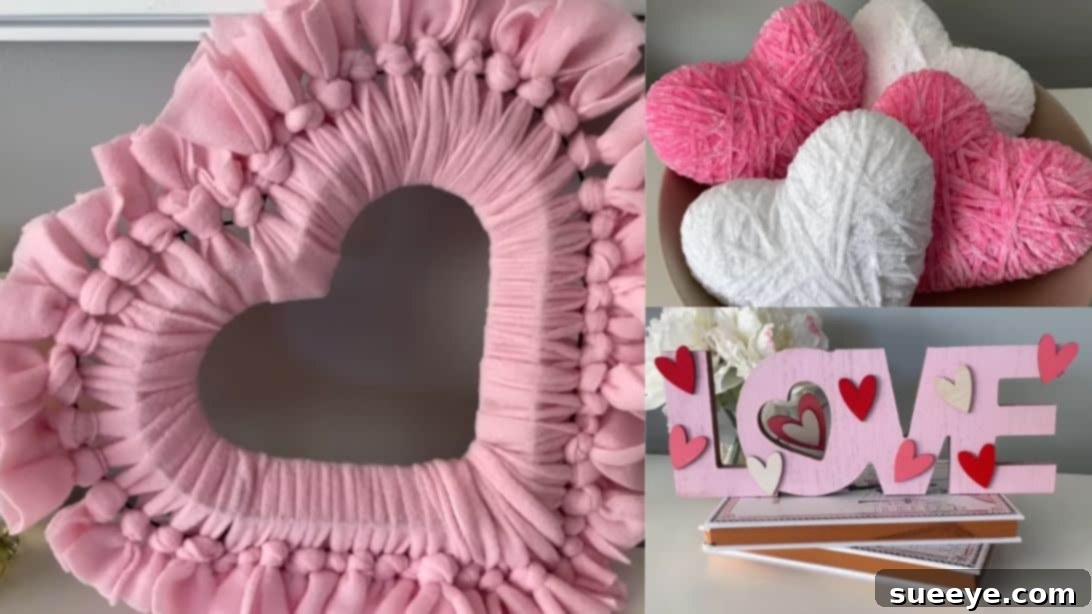
Are you ready to infuse your home with the delightful spirit of Valentine’s Day without breaking the bank? Look no further! This year, celebrate love and creativity with stunning DIY decor projects crafted almost entirely from Dollar Tree finds. The “Life of Style Blog” on YouTube has truly mastered the art of budget-friendly elegance, and we’re thrilled to share their ingenious ideas. These projects are not just easy and quick to make; they promise to transform your space into a loving sanctuary, proving that gorgeous decor doesn’t require a hefty price tag. Get ready to unleash your inner crafter and create beautiful, personalized Valentine’s Day accents that will warm hearts and impress guests. Forget expensive store-bought decorations; embrace the charm and satisfaction of handmade beauty!
Affordable & Adorable: Transform Your Home with Dollar Tree Valentine’s Day DIY Decor Ideas
Valentine’s Day is a wonderful occasion to express love, and what better way to do so than by decorating your living space with heartwarming touches? While many believe that stunning holiday decor demands a significant investment, we’re here to show you how to achieve a high-end look on a Dollar Tree budget. These brilliant DIY projects, inspired by the creative insights of the “Life of Style Blog,” are designed for crafters of all skill levels, offering a fantastic opportunity to add a personal, loving touch to your home. From whimsical wreaths to charming signs and elegant centerpieces, these ideas prove that creativity and resourcefulness can yield breathtaking results. Let’s dive into these delightful crafts and make your Valentine’s Day truly special and uniquely yours.
Before you begin, remember that the joy of DIY lies in customization. Feel free to adapt colors, textures, and embellishments to match your personal style and existing home decor. The beauty of Dollar Tree finds is their versatility, allowing you to create truly unique pieces that reflect your heart and elevate your festive arrangements.
Creative Valentine’s Day Crafts Using Dollar Tree Finds
1. Jumbo Yarn-Wrapped Hearts: A Cozy Statement Piece
Imagine soft, plush hearts adding a touch of cozy romance to your mantelpiece, shelf, or hanging display. These jumbo yarn-wrapped hearts are incredibly simple to make yet offer a significant visual impact, bringing warmth and texture to any room. Their substantial size makes them stand out, while the soft yarn provides an inviting, tactile quality. They are perfect for creating a focal point in your Valentine’s Day arrangements, offering a handmade charm that feels both rustic and modern. This project is ideal for adding a soft, comforting vibe to your seasonal decor.
Materials You’ll Need:
- 2 jumbo foam hearts (typically found in the craft or seasonal aisle at Dollar Tree)
- Pink and white chenille yarn (or any color combination that suits your palette)
- Scissors
- Hot glue gun (optional, for extra security and neatness)
Step-by-Step Instructions:
- Prepare Your Yarn: Take one jumbo foam heart. Unroll a comfortable length of your chosen yarn, but keep it attached to the skein for continuous wrapping to avoid frequent tying off.
- Start Wrapping: Hold one end of the yarn firmly against the center of the foam heart. You can secure this initial end with a tiny dot of hot glue if you prefer, but simply holding it in place with your thumb is usually sufficient as you begin the wrapping process.
- Wrap Strategically: Begin wrapping the yarn around the foam heart. The key to achieving an interesting, full, and visually appealing look is to wrap in various directions. Don’t just wrap horizontally; angle your wraps, go vertically, and crisscross the yarn to cover every part of the foam. This technique not only ensures comprehensive coverage but also creates a beautiful, textured surface that is rich and inviting.
- Maintain Tension: As you wrap, pull the yarn taut enough so that it lies flat and snug against the foam, preventing looseness. However, be careful not to pull so tight that it deforms the heart shape. Ensure there are no visible gaps revealing the foam underneath.
- Switch Colors (Optional): If you’re using two colors, you have several options. You can wrap one heart entirely in pink and the other in white, or you can alternate colors on a single heart for a striped or color-blocked effect. To switch colors, simply tuck the end of the first yarn color underneath existing strands, trim it neatly, and then start wrapping with the new color, securing its beginning in a similar fashion.
- Secure the End: Once the entire foam heart is covered and you are satisfied with the appearance and fullness, carefully tuck the tail end of the yarn underneath several wrapped strands, ideally on the back side of the heart. For permanent security, you can add a small dab of hot glue to secure it, ensuring it won’t unravel over time.
- Repeat: Follow the same detailed process for your second jumbo foam heart, ensuring consistency in wrapping technique for a cohesive pair.
Pro Tip: Experiment with different yarn textures! Fluffy, chunky, or even metallic yarns can give your hearts unique personalities and make them truly pop. Consider adding small felt letters to spell “LOVE” across a pair of hearts, or attaching them to a simple wooden dowel to create a charming Valentine’s Day centerpiece. Display these hearts on a bookshelf, a tiered tray, or as part of a festive mantel arrangement.
2. Fabric Heart Wreath: A Welcoming Touch of Love
A wreath is a classic and inviting way to adorn your door or walls for any season, and Valentine’s Day is certainly no exception. This fabric heart wreath offers a soft, inviting, and wonderfully tactile alternative to traditional floral wreaths. Made from inexpensive fleece baby blankets readily available at Dollar Tree, it’s incredibly soft to the touch and creates a beautiful, full display of color and texture. It’s a fantastic way to welcome guests with a burst of Valentine’s cheer, or to hang inside as a charming wall accent in your living room, entryway, or even a child’s bedroom. Its plush appearance adds an instant touch of warmth and coziness.
Materials You’ll Need:
- Heart wreath ring (often found in the floral or craft section at Dollar Tree)
- 2 fleece baby blankets (choose complementary or contrasting colors like red, pink, white, or even a subtle pattern)
- Rotary cutter and self-healing mat (highly recommended for efficiency and straight cuts, or use sharp fabric scissors)
- Ruler or measuring tape
Step-by-Step Instructions:
- Prepare Your Fabric: Unfold one fleece baby blanket completely. For ease of cutting and to ensure consistent strip sizes, fold the blanket in half lengthwise, then fold it in half again. This will create a narrower, multi-layered strip that is easier to manage.
- Cut Your Strips: Using your rotary cutter, ruler, and self-healing mat (or sharp scissors), first cut along one long edge of the folded fabric to create a clean, straight start. Next, begin cutting strips approximately 2 inches wide and about 15 inches long. The exact length isn’t critical, but maintaining consistency helps with a uniform and polished final look for your wreath. Discard any curved or uneven edges from the blanket’s original hem.
- Repeat for Second Blanket: Repeat the precise folding and cutting process for your second fleece baby blanket. Having a generous amount of strips (at least 50-70, depending on wreath size) is crucial to achieving a full, lush, and gap-free wreath.
- Attach Fabric to Wreath Ring: Take one fabric strip. Fold it in half lengthwise, creating a loop at one end.
- Knot the Fabric: Position the folded fabric strip underneath the heart wreath ring, ensuring the folded end is slightly longer than the two loose ends. Bring the two loose ends up and through the loop created by the folded end. Pull firmly and snugly to create a secure knot around the wreath ring.
- Continue Knotting: Repeat this process meticulously, attaching fabric strips all the way around the entire heart wreath ring. Push the knots closely together as you go to ensure there are no visible gaps between them and the wreath looks as full and plush as possible. You can alternate colors as desired to create patterns, or mix them randomly for a more variegated look.
- Fluff and Adjust: Once all the fabric strips are tied onto the wreath, gently fluff out the knots with your fingers to make the wreath appear even fuller and more voluminous. Adjust any strips to cover bare spots or to even out the overall shape.
Creative Customization: Consider adding small felt heart cutouts, tiny bows made from contrasting ribbon, or even a lightweight “LOVE” sign glued to the center for an extra pop of flair. This charming wreath can be hung on your front door (ensure it’s protected from direct weather to preserve the fabric), an interior door, or on a prominent wall in your living space to spread Valentine’s cheer. For a layered look, combine different shades of pink and red fleece.
3. Love Wood Sign Decor: A Charming Message
Every home needs a sign that speaks to its heart, and this “LOVE” wood sign project is a wonderfully simple yet impactful way to declare your affection for the season. Using a pre-cut wooden sign from Dollar Tree, you can easily transform it into a personalized piece of art that adds a rustic, loving touch to any room. It’s an ideal piece for a mantel, a tiered tray, a shelf display, or even as part of a gallery wall arrangement. This project combines classic charm with a handmade touch, making it truly special.
Materials You’ll Need:
- “LOVE” sign wood piece (look for unfinished wood crafts in the Dollar Tree craft aisle)
- Rust-Oleum Candy Pink spray paint (or any desired color such as red, white, or even metallic gold)
- Small wood heart ornaments (various sizes if possible, for layering effects)
- Hot glue gun and plenty of glue sticks
- Twine (for hanging, if desired, or ribbon for a different look)
- Protective covering (such as cardboard or a drop cloth) for your painting area
- Optional: Fine-grit sandpaper for a smoother finish before painting
Step-by-Step Instructions:
- Prepare for Painting: Before painting, lightly sand the wood sign if it has any rough edges or imperfections, then wipe it clean. Lay down your protective covering in a well-ventilated area, preferably outdoors or in a garage. Place the “LOVE” wood sign on top.
- Paint the Sign: Shake your chosen spray paint can thoroughly for at least one minute. Apply several light, even coats of spray paint to the wood sign. It’s always better to apply multiple thin coats than one thick coat to avoid drips, ensure smooth coverage, and achieve a professional finish. Allow each coat to dry completely according to the paint manufacturer’s instructions before applying the next.
- Assemble Heart Ornaments: While the “LOVE” sign is drying, prepare your wood heart ornaments. For added visual interest and dimension, you can glue smaller hearts onto larger ones using hot glue. This creates a charming layered effect. You can also choose to paint these hearts a contrasting color (e.g., white hearts on a pink sign), add a touch of glitter, or leave them natural for a more rustic aesthetic.
- Attach Hearts to Sign: Once the “LOVE” sign is fully dry and cured, arrange your prepared wood heart ornaments onto the sign. Experiment with placement until you find an arrangement that is aesthetically pleasing and balanced. Then, use hot glue to securely attach the hearts to the wood sign. Press firmly for a few seconds to ensure a strong bond.
- Add Twine for Hanging (Optional): If you wish to hang your sign, flip it over to the back. Cut a length of twine appropriate for hanging (usually 12-18 inches). Apply a generous line of hot glue across the top back edge of the “O” (or another stable letter, ensuring it’s balanced) and press the twine firmly into the glue. Hold it in place for a few seconds until the glue sets and is dry. You can add another small dab of glue to the center of the twine for extra stability and to prevent sagging.
- Secure Heart to Twine (Optional): For an extra decorative flourish, you can glue one of your smaller wood hearts (or a mini bow made from ribbon) onto the center of the twine string. Apply a dab of hot glue to the back of the heart and gently press it onto the twine, ensuring it’s centered and securely attached.
Design Variations: Instead of spray paint, consider using acrylic paints and brushes for a hand-painted, more artisanal look. Add glitter to the hearts, use decorative stencils for intricate patterns, or even distress the paint lightly for a vintage feel. This sign is perfect for a shelf, a coffee table display, or as part of a larger Valentine’s vignette alongside candles and other small decor items.
4. Love Frames: Elegant and Personal Picture Displays
Floating glass frames from Dollar Tree are an absolute gem for DIY enthusiasts, offering a sophisticated and minimalist way to display art or photos without the high cost typically associated with such frames. For Valentine’s Day, you can effortlessly transform these chic frames into elegant declarations of love using simple printables. This project is incredibly versatile, allowing you to easily update your decor with new images, meaningful quotes, or personalized messages each year, or even for different holidays. Their clean lines and transparency create a modern aesthetic that complements any decor style.
Materials You’ll Need:
- Glass floating frames (various sizes are usually available at Dollar Tree, allowing for a grouped display)
- Valentine’s-themed printables (look for romantic quotes, subtle patterns, vintage artwork, or elegant script)
- Printer and good quality paper (cardstock, photo paper, or even vellum can work beautifully)
- Sharp scissors or a craft knife
- Optional: Ruler for precise cuts, distressing tool or fine-grit sandpaper for creating charming ripped edges
Step-by-Step Instructions:
- Select and Print Your Art: Browse online for free or inexpensive Valentine’s printables. Websites like Pinterest or Etsy offer a plethora of options. Look for romantic quotes, simple heart patterns, elegant script, or vintage love letters. Print them on good quality paper that complements the minimalist style of the frames. For a more rustic or antique look, you can use kraft paper or light cardstock.
- Cut Your Printables: Carefully cut out your chosen printables. You have two main aesthetic choices here:
- For a crisp, modern look: Cut them precisely to fit within the floating glass panes, leaving a small border of clear glass for the “floating” effect.
- For a charming, rustic, or vintage feel: Intentionally rip the edges of the paper. To achieve this, gently tear along a ruler for controlled rips, or use a distressing tool or fine-grit sandpaper to soften and fray the edges.
- Open the Frame: Open your glass floating frame. This usually involves unlatching small clips or tabs at the back, which allows you to separate the two glass panes. Handle the glass carefully to avoid fingerprints or smudges.
- Position the Printable: Carefully place your cut or ripped printable between the two panes of glass. Adjust its position until it’s perfectly centered, artfully off-centered, or arranged as desired. The “floating” effect means there will be clear glass around your design, which looks very chic and allows light to pass through.
- Secure the Frame: Once your printable is perfectly positioned, carefully close the frame, ensuring the clips or tabs are securely fastened. Double-check that your printable remains firmly in place and doesn’t shift when the frame is moved.
Display Ideas: These elegant frames look stunning when grouped together in different sizes on a shelf, hanging on a wall as part of a sophisticated gallery wall, or standing alone on a bedside table, desk, or entryway console. You can even combine them with small Dollar Tree artificial flowers, battery-operated fairy lights, or small ceramic hearts for an added touch of romance and glow. Consider printing personalized photos of loved ones, family, or pets with Valentine’s quotes for an even more meaningful and sentimental display.
5. Valentine’s Tree: A Whimsical Centerpiece of Love
Who says trees are just for Christmas? A miniature Valentine’s tree can be a wonderfully whimsical and unique centerpiece for your holiday celebrations, bringing a festive and loving ambiance to any room. It’s a fantastic and charming way to display an assortment of small ornaments, handmade decorations, and ribbons, creating a delightful conversation starter and a joyful focal point in your home. This project is incredibly versatile and allows for endless creative possibilities, truly reflecting your personal style and festive spirit.
Materials You’ll Need:
- Small artificial “Valentine’s Tree” (Dollar Tree often carries these during the season, or you can use a small white, pink, or even a basic green artificial tree)
- Heart ornaments (a variety of sizes, colors, and textures if possible, for visual interest)
- Ribbons (red, pink, white, or patterned, in various widths for layering)
- Red and pink felt sheets (for crafting custom decorations)
- Scissors (sharp craft scissors are best for felt)
- Hot glue gun and glue sticks
- Optional: Battery-operated fairy lights, small pom-poms, beads, or glitter for extra embellishment.
Step-by-Step Instructions:
- Assemble the Tree: If your chosen artificial tree requires assembly, follow the package instructions carefully. Once assembled, take the time to gently fluff out all the branches to create a full, even, and inviting shape that serves as a beautiful base for your decorations.
- Hang Ornaments: Begin by hanging your heart ornaments evenly around the tree. Distribute different colors, sizes, and textures to create a balanced and visually appealing look. Step back occasionally to assess the balance and adjust as needed.
- Wrap with Ribbon: Take your chosen ribbons and gently wrap them around the tree branches, spiraling downwards from the top. You can make small bows with the ribbon and attach them to the branches, or simply drape the ribbon for a more flowing, elegant effect. Experiment with different ribbon widths and textures for added depth and interest.
- Craft Felt Curves/Petals: Take a red felt sheet. Fold it in half twice (into quarters). Cut the open edges into gentle curves, making a shape that resembles a petal or a scalloped edge when unfolded. These can be used to create felt flowers or layered effects.
- Create Felt Flowers/Spirals: From one of the folded lines (the closed edge) of your curved felt, cut a single line from the edge up towards the center, stopping about an inch from the middle. This cut allows the felt to lie flat. Then, fold the felt in half again and cut a half-circle shape from the folded edge. This technique is often used to create felt roses or ruffled edges when unfolded. Alternatively, you can simply cut a felt sheet into a spiral shape and then roll it up from the outside in, gluing the base to create a small, charming rosebud.
- Cut Felt Hearts: From the pink felt, cut out various sizes of small hearts. You can freehand these for a rustic look or use cookie cutters or stencils as templates for more uniform shapes.
- Attach Felt Decorations: Use your hot glue gun to attach the felt curves/petals, felt roses, and pink felt hearts to the branches of the tree. You can scatter them among the ornaments, or create small clusters for visual interest and impact. Ensure they are securely glued but allow some flexibility for adjustment.
Enhance Your Tree: For an extra magical touch, weave in a string of battery-operated fairy lights (also often available at Dollar Tree) among the branches. You could also create small garlands from pom-poms or beads to drape around the branches, adding more texture and color. This unique Valentine’s tree makes a fantastic tabletop centerpiece for a romantic dinner, a cheerful addition to a child’s bedroom, or a delightful accent in an entryway.
Why Choose Dollar Tree for Your Valentine’s Day DIYs?
The allure of Dollar Tree for crafting isn’t just about the incredible price point; it’s about the boundless potential and creative freedom it offers. Here’s why these budget-friendly stores are an absolute goldmine for your holiday decor and craft projects:
- Unbeatable Value: With virtually every item priced at just a dollar (or a dollar and a quarter in some locations), you can stock up on a wide array of materials without any financial strain. This incredible affordability means you can experiment more freely with different designs, try new techniques without fear of wasting expensive supplies, and even make multiple versions of a project to share with loved ones without guilt.
- Wide and Varied Selection: From seasonal craft supplies specifically designed for holidays like Valentine’s Day to everyday essentials that can be creatively repurposed, Dollar Tree offers a surprisingly diverse range of products. You’ll discover everything from foam shapes, unfinished wood signs, ribbons, and vases to paints, glitter, and floral accents – all perfect for transforming into beautiful decor.
- Sparking Creativity and Resourcefulness: The delightful challenge of creating something beautiful and high-quality from inexpensive items is incredibly rewarding. Shopping at Dollar Tree encourages you to think outside the box, view common objects in a new light, and develop innovative solutions, pushing the boundaries of your crafting abilities.
- Personalized and Unique Touch: Handmade decor carries a unique charm, a personal story, and a sense of warmth that mass-produced, store-bought items simply can’t replicate. Each piece you create is infused with your effort, love, and creativity, making your home truly feel like a reflection of your personality and heart.
- Fun for All Ages and Skill Levels: Many Dollar Tree DIY projects, including the ones mentioned here, are often simple enough for older children and teens to participate in, making crafting a wonderful family activity. It’s an excellent way to bond over the holiday season, share skills, and create lasting memories together. Even beginner crafters can achieve impressive results with these accessible projects.
Embrace the Spirit of Handmade Love This Valentine’s Day
As you can see, creating beautiful and heartfelt Valentine’s Day decor doesn’t require a lavish budget or professional crafting skills. With a little imagination, a fun trip to Dollar Tree, and these fantastic, inspiring ideas from the Life of Style Blog, you can effortlessly transform your home into a charming expression of love and warmth. These DIY projects offer a wonderful opportunity to slow down, engage your creativity, and infuse your living space with personalized charm and character.
Whether you’re making a grand statement with a plush fabric wreath welcoming guests at your door, adding subtle touches with cozy yarn-wrapped hearts on your mantel, or crafting a whimsical Valentine’s tree, each handmade piece will carry the unique imprint of your care, creativity, and affection. The satisfaction of crafting something beautiful with your own hands, especially for such a special occasion, is truly unmatched.
So, gather your budget-friendly materials, put on some festive music, and start crafting! We hope these ideas inspire you to celebrate Valentine’s Day with an abundance of handmade love, affordable beauty, and joyous personal expression. Happy crafting!