
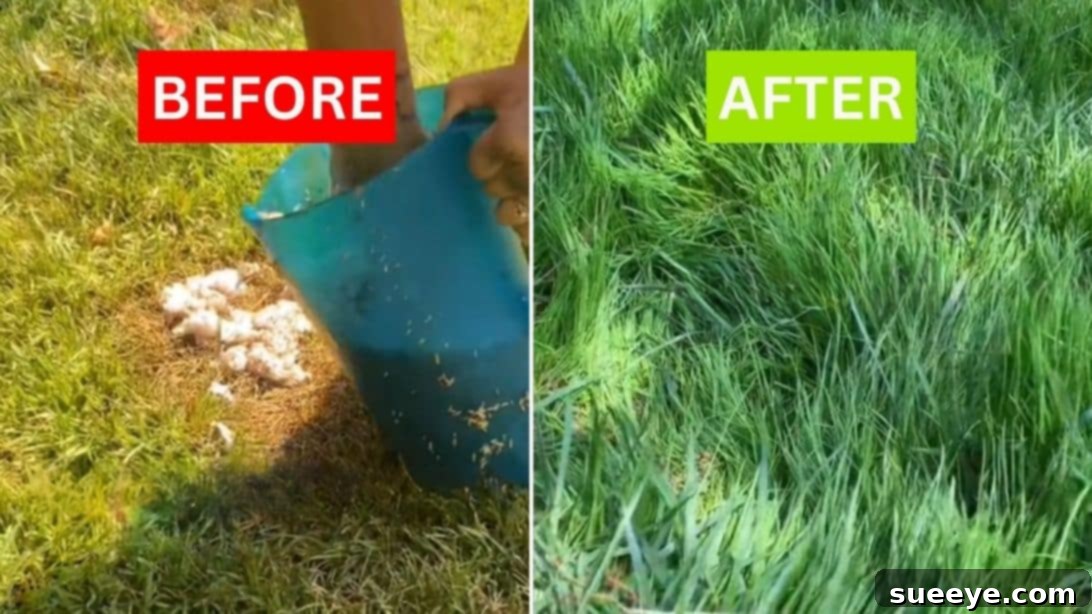
There’s nothing quite like the satisfaction of a vibrant, healthy lawn, especially as the warmer months approach. For many, including myself, a lush green outdoor space is an invitation to relax, read, and truly enjoy the beauty of summer. The journey to achieving this ideal lawn often begins in spring, a season dedicated to meticulous care: clearing winter debris, raking away dead grass, and providing essential nutrients through fertilization. Despite these diligent efforts, the appearance of stubborn dead patches of grass can be incredibly frustrating, marring the otherwise perfect landscape.
RELATED: How to Remove Grass Stains From Clothes
Revitalize Your Lawn: The Easiest Way to Fix Dead Grass Patches
Dead spots on your lawn are a common nuisance, and they can stem from a variety of causes. Understanding these culprits is the first step toward effective treatment and prevention. Common issues include fungal diseases that spread quickly, insufficient sunlight due to shading from trees or structures, and disturbances from animals digging or relieving themselves. Furthermore, improper watering techniques, whether underwatering (leading to dry, brittle spots) or overwatering (causing root rot and disease), are frequent contributors to lawn distress.
Traditionally, repairing these areas involves a multi-step process: meticulously removing the dead grass, scratching the soil surface with a rake to improve aeration and seed-to-soil contact, scattering fresh grass seed, covering it with a protective layer of mulch, and then diligently watering it lightly every day. While effective, this method can be time-consuming and sometimes requires significant effort. However, the world of DIY hacks is constantly evolving, and a recent viral sensation offers a surprisingly simple and efficient alternative to tackle those unsightly dead patches. This innovative approach promises to make your lawn repair efforts much easier and more enjoyable.
@dabzndawgz ive never been this domesticated in my life, thanks clock app 💚 #grasstiktok #grasstok #viral #fy
♬ animal crossing ~ new horizons lofi – Closed on Sunday
Understanding the Causes of Dead Patches in Your Lawn
Before diving into solutions, it’s beneficial to understand why these dead spots appear in the first place. A comprehensive approach to lawn care begins with diagnosis. Beyond the reasons mentioned, several other factors can contribute to a patchy lawn:
- Pest Infestations: Grubs, armyworms, and other lawn pests feed on grass roots, causing widespread damage that often manifests as dead patches. Look for signs like birds digging or spongy turf.
- Chemical Spills: Accidental spills of gasoline, fertilizer in too high a concentration, or herbicides can burn and kill grass in distinct patterns.
- Dog Urine: The high nitrogen content in dog urine can create burnt spots on your lawn. These often have a distinct dark green ring around the dead patch.
- Soil Compaction: Heavily trafficked areas can lead to compacted soil, preventing water, air, and nutrients from reaching grass roots, eventually leading to die-off.
- Improper Mowing: Mowing too short stresses the grass, making it more susceptible to disease and heat damage. Always follow the “one-third rule.”
Identifying the root cause is crucial. If you constantly battle fungal diseases, you might need to adjust your watering schedule or apply fungicides. If animals are the problem, deterrents might be necessary. This holistic understanding ensures your repair efforts are not just temporary fixes but steps toward long-term lawn health.
The Genius DIY Grass Hack: What You Need
This viral TikTok DIY grass hack, shared by dabzndawgz, has garnered significant attention for its simplicity and effectiveness. It challenges traditional methods by using common household items to create an ideal environment for grass seed germination. The beauty of this method lies in its accessibility and the minimal cost involved. Here’s what you’ll need to gather:
- A spacious container (bucket or large bowl)
- A roll of standard toilet paper
- Clean water
- High-quality grass seed suitable for your climate and existing lawn type
Choosing the right grass seed is paramount. Consider your local climate, the amount of sunlight your lawn receives, and the type of grass already present. Blending new seed with existing varieties ensures a consistent look as your lawn regenerates. With these simple items on hand, you’re ready to transform your patchy lawn into a uniform carpet of green.
How to Fix Dead Spots in Your Lawn (DIY Grass Hack Step-by-Step)
This innovative method capitalizes on the properties of toilet paper to create a nurturing bed for your grass seeds, promoting better germination and seedling survival. Follow these steps carefully for the best results:
Step 1: Prepare the Mixture Base
Begin by filling your chosen container with a generous amount of clean water. This will be the base for our seed mixture. Next, take your roll of toilet paper. Instead of just tearing off pieces, gently unroll several sheets and lay them flat on top of the water in the container. The toilet paper will quickly absorb the water, becoming saturated and forming a pulpy, moist mat. This moist environment is crucial for the initial stage of seed germination, keeping the seeds damp and protected.
Step 2: Incorporate the Grass Seed
Once the toilet paper is fully saturated, it’s time to introduce the star of the show: your grass seed. Sprinkle a generous amount of grass seed evenly over the wet toilet paper. The goal is to ensure a good distribution so that when applied, the new grass will grow uniformly. After sprinkling, use your hands to gently mix the grass seed into the pulpy toilet paper and water mixture. The toilet paper will break down further, encapsulating the seeds within a moist, protective matrix. This “seed-pulp” effectively pre-germinates the seeds and keeps them hydrated, a significant advantage over simply scattering dry seeds on the soil surface.
Step 3: Apply to Dead Patches and Nurture Growth
Before applying your seed-pulp mixture, briefly prepare the dead patches on your lawn. Clear away any loose debris or remaining dead grass to expose the soil. A light scratching of the surface with a hand rake or a sturdy garden fork can help improve seed-to-soil contact and aeration. Now, take your tissue and seed mixture and gently spread it over the prepared dead areas. Apply a layer thick enough to cover the bare spots, ensuring the seeds are embedded within the moist toilet paper. Once applied, lightly pat the mixture down to ensure good contact with the underlying soil.
The crucial next step is consistent aftercare. The mixture itself provides initial moisture, but daily light watering is essential, especially in the first few weeks. You want to keep the area consistently damp, not waterlogged. The toilet paper will naturally break down over time, enriching the soil slightly as the grass seeds germinate and sprout. Protect these newly seeded areas from heavy foot traffic, pets, and birds if possible. Patience is key; depending on the grass type and weather conditions, you should start seeing tiny green shoots emerge within one to three weeks. Continue light watering until the new grass is well-established, then gradually transition to your regular lawn watering schedule.
Advanced Tips for DIY Lawn Repair Success
While the toilet paper hack is simple, a few extra considerations can significantly boost your success rate and ensure your newly repaired patches blend seamlessly with the rest of your lawn:
- Timing is Everything: The best times to reseed your lawn are typically in the fall (late August to mid-October) or spring (mid-March to mid-May). These periods offer moderate temperatures and consistent rainfall, which are ideal for germination and growth. Avoid seeding during peak summer heat or late winter cold.
- Soil Preparation: Beyond just clearing debris, consider conducting a soil test if you frequently encounter issues. This can reveal nutrient deficiencies or pH imbalances that hinder grass growth. Amending the soil with compost or appropriate fertilizers before seeding can create a much healthier environment.
- Seed Choice Matters: Don’t just grab any grass seed. Research which types thrive in your specific region and match your existing lawn. Some common choices include Kentucky Bluegrass, Fescue, or Ryegrass, each with different sun, water, and traffic tolerances.
- Protect from Pests and Elements: Young grass seedlings are vulnerable. Consider covering newly seeded areas with a light layer of straw or a fine mesh netting to deter birds and protect against strong winds or heavy rain that could wash away seeds.
- Consistent Moisture: The toilet paper helps, but don’t rely solely on it. Light, frequent watering (2-3 times a day for short durations) is better than heavy, infrequent watering for new seeds. The top inch of soil needs to remain moist.
- Avoid Early Mowing: Resist the urge to mow your newly grown grass too soon. Wait until the seedlings are at least 3-4 inches tall before their first cut. Set your mower to its highest setting to avoid stressing the young blades.
Preventative Measures for a Consistently Lush Lawn
Repairing dead patches is important, but preventing them from occurring in the first place is even better. Implementing good lawn care practices can significantly reduce your chances of encountering these frustrating spots:
- Proper Watering: Water deeply and infrequently, aiming for 1 inch of water per week, including rainfall. Water in the early morning to allow grass to dry, minimizing fungal growth.
- Balanced Fertilization: Feed your lawn regularly according to its needs and soil test results. Over-fertilizing can burn the grass, while under-fertilizing can lead to weak growth.
- Mow at the Right Height: Keep your grass at a height of 2.5 to 3 inches for most varieties. Taller grass shades the soil, retains moisture, and promotes deeper root growth, making it more resilient.
- Aeration and Dethatching: Periodically aerate your lawn to relieve soil compaction and improve air, water, and nutrient penetration. Dethatching removes the layer of dead grass that can suffocate your lawn.
- Pest and Disease Management: Be vigilant for signs of pests or diseases. Early detection and treatment can prevent small issues from becoming widespread problems.
- Sunlight and Drainage: Address issues like excessive shade (trim trees/shrubs) or poor drainage (install French drains or amend soil) that create unfavorable growing conditions.
Conclusion: Embrace a Greener Lawn with Simple Solutions
Achieving a beautiful, uniform lawn doesn’t have to be an uphill battle, nor does it require a professional landscaping budget. The occasional dead patch is an inevitable part of lawn care, but with innovative DIY solutions like the toilet paper grass hack, you have a simple, cost-effective, and remarkably efficient way to address these common issues. This method not only helps germinate seeds more effectively by providing a consistently moist and protective environment but also simplifies the application process.
By understanding the underlying causes of dead spots and implementing both reactive repairs and proactive preventative measures, you can maintain a resilient and vibrant lawn year-round. So, next time you spot those frustrating bare patches, don’t despair. Grab some toilet paper, water, and grass seed, and try this ingenious hack. You might just find yourself with the lushest lawn on the block, ready for all your summer enjoyment!