
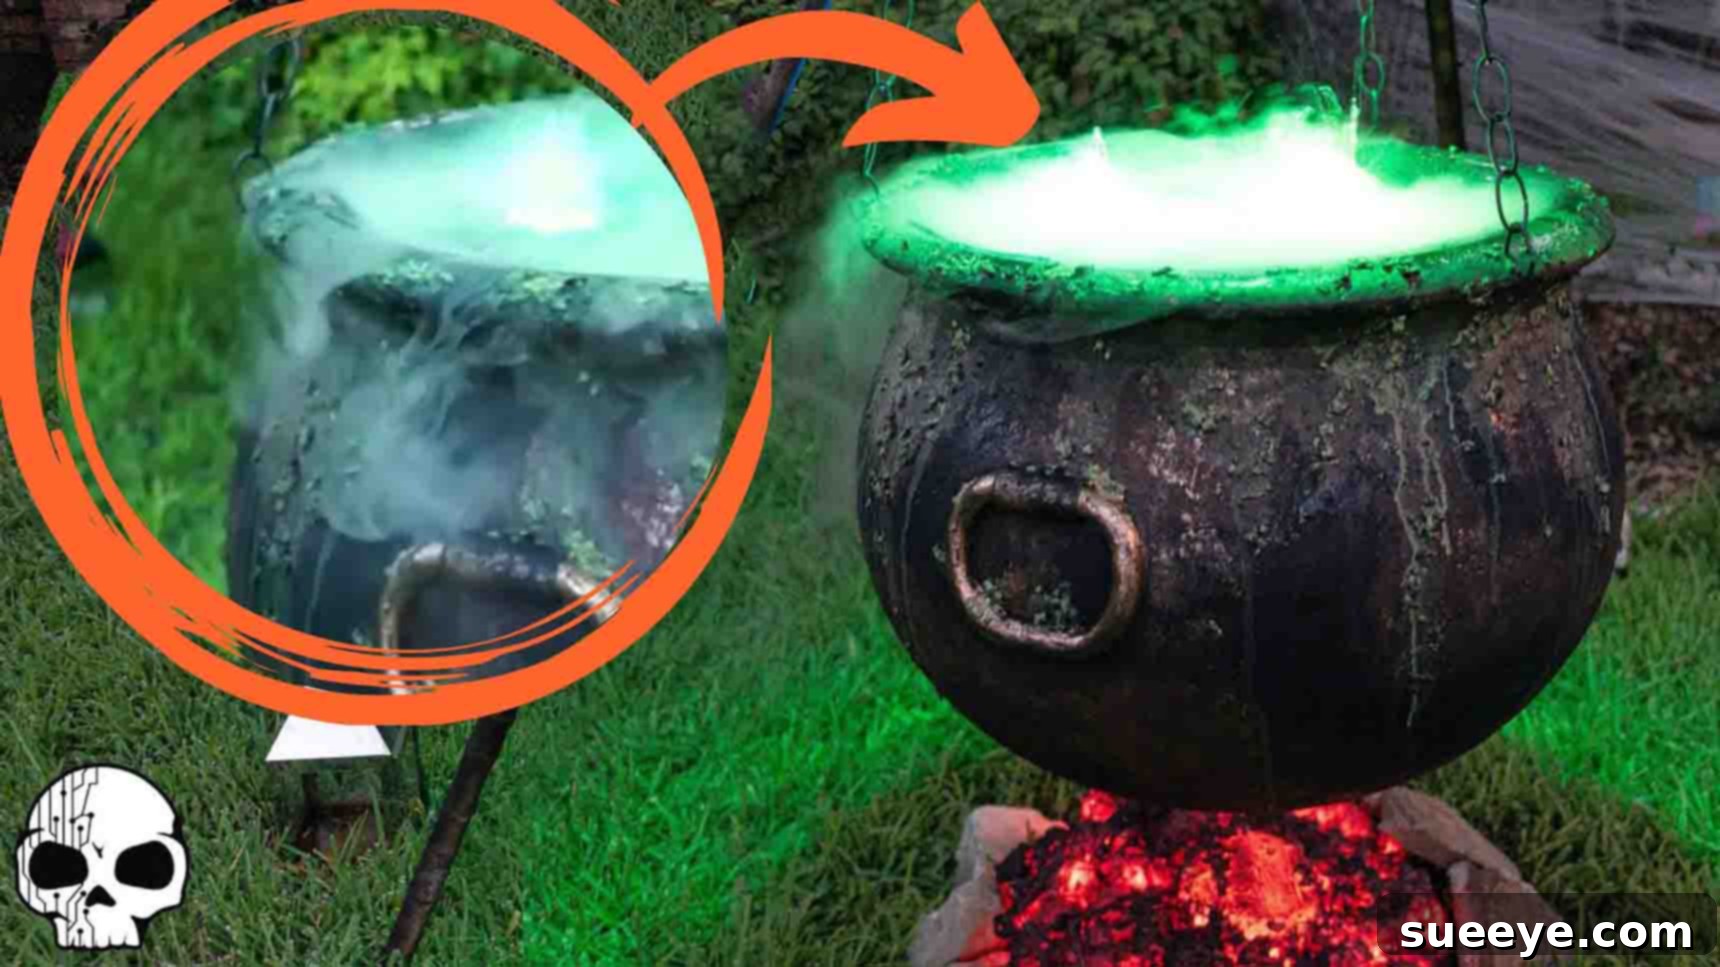
DIY Bubbling Witch’s Cauldron with Glowing Coals: The Ultimate Halloween Centerpiece
As the crisp autumn air signals the approach of Halloween, it’s time to elevate your spooky scene and immerse your space in eerie enchantment. Forget generic store-bought decorations; this year, create a captivating centerpiece that will leave a lasting impression on all who dare to approach. We’re talking about a classic witch’s cauldron, reimagined with a mesmerizing bubbling effect and glowing coals, courtesy of an ingenious tutorial by Wicked Makers on YouTube. There’s simply no Halloween without a touch of witchy magic, and this project delivers a truly authentic and spine-chilling experience. It’s incredibly rewarding to craft, surprisingly straightforward, and guaranteed to be the focal point of your festivities. Get ready to transform your yard or party space into a haunted haven with this spellbinding DIY bubbling cauldron!
This comprehensive guide will walk you through every step, from texturing and painting your cauldron to creating the illusion of smoldering embers and mystical, swirling fog. We’ll delve into the techniques that make this prop look incredibly realistic, ensuring your Halloween display stands out. So gather your materials, unleash your inner alchemist, and prepare to conjure up the most unforgettable Halloween decoration yet.
Materials for Your Magical Cauldron:
Before you begin your enchanting endeavor, ensure you have all the necessary components. Most items can be found at local craft stores, hardware stores, or online, making this a highly accessible DIY project.
- Witch’s cauldron (a sturdy plastic or metal one works best)
- Ultrasonic pond foggers (ensure they are rated for continuous use)
- Spray foam (black or dark-colored recommended for faux coals)
- Orange string lights (LEDs are energy-efficient and safer)
- Black spray paint (hammered finish or matte for texture)
- Mod Podge (matte or gloss, depending on desired finish)
- Twine (natural fiber for an authentic look)
- Plastic bags (for protection during painting)
- Black duct tape (for sealing and securing)
- Oatmeal (quick oats or old-fashioned for texture)
- Long sticks (bamboo poles or sturdy branches for the stand)
- Metal chain (decorative, for hanging the cauldron)
- Hot glue gun and glue sticks (for various attachments)
- Pliers (for manipulating chain links)
- Scissors (for cutting twine, tape, etc.)
- Drill with appropriate bit (for creating holes in the cauldron)
- Paint brushes (various sizes for detailing)
- Red, brown, gray, and copper/orange acrylic or spray paints (for coal and rust effects)
- Green paint (for detailing the “bubbled” oatmeal)
- Outdoor spotlight (LED, for illuminating the fog)
Crafting Your Spooky Masterpiece: A Step-by-Step Guide
Step 1: Cauldron Transformation – Weathering and Rusting
The first step in bringing your witch’s cauldron to life is to give it an authentic, aged, and well-used appearance. This involves a multi-layered painting and texturing process that will create a truly believable prop.
- Initial Blackout: Begin by thoroughly cleaning your cauldron. Once dry, apply an even coat of black hammered spray paint across its entire surface. This not only provides a uniform base but also adds a subtle texture that mimics aged iron. Allow this layer to dry completely according to the manufacturer’s instructions.
- Crafting the “Bubbled Over” Effect: To simulate the look of ancient brew bubbling over and crusting onto the cauldron’s edges, mix a generous amount of oatmeal with Mod Podge. The consistency should be thick and dab-able. Using a paintbrush or your fingers (wearing gloves), artfully dab this mixture around the rim and down the sides of the cauldron, focusing on areas where liquid might naturally overflow. Don’t be afraid to make it look organic and uneven.
- Securing the Texture: Once all the oatmeal mixture is applied, let the Mod Podge dry for at least two hours. This allows the oatmeal to set firmly. Afterward, apply a second, thin layer of pure Mod Podge over all the textured areas. This acts as a sealant, ensuring the oatmeal remains securely attached and ready for the next painting stages.
- Achieving the Rusty Patina: With the cauldron completely dry, it’s time to introduce the weathered, rusty look. This technique involves alternating splotchy areas of brown and black paint. Using a single paintbrush and both brown and black paints, lightly tap and twist your brush across the surface. The goal is not to create solid blocks of color but rather a mottled, irregular pattern that mimics natural rust and wear. Experiment with the amount of pressure and twisting to achieve varied textures.
- Adding Metallic Highlights: Next, take your orange or copper-colored paint. Using a very light touch, apply small dabs of this metallic paint randomly across the cauldron. These highlights will catch the light, giving the impression of real metal peeking through the rust and adding depth to the finish.
- Detailing the “Bubbles”: For a final, grotesque touch, take some green paint and carefully dab it onto the oatmeal chunks. This gives the illusion of ancient, magical residue or even algae growing on the overflow, enhancing the eerie authenticity of your prop.
Step 2: Constructing the Rustic Stand and Assembling the Mystical Elements
With your cauldron expertly aged, it’s time to build its rustic stand and integrate the mesmerizing fire and fog effects that will truly bring your Halloween display to life.
- Building the Cauldron Stand: Select two long, sturdy bamboo sticks or branches. Place them parallel to each other, approximately 2-3 feet apart, depending on the size of your cauldron. Take a third stick and position it perpendicular to the first two, forming the top crossbeam of your stand. Using strong twine, securely tie the crossbeam to the two vertical sticks. Wrap the twine multiple times around each joint and tie off with a secure knot. This creates a stable tripod-like structure.
- Reinforcing the Stand: Once the basic frame is propped up and stable, wrap additional twine around the top section of the stand, crisscrossing and securing it. This not only adds to the rustic aesthetic but also reinforces the structure, providing a sturdy point from which to hang your cauldron.
- Preparing the Hanging Chains: Take your metal chain and, if desired, spray paint it black or a distressed bronze/silver to give it an aged appearance. Allow it to dry. Using pliers, cut the chain into three equal sections. These will be used to suspend the cauldron.
- Attaching Chains to Cauldron: Carefully drill three small holes equidistantly around the rim of your cauldron. Ensure the holes are slightly larger than the chain links but not so large as to compromise the cauldron’s integrity. Open up the end links of each chain section with pliers and thread them through the drilled holes, then close the links securely to attach the chains to the cauldron.
- Creating the Faux Glowing Coals: Gather your orange string lights and arrange them on the ground or a base where the cauldron will sit. These will provide the glowing effect. Next, take your spray foam and generously apply it over and around the string lights. Shape the foam to create an irregular pile, mimicking a heap of smoldering coals. The foam is excellent for building realistic, textured forms. Allow the spray foam to fully set and cure, which can take several hours depending on the product and humidity.
- Painting the Ember Effect: Once the spray foam is completely dry, use red, black, and gray spray paints to create the burning ember look. Start with a base of black, then lightly dust with gray for ash, and finally, add streaks and patches of red and orange for the hot, glowing areas. Layering these colors will add incredible depth and realism to your faux fire.
- Setting Up the Bubbling Fog: For the mystical bubbling effect, you’ll need to create an elevated platform inside your cauldron. Use scrap foam or sturdy plastic to build a small, stable platform that sits just below the rim of the cauldron. On top of this platform, place a shallow bowl. This bowl will hold the ultra-sonic pond fogger and water. Position the fogger inside the bowl, ensuring it is submerged in water according to its instructions.
- Sealing the Fog Chamber: To maximize the fog output and prevent it from escaping prematurely, use black duct tape to cover any gaps around the edges of the cauldron and the internal platform. This creates a relatively sealed chamber that will direct the fog upwards and outwards, enhancing the bubbling illusion.
- Final Assembly and Illumination: Now, carefully lift your prepared cauldron by its chains and hook them onto the twine-wrapped crossbeam of your bamboo stand. Adjust the height so the cauldron hangs menacingly above your faux fire. Position the glowing faux coals directly beneath the cauldron. For the ultimate eerie glow, attach an outdoor LED spotlight to the top of your bamboo holder, pointing it downwards at the fog within the cauldron. This will illuminate the rising mist, giving it an otherworldly, ghastly radiance.
Tips for an Even More Magical Display
- Safety First: When using spray paints and foam, ensure you are in a well-ventilated area or outdoors. Wear gloves and a mask if necessary. Always exercise caution with power tools like drills.
- Patience is Key: Allow ample drying time for all paints and Mod Podge layers. Rushing this process can lead to a less durable and less aesthetically pleasing finish.
- Customization: Don’t be afraid to personalize your cauldron! Add plastic spiders, rubber snakes, or other creepy crawlies clinging to the sides. You could even drape some faux spiderwebs around the stand.
- Weatherproofing: If your cauldron will be displayed outdoors, consider applying a clear, matte sealant over all painted surfaces to protect them from the elements. Ensure any electrical components (lights, fogger) are rated for outdoor use or protected from moisture.
- Enhance the Fog: For an even more dramatic fog effect, consider adding a few drops of Halloween-themed scent oil (like “graveyard dirt” or “pumpkin spice”) to the water in the fogger’s bowl.
- Troubleshooting Fog: If your fog isn’t rising well, check for drafts, ensure the water level in the bowl is correct for your fogger, and confirm that your internal sealing with duct tape is airtight.
Why This DIY Cauldron Stands Out
This bubbling witch’s cauldron isn’t just another Halloween decoration; it’s a statement piece that offers a multitude of benefits:
- Unforgettable Visual Impact: The combination of glowing coals, a rustic stand, and continuously swirling fog creates a dynamic and captivating display that truly draws the eye.
- Interactive Experience: The bubbling fog adds an element of mystery and motion, making the prop feel alive and engaging for visitors.
- Cost-Effective Creativity: Compared to purchasing high-end, animated Halloween props, this DIY project allows for significant cost savings while still achieving a professional-looking result.
- Sense of Accomplishment: There’s immense satisfaction in creating something so impressive with your own hands. It’s a project that showcases your creativity and dedication to Halloween spirit.
- Versatile Decor: Perfect for front yards, porch displays, indoor party backdrops, or even as a prop for a haunted house, its versatility is unmatched.
With these detailed steps and creative insights, you’re now fully equipped to construct a truly enchanting and spooky bubbling witch’s cauldron with glowing coals. This captivating centerpiece will undoubtedly be the talk of your Halloween celebrations, beckoning trick-or-treaters and party guests alike into your wonderfully wicked world. So, embrace the spirit of the season, gather your supplies, and let the magic begin. Happy haunting!