
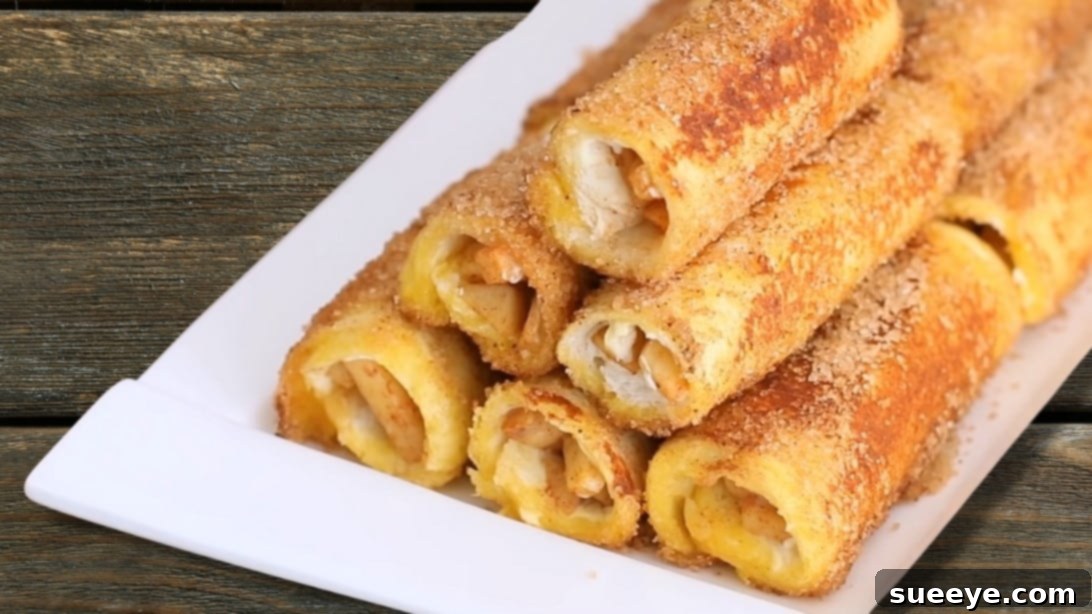
Delicious & Easy Apple French Toast Roll-Ups: A Budget-Friendly Sweet Treat!
Are you searching for a dessert or breakfast recipe that’s not only incredibly simple and budget-friendly but also delivers an amazing burst of flavor? Look no further! These delightful Apple French Toast Roll-Ups, inspired by the creative culinary minds at Home Cooking Adventure on YouTube, are exactly what you need. Perfect for a quick breakfast, a satisfying brunch, or a charming dessert, this recipe proves that delicious doesn’t have to be complicated or expensive. You’ll be surprised at how easy it is to transform simple pantry staples into a warm, cinnamony, and utterly irresistible treat that everyone will adore. Forget complex baking; these roll-ups are fun to make and even more fun to eat, making them a fantastic choice for both novice cooks and seasoned home chefs alike. Get ready to impress your taste buds without breaking the bank!
This recipe is designed to be straightforward, using ingredients you likely already have on hand. The magic happens when tender, spiced apples meet creamy cheese, all wrapped in a golden, crispy French toast shell. The final cinnamon-sugar coating adds that perfect touch of sweetness and sparkle, elevating a humble slice of bread into a gourmet-like experience. Whether you’re whipping up a special weekend breakfast for the family or need a last-minute dessert for guests, these Apple French Toast Roll-Ups are guaranteed to be a hit. Follow our detailed instructions below to create this sweet and yummy snack – your new go-to recipe for any occasion!
Essential Ingredients for Your Apple French Toast Roll-Ups
Crafting these delectable roll-ups requires a handful of common ingredients. We’ve broken down each component, offering tips to help you choose the best for perfect results.
- 2 Medium Apples (Peeled): The star of our show! While many apple varieties work, tart apples like Granny Smith or crisp ones like Fuji or Honeycrisp offer a great balance with the sweetness of the dish. Peeling ensures a smooth filling texture and prevents any tough bits from interfering with your delicious roll-ups.
- 1/2 Teaspoon Ground Cinnamon (for apples): This warm spice beautifully complements the natural sweetness of apples, creating that classic apple pie flavor profile. It infuses the apple filling with a comforting aroma and taste.
- 2 Teaspoons Lemon Juice: A splash of lemon juice is crucial! It not only prevents the apples from browning once cut but also adds a bright, tangy note that cuts through the richness of the other ingredients, balancing the overall flavor and enhancing the apple’s natural zest.
- 2 Large Eggs: These form the base of our French toast custard, binding the milk and providing a rich, golden coating for the bread rolls. Ensure they are well beaten for an even texture.
- 3 Tablespoons Milk: Any milk will do – whole, low-fat, or even a dairy-free alternative like almond or oat milk. It thins out the egg mixture, allowing for even coating and contributing to a tender, custardy French toast texture.
- 10-12 Slices Toast Bread: Standard sandwich bread (white or wheat) works perfectly. Look for slices that aren’t too thick or too thin, as they need to be pliable enough to flatten and roll without tearing. Brioche or challah bread can also be used for an even richer taste, though regular toast is ideal for budget-friendliness.
- 4 oz Cream Cheese (Room Temperature): The creamy filling that holds it all together. Ensure it’s at room temperature for easy, smooth spreading. This adds a lovely tang and a delightful texture contrast to the soft apple filling.
- 1/3 Cup Granulated Sugar: This is for the irresistible cinnamon-sugar coating that provides a sweet, crunchy exterior.
- 1 Teaspoon Ground Cinnamon (for coating): Paired with sugar, this creates the signature sweet and spiced exterior, giving the roll-ups their final irresistible flourish.
- 2 Tablespoons Unsalted Butter (for cooking): Butter is essential for frying the roll-ups, imparting a golden-brown crust and a rich, buttery flavor that can’t be beaten. Using unsalted butter allows you to control the overall sodium content.
Step-by-Step Guide: How to Make Apple French Toast Roll-Ups
Follow these easy instructions carefully to create a batch of perfect Apple French Toast Roll-Ups. Each step is designed for clarity and delicious results.
Step 1: Prepare Your Apple Filling
Begin by meticulously peeling your two medium apples. Once peeled, core them and cut the apple flesh into small, uniform pieces. Aim for pieces that are roughly 1/4 to 1/2 inch in size – this ensures they cook evenly and are easy to roll into the bread. Transfer these diced apples to a small saucepan. Add the 1/2 teaspoon of ground cinnamon and the 2 teaspoons of fresh lemon juice. Stir gently to ensure the apples are well coated with both the spice and the acid. Place the saucepan over low heat and cook for approximately 3 minutes, or until the apple pieces begin to soften slightly but still retain a bit of their bite and texture. Be careful not to overcook them into a mush; we want tender, not disintegrating, apples. Once softened to your liking, remove the apples from the pan and transfer them into a bowl. Set them aside to cool completely. This cooling step is important to prevent the warm apples from melting the cream cheese too quickly or making the bread soggy when assembling the roll-ups.
Step 2: Prepare the Cinnamon-Sugar Coating and Egg Wash
While your apples are cooling, you can efficiently prepare the other essential components. In a small, shallow bowl (wide enough to roll the finished product), combine the 1/3 cup of granulated sugar with the 1 teaspoon of ground cinnamon for the coating. Stir these two ingredients thoroughly with a fork or spoon until they are well mixed and uniform in color. This mixture will give your roll-ups their signature sweet and spiced exterior. Set this bowl aside, as it will be used for the very final step. In a separate, slightly larger shallow bowl, crack the two large eggs. Add the 3 tablespoons of milk. Use a whisk or a fork to beat the eggs and milk together vigorously until the mixture is light yellow, frothy, and completely combined, with no streaks of egg white remaining. This smooth egg wash is what will give our roll-ups their classic French toast texture and help them achieve that beautiful golden-brown finish.
Step 3: Prepare and Flatten the Bread Slices
Take each slice of toast bread. Using a sharp knife, carefully trim off all the crusts from each slice. This step is crucial as it makes the bread much easier to flatten and roll without cracking or breaking. Once the crusts are removed, place one slice of bread on a clean work surface. Using a rolling pin, firmly and evenly flatten each slice of bread until it is thin and pliable, almost like a thin pastry sheet or tortilla. Apply consistent pressure to achieve an even thickness, ensuring they hold their shape and cook beautifully. After flattening, take your room-temperature cream cheese and spread a thin, even layer over one side of each flattened bread slice, leaving a small border (about 1/4 inch) at one edge. This border will help to seal the roll effectively when assembled.
Step 4: Assemble Your Apple French Toast Roll-Ups
Now it’s time to bring all the delicious components together. Take one of your cream cheese-coated, flattened bread slices. Scoop approximately 2 teaspoons of the cooled apple mixture and place it neatly along one edge of the bread slice, over the cream cheese. Distribute the apple pieces evenly to avoid a lumpy roll. Be careful not to overfill, as this can make rolling difficult, cause the bread to tear, or lead to the filling spilling out during cooking. Starting from the edge with the apple filling, carefully and tightly roll up each slice of bread, ensuring the filling stays tucked inside. Press gently along the seam to help seal the roll. Repeat this precise process for all remaining bread slices and apple filling. You should have 10-12 neat, compact rolls ready for the cooking stage.
Step 5: Cook Your French Toast Roll-Ups to Golden Perfection
Place a non-stick pan or skillet over medium heat. Add 1 tablespoon of unsalted butter to the pan and allow it to melt completely, coating the bottom evenly. While the butter is melting and sizzling gently, take your prepared rolls and one by one, dip each roll into the egg mixture you prepared in Step 2. Ensure each side of the roll is well coated but not overly soaked – a quick, thorough dip is sufficient to achieve the desired French toast texture without making the bread soggy. Once the butter is hot and shimmering, carefully place 2-4 rolls into the pan, ensuring they have enough space and don’t overcrowd the skillet. Overcrowding can lower the pan temperature and result in uneven cooking. Cook the rolls for 1-2 minutes on each side, turning them gently with tongs, until all sides are beautifully golden brown and lightly crispy. The medium heat is key here; it allows the bread to cook through and become golden without burning. As each batch finishes cooking, remove them from the pan. If necessary, use a paper towel to lightly clean the pan between batches to remove any burnt butter bits, and add more butter (1 tablespoon at a time) as needed before cooking the next set of rolls. Repeat this process until all your delicious roll-ups are cooked to perfection.
Step 6: Finish with a Sweet Cinnamon-Sugar Coating and Serve
Immediately after removing the hot, golden-brown roll-ups from the pan, transfer them directly to the shallow bowl containing your cinnamon-sugar mixture (from Step 2). Gently roll each French toast roll-up in the sugar-cinnamon blend, ensuring it is evenly coated on all sides. The warmth of the roll-ups will help the sugar adhere beautifully, creating a sparkling, flavorful crust that is a hallmark of this delightful treat. Once coated, arrange them neatly on a serving platter. These Apple French Toast Roll-Ups are best enjoyed warm, right after preparation, when they are at their most crispy and delicious. Serve them as is, or elevate your presentation with a drizzle of warm maple syrup, a dollop of freshly whipped cream, a sprinkle of powdered sugar, or even a scoop of vanilla ice cream for an extra indulgent dessert. Enjoy every sweet, cinnamony bite of this irresistible creation!
Why You’ll Love These Apple French Toast Roll-Ups
Beyond their delightful taste, these Apple French Toast Roll-Ups offer a multitude of reasons to become a staple in your recipe collection:
- Budget-Friendly: Made with everyday ingredients, this recipe offers maximum flavor without a hefty price tag, making it perfect for families or anyone looking to save money on delicious treats.
- Quick & Easy: With straightforward steps and minimal prep time, you can have a batch ready in under 30 minutes, ideal for busy mornings, last-minute cravings, or spontaneous guest arrivals.
- Versatile Treat: Whether you serve them for breakfast, brunch, as a comforting snack, or as a charming dessert, they fit perfectly into any occasion, pleasing palates of all ages.
- Kid-Friendly: The fun roll-up format, coupled with the sweet apple filling and crispy exterior, makes them a huge hit with children. They might even enjoy helping with some of the simpler preparation steps!
- Delicious Flavor Profile: The harmonious combination of tender spiced apples, creamy, slightly tangy cream cheese, and a crispy, cinnamon-sugar exterior creates an unforgettable taste experience that balances sweetness and warmth.
Expert Tips for Perfectly Irresistible Roll-Ups
To ensure your Apple French Toast Roll-Ups turn out perfectly every time, keep these expert tips in mind for consistently delicious results:
- Choose the Right Apples: While any apple works, firmer, slightly tart varieties like Granny Smith, Gala, or Honeycrisp will hold their shape better during cooking and provide a nice flavor contrast to the sweetness of the dish.
- Room Temperature Cream Cheese is Key: Don’t skip this crucial step! Softened cream cheese spreads smoothly and effortlessly across the bread, preventing tearing of the delicate flattened slices and ensuring an even layer.
- Flatten Bread Evenly: A uniformly thin bread slice will roll more easily and cook more evenly, resulting in a consistent texture. Avoid making it too thin, which can cause the bread to tear, or too thick, which can make it hard to roll.
- Don’t Overfill: While tempting to maximize the apple goodness, too much apple filling can make rolling difficult, cause the bread to split, and lead to leakage during frying. Stick to the suggested 2 teaspoons for optimal assembly and cooking.
- Medium Heat is Your Friend: Cooking over medium heat allows the roll-ups to become beautifully golden brown and cooked through without burning the exterior. Adjust your stove’s heat as needed to maintain a gentle sizzle.
- Roll While Warm: Coating the roll-ups in the cinnamon-sugar mixture immediately after cooking ensures the sugar adheres beautifully and melts slightly onto the warm surface, creating a sparkling, glossy, and delicious crust.
Creative Variations to Try
Feeling adventurous or looking to customize your roll-ups? These apple French toast roll-ups are incredibly adaptable. Here are a few ideas to spark your creativity and try new flavor combinations:
- Berry Blast: Substitute apples with a mix of finely diced strawberries, blueberries, or raspberries. If using frozen berries, ensure they are thawed and thoroughly drained to prevent excess moisture.
- Banana Nut: Mash a ripe banana with a pinch of cinnamon and a spoonful of finely chopped walnuts or pecans for a comforting and hearty twist.
- Cream Cheese Flavor Boost: Mix a little orange zest, a dash of vanilla extract, or even a touch of pumpkin spice into your cream cheese before spreading for an added layer of aromatic flavor.
- Chocolate Drizzle: After coating with cinnamon sugar, drizzle the finished roll-ups with melted chocolate (dark, milk, or white) or a luscious caramel sauce for an extra indulgent treat.
- Nutella Surprise: Replace the cream cheese with a thin layer of Nutella before adding the apple filling for a rich chocolate-hazelnut delight that’s sure to please.
Serving Suggestions & Storage
These Apple French Toast Roll-Ups are fantastic on their own, but they also pair wonderfully with various accompaniments to enhance the experience:
- Classic Syrup: A drizzle of warm maple syrup is always a winning combination, adding traditional sweetness.
- Whipped Cream: A dollop of freshly whipped cream adds a luxurious, airy touch and a delightful creamy contrast.
- Ice Cream: For a decadent dessert, serve warm roll-ups with a scoop of vanilla or cinnamon ice cream, allowing it to melt slightly over the hot roll-ups.
- Powdered Sugar: A simple dusting of powdered sugar makes for an elegant finish and adds a delicate touch of sweetness.
- Fruit Coulis: A berry or apricot coulis can add a sophisticated fruity note and a pop of vibrant color.
Storage: Leftover Apple French Toast Roll-Ups can be stored in an airtight container in the refrigerator for 2-3 days. To reheat, you can use a microwave for a quick warm-up (though they might lose some crispness), or for a crispier result, gently re-fry them in a pan with a little butter over medium-low heat until warmed through and re-crisped. An air fryer also works great for reheating, bringing back that delightful crunch and golden exterior.
There you have it – a comprehensive guide to making the most delicious, easy, and budget-friendly Apple French Toast Roll-Ups. We hope you enjoy preparing and sharing this wonderful recipe with your loved ones!