
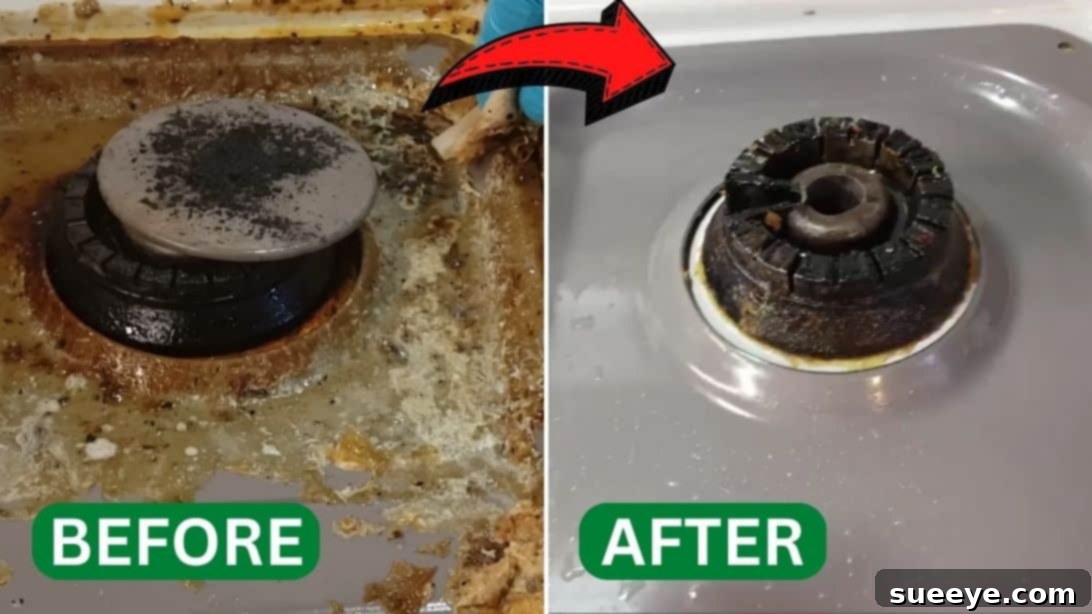
Cleaning a gas stove, especially one caked with stubborn grease buildup, often feels like an impossible chore. Many conventional cleaning methods require intense scrubbing, harsh chemicals, and endless effort, often yielding unsatisfactory results. If you’ve been searching for an effortless, effective way to restore your stove’s sparkle without breaking a sweat, your quest ends here. We’ve discovered a revolutionary no-scrub cleaning technique that promises to melt away even the most deeply set grease, transforming your kitchen cleaning routine forever. This ingenious method, championed by Clean Freak & Germaphobe on YouTube, eliminates the need for any scrubbing or brushing. Instead, it leverages the power of passive soaking, allowing a simple solution to do all the hard work for you. Just set it, forget it for a few hours while you tackle other tasks, and return to a stove ready for a quick, satisfying wipe. Prepare to be amazed as you witness grease and grime simply disappear.
The accumulation of grease and food residue on gas stoves is an inevitable part of cooking. Splatters, spills, and everyday use lead to layers of grime that, if left unattended, can become incredibly difficult to remove. Beyond aesthetics, a dirty stove can pose hygiene concerns and even become a fire hazard. Traditional cleaning often involves vigorous scrubbing, which can be time-consuming, physically demanding, and sometimes even damaging to your stove’s finish. This innovative approach offers a gentle yet powerful alternative, proving that deep cleaning doesn’t have to mean intense labor. By creating a controlled environment where the cleaning solution can penetrate and dissolve grime, this method ensures a sparkling clean stove with minimal effort.
Essential Materials for Your No-Scrub Stove Cleaning Hack
Gathering the right tools is the first step towards an effortlessly clean stove. Most of these items are likely already in your home, making this method not only effective but also highly accessible. Remember, safety is paramount, so ensure you have all protective gear ready before you begin.
- Your Favorite Heavy-Duty Cleaning Product: The key to this method’s success lies in the cleaning solution. For optimal results on stubborn grease, opt for a strong degreaser or an ammonia-based cleaner. If you prefer more natural or eco-friendly options, a powerful all-purpose cleaner might also work, though it may require a longer soaking time. Always check the product label for suitability on gas stove surfaces and wear appropriate protection.
- Absorbent Paper Towels: These will act as the carriers for your cleaning solution, allowing it to stay in direct contact with the grease for an extended period. Choose sturdy, absorbent paper towels that won’t easily tear when saturated.
- Durable Rubber Gloves: Protecting your hands from harsh chemicals and grime is essential. Rubber gloves provide an effective barrier, preventing skin irritation and ensuring a safer cleaning experience.
- Reliable Cling Wrap (Plastic Film): This is a crucial element for creating the “no-scrub” magic. Cling wrap traps the cleaning solution’s fumes and moisture, preventing it from drying out and maximizing its dissolving power. It effectively creates a humid, concentrated environment for the cleaner to work.
- Sharp Scissors: Useful for neatly cutting the cling wrap to cover your stove and basin efficiently.
- A Sturdy Basin or Tub: This will be used to soak your gas stove grates separately, ensuring they receive the same powerful cleaning treatment as the stove surface.
Step-by-Step Directions for Effortless Grease Removal
Follow these detailed steps to transform your gas stove from grimy to gleaming. Remember to work in a well-ventilated area and prioritize safety throughout the process.
Step 1: Prepare and Soak for Maximum Impact
Begin by ensuring your kitchen is well-ventilated; open windows and turn on exhaust fans. This is especially important if you are using an ammonia-based cleaner. Put on your rubber gloves to protect your hands.
Carefully remove all the grates from your gas stove. Place these grates into a sturdy basin or tub. Generously pour your chosen heavy-duty cleaning solution over the grates, ensuring they are thoroughly coated. If using a spray cleaner, spray each grate completely. Cover the basin tightly with cling wrap. This creates an airtight seal that traps the cleaning solution’s fumes, allowing it to deeply penetrate and soften the baked-on grease on the grates without drying out. Set the basin aside to soak.
Next, soak a generous stack of paper towels directly in your cleaning solution, ensuring they are fully saturated but not dripping excessively. Carefully lay these soaked paper towels all over the entire surface of your gas stove, paying particular attention to areas with heavy grease buildup, burners, and any other soiled spots. The goal is to cover all grimy areas completely, creating a direct contact point between the cleaner and the grease.
Once the stove surface is covered, completely cover the entire stove with cling wrap. Use large sheets of cling wrap to create a secure, airtight seal over the paper towels and the stove’s surface. This wrapping serves multiple critical purposes: it prevents the cleaning solution from evaporating, keeps the paper towels moist, and most importantly, minimizes the release of strong fumes into your kitchen, protecting your eyes and respiratory system. The cling wrap acts like a powerful steam bath, allowing the cleaning solution to work its magic undisturbed. Let both the grates in the basin and the wrapped stove surface sit in this solution for a minimum of 3 hours. For extremely heavy or decades-old grease buildup, extending the soaking time to 6-8 hours or even overnight can yield even more impressive results. The longer the soak, the more thoroughly the grease will dissolve, making removal virtually effortless.
Step 2: Reveal a Spotless Shine
After the recommended soaking time has passed (at least 3 hours, or longer for severe cases), return to your stove. Ensure your kitchen is still well-ventilated. Carefully remove the cling wrap from both the basin of grates and the stove surface. As you peel away the cling wrap and the saturated paper towels from the stove, you will immediately notice the incredible transformation. The once-stubborn grease and grime will have softened and lifted, adhering directly to the paper towels, making them incredibly easy to wipe away. As you remove the paper towels, simultaneously wipe down the stove surface. You’ll be astonished at how effortlessly the grease comes right off, leaving a clean surface behind.
If the smell of the cleaner becomes too strong during this stage, take a break, step away, and ensure your ventilation is maximized. If any particularly stubborn spots remain after the initial wipe, don’t despair. You can repeat the process on those specific areas by placing fresh, soaked paper towels and re-covering them with cling wrap for another hour or two. This targeted re-application will typically tackle any remaining residue.
Now, turn your attention to the grates in the basin. The cleaning solution will have worked its magic, loosening and dissolving the grease. You should be able to wipe them clean with minimal effort, possibly using a soft brush or sponge for any corners or crevices. Rinse both the cleaned grates and the stove surface thoroughly with clean, running water or a damp cloth to remove all traces of the cleaning solution and dissolved grime. Ensure no residue is left behind, as this can attract new dirt or affect cooking performance. Finally, allow the grates to dry completely before carefully placing them back in their designated spots on the stove. Step back and admire your sparkling clean, grease-free gas stove! This method significantly cuts down on active cleaning time, proving that a truly deep clean doesn’t always require intense physical labor.
Advanced Tips for Best Results and Maintenance
While this no-scrub method is incredibly effective, a few additional tips can enhance your results and help maintain a consistently clean stove.
- Consistency is Key: While this method can tackle decades of buildup, regular application every few months (or even monthly, depending on cooking frequency) will prevent grease from accumulating to extreme levels, making future cleanings even quicker and easier.
- Pre-Scrape if Necessary: For truly monumental, crusty buildup that is almost solid, a gentle pre-scrape with a plastic scraper (never metal, to avoid scratching) can help the cleaning solution penetrate more effectively. Be cautious not to damage the stove’s surface.
- Ventilation: Always prioritize ventilation. Even with cling wrap, some fumes may escape, especially during removal. Keep windows open and fans running to ensure fresh air circulation.
- Spot Treatment: For smaller spills or recent splatters, you might not need to do a full-stove wrap. A quick spot treatment with a soaked paper towel and a small piece of cling wrap for an hour can be highly effective.
- Read Cleaner Labels: Always double-check that your chosen cleaning product is safe for your stove’s specific materials. Some strong chemicals might not be suitable for certain finishes.
- Proper Disposal: The soiled paper towels and cleaning solution should be disposed of responsibly according to local guidelines, particularly if using harsh chemicals. Avoid pouring large quantities of chemical-laden water down the drain.
- Burner Cap Care: If your stove has removable burner caps, they can also benefit from soaking in the cleaning solution in the basin. Ensure they are thoroughly dried before reassembling.
How to Clean a Stove with Over a Decade of Grease Build Up
If your stove has accumulated more than a decade’s worth of grease and grime, the thought of cleaning it can be daunting. The good news is that this no-scrub method is specifically designed to tackle even the most extreme cases. For such heavy-duty challenges, extend the soaking time significantly. Instead of the minimum 3 hours, consider leaving the grates and the wrapped stove surface to soak for 8-12 hours, or even overnight. This extended duration allows the cleaning solution ample time to penetrate through the thick, hardened layers of grease, breaking them down from within. You might also find it beneficial to perform a second application on any particularly stubborn areas after the initial wipe-down. Don’t underestimate the power of patience with this method; the longer the solution has to work, the less effort you’ll expend in the end. The key is allowing the chemical reaction to fully dissolve the baked-on residue, transforming a seemingly insurmountable cleaning task into a manageable one. This method truly offers a path to a pristine stove, no matter how neglected it may seem.
*All image credit belongs to Clean Freak & Germaphobe via YouTube. Follow and subscribe to her channel for more incredible cleaning hacks!