
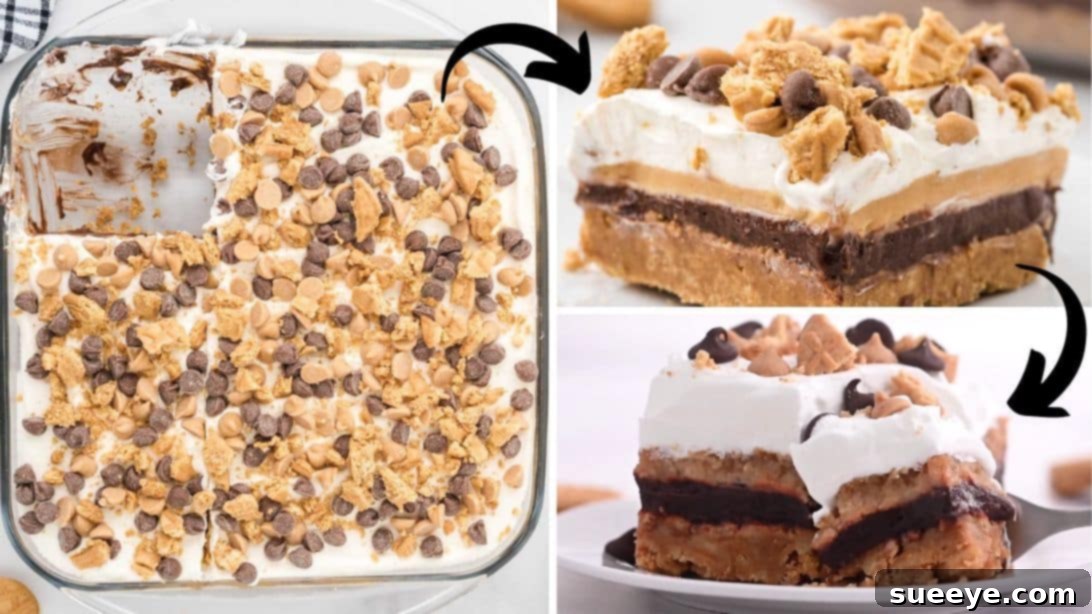
Prepare to embark on a culinary journey to dessert heaven! If you haven’t yet experienced the sheer delight of these Peanut Butter Dream Bars, inspired by the fantastic recipe from Spaceships and Laser Beams on YouTube, then you’re truly missing out on what might be the ultimate dessert idea. Imagine a dessert so decadently delicious, so perfectly balanced in flavor and texture, that you might find yourself reaching for “just one more piece” until the entire pan is gone. Trust us, it’s *that* good. This recipe is an absolute game-changer for anyone who loves the timeless combination of peanut butter and chocolate, and it’s guaranteed to be a hit with family and friends of all ages, even the pickiest eaters!
These dream bars aren’t just a treat; they’re an experience. With layers of crunchy cookie crust, smooth chocolate pudding, a rich peanut butter cream cheese filling, and a light, airy whipped topping, every bite is a symphony of flavors and textures. It’s the kind of dessert that looks impressive but is surprisingly simple to make, making it perfect for both novice bakers and seasoned dessert enthusiasts alike. Get ready to impress everyone at your next gathering or simply treat yourself to a truly unforgettable homemade dessert. Let’s dive into how you can create these magnificent Peanut Butter Dream Bars right in your own kitchen!
What Makes These Peanut Butter Dream Bars So Dreamy?
Peanut Butter Dream Bars are a magical concoction designed to satisfy every sweet tooth. This particular rendition is a layered masterpiece, offering a delightful contrast in every bite:
- The Foundation: A buttery, crunchy crust made from crushed peanut butter sandwich cookies sets the stage, providing a sturdy and flavorful base.
- The First Layer of Bliss: A thick, creamy layer of instant chocolate pudding adds a rich, cool element that perfectly complements the peanut butter.
- The Heart of the Dream: A luscious, tangy-sweet cream cheese and peanut butter filling forms the star attraction, offering that unmistakable nutty flavor.
- The Cloud-Like Topping: A generous spread of fluffy whipped topping crowns the bars, creating a light finish that ties all the layers together.
- The Finishing Touch: A sprinkle of chocolate and peanut butter chips, along with more crushed cookies, adds visual appeal and extra texture.
This dessert isn’t just about ingredients; it’s about the harmony they create. The slight saltiness of the peanut butter against the sweetness of the chocolate, the crunch of the crust against the creaminess of the filling – it’s a perfectly engineered dessert that truly lives up to its “dream” name.
Why This Peanut Butter Dream Bars Recipe is a Must-Try
Beyond its deliciousness, there are several compelling reasons why these Peanut Butter Dream Bars should be at the top of your baking list:
- Effortless Preparation: While there are multiple layers, each step is straightforward and uses readily available ingredients. The majority of the process is “no-bake” after the initial crust, making it perfect for avoiding a hot oven in warmer months.
- Unbeatable Flavor Combination: Peanut butter and chocolate is a classic for a reason. This recipe expertly balances the two, creating a taste that’s both comforting and incredibly satisfying. It hits all the right notes – sweet, salty, rich, and creamy.
- Guaranteed Crowd-Pleaser: Whether you’re bringing it to a potluck, serving it at a birthday party, or just making it for a family dinner, these bars disappear quickly. They appeal to a wide range of palates, making them a safe bet for any occasion.
- Visually Stunning: The distinct layers create a beautiful presentation when sliced, making them an impressive dessert to serve, even though they were so easy to make!
- Make-Ahead Friendly: These bars require chilling time, which means you can prepare them hours or even a day in advance. This makes them ideal for entertaining, as it frees up your time on the day of the event.
- Perfect for All Seasons: While great in summer for their coolness, they are equally welcome as a comforting treat during colder months.
Gather Your Ingredients for Pure Bliss
The beauty of these Peanut Butter Dream Bars lies in their simple yet effective ingredients. Quality ingredients will elevate your dessert, so choose your favorites!
For the Irresistible Cookie Crust:
- 16-ounce package of peanut butter sandwich cookies, such as Nutter Butters, crushed to a fine crumb. (Approximately 30-36 cookies depending on brand and size.)
- 8 tbsp (1 stick) of unsalted butter, melted. Unsalted butter allows you to control the saltiness of the crust.
For the Rich Chocolate Pudding Layer:
- 1½ cups of cold milk. Whole milk or 2% milk will yield the creamiest results.
- 3.9-ounce box of instant chocolate pudding mix. Make sure it’s instant, not cook-and-serve.
For the Creamy Peanut Butter Dream Layer:
- 4 ounces (half a brick) of cream cheese, softened to room temperature. This is crucial for a smooth, lump-free filling.
- ½ cup of powdered sugar (confectioner’s sugar). This sweetens the cream cheese layer and contributes to its silky texture.
- ½ cup of creamy peanut butter. Use a conventional creamy peanut butter (like Jif or Skippy) for best results, as natural peanut butter can separate.
For the Fluffy Whipped Topping and Garnishes:
- 8-ounce tub of Cool Whip, thawed. Alternatively, you can use homemade whipped cream for a richer flavor.
- ½ cup of milk chocolate chips.
- ½ cup of peanut butter chips.
- Reserved 8-9 peanut butter sandwich cookies, crushed, specifically for topping the bars.
Step-by-Step Guide to Crafting Your Dream Bars
Creating these layered wonders is an enjoyable process. Follow these steps carefully to ensure perfect results every time.
Step 1: The Foundation – Crafting the Cookie Crust
Begin by preparing your crust. In a medium mixing bowl, combine the finely crushed peanut butter sandwich cookies with the melted unsalted butter. You can crush the cookies using a food processor for fine crumbs or place them in a zip-top bag and crush them with a rolling pin. Stir the cookie crumbs and butter together until they are thoroughly combined and resemble wet sand. Lightly spray a 9×9 inch (or similar sized) square baking pan with non-stick spray. Press the mixture firmly and evenly onto the bottom of the prepared pan. This creates a compact, sturdy base for your bars. Place the pan in a preheated oven at 350°F (175°C) and bake for about 10 minutes. This brief bake helps to set the crust, preventing it from becoming too soggy. Once baked, remove from the oven and allow it to cool completely on a wire rack before proceeding. A fully cooled crust is essential.
Step 2: The Decadent Chocolate Pudding Layer
While your crust is cooling, prepare the first creamy layer. In another small mixing bowl, combine the cold milk and the instant chocolate pudding mix. Using an electric mixer or a whisk, beat them together for about 2 minutes, or until the mixture thickens considerably. The pudding should be firm enough to spread. Once thickened, carefully spread the chocolate pudding mixture evenly over the cooled cookie crust. Gently cover the pan and place it in the refrigerator to chill and set while you prepare the next luscious layer. Allowing the pudding to set properly will ensure clean layers when you slice the bars.
Step 3: The Star – Rich Peanut Butter Cream Cheese Filling
Now for the heart of the dream bars! In a medium-sized mixing bowl, beat the softened cream cheese using an electric mixer on medium-high speed for about 1 minute. Continue until the cream cheese is completely smooth and free of any lumps. Add the creamy peanut butter to the bowl and continue beating for another 30 seconds to a full minute, or until the mixture is uniformly smooth and well combined. Next, reduce the mixer speed to low. Gradually add the powdered sugar, a little at a time, beating continuously until all the sugar is incorporated and the mixture is light, fluffy, and perfectly smooth. Scrape down the sides of the bowl as needed to ensure everything is fully mixed.
Step 4: The Grand Assembly and Chilling
Once all your layers are prepared, it’s time to assemble your masterpiece. Retrieve the pan from the refrigerator. Carefully spread the prepared peanut butter cream cheese mixture evenly over the top of the chocolate pudding layer. Take your time to ensure a smooth, consistent layer. Finally, top the peanut butter layer generously with the thawed Cool Whip, spreading it gently across the entire surface. To add the finishing touches and extra flavor, sprinkle the milk chocolate chips and peanut butter chips evenly over the whipped topping. Then, sprinkle the reserved crushed peanut butter sandwich cookies over the top for an added crunch and decorative appeal. Once fully assembled, place the baking dish back inside the refrigerator to chill for at least 2 hours. For best results and the cleanest slices, chilling for 4 hours or even overnight is highly recommended. This allows all the layers to firm up and meld together beautifully.
Tips for Peanut Butter Dream Bar Perfection
To ensure your Peanut Butter Dream Bars turn out absolutely flawless, keep these expert tips in mind:
- Room Temperature Cream Cheese: This cannot be stressed enough! Softened cream cheese is key to a smooth, lump-free peanut butter layer. If it’s too cold, your filling will be chunky.
- Thorough Chilling is Essential: Do not rush the chilling process. The longer these bars chill, the better they will set, resulting in clean, beautiful slices and a superior texture. Overnight chilling is ideal.
- Even Layers: Take your time spreading each layer. An even thickness for each component ensures a balanced flavor and an appealing presentation.
- Crushing Cookies: For the crust, a food processor yields the finest, most consistent crumbs. If using a bag and rolling pin, make sure there are no large chunks left.
- Pudding Consistency: Ensure your instant pudding is fully thickened before spreading. If it’s too runny, it won’t hold its shape.
- Clean Slicing: For perfectly neat squares, use a sharp knife warmed under hot water and wiped clean between each cut.
- Quality Ingredients: While simple, using good quality peanut butter and fresh cream cheese will make a noticeable difference in taste.
Variations and Customizations for Your Dream Bars
While the classic Peanut Butter Dream Bars are incredible as they are, don’t hesitate to get creative and customize them to your liking!
- Crust Alternatives: Instead of peanut butter sandwich cookies, try an Oreo crust (chocolate and peanut butter are a match made in heaven!), graham cracker crust, or even a shortbread cookie crust.
- Pudding Power: Experiment with different instant pudding flavors. Vanilla pudding offers a milder backdrop, while butterscotch could add an extra layer of richness.
- Nut Butter Swaps: For those with allergies or different preferences, almond butter or cashew butter can be substituted for peanut butter in the cream cheese layer, creating “Almond Butter Dream Bars” or “Cashew Butter Dream Bars.”
- Enhanced Toppings: Drizzle with caramel sauce, hot fudge, or melted white chocolate. Add chopped roasted peanuts, mini M&M’s, or even a sprinkle of sea salt flakes for a gourmet touch.
- Homemade Whipped Cream: For a less processed option, whip your own heavy cream with a touch of powdered sugar and vanilla extract instead of Cool Whip.
- Individual Servings: Instead of a pan, layer the ingredients in small dessert cups or mini trifles for elegant individual portions.
Storage and Make-Ahead Tips
These Peanut Butter Dream Bars are fantastic for making ahead, which is a huge bonus for busy hosts or anyone craving a quick dessert later!
- Refrigeration: Store leftover bars in an airtight container in the refrigerator for up to 3-4 days. The flavors tend to deepen and meld even more over time.
- Freezing: For longer storage, you can freeze these bars. Cut them into individual squares, place them on a parchment-lined baking sheet, and freeze until solid. Once frozen, transfer them to a freezer-safe airtight container or bag, separating layers with parchment paper. They can be frozen for up to 1 month. Thaw in the refrigerator for a few hours before serving.
- Advance Preparation: The entire dessert can be assembled and chilled up to 24 hours in advance, making it a stress-free option for entertaining.
These irresistible Peanut Butter Dream Bars are more than just a recipe; they’re an invitation to indulge in pure, unadulterated dessert joy. With their perfectly balanced layers, simple preparation, and guaranteed crowd-pleasing appeal, they are bound to become a staple in your dessert rotation. So, what are you waiting for? Gather your ingredients, follow these easy steps, and treat yourself and your loved ones to a truly dreamy experience. You’ll quickly understand why this recipe from Spaceships and Laser Beams is hailed as the ultimate dessert idea. Happy baking (and eating)!
*All image credit belongs to Spaceships and Laser Beams via YouTube. Follow and subscribe to their channel for more inspiring recipes and delightful creations!