
How To Make A Dollar Tree Fall Mason Jar Sign: Your Ultimate Guide to Affordable Autumn Decor
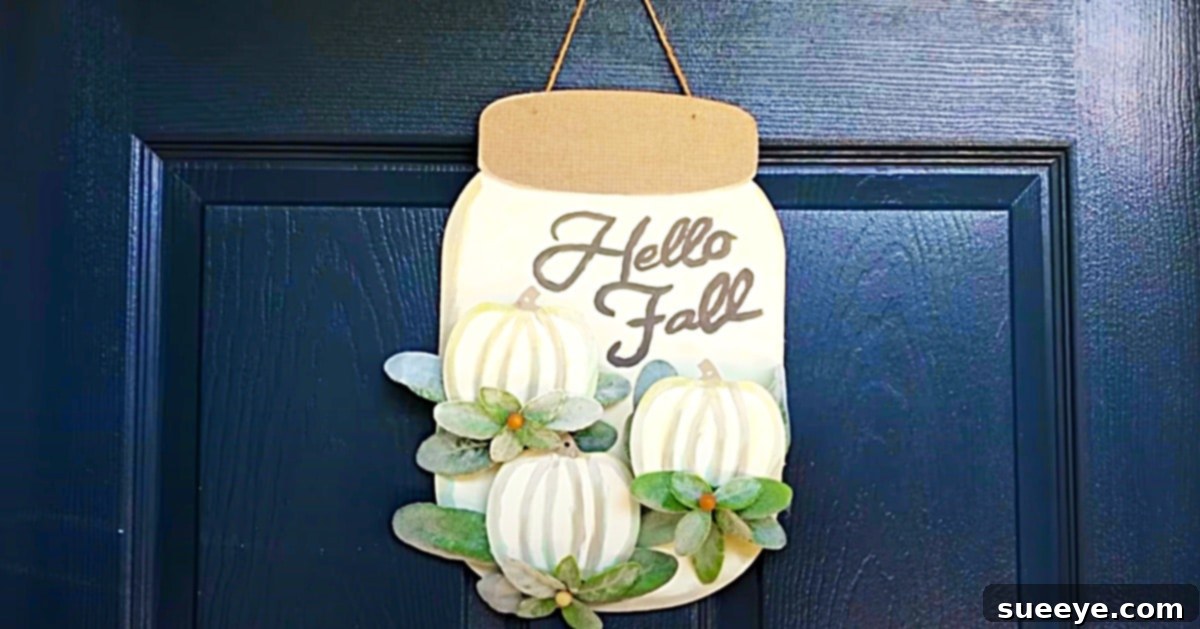
As the leaves begin to change and a crispness fills the air, there’s an undeniable urge to infuse our homes with the warmth and charm of the Autumn season. While searching for fresh and inspiring Fall wreath ideas, I stumbled upon a truly delightful and innovative alternative: a DIY Autumn mason jar sign. This clever craft project, inspired by a captivating video tutorial by My Darling Little Home on YouTube, immediately caught my attention as a perfect replacement for a traditional, often costly, Fall wreath. The concept was simple, charming, and best of all, incredibly budget-friendly, utilizing readily available materials from Dollar Tree.
The moment I saw the tutorial, I knew I had to try it. The appeal of creating something beautiful and seasonal without breaking the bank was irresistible. My excitement led me straight to Dollar Tree, where I was thrilled to find the exact mason jar-shaped sign and all the other essential, inexpensive supplies needed to bring this vision to life. This project promises not just a beautiful piece of decor, but also a rewarding crafting experience that allows you to personalize your home for the Fall season. Join me as we delve into creating this charming Autumn mason jar sign, transforming simple dollar store finds into a captivating piece of seasonal artistry.
Why Choose a DIY Dollar Tree Fall Mason Jar Sign?
In a world where seasonal decor can often come with a hefty price tag, DIY projects offer a refreshing and creative escape. Opting for a handmade Fall mason jar sign, especially one crafted from Dollar Tree finds, presents numerous advantages:
- Budget-Friendly Decor: Significantly reduce your decorating expenses. Most materials can be sourced for just a few dollars, allowing you to achieve a high-end look on a minimal budget.
- Personalized Touch: Unlike mass-produced decor, a DIY sign allows for complete customization. Choose your own colors, add unique embellishments, and truly make it reflect your personal style and home aesthetic.
- Creative Outlet: Engage your artistic side and enjoy the therapeutic process of crafting. It’s a wonderful way to unwind and express your creativity.
- Unique Home Accent: Stand out from traditional Fall decorations. This mason jar sign offers a novel and charming twist on typical door or wall decor, sure to garner compliments.
- Satisfaction of Creation: There’s immense satisfaction in looking at something you’ve made yourself. This project provides a tangible reminder of your crafting efforts and adds a special warmth to your home.
- Versatile Display: While perfect for your front door, this sign can also adorn an entryway, mantel, gallery wall, or even serve as a thoughtful handmade gift.
This project embodies the spirit of Autumn: warm, welcoming, and deeply personal. It’s more than just a craft; it’s an opportunity to create cherished memories and beautiful decor.
Essential Materials for Your Autumn Mason Jar Sign: The Dollar Tree Haul
One of the best aspects of this DIY project is the accessibility and affordability of the materials. Most, if not all, of what you need can be found at your local Dollar Tree, making it an incredibly budget-conscious craft. Here’s a detailed list of what you’ll need, along with some tips for selection:
- Mason Jar Fall-Themed Sign: The star of our project! Dollar Tree often carries various wooden or MDF signs in seasonal shapes. Look for one shaped like a mason jar. These typically come pre-sanded and ready for paint, making your job easier. If you can’t find a mason jar specifically, any simple Fall-themed wooden sign can be adapted.
- Waverly Chalk Paint: This brand is a favorite among crafters for its matte finish and excellent coverage.
- Plaster (or off-white): This will serve as your base coat, providing a clean, neutral canvas. An off-white or cream shade creates a lovely rustic or farmhouse aesthetic.
- Celery: A soft, muted green, perfect for adding subtle foliage details, stems, or a gentle touch of Autumn greenery.
- Mineral: A beautiful cool blue-grey, ideal for adding depth, shadows, or perhaps a unique accent color that complements Fall tones.
- Crystal: A light, airy blue, fantastic for highlight details, a subtle shimmer, or a contrasting element to make other colors pop. Feel free to substitute these accent colors with other Fall shades like burnt orange, deep red, or golden yellow if you prefer.
- Small Wooden Pumpkins: Dollar Tree typically stocks packs of small wooden cutouts, including pumpkins, leaves, or acorns, especially during the Fall season. These will be your primary embellishments. Select a few that vary slightly in size for visual interest.
- A Small Piece of Floral Foam: Often found in the floral section, this can be used to add dimension behind your embellishments, creating a more three-dimensional effect and allowing for easier attachment of elements like faux berries or twigs.
- A Glue Gun and Glue Sticks: An absolute essential for securing all your decorative elements quickly and effectively. Always use caution when operating a hot glue gun.
- A Pair of Scissors: For cutting any ribbons, twine, or other small embellishments you might add.
- A Pair of Small Pliers: Useful for adjusting small wires on faux floral picks, or for manipulating any metal hangers that might come with the sign.
- 3 Sizes of Paintbrushes:
- Large flat brush: For applying the base coat evenly.
- Medium flat or round brush: For painting the wooden pumpkins and larger details.
- Small detail brush: For fine lines, intricate details, and adding subtle accents.
- Optional Embellishments: Consider adding faux leaves, berries, twine, burlap ribbon, or even small acorns to further enhance your design. These can also be found at Dollar Tree.
Having all your materials ready before you start will ensure a smooth and enjoyable crafting process.
Step-by-Step Guide: Crafting Your Autumn Masterpiece
Creating this charming Autumn mason jar sign is a straightforward and enjoyable process. While the original inspiration came from the excellent Autumn mason jar sign video tutorial by My Darling Little Home, here’s a detailed breakdown of the steps, ensuring you can follow along even without the video:
Step 1: Prepare Your Mason Jar Sign
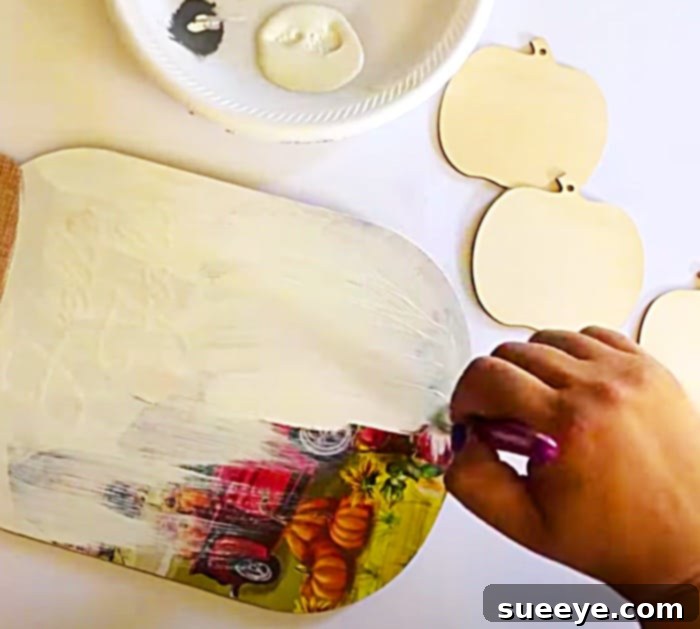
Begin by taking your mason jar-shaped sign from Dollar Tree. Ensure it’s clean and free of any dust or debris. If there are any rough edges, a light sanding can help achieve a smoother finish, though often these signs are ready to paint right out of the package. Set up your workspace in a well-ventilated area, covering your surface to protect it from paint spills.
Step 2: Apply the Base Coat
Using your large paintbrush, apply an even coat of Waverly chalk paint in “Plaster” (or your chosen off-white/cream shade) to the entire surface of the mason jar sign. Chalk paint is known for its excellent coverage, but you may need two thin coats for a perfectly opaque finish. Allow the first coat to dry completely before applying the second. This base layer creates a beautiful, neutral backdrop that will make your Fall-themed decorations pop.
Step 3: Decorate Your Wooden Pumpkins and Embellishments
While your base coat is drying, turn your attention to the small wooden pumpkins. Use your medium paintbrush and your chosen Fall paint colors (like orange, red, or even the “Celery” green for a unique look) to paint these. You can keep them solid colors or add simple details like small stems with a fine brush. Consider painting some of them with a distressed look by applying a thin coat and gently sanding after it dries for a rustic charm. If you have other wooden cutouts like leaves or acorns, paint those as well.
Step 4: Add Decorative Details to the Mason Jar Sign
Once your base coat is fully dry, it’s time to add artistic touches to the mason jar. Using your smaller paintbrushes and the “Celery,” “Mineral,” and “Crystal” Waverly chalk paints, you can create various designs:
- Leaves and Vines: Use “Celery” to paint subtle leaf shapes or swirling vines around the edges or bottom of the mason jar.
- Distressing (Optional): For a vintage or shabby-chic look, gently distress the edges of the sign with a piece of sandpaper after the paint has dried. This reveals a bit of the raw wood underneath, adding character.
- Highlights and Shadows: Use “Crystal” for subtle highlights or “Mineral” for shadows to add depth and dimension to your painted details.
This is where you can truly let your creativity shine! You might also consider stenciling words like “Welcome” or “Autumn” if you have stencils available.
Step 5: Assemble Your Embellishments
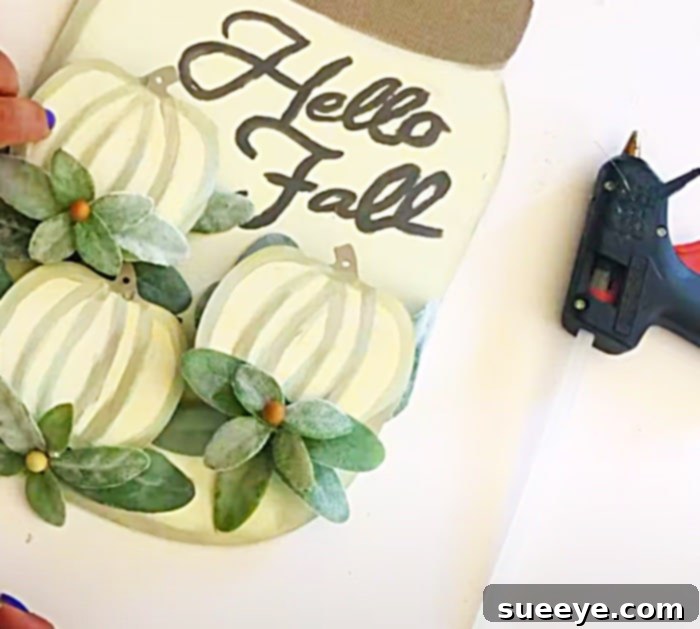
Now it’s time to bring all the elements together. First, decide on the arrangement of your painted wooden pumpkins and any other embellishments (like faux leaves or berries). Play around with different layouts until you find one you love. The small piece of floral foam can be glued to the back of the sign in a strategic spot (e.g., at the bottom or top rim) to create a base for your embellishments, giving them a bit of lift and dimension.
Once you’re happy with the placement, use your hot glue gun to securely attach the wooden pumpkins and other decorative items. Be sure to use enough glue for a firm hold, but not so much that it oozes out. Press each item firmly into place for a few seconds until the glue sets. If you’re adding a bow made from ribbon or twine, now is the time to glue that into position as well.
Step 6: Final Touches and Hanging
Inspect your sign for any areas that need touch-ups or additional details. Once you’re satisfied, your beautiful DIY Autumn mason jar sign is complete! If your sign didn’t come with a hanger, you can easily attach a piece of twine or a wire loop to the back using hot glue or small eye hooks. It’s now ready to adorn your door, wall, or any space that needs a touch of Fall cheer.
Customization and Personalization: Make It Uniquely Yours
The beauty of DIY lies in the ability to infuse your personal style into every project. While the basic steps provide a fantastic foundation, here are numerous ways you can customize your Dollar Tree Fall Mason Jar Sign to truly make it one-of-a-kind:
- Vary Paint Colors: Instead of traditional Fall hues, experiment with a pastel Autumn palette (soft pinks, mint greens, creams), or a bolder, jewel-toned collection (deep emerald, sapphire blue, rich plum) for a more modern look. Metallic accents in gold or copper can also add a touch of elegance.
- Add Text or Stencils: Use stencils and paint to add welcoming phrases like “Happy Fall,” “Gather,” “Blessed,” or your family name. You can also freehand calligraphy if you have a steady hand.
- Alternative Embellishments: Beyond wooden pumpkins, consider incorporating:
- Faux Florals: Small silk sunflowers, mums, or berry sprigs.
- Natural Elements: Small pinecones, acorns, dried leaves (sealed with Mod Podge), or cinnamon sticks for a natural scent.
- Ribbons and Bows: Burlap, plaid, or satin ribbons can add texture and color. Create a simple bow for the top or bottom of the sign.
- Twine and Jute: Wrap twine around the “neck” of the mason jar for a rustic feel.
- Glitter or Sparkle: A touch of glitter on the pumpkins or leaves can add a festive shimmer.
- Small Bells: Tiny rustic bells for a subtle jingle when the door opens.
- Distressing Techniques: For a true farmhouse or vintage look, after painting, gently sand the edges and raised areas of the sign to reveal the wood underneath. You can also use a dark wax to antique the paint.
- Layering: Use the floral foam or small wooden blocks behind some elements to create a more layered, dimensional effect.
- Theme Variations: While Fall-focused, you could easily adapt this idea for other seasons or holidays, simply by changing the colors and embellishments (e.g., snowflakes and evergreens for winter, spring flowers for spring).
Don’t be afraid to experiment! The goal is to create a piece that brings you joy and enhances your home’s seasonal ambiance.
Displaying and Caring for Your Fall Creation
Once your beautiful DIY Dollar Tree Fall Mason Jar Sign is complete, it’s time to find the perfect spot for it. While it makes a fantastic wreath alternative for your front door, its versatility allows for many other display options:
- Front Door Welcome: The most popular choice! It instantly adds curb appeal and a warm welcome to guests.
- Entryway or Foyer: Hang it on a wall hook in your entryway to greet visitors as they step inside.
- Living Room Mantel: Place it prominently on your fireplace mantel, perhaps nestled among other Fall decor like candles, gourds, or small potted plants.
- Gallery Wall Accent: Integrate it into a larger gallery wall arrangement, adding a seasonal touch to your collection of art and photos.
- Kitchen or Dining Area: A charming addition to a kitchen wall, especially if your home has a farmhouse or rustic decor style.
- Covered Porch or Patio: If your porch is covered and protected from direct elements, it can be a lovely addition to your outdoor Fall display.
- Thoughtful Gift: Handmade gifts are always cherished. This sign makes a wonderful hostess gift, housewarming present, or a thoughtful gesture for a friend or family member who loves Fall.
Care and Maintenance:
To ensure your sign lasts for many Fall seasons to come, a little care goes a long way:
- Indoor Use Recommended: While the sign can withstand some exposure, direct and prolonged exposure to harsh weather (rain, intense sun, heavy winds) can cause paint to fade, wood to warp, or embellishments to loosen. If displaying outdoors, a covered porch is ideal.
- Sealant (Optional): For added durability, especially if you anticipate outdoor exposure, consider spraying your finished sign with a clear matte or satin sealant (like Mod Podge Acrylic Sealer) after all paint and glue have dried completely. This protects the paint from moisture and UV damage.
- Gentle Cleaning: If dusty, simply wipe your sign gently with a dry, soft cloth. Avoid harsh chemicals or abrasive cleaners.
- Storage: When the Fall season ends, store your sign in a dry, temperate place, wrapped in tissue paper or bubble wrap to protect it from dust and damage until next year.
By following these simple care tips, your DIY Dollar Tree Fall Mason Jar Sign will remain a cherished part of your Autumn decor tradition for years.
Embrace the Autumn Spirit with DIY Decor!
There’s an undeniable magic that comes with crafting something beautiful with your own hands, especially when it transforms simple, affordable materials into a stunning piece of seasonal decor. The journey of creating this Dollar Tree Fall Mason Jar Sign, from gathering the inexpensive supplies to meticulously painting and assembling each element, is incredibly rewarding. I can personally attest to the joy it brings; this adorable sign looks absolutely charming on my door, radiating warmth and welcoming vibes throughout the Fall season.
In fact, my enthusiasm for Autumn DIY ideas is so strong that I’m already contemplating moving this sign to my back door to make room for an even grander wreath on the front, purely because I can’t get enough of Fall decorating! This project isn’t just about saving money; it’s about investing your time and creativity into something that truly makes your house feel like a home. It’s a testament to how simple dollar store finds, coupled with a dash of imagination, can elevate your seasonal decor to new heights. So, gather your materials, unleash your inner artist, and get ready to create a Fall masterpiece that you’ll be proud to display. Happy crafting, and happy Autumn!