
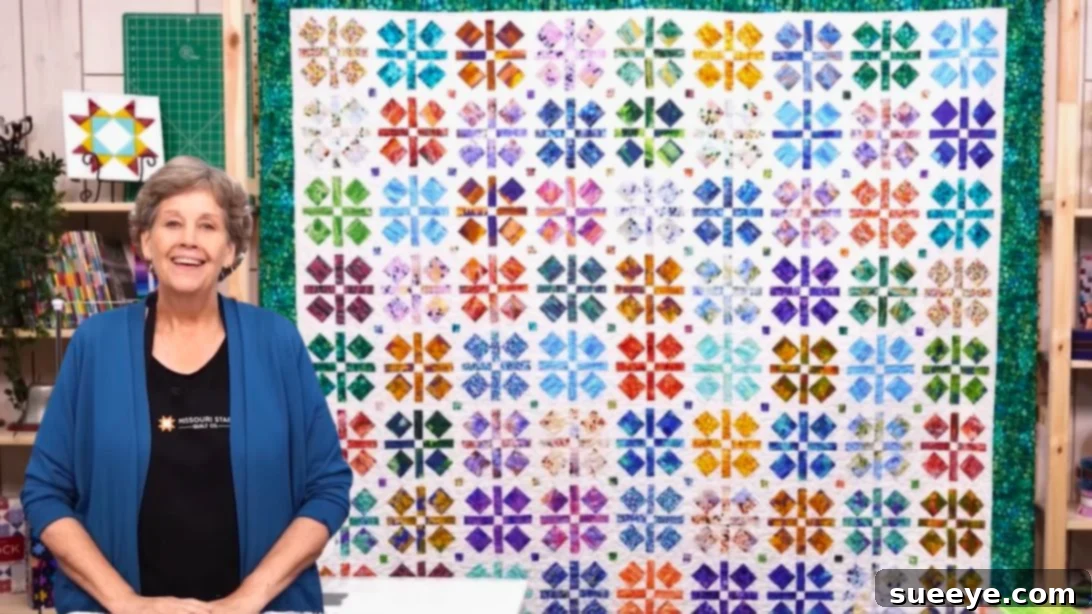
There’s an undeniable charm in traditional quilting patterns, and the Grandma Mae’s Economy Quilt block is a perfect example of timeless beauty and playful design. Also affectionately known as the Garden of Eden quilt, this classic economy block offers a delightful journey into the world of patchwork. Made popular by experts like Missouri Star Quilt Company, this design is renowned for its straightforward construction and visually stunning results. Whether you’re a seasoned quilter or just embarking on your first sewing adventure, this project promises satisfaction and a beautiful finished piece that you’ll cherish for years to come.
The beauty of the Economy Block lies in its simplicity and versatility. It’s fundamentally a “square-in-a-square” design, where fabric pieces are added around a central square to expand its size and create intriguing patterns. This method not only makes the block relatively quick to assemble but also allows for endless creative possibilities through fabric selection. Its approachable nature makes it an ideal project for beginners, providing a solid foundation in essential quilting techniques without overwhelming complexity. Follow along, and you’ll soon discover the joy of creating this captivating quilt block yourself.
Why Choose the Grandma Mae’s Economy Quilt for Your Next Project?
The Grandma Mae’s Economy Quilt pattern stands out for several compelling reasons. Firstly, its design, often referred to as the Garden of Eden quilt, evokes a sense of vintage charm while remaining incredibly modern and adaptable. The playful arrangement of squares and triangles creates a dynamic visual texture that can be as vibrant or as subdued as your fabric choices dictate. Secondly, it’s an exceptionally beginner-friendly pattern. The steps are logical, repetitive, and build confidence with each completed block. You’ll master crucial skills like accurate cutting, precise piecing, and effective pressing – all fundamental to successful quilting. Finally, the rapid assembly of these blocks means you’ll see your quilt top come together quickly, offering immediate gratification and motivating you to complete your masterpiece.
RELATED QUILTING INSPIRATION:
- Easy Double Tulip Quilt Block Tutorial
- Stackabond Quilt In A Day Tutorial
- X Plus Block Quilt Tutorial
- Easy Squeeze the Day Quilt Tutorial
Understanding the Economy Block Construction
At its core, the Economy Block is a simplified form of a square-in-a-square block. You begin with a central square, typically a vibrant print, and then add triangles to each side, creating a larger square. This process is repeated with another set of fabric pieces, often background fabric, to frame the initial design. The magic happens as these layered squares come together, forming a visually appealing block that appears more complex than it truly is. For this particular Grandma Mae’s version, the process involves cutting specific squares and rectangles from a jelly roll, adding small background fabric triangles to four primary squares, and then assembling these “quadrant” squares around a central background square. This method streamlines the process, ensuring consistent and beautiful results every time.
Essential Materials for Your Grandma Mae’s Economy Quilt
Gathering your materials is the first exciting step in any quilting project. For the Grandma Mae’s Economy Quilt, the fabric choices play a crucial role in defining the overall aesthetic. Using a jelly roll provides a curated collection of coordinating prints, simplifying the fabric selection process and ensuring a cohesive look. Here’s a detailed list of what you’ll need to create this charming quilt:
- 1 roll of 2 1/2″ print strips: Also known as a jelly roll, these pre-cut strips are perfect for adding a variety of patterns and colors to your quilt. Opt for a roll with fabrics that inspire you, considering how they will interact when cut into smaller squares and rectangles.
- 1 pack of 10″ background squares: These pre-cut squares, often called “layer cakes,” will be vital for creating your background triangles and potentially your central squares. Choosing a solid, low-volume, or tone-on-tone fabric for your background will allow your print strips to truly pop and define the block’s structure.
- 1 1/2 yards of sashing and inner border fabric: Sashing strips separate your quilt blocks, adding definition and visual breathing room. An inner border provides a frame for the pieced quilt center, connecting the blocks before the main outer border. Ensure this fabric complements both your print strips and background.
- 1 1/4 yards of outer border fabric: The outer border gives your quilt a finished, polished look and can be used to either subtly frame or dramatically accent your design. Consider a fabric that ties all your colors together or introduces a bold contrast.
- 3/4 yard of binding fabric: Binding is the narrow strip of fabric that finishes the edges of your quilt, encasing the raw edges and protecting them. It can be a vibrant accent or a harmonious blend with your other fabrics.
- Backing fabric: The fabric for the back of your quilt. The amount needed will depend on the final size of your quilt top. Choose something soft and coordinating for comfort and aesthetics.
- Batting: The middle layer of your quilt, providing warmth, loft, and structure. Common types include cotton, polyester, or a blend. The size will match your quilt top.
How to Make the Grandma Mae’s Economy Quilt: A Step-by-Step Guide
Creating your Grandma Mae’s Economy Quilt block is a rewarding process that combines precision with creativity. Follow these detailed steps to bring your beautiful block to life:
Step 1: Precision Cutting of Print Strips
Begin by carefully cutting your 2 1/2″ print strips from your jelly roll. From each strip, you will need to cut 8 pieces of 2 1/2″ square and 8 pieces of 1 1/4″ by 3 1/2″ rectangle. Accuracy in this initial cutting stage is paramount for a perfectly pieced quilt, so use a sharp rotary cutter, a clear quilting ruler, and a self-healing mat. Take your time, squaring up your strips before cutting to ensure all pieces are uniform. Keep any excess fabric; it will be used later for cornerstones and sashing, minimizing waste and adding to the cohesive design of your quilt.
Step 2: Preparing Background Triangles
Next, focus on your background squares. From your 10″ background squares, cut 2 1/2″ squares. Once you have these, cut each 2 1/2″ square in half diagonally. This will yield two triangles from each square. These triangles will form the crucial “economy” element of your block, creating the illusion of squares set on point. Again, precision is key; a straight diagonal cut will ensure your triangles fit perfectly when sewn.
Step 3: Assembling the Quadrant Units
Now it’s time to bring your print squares and background triangles together. Take one of your 2 1/2″ printed squares. Carefully sew one background triangle onto each of the four sides of the square. It’s essential to ensure the triangles are centered along each side, leaving a small “dog ear” of excess fabric at the corners (these will be trimmed later). Use a consistent 1/4″ seam allowance, a standard in quilting, for all your seams. Once sewn, press the seams flat. You can press them open or to one side, depending on your preference and how it minimizes bulk. After pressing, use a square ruler to trim these units down to 3 1/2″ squares. This squaring-up process is critical for achieving perfectly sized blocks that will fit together seamlessly in your quilt top.
Step 4: Block Assembly and Finishing Touches
With your quadrant units complete, it’s time to assemble the full Grandma Mae’s Economy Quilt block. Arrange your four newly created 3 1/2″ quadrant squares around a central white square. This central square should measure 1 1/4″ and will also be cut from your background fabric. Refer to the photo below for the correct arrangement. Once you are satisfied with the layout, begin sewing them together in rows. Sew the three squares for the top row, then the three for the middle row (including your central background square), and finally the three for the bottom row. After pressing these row seams, sew the rows together to complete your block. Pay attention to nesting your seams where possible to reduce bulk and ensure your points align beautifully. Press the finished block one last time to ensure it lays perfectly flat.
Maximizing Fabric Use: Leftover Pieces for Sashing and Cornerstones
Don’t let those leftover fabric scraps go to waste! From your remaining background fabric, cut 1 1/4″ squares. These will serve as charming cornerstones, which are small squares used at the intersections of sashing strips. Additionally, cut 1 1/4″ by 7″ strips from your background fabric. These are your sashing strips, designed to separate your finished Economy Quilt blocks, adding structure and often a visual “frame” between each block. Using these leftover pieces not only promotes efficient fabric use but also adds an extra layer of design continuity to your final quilt.
Tips for Quilting Success with the Economy Block
- Precision is Paramount: Take your time with cutting and sewing. Even a slight inaccuracy can compound over multiple blocks, leading to a wavy quilt. Invest in good quality rulers and a sharp rotary blade.
- Consistent Seam Allowance: A perfect 1/4″ seam allowance is the cornerstone of accurate patchwork. Practice on scrap fabric if needed, and consider using a 1/4″ presser foot on your sewing machine.
- Pressing Matters: Pressing seams after each step, rather than ironing, is crucial for flat, crisp blocks. Experiment with pressing seams open or to one side to find what works best for reducing bulk and maintaining flatness.
- Squaring Up: Don’t skip the squaring-up step after attaching your triangles. This ensures all your units are the exact same size, which is vital for blocks to fit together without stretching or puckering.
- Chain Piecing: For efficiency, especially when making multiple blocks, try chain piecing. This involves sewing pieces continuously without cutting threads between units, saving time and thread.
- Embrace the Journey: Quilting is a journey of learning and creativity. Don’t be discouraged by small imperfections; they often add character to a handmade item. Enjoy the process of bringing your Grandma Mae’s Economy Quilt to life!
Grandma Mae’s Economy Quilt Block With Jenny Doan and Beyond
The original tutorial for this delightful Grandma Mae’s Economy Quilt Block, often presented by the ever-inspiring Jenny Doan of Missouri Star Quilt Company, demystifies the process with her approachable teaching style. Her guidance makes complex-looking blocks accessible to everyone. Once you master this individual block, the real fun begins! You can create a stunning full-sized quilt by making multiple blocks and arranging them in various layouts. Consider a straight set for a classic look, or rotate alternating blocks for a more dynamic pattern. The addition of sashing and cornerstones, as discussed in Step 4, will help frame each block beautifully and add an extra layer of design sophistication to your finished quilt top.
After your quilt top is assembled, you’ll move on to the quilting phase, which involves layering your quilt top with batting and a backing fabric, then stitching through all three layers. Finally, you’ll add the binding to create a durable and attractive finish. Each step in the quilting process is an opportunity for creative expression, and with the foundational skills you’ve gained from making the Grandma Mae’s Economy Quilt block, you’ll be well-prepared for many more wonderful quilting adventures.
Embrace the tradition, enjoy the process, and delight in the beautiful heirloom you’ll create with the timeless Grandma Mae’s Economy Quilt pattern. Happy quilting!