
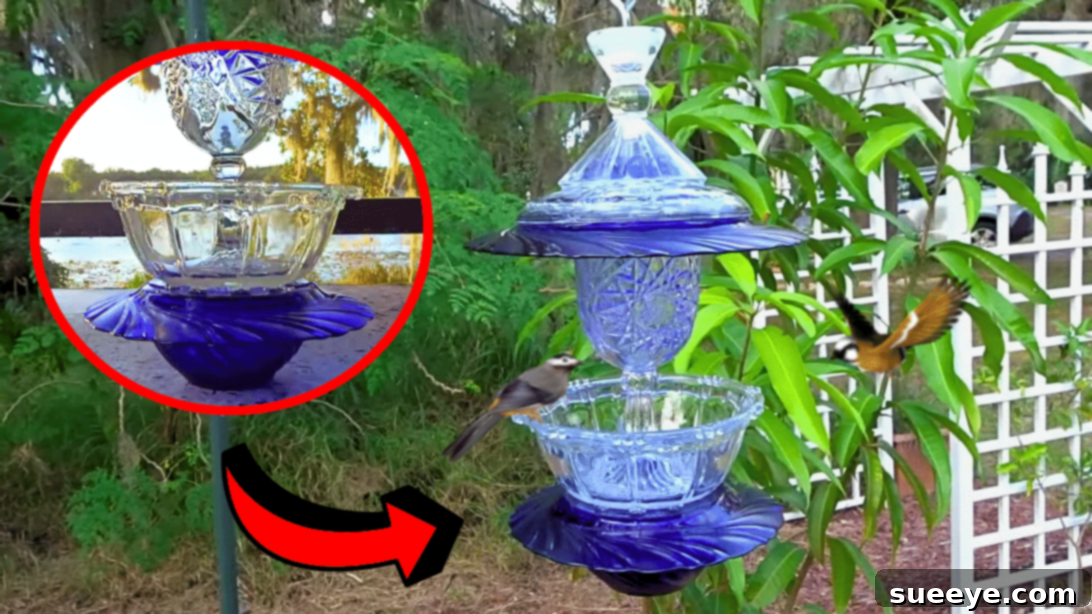
Transforming forgotten treasures into functional art is a deeply satisfying endeavor, and this brilliant project idea by My Little Slice of Paradise on YouTube stands out as one of the most inspired DIY crafts for home and garden enthusiasts. It’s an incredibly simple concept, yet remarkably practical, leveraging readily available materials. You can easily source these items from your local thrift store, or perhaps rediscover some forgotten glassware tucked away in your own storage. This approach not only saves money but also gives beautiful, pre-loved items a new lease on life, promoting a sustainable crafting lifestyle.
RELATED: Easy Repurposed DIY Lamp Bird Bath Tutorial
What truly elevates this project is the immense creative freedom it offers. You’re not just following a rigid tutorial; you’re invited to infuse your unique style into every bird feeder. Imagine crafting a vibrant masterpiece by combining glassware of different colors, textures, and designs. Let your imagination soar, creating a truly personalized outdoor accent that reflects your taste and attracts feathered friends to your yard.
Why Create a DIY Glassware Bird Feeder?
Diving into a DIY project like crafting a glassware bird feeder offers a plethora of benefits beyond just having a new garden accessory. Firstly, it’s an incredibly eco-friendly endeavor. By repurposing old glassware, you’re diverting items from landfills and embracing the principles of reduce, reuse, and recycle. This sustainable approach not only helps the environment but also adds a unique, upcycled charm to your outdoor space.
Secondly, these feeders are wonderfully cost-effective. Instead of buying expensive, mass-produced feeders, you can create a stunning, one-of-a-kind piece for a fraction of the price. Thrift stores are treasure troves for inexpensive and beautiful glassware, making this project accessible to almost any budget. It’s a fantastic way to stretch your crafting dollars while producing something truly special.
Furthermore, a handmade bird feeder becomes a delightful focal point in any garden or patio. Its unique design, often sparkling in the sunlight, adds a touch of whimsical elegance that store-bought items simply can’t replicate. Each piece of glassware tells its own story, culminating in a finished product that is rich in character and personal charm. Attracting local birdlife also brings a sense of serenity and natural beauty to your surroundings, allowing you to observe and appreciate nature right from your home.
Finally, the crafting process itself can be incredibly therapeutic. It provides a creative outlet, allowing you to relax, focus, and enjoy the satisfaction of building something beautiful with your own hands. This project is perfect for beginners, offering a straightforward yet rewarding experience that culminates in a durable and charming addition to your outdoor decor.
Essential Materials for Your Unique DIY Glassware Bird Feeder:
- Thrift Store Glassware: Assorted pieces such as bowls, plates, vases, candle holders, and even teacups. Look for varying sizes and shapes to create visual interest and multiple tiers.
- Gorilla Epoxy: Or another strong, waterproof adhesive specifically designed for glass. This is crucial for creating a durable and long-lasting bond that can withstand outdoor elements.
- Glass Beads or Marbles: Optional, but highly recommended for adding decorative flair and extra weight/stability to the feeder’s base or within certain sections.
- Strong Metal Hook: Essential for hanging your completed bird feeder securely. Choose one appropriate for the potential weight of the feeder once filled with birdseed.
- Cleaning Supplies: Soap, water, and a cloth to thoroughly clean all glassware before assembly.
Step-by-Step Guide: How to Craft a DIY Glassware Bird Feeder:
Step 1: Plan Your Design and Layout
Before you even think about adhesive, the most critical first step is to thoroughly plan the assembly of your glassware pieces. Lay out all your thrift store finds on a flat surface. Experiment with different arrangements to determine which pieces will serve as the base, the supporting stands, and the various tiers for holding birdseed. Consider the overall height, balance, and aesthetic appeal. Identify which bowls will form the primary seed trays and how you can create multiple levels for different types of birds or seeds. This pre-assembly visualization helps prevent mistakes and ensures a harmonious final product. Also, take this time to thoroughly clean all your glassware, removing any dust, dirt, or labels, as a clean surface ensures optimal epoxy adhesion.
Step 2: Assemble Your Feeder in Manageable Sections
Once your design is finalized, begin grouping your glassware into smaller, manageable sections. For example, you might create a sturdy base section first, then a middle support section, and finally the top feeder bowl. Apply a small, even amount of Gorilla epoxy (or your chosen glass adhesive) to the contact points between the pieces. Press them firmly together, holding them in place for a few moments as the epoxy begins to set. If you’ve chosen to include glass beads or marbles for added decoration or weight, carefully place them inside any hollow glassware sections during this step. Working in sections is crucial for stability and allows each bond to strengthen before adding more weight.
Step 3: Allow for Thorough Drying Between Layers
Patience is paramount in this step. After assembling each section, it is absolutely vital to leave them undisturbed to dry completely. Depending on the type of epoxy you’re using, this could take anywhere from a couple of hours to overnight. Refer to the adhesive’s instructions for precise drying times. Resisting the urge to rush this process will prevent your bird feeder from falling apart later. Once a section is fully cured and stable, you can then proceed to adhere the next set of pieces. Continue this process of assembling small segments and allowing them to dry, building your bird feeder layer by layer, ensuring each bond is strong and secure.
Step 4: Final Assembly, Hook Attachment, and Hanging
With all your individual sections dried and solidified, it’s time to connect them to form the complete bird feeder. Carefully apply epoxy to the joining surfaces and gently bring the sections together, ensuring they are aligned and stable. Again, allow ample drying time for these larger connections. The final, crucial step is attaching the hanging hook to the very top piece of your feeder. Apply a generous amount of epoxy around the base of the hook where it meets the glass, ensuring it’s centered and deeply embedded. This strong bond is essential to hold the entire weight of the bird feeder, especially when it’s filled with seed and potentially visited by multiple birds. Once the epoxy is completely dry and cured – often a full 24-48 hours for maximum strength – your beautiful, custom-made glassware bird feeder is ready to be hung anywhere you desire in your garden, patio, or backyard.
Customization Tips for Your Glassware Bird Feeder
The beauty of this DIY project lies in its adaptability. Don’t feel constrained by the examples you see; instead, let them inspire your own unique creation. Consider using various types of glassware beyond basic bowls and plates. Vases can form elegant central pillars, while vintage candle holders can create intricate bases or decorative elements. Explore different color palettes by selecting colored glass, or even apply specialized glass paints to add patterns and details. You could incorporate small mirrors, stained glass fragments, or even attach small solar-powered lights to make your feeder glow softly at night, adding an enchanting ambiance to your garden.
Sourcing and Selecting Thrift Store Glassware
When embarking on your thrifting adventure, keep an open mind and an eye for quality. Look for sturdy, chip-free pieces that can withstand outdoor conditions. Consider how different shapes and sizes will stack and balance. Sometimes, a mismatched set can create the most interesting and eclectic design. Don’t be afraid to mix and match styles – a vintage etched plate combined with a modern minimalist bowl can create a captivating contrast. Always prioritize functionality and stability; the feeder needs to be strong enough to hold seed and accommodate visiting birds comfortably.
Care and Maintenance for Your DIY Bird Feeder
To ensure your glassware bird feeder remains a beloved feature in your garden for years to come, regular care and maintenance are key. Periodically, especially during periods of heavy use or after rain, check the feeder for any signs of wear or loosening of the adhesive. While Gorilla epoxy is strong, extreme temperature fluctuations can sometimes affect bonds over a long period. Cleaning your bird feeder regularly is crucial for the health of your feathered visitors. Empty out old seed, scrub the glass surfaces with warm soapy water (using a mild, bird-safe soap), and rinse thoroughly before refilling. This prevents mold and bacterial growth, keeping the feeder hygienic for local wildlife. Offering a variety of high-quality birdseed will also attract a wider array of bird species to enjoy your beautiful, handcrafted feeder.
*All these amazing images are thanks to My Little Slice of Paradise via YouTube. Do visit her channel to see more inspiring projects like this!
Create Your Own Thrift Store Glassware Bird Feeder Today!
Embrace your creative side and bring a touch of unique charm to your outdoor space with this delightful DIY project. A handmade glassware bird feeder is more than just a functional item; it’s a statement of personal style, a nod to sustainability, and a welcoming beacon for the vibrant birdlife in your area. Start gathering your thrift store treasures today and enjoy the rewarding process of crafting something truly beautiful and enduring.