
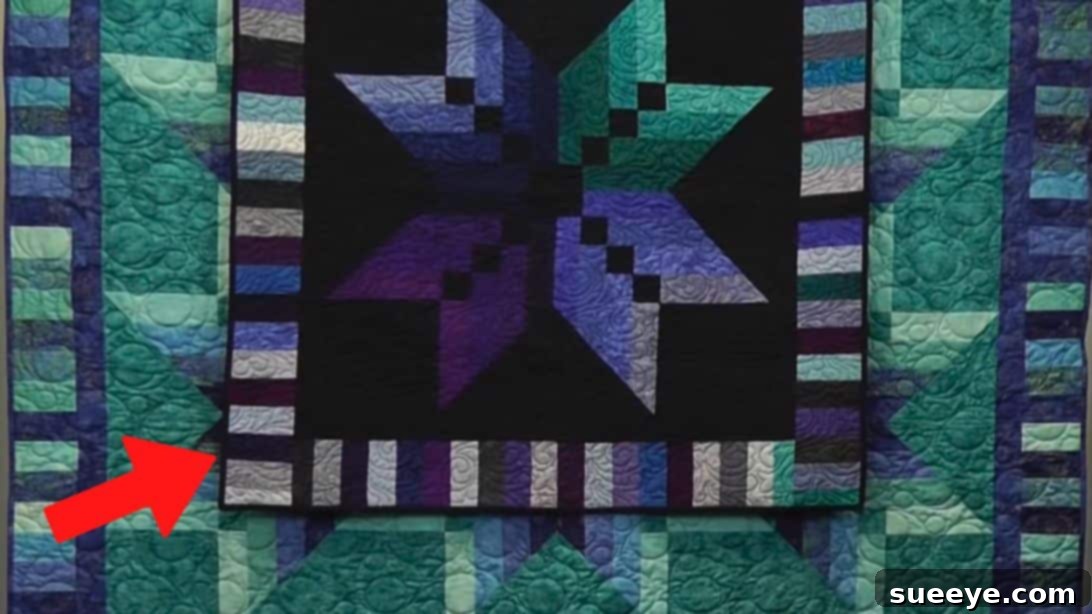
Craft a Stunning Binding Tool Star Quilt: An Easy Step-by-Step Guide
Welcome, fellow quilters, to an exciting journey into creating a dazzling star quilt! If you’re searching for a project that delivers spectacular results without overwhelming complexity, the Binding Tool Star Quilt is your perfect match. This ingenious design, popularized by quilting experts like Missouri Star, leverages a specialized binding tool template to simplify intricate cuts, transforming what might seem like a daunting star pattern into an accessible and enjoyable sewing experience. Whether you’re a seasoned quilter looking for a quick and satisfying project or a confident beginner ready to expand your skills, this tutorial will guide you through every seam and stitch. We’ll explore how to construct two distinct star designs from the same basic blocks: a magnificent central star that radiates outwards, or a dynamic pattern featuring multiple star points. Get ready to unlock the magic of your binding tool and create a quilt that will surely become a cherished heirloom.
Unveiling the Appeal of the Binding Tool Star Quilt
The Binding Tool Star Quilt stands out for several compelling reasons. Firstly, its design versatility is remarkable. By simply rearranging the orientation of your finished blocks, you can achieve dramatically different visual effects – from a grand, singular star dominating the center of your quilt to a more abstract, multi-pointed constellation. This flexibility makes it an excellent pattern to revisit, as each iteration can feel fresh and unique. Secondly, the reliance on a binding tool template streamlines the cutting process significantly. This tool ensures precision and consistency, which are crucial for achieving crisp, well-defined star points. It eliminates the need for complex angle calculations, allowing you to focus more on fabric selection and the joy of piecing. Lastly, this quilt pattern is incredibly stash-friendly. It’s an ideal project for utilizing leftover jelly roll strips or other fabric scraps, making it not only economical but also a fantastic way to celebrate a diverse palette of fabrics.
Essential Materials for Your Star Quilt Journey
Before we dive into the creative process, gathering all your materials is key. Precise measurements and quality fabrics will ensure your quilt top comes together beautifully and withstands the test of time. Here’s what you’ll need:
- Binding Tool Template: This specialized ruler is the cornerstone of this project. It simplifies the cutting of specific angled shapes needed for your star points, ensuring accuracy and saving you time.
- 1 Yard of Background Fabric: Choose a high-quality quilting cotton that contrasts well with your strip fabrics. This fabric will form the foundation of your blocks and highlight the star design. A light solid or subtle tone-on-tone print often works best.
- 20 Pieces of 2 1/2-Inch Strips: These are typically referred to as “jelly roll strips.” You’ll want a variety of colors and patterns to create a dynamic and visually interesting star. Fat quarter bundles or even carefully cut scraps can also be used if you don’t have a jelly roll on hand. Ensure your strips are pre-cut to 2 1/2 inches wide and are at least 42 inches long (standard width of fabric).
Tips for Fabric Selection: When choosing your fabrics, consider the overall aesthetic you want to achieve. High-contrast strips against a solid background will create a bold, striking star. A more monochromatic palette with subtle shifts in tone can result in a softer, more blended star effect. Don’t be afraid to experiment with different combinations!
Step-by-Step Instructions: Crafting Your Binding Tool Star Quilt
Now, let’s embark on the detailed instructions to bring your Binding Tool Star Quilt to life. Accuracy in cutting and pressing at each stage will contribute significantly to the final, polished look of your quilt.
Step 1: Preparing Your Background Fabric Pieces
The foundation of each quadrant of your star block begins with precise cuts of your background fabric. For each individual quadrant you intend to make (you will need four in total for a full star), gather the following background pieces:
- One 8 1/2-inch square: This will serve as the central anchor for the strip piecing within each quadrant.
- Four 2 1/2-inch squares: These small squares will be strategically placed at the ends of some of your colored strips, helping to shape the inner points of the star.
- One 8 7/8-inch square: This square is crucial for creating the corner triangles of your quadrant. Carefully cut this square in half diagonally once to yield two identical large triangles. These triangles will be added later to square up your block.
Pro Tip: Use a sharp rotary cutter and a reliable quilting ruler for all your cuts. Precision here will make subsequent steps much easier and ensure your star points align perfectly.
Step 2: Mastering the Binding Tool for Strip Preparation
This step is where your binding tool truly shines, enabling you to cut your colored strips efficiently and with the correct angles for your star points. You’ll be preparing pairs of strips that will radiate in opposite directions.
- From your collection of 2 1/2-inch precut strips, select four pairs of colors or prints that you wish to have together. These will form the distinctive rays of your star.
- Take one strip from a pair and leave it folded (as it often comes in a jelly roll, or fold it lengthwise). Lay your binding tool along one edge of the folded strip.
- Align the tool’s edge with the fabric, ensuring you have enough fabric to cut cleanly. Trim off the selvage edge if present, then make your first cut precisely along the diagonal edge of the binding tool.
- Repeat this process with the remaining strips. When unfolded, each cut will yield two mirror-image pieces that angle in opposite directions. This is critical for the balanced look of your star points.
- The leftover rectangular pieces from these cuts are not waste! Save them, as they will be creatively pieced together to form a beautiful “piano key” border later in the project. This efficient use of fabric minimizes waste and adds another layer of detail to your quilt.
Cutting Accuracy: Always double-check your alignment with the binding tool. Slight variations in angle can accumulate and affect the final shape of your star points.
Step 3: Attaching Small Background Squares to Strips
Now that your strips are cut with the perfect angles, it’s time to begin assembling the individual components of your quadrants.
- Separate your prepared strip pairs into two distinct stacks based on the direction of their angle.
- From one set of strips (e.g., those angled to the left), take each strip and sew one of the 2 1/2-inch background squares (prepared in Step 1) to the wider, straight end of the strip. Use a precise 1/4-inch seam allowance.
- Once sewn, press each unit flat. You can choose to press your seams open for a flatter finish, or press them towards the darker fabric (the strip) to hide any potential shadowing. Consistency in your pressing direction throughout the quilt is recommended.
These small background squares are vital as they will define the inner “negative space” and sharp points where your star arms meet the center of your block.
Step 4: Beginning the Strip Assembly for Each Quadrant
With your initial strip units ready, it’s time to start building out the sides of your 8 1/2-inch background block.
- Take one of the strip units you just created (a colored strip with a 2 1/2-inch background square attached).
- Align its raw edge with one side of your 8 1/2-inch background square. Pin if necessary to ensure it doesn’t shift.
- Sew this strip unit to the side of the 8 1/2-inch background block using a 1/4-inch seam allowance.
- Press the seam flat, again maintaining consistency in your pressing direction.
- Now, take a matching strip unit from your *other* pile (the one with strips angled in the opposite direction). Sew this second strip unit to the opposite side of the 8 1/2-inch background block.
- Press this seam flat as well. You will now see the beginnings of the star’s radiant points emerging from the central background square.
Maintaining Alignment: When sewing multiple pieces, chain piecing can be a great time-saver, but for accuracy, take your time to align each piece carefully before stitching.
Step 5: Continuing to Add Strips to Form the Quadrant
You’ll continue to add the remaining strip units to your background block, mimicking the process from Step 4. Think of it as building outwards, alternating sides to keep the block balanced.
- Keep adding the other prepared strip pieces, attaching them to the remaining two sides of your 8 1/2-inch background square. Ensure you are using the correct angled strips from your two piles to maintain the radiating star effect.
- After sewing each strip, remember to press your seams flat. This continuous pressing is essential for keeping your block square and preventing bulkiness at the seam intersections.
- By the end of this step, your 8 1/2-inch background square will be framed on all four sides by your angled, colorful strip units, beginning to resemble the intricate pattern of a star point.
Step 6: Squaring Up Your Quadrant with Background Triangles
At this point, your block will not yet be a perfect square due to the angled strips. The large background triangles you prepared in Step 1 will complete the quadrant.
- Take the two large background triangles (cut from the 8 7/8-inch square).
- Align one triangle with one of the straight edges of your pieced unit, ensuring the hypotenuse (the longest side) of the triangle extends along the outer, angled edge of your pieced strips.
- Sew the triangle to the side of your block. It will slightly hang off the edge on either end – this is expected and part of the design process.
- Repeat this process with the second background triangle on the opposite side.
- Once both triangles are sewn, carefully press these new seams flat.
- Now, using a large quilting ruler and rotary cutter, trim the entire block into a perfect 16-inch square. Be mindful of your seam allowances and ensure that your star points remain intact and properly centered within this 16-inch dimension.
Congratulations! You have now completed one full quadrant of your Binding Tool Star Quilt. This precisely trimmed 16-inch block is the building block for your entire quilt top.
Step 7: Assembling the Full Star from Four Quadrants
The beauty of this pattern lies in the repetition and strategic placement of your quadrants. To form the magnificent star, you will need four identical quadrant blocks.
- Repeat Steps 1 through 6 three more times, creating a total of four 16-inch star quadrants. Consistency in your cutting and sewing will ensure they fit together seamlessly.
- Once you have all four quadrants, lay them out on a design wall or a flat surface. Experiment with different orientations until you achieve your desired star effect.
- For a large, central star: Arrange the quadrants so their inner star points meet in the center, forming a cohesive, radiant star.
- For a more dynamic, multi-point design: Rotate some of the quadrants to create interesting intersections and a more abstract overall pattern.
- Once satisfied with your layout, sew the four quadrants together, just like you would assemble a traditional four-patch block. Carefully match your seams where the blocks meet in the center to create a crisp, aligned star point. Pinning extensively at these intersections is highly recommended.
- Press all seams meticulously. This “giant four-patch” now forms the impressive center of your Binding Tool Star Quilt.
The transformation from individual quadrants to a cohesive star is truly magical to behold!
Step 8: Adding a Framing Inner Border
A simple border can dramatically enhance the appearance of your central star block, providing a visual break and preparing the quilt top for the final outer border.
- Cut four strips of background fabric (or a contrasting fabric if you prefer) measuring 2 1/2 inches wide and the appropriate length to fit each side of your assembled star center. The length will be 32 inches if your quadrants are 16 inches and you’ve sewn them into a 32×32 inch center.
- Sew two of these 2 1/2-inch strips to opposite sides of your star block. Press the seams.
- Then, sew the remaining two 2 1/2-inch strips to the remaining two sides. Make sure to measure the length of these strips after the first two sides are added to ensure a perfect fit. Press the seams again.
This inner border frames your star, giving it a polished and finished look before the final decorative border is added.
Step 9: Crafting the Whimsical Piano Key Border
This final border utilizes the leftover pieces from Step 2, adding a charming and eco-friendly touch to your quilt.
- Gather all the leftover rectangular pieces from when you cut your angled strips using the binding tool.
- Trim these pieces uniformly to a consistent width (e.g., 2 1/2 inches wide if they aren’t already) and a consistent length, such as 5 inches. The “5 inches” refers to the desired length of each individual “key” in your border, but you can adjust this based on your preference and the size of your leftover scraps. Consistency is key here.
- Begin sewing these trimmed pieces together end-to-end, alternating different colors and patterns to create a vibrant “piano key” effect. Create long strips of these pieced units.
- Measure the perimeter of your quilt top (including the inner border added in Step 8). Cut your piano key strips to the required lengths for each side of the quilt.
- Sew these piano key borders to your quilt top, attaching the side borders first, then the top and bottom borders. Carefully match seams and press flat.
The piano key border is a wonderful way to incorporate more of your chosen fabrics and adds a delightful, playful element to your finished quilt top.
Design Variations and Further Inspiration
The beauty of the Binding Tool Star Quilt lies not just in its ease of construction but also in its adaptability. Once you master the basic block, a world of creative possibilities opens up:
- Color Play: Experiment with high-contrast color schemes for a dramatic, bold star, or choose analogous colors for a softer, more blended effect. Consider using a single color family for your strips with varying shades, or a rainbow spectrum for a vibrant statement.
- Block Arrangement: As mentioned, rotating the finished 16-inch quadrants can drastically alter the final quilt design. Play on a design wall to discover new star patterns or abstract configurations.
- Quilt Size: To create a larger quilt, simply make more 16-inch star quadrants and assemble them into a larger grid. You could also vary the size of your initial 2 1/2-inch strips and background squares to make smaller or larger star blocks (though this would require adjusting all measurements proportionally).
- Quilting Patterns: Once your quilt top is pieced, the quilting itself offers another layer of creative expression. Consider simple stitch-in-the-ditch around your star points to emphasize their shape, or free-motion quilting to add texture and intricate designs to the background areas.
Why Choose the Binding Tool Star Quilt?
This quilt pattern offers numerous benefits for quilters of all levels. It’s an excellent project for honing your precision cutting and piecing skills, particularly with angles. The binding tool demystifies complex-looking cuts, making advanced designs accessible. Furthermore, it’s a fantastic way to utilize pre-cut fabric strips like jelly rolls, reducing fabric waste and making the selection process enjoyable. The resulting quilt is visually stunning, making it a perfect gift or a cherished addition to your home decor. Its versatility in design ensures that each quilt you make can be truly unique.
Conclusion: Your Star Quilt Awaits!
You’ve now learned how to create a breathtaking Binding Tool Star Quilt, a project that skillfully combines ease of construction with striking visual impact. From the initial precise cuts facilitated by the binding tool to the final whimsical piano key border, each step contributes to a masterpiece that you’ve crafted with your own hands. The ability to create a bold central star or a dynamic, multi-pointed design from the same basic block showcases the incredible versatility of this pattern.
We encourage you to gather your fabrics, fire up your sewing machine, and embark on this rewarding quilting adventure. Don’t be afraid to experiment with colors and layouts to truly make this quilt your own. Share your beautiful creations with the quilting community, inspire others, and continue to explore the endless possibilities that fabric and thread offer. Happy quilting!