
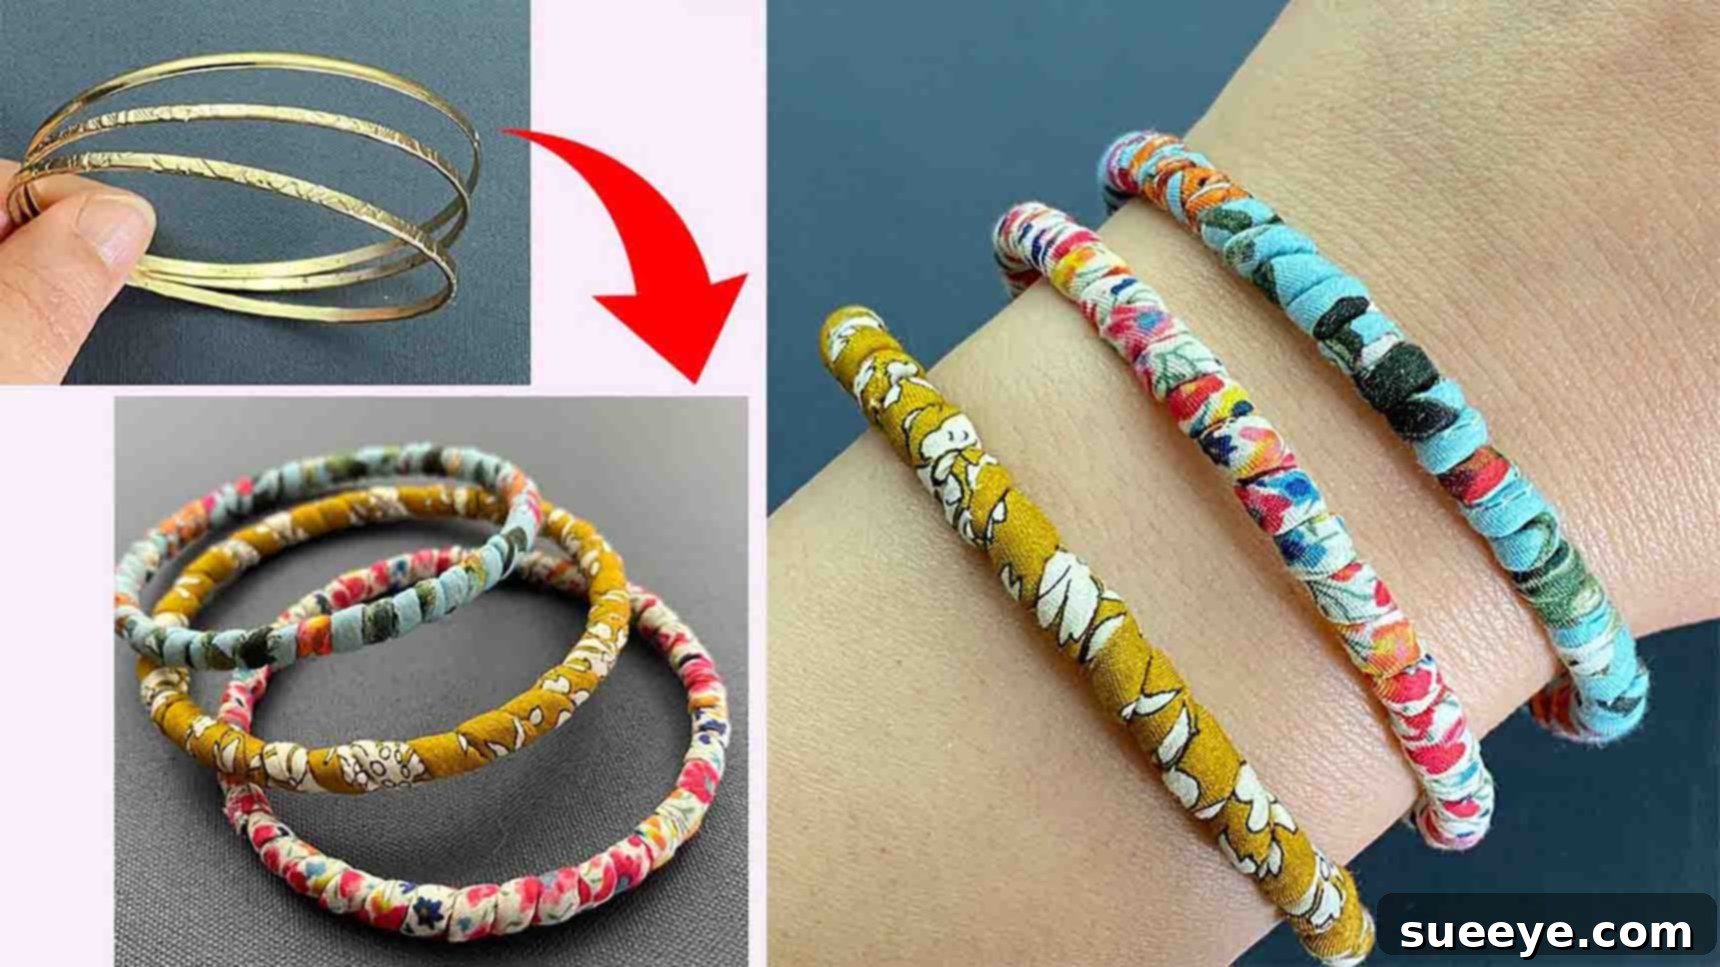
DIY Fabric Wrapped Bangle Bracelets: Transform Scraps into Stylish Accessories
For those of us who cherish the art of sewing, our craft rooms often become sanctuaries brimming with vibrant textiles and countless creative possibilities. Along with the joy of creating, however, often comes an accumulation of beautiful fabric scraps—too lovely to discard, yet sometimes challenging to incorporate into new projects. This delightful dilemma is precisely what sparks my passion for upcycling, constantly seeking ingenious ways to give these remnants a second life. Today, I’m thrilled to share a project that perfectly marries sustainability with personal style: the creation of adorable and incredibly fashionable fabric-wrapped bangle bracelets. Inspired by a fantastic DIY tutorial from Red Blossom Designs on YouTube, this craft allows you to transform simple fabric strips into wearable art. Not only are these bracelets incredibly cute, but they also offer a fantastic opportunity to personalize your accessories, make unique gifts, and contribute to a more sustainable crafting practice. Dive into this guide to learn how to craft your very own collection of these charming fabric bangles.
Why Embrace DIY Fabric Wrapped Bracelets? More Than Just an Accessory
Beyond their undeniable charm, crafting fabric-wrapped bangles offers a multitude of benefits that extend beyond simply creating a new piece of jewelry. This project taps into several key aspects of modern crafting and lifestyle:
Sustainable Crafting and Upcycling
In an era where environmental consciousness is paramount, upcycling fabric scraps is a powerful way to reduce waste. Instead of letting those beautiful remnants languish in a bin, you can give them a new purpose, transforming them into something both functional and fashionable. This approach not only minimizes your environmental footprint but also encourages a mindful approach to your crafting materials.
Unleash Your Creativity and Personal Style
Mass-produced jewelry often lacks that unique touch that truly reflects an individual’s personality. With DIY fabric bracelets, the possibilities for customization are virtually endless. Choose fabrics that resonate with your wardrobe, experiment with different colors, patterns, and textures, and even mix and match to create truly bespoke pieces. This allows you to express your unique aesthetic in a tangible way, ensuring your accessories are as individual as you are.
Cost-Effective and Accessible Hobby
Compared to purchasing new jewelry or high-end craft supplies, making fabric-wrapped bangles is remarkably budget-friendly. You’re primarily utilizing materials you likely already have on hand—fabric scraps, an old bangle, and basic sewing supplies. This makes it an accessible hobby for crafters of all skill levels, allowing you to create stunning accessories without breaking the bank.
Therapeutic and Rewarding Experience
Engaging in hands-on crafting can be incredibly therapeutic. The repetitive motion of folding, sewing, and wrapping can be a meditative process, offering a calming escape from daily stresses. The sense of accomplishment that comes from completing a beautiful, handmade item is profoundly rewarding, boosting confidence and fostering a deeper appreciation for your own creative capabilities.
Thoughtful Handmade Gifts
A handmade gift carries a special kind of warmth and thoughtfulness. Fabric-wrapped bangles make exquisite presents for friends and family, perfect for birthdays, holidays, or just to show someone you care. The effort and personal touch invested in a handmade item convey a message that mass-produced gifts simply cannot replicate.
Essential Materials for Your Fabric Bangle Project
Before embarking on this creative journey, gather your tools and materials. Having everything ready beforehand will ensure a smooth and enjoyable crafting experience. Here’s a detailed look at what you’ll need:
- Fabric Strip (approx. 2 cm x 80 cm): This is the star of our project! While the specified dimensions are a great starting point, feel free to adjust them. A longer strip will allow for a thicker wrap or a larger bangle, while a wider strip will result in a more substantial fabric rope. Ideal fabrics include lightweight cotton, linen, or even silk remnants. Choose a fabric that is easy to fold and sew, and remember that its pattern and color will define the bracelet’s aesthetic.
- Iron, for pressing: An iron is crucial for achieving crisp, clean folds. Well-pressed seams contribute significantly to a professional-looking finish, making the fabric easier to work with and ensuring a neat final product.
- Scissors: A good pair of sharp fabric scissors is essential for precise cutting. Clean cuts prevent fraying and make the subsequent sewing steps much smoother.
- Needle (hand sewing): You’ll need a basic hand-sewing needle for both turning the fabric tube and securing the fabric to the bangle. Choose one with an eye large enough for your chosen thread.
- String (e.g., strong cotton or embroidery floss): This short piece of strong string or cord is ingeniously used to turn your fabric tube right side out. Its strength is key, as it needs to withstand the gentle tugging required for this step.
- Yarn (approx. 4 strands, each 80 cm+): The yarn acts as a filler, giving the fabric rope its body and plushness. You can experiment with different yarn thicknesses and textures to achieve varying levels of fullness and softness. Choose a yarn color that blends with or complements your fabric.
- Bangles (plain, smooth): These are the foundation of your bracelet. Look for simple, plain bangles made from plastic, wood, or metal. Ensure they have a smooth surface, as any rough edges could snag your fabric. Recycled bangles or inexpensive ones from craft stores are perfect for this project.
- Matching Thread: While not explicitly listed, a spool of thread matching your fabric color is essential for sewing both the fabric tube and securing it to the bangle. For a subtle look, choose a thread that disappears into the fabric; for a decorative touch, a contrasting color can be used.
- Optional: Fabric Glue: A tiny dab of fabric glue can provide extra security for the ends of your fabric wrap, particularly if you’re concerned about fraying or want an exceptionally durable finish.
Step-by-Step Directions: Crafting Your Fabric Wrapped Bangle
Now that you’ve gathered your materials, let’s get into the heart of the project. Follow these detailed steps to create your beautiful fabric-wrapped bangle.
Step 1: Preparing Your Fabric Rope – The Foundation
The first step involves transforming your flat fabric strip into a soft, cylindrical rope that will eventually wrap around your bangle. Precision here will lead to a much neater final product.
- Prepare the Fabric Strip: Take your 2 cm x 80 cm fabric strip. Lay it flat and iron out any wrinkles to ensure a smooth surface.
- Fold and Press: Fold the fabric strip horizontally in half, wrong sides together, along its entire length. This will create a strip that is approximately 1 cm wide. Press this fold thoroughly with a hot iron. This crisp fold is essential for straight sewing and a clean edge.
- Sew the Seam: Using your sewing machine (or hand-sewing if preferred), sew a straight seam along the raw edges of your folded strip, leaving a 5 mm (approx. 1/4 inch) seam allowance. Start with a backstitch and finish with one to secure the stitches. This will create a long, narrow fabric tube.
- Prepare for Turning: At one end of the newly sewn fabric tube, snip the corner diagonally, close to the seam but being careful not to cut through the stitches. This reduces bulk when turning.
- Thread the String: Thread your strong string onto your hand-sewing needle. Insert the needle into the diagonally snipped end of the fabric tube, pushing it through the channel you just sewed, all the way to the other end. Once the needle emerges from the opposite end, pull the string through, leaving a tail of string hanging out from both ends of the fabric tube. Securely knot one end of the string to the fabric tube, right at the corner, ensuring it won’t slip.
- Turn the Fabric Tube: Carefully and gently, start pushing the fabric tube over the knotted end of the string. You’ll essentially be pulling the fabric tube inside out over itself, using the string as a guide. This can take a little patience; take your time to avoid tearing the fabric. Once it’s fully turned, you’ll have a neat fabric tube with the seam hidden inside.
- Insert the Yarn Filler: Now, take your four strands of yarn. Bunch them together and attach them securely to one end of the string that is now inside your fabric tube (the end that helped you turn it). Using the string, pull the yarn bundle all the way through the fabric tube. This will create a soft, plump fabric rope.
- Trim Excess: Once the yarn is fully inside, trim any excess yarn and fabric from both ends of your newly formed fabric rope, leaving neat, flush ends.
Step 2: Attaching and Wrapping the Fabric Rope to the Bangle
With your fabric rope ready, it’s time to transform your plain bangle into a vibrant, textile-wrapped accessory. This step requires consistent tension and careful stitching for a polished look.
- Secure the Start: Take your plain bangle. Thread your hand-sewing needle with a length of thread that matches your fabric. Begin by securely sewing one end of your fabric rope to a point on the bangle. Make several small, neat stitches to ensure it’s firmly attached and won’t unravel. You can hide the starting raw edge of the fabric by folding it inward slightly before sewing.
- Begin Wrapping: Once the start is secure, begin wrapping the fabric rope tightly and evenly around the bangle. As you wrap, ensure each turn sits snugly against the previous one, completely covering the bangle’s surface. Maintain consistent tension throughout the wrapping process to avoid gaps or loose sections. You can wrap with a slight overlap or aim for edge-to-edge coverage, depending on the desired look and fabric thickness.
- Secure as You Go (Optional but Recommended): For added durability and to prevent the fabric from shifting, you can periodically make small, invisible stitches through the fabric wrap and around the bangle as you go. This secures the fabric in place and helps maintain an even tension. These stitches should be small and hidden within the fabric folds.
- Complete the Wrap: Continue wrapping until the entire surface of the bangle is covered. Ensure the wrapping is consistent all the way around, meeting neatly where you began.
- Finish the End: When you reach the point where you started, carefully trim any excess yarn and fabric from the end of your fabric rope. Fold the raw edge inward to create a neat finish. Then, use your needle and thread to securely sew this final end to the wrapped bangle. Make sure to use strong, tight stitches to prevent fraying and ensure the end is firmly anchored. A small dab of fabric glue underneath the final fold can provide extra security.
Tips for Crafting the Perfect Fabric Wrapped Bangle
To ensure your fabric-wrapped bangle turns out beautifully and lasts for a long time, consider these helpful tips:
- Choose the Right Fabric: While almost any fabric can be used, medium-weight cotton or linen are often the easiest to work with. Avoid very stretchy fabrics like knits unless you’re experienced, as they can be challenging to keep consistent during wrapping. Thin silks can be elegant but might require a tighter weave for durability.
- Maintain Consistent Tension: This is perhaps the most crucial tip. Whether you’re sewing the fabric tube or wrapping it around the bangle, consistent tension prevents puckering, gaps, and an uneven finish. Practice on a scrap piece if you’re new to this.
- Match Your Thread: For a truly seamless look, use a thread color that closely matches your fabric. If you want to add a subtle design element, a contrasting thread can be used, but ensure your stitches are very neat and intentional.
- Secure Everything Well: Don’t skimp on stitches when securing the start and end of your fabric wrap. These points are critical for the bracelet’s durability. A few extra hidden stitches can make a big difference.
- Consider Fabric Glue: For extra peace of mind, a tiny dot of fabric glue (like Fray Check or a clear craft glue) at the start and end points, hidden beneath the folds, can provide remarkable security and prevent any potential unraveling.
- Experiment with Yarn Fillers: The type and amount of yarn you use can significantly impact the final look and feel of your bracelet. Thicker yarns create a fuller, softer bangle, while thinner yarns result in a more subtle texture. Try different combinations!
- Cleaning Your Bracelet: Since these bracelets are made of fabric, they might eventually need cleaning. Spot clean with a damp cloth and mild soap, being careful not to saturate the fabric. Air dry completely.
Variations and Customization Ideas for Endless Creativity
Once you’ve mastered the basic technique, the door opens to a world of customization. Here are some ideas to spark your creativity and help you design truly unique fabric bangles:
- Color Blocking and Striping: Instead of one continuous fabric strip, join several shorter strips of different colors or patterns to create a color-blocked or striped effect. This is an excellent way to use even smaller scraps!
- Embellishments: Elevate your bangle by adding beads, charms, or even delicate hand embroidery after the wrapping is complete. Stitch small seed beads along the edge, or attach a charm dangle for a personalized touch.
- Textural Mix: Combine different fabric textures. Imagine a smooth cotton wrap adorned with a tiny strip of velvet or lace sewn along its edge.
- Different Bangle Shapes: While round bangles are common, experiment with oval, square, or even cuff-style bangles. The wrapping technique remains similar but offers a different base shape.
- Layering: Create a set of bangles in varying thicknesses, colors, or patterns that can be worn together for a layered, bohemian look.
- Thematic Designs: Design bracelets for specific seasons or holidays. Use festive fabrics for Christmas, pastels for spring, or autumnal tones for fall.
- Braided or Twisted Wraps: Instead of a simple wrap, consider braiding two thinner fabric ropes together before securing them to the bangle for a more intricate look.
- Adding a Bow or Knot: Instead of sewing the ends discreetly, create a small decorative bow or knot with the fabric ends for an intentional design element.
Conclusion: Embrace Your Inner Designer with Fabric Wrapped Bangles
Creating DIY fabric-wrapped bangle bracelets is a wonderfully rewarding project that combines the joy of sewing with the principles of sustainable crafting. It’s an accessible way to transform forgotten fabric scraps into chic, personalized accessories that speak volumes about your unique style and commitment to conscious living. Whether you’re a seasoned seamstress or just starting your crafting journey, this tutorial offers a clear path to crafting beautiful, custom jewelry.
Not only will you enjoy the therapeutic process of making these bangles, but you’ll also cherish the opportunity to wear or gift something truly handmade, infused with your own creativity and effort. So, gather your fabric remnants, unleash your inner designer, and get ready to adorn your wrists with these delightful, one-of-a-kind fabric accessories. Don’t forget to share your amazing creations!