
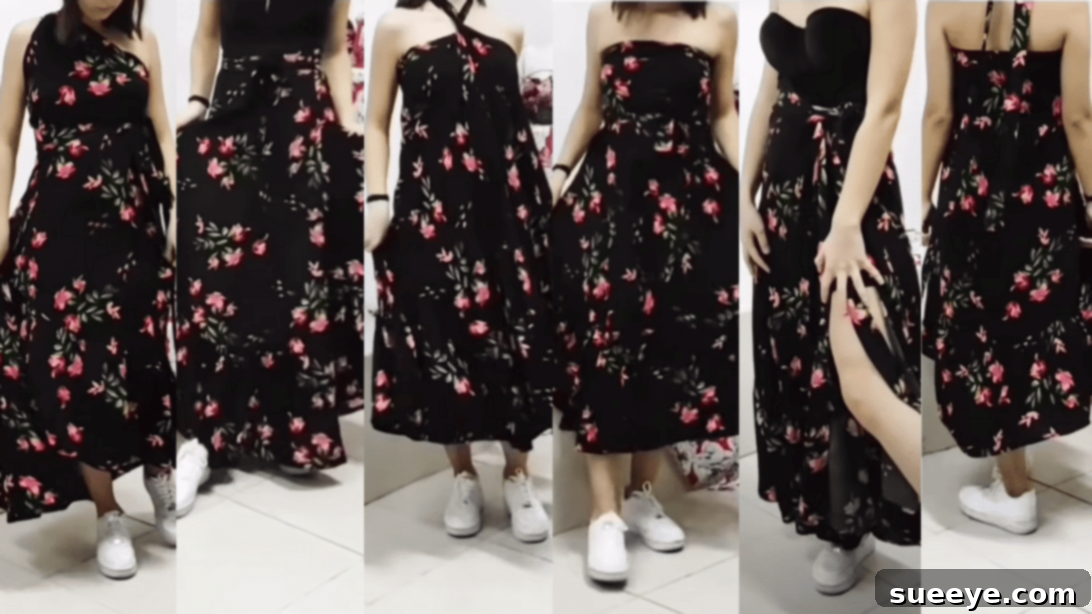
Are you gearing up for an exciting vacation, a sun-drenched beach getaway, or perhaps just a delightful day trip to a charming tourist spot? If your wardrobe feels a little uninspired or you’re simply craving a unique piece that offers unparalleled versatility, why not create your own? Imagine a single garment that can transform into six distinct styles, adapting effortlessly to your mood and occasion. This isn’t just a sewing project; it’s an invitation to unleash your creativity and elevate your personal style with a stunning, multi-functional frilly flared skirt.
This particular DIY sewing idea, inspired by the brilliant craftsmanship of Zelis’s Sewing Room on YouTube, stands out for its ingenious design and incredible adaptability. You’ll never be short on options to style this exquisite skirt, making it an indispensable addition to your travel wardrobe or your everyday fashion rotation. The beauty of this project lies in its simplicity – it’s surprisingly easy to make, even for those with moderate sewing experience, and incredibly rewarding. Beyond the practical benefits of having a multi-style garment, the process of creating something beautiful with your own hands is immensely fun and deeply satisfying. Get ready to embark on a creative journey and learn how to construct this amazing 6-in-1 skirt with our detailed sewing tutorial, guided by the principles from Zelis’s original design.
DIY fashion empowers you to customize your clothing, ensuring a perfect fit and a style that truly reflects your individuality. This versatile flared skirt is not only a fantastic way to add a unique piece to your collection but also an excellent opportunity to hone your sewing skills. Whether you’re dreaming of a vibrant floral print that screams summer or a classic solid hue that offers timeless elegance, this pattern allows for endless customization. Let’s gather our supplies and transform a simple piece of fabric into a wardrobe essential that promises to turn heads wherever you go!
Essential Materials for Your Versatile 6-in-1 Skirt Project
Embarking on any sewing adventure begins with gathering the right materials. For this spectacular 6-in-1 flared skirt, a few key items are all you need to bring your creative vision to life. Choosing the right fabric is crucial, as it will determine the drape, comfort, and overall aesthetic of your finished garment. Don’t forget the indispensable tools that will ensure precision and ease throughout your sewing journey.
- Fabric: You will need a generous piece of cloth measuring approximately 102 x 59 inches. While a vibrant floral pattern is entirely optional and perfect for capturing a lively summer vibe, feel free to explore other fabric choices that resonate with your personal style. Lightweight, flowing fabrics such as rayon, challis, voile, or a soft cotton blend are ideal for this skirt, as they will drape beautifully and provide the elegant flare and movement that are characteristic of this design. Consider the occasion: a solid pastel for a classic look, a bold geometric print for a modern touch, or a delicate stripe for understated charm. Always remember to pre-wash and iron your fabric before cutting to prevent any shrinkage after construction and ensure accurate measurements.
- Sewing Machine: A reliable sewing machine is your best friend for this project. Any standard home sewing machine equipped with basic straight stitch and zigzag stitch capabilities will suffice. Ensure your machine is threaded with a good quality polyester thread that matches or complements your fabric color. Before you begin, it’s always a good practice to test your stitch settings on a scrap piece of your chosen fabric.
- Basic Sewing Kit: Beyond the main items, a few essential tools will make your sewing experience much smoother. These include sharp fabric scissors for precise cutting, a measuring tape or ruler for accurate dimensions, fabric chalk or a washable marker for marking lines, plenty of sewing pins to hold fabric layers in place, and an iron and ironing board for pressing seams, which is critical for a professional finish.
Having all your materials prepared and organized before you start will set you up for success and make the entire sewing process more enjoyable. Now, let’s move on to the exciting part: transforming these materials into a fashionable and versatile skirt!
Step-by-Step Guide: Crafting Your Stylish 6-in-1 Flared Skirt
Creating this multi-wear flared skirt is a rewarding experience that combines precise cutting with fundamental sewing techniques. Follow these detailed instructions carefully to construct a garment that is both beautiful and incredibly versatile. Remember, patience and precision are key to a professional-looking finish.
Step 1: Fabric Preparation and Skirt Base Construction
The first step involves meticulously preparing your fabric and cutting the main body of your skirt. This phase lays the foundation for the flared silhouette and ensures the correct dimensions for the various styling options.
- Prepare Your Fabric: Start by laying your pre-washed and ironed fabric flat on a large work surface. Ensure it is smooth and free of wrinkles. We begin with a piece measuring 102 x 59 inches. This generous size allows for the ample flare and length required for the skirt’s versatile design.
- Initial Cut for Ruffles: From one of the 102-inch ends, measure in 23.6 inches and carefully cut across the width of the fabric. This smaller piece (23.6 x 59 inches) will be set aside for creating the elegant frills later on. You are now left with a larger piece of fabric measuring approximately 79 x 59 inches, which will form the main body of your skirt.
- Folding for the Flared Shape: Take your 79 x 59-inch fabric. Fold it in half lengthwise, aligning the 79-inch edges perfectly. Once folded, carefully pull one corner of the folded fabric diagonally to the opposite side, creating a large triangular shape. The raw edges should align along two sides, and the folded edge will form the hypotenuse of your triangle. This strategic fold is what allows you to cut a circular or flared shape efficiently.
- Marking the Waistline: Locate the tip of your folded triangle (the corner where all the raw and folded edges meet). From this tip, measure down 11.8 inches along the folded edges. Mark this point. Now, pivot your measuring tape from the tip and create a smooth, gentle curve connecting these two 11.8-inch marks. This curve will form the waistline of your skirt. Use fabric chalk or a washable marker for clear lines. Accuracy here is important for a comfortable and well-fitting waist.
- Marking the Hemline: From the curve you just drew (your waistline), measure downwards 23.6 inches. Again, pivot your measuring tape and draw another smooth curve parallel to your waistline curve, connecting the two points that are 23.6 inches from the waistline curve. This longer curve will define the hemline of your flared skirt. Ensure both curves are fluid and even.
- Cutting the Skirt Panels: Carefully cut along both the waistline curve and the hemline curve you have marked. You will also cut off the very tip of the triangle, as this small section is not part of the skirt. When you unfold your fabric, you will have a beautiful circular or flared skirt panel, complete with a waist opening and a gracefully curved hem. Take your time with the cutting to ensure clean, precise edges.
Step 2: Assembling the Ruffles, Hemming, and Adding the Versatile Tie
With your skirt base cut, it’s time to add the signature frills, finish the edges, and attach the crucial tie that gives this skirt its incredible 6-in-1 functionality. This stage involves sewing and attention to detail for a polished final product.
- Prepare the Ruffle Strips: Take the 23.6 x 59-inch piece of fabric that you cut in Step 1. First, cut this piece in half lengthwise, resulting in two pieces, each roughly 23.6 x 29.5 inches. Then, cut each of these two pieces in half again lengthwise. This will give you four strips of fabric, each approximately 23.6 inches long and about 14.75 inches wide. These four pieces will form the beautiful frills of your skirt.
- Join the Ruffle Strips: Take two of these four ruffle strips. Place them right sides together, aligning one of the shorter (14.75-inch) edges. Sew them together with a straight stitch, using a standard seam allowance (e.g., 1/2 inch or 1.25 cm). Repeat this with the other two strips, creating two longer pieces. Then, join these two longer pieces together in the same manner to create one continuous, very long strip of fabric. Press your seams open for a neat finish. This long strip will now be used to create the skirt’s frill.
- Create and Attach the Frill: Along one long edge of your continuous ruffle strip, create a gathering stitch. This can be done by sewing two parallel rows of long basting stitches (without backstitching) or by using a gathering foot on your machine. Gently pull on the bobbin threads of these stitches to gather the fabric until its length matches the circumference of your skirt’s waistline. With right sides together, pin the gathered ruffle strip to the waistline of your main skirt body, distributing the gathers evenly. Stitch securely in place, then remove your basting stitches. Serge or zigzag stitch the raw edges to prevent fraying.
- Sewing the Skirt Hem: Once the frill is attached, it’s time to finish the hem of the skirt for a clean and durable edge. A narrow double-fold hem works wonderfully for flared skirts. Fold the raw edge of the hem up by about 1/4 inch (0.6 cm) and press. Fold it up again by another 1/4 to 1/2 inch (0.6 to 1.25 cm) and press once more, encasing the raw edge. Stitch close to the folded edge all the way around the skirt. This creates a polished finish that also helps the skirt drape beautifully.
- Crafting and Attaching the Versatile Tie: For the essential belt/tie, cut a piece of fabric measuring approximately 3.9 x 11.8 inches. Fold this strip in half lengthwise, right sides together, and stitch along the raw long edge and one short end, leaving the other short end open. Trim the seam allowance, clip the corners, and turn the fabric right side out. Press it flat. This piece will be your main tie.
- Attaching the Tie: Position this finished tie at the top part of your skirt, aligning it with the waistline. The original design uses this piece to create the tie that enables the skirt’s versatility. Carefully sew the open end of the rectangular cloth to the top edge of your skirt. Ensure it is securely attached and that the tie can be manipulated easily. This “rectangular cloth” is crucial as it will be used to tie the skirt in various creative ways, unlocking its 6-in-1 potential. Reinforce the stitching at the attachment points for durability.
Congratulations! You now have a beautifully crafted frilly flared skirt, perfectly designed for summer and ready to be styled in countless ways. This stylish piece is a testament to your sewing skills and an excellent foundation for a versatile wardrobe. Enjoy wearing your unique creation!
Unlock Endless Style: Your 6-in-1 Skirt Sewing Tutorial and Styling Guide
This remarkable skirt is more than just a beautiful garment; it’s a testament to innovative design, offering an incredible six distinct ways to wear it. Its unique construction, particularly the versatile tie, allows for effortless transformations, making it the ultimate travel companion and a flexible staple for any wardrobe. Let’s explore the myriad ways you can style your newly sewn masterpiece, ensuring you’re prepared for any occasion with just one item.
1. The Classic Flared Skirt
The most straightforward and elegant way to wear your creation is as a traditional flared skirt. Simply tie the rectangular fabric belt securely around your natural waist. The frilly detailing at the top will cascade beautifully, adding volume and movement, while the flowing hemline will create a graceful silhouette. This style is perfect for a casual day out, a garden party, or even a relaxed evening gathering. Pair it with a tucked-in blouse, a simple t-shirt, or a chic crop top for an effortlessly stylish look.
2. The High-Waisted Statement Skirt
For a more fashion-forward and elongating effect, wear your skirt as a high-waisted piece. Pull the waistline up to just below your bust or at the narrowest part of your torso, and tie the fabric belt firmly around this elevated position. This creates an elegant, retro-inspired silhouette that pairs wonderfully with fitted tops or bodysuits. The high-waisted look is fantastic for creating an illusion of longer legs and a defined waist, making it a sophisticated choice for dinners, dates, or semi-formal events.
3. Elegant Strapless Dress
Transform your skirt into a charming strapless dress for a breezy, feminine look. Pull the skirt up over your bust, allowing the frilled edge to form the top of the dress. Use the versatile fabric tie to secure it firmly around your chest, creating a comfortable and flattering bandeau-style neckline. This simple yet effective transformation makes it perfect for beach holidays, summer festivals, or an impromptu picnic. Accessorize with a statement necklace and sandals for a complete ensemble.
4. Chic Halter Dress
For an effortlessly chic and slightly more secure dress option, convert your skirt into a halter-neck dress. Pull the skirt up to your bust as you would for the strapless style. Instead of tying the fabric belt around your chest, bring the two ends of the tie up and around your neck, tying them securely at the back to create a graceful halter neckline. This style offers a touch more support and sophistication, making it ideal for poolside lounging, evening strolls, or casual daytime events where you want to look put-together yet relaxed.
5. Asymmetrical Shoulder Top/Dress
Embrace a unique and artistic flair by styling your garment as an asymmetrical top or one-shoulder dress. Pull the skirt up and position one side of the waistline over one shoulder. Drape the fabric across your body, and use the tie to secure it around your waist or cinched at the opposite hip, creating an intriguing, flowing silhouette. This avant-garde style is perfect for making a statement at art events, bohemian gatherings, or any occasion where you want to showcase your individualistic fashion sense. Experiment with how you drape the fabric to find your favorite asymmetrical look.
6. Stylish Beach Cover-Up or Sarong
When heading to the beach or pool, this 6-in-1 skirt effortlessly transforms into a chic cover-up or traditional sarong. Simply wrap the fabric around your waist or hips, allowing the frills to add a playful touch. Use the tie to secure it firmly at the side or front, creating a flowing and elegant layer over your swimwear. This option is not only practical for moving between the beach and nearby cafes but also incredibly stylish, adding an element of resort wear to your look. It’s quick, easy, and undeniably glamorous.
With these six distinct ways to wear your newly crafted garment, you’ve essentially created an entire mini-wardrobe in one piece! This 6-in-1 skirt is an ode to creativity, functionality, and personalized fashion. Embrace the freedom of choice and enjoy experimenting with each style to suit your mood and the moment. Happy styling!