
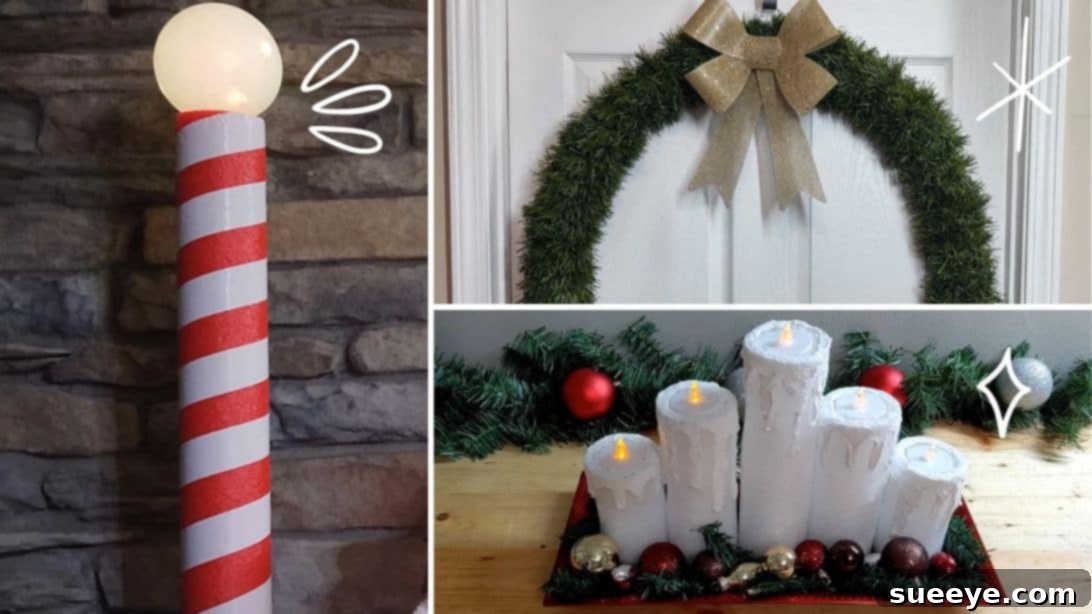
Transform Your Holidays: Creative Pool Noodle Christmas Decor Ideas
The holiday season brings a unique opportunity to infuse your home with warmth, joy, and festive spirit. While store-bought decorations are convenient, there’s an unparalleled charm in crafting your own. This year, discover the surprising versatility of an everyday item – the humble pool noodle – to create stunning, budget-friendly, and incredibly adorable Christmas decor. Inspired by the brilliant DIY ideas from Ta-Day’s Crafts on YouTube, we’ll guide you through making three distinct decorations that will undoubtedly become cherished parts of your seasonal display. From elegant wreaths to whimsical candy lamps and cozy faux candles, these projects are not only fun to make but also offer a fantastic way to personalize your holiday atmosphere without breaking the bank. Get ready to unleash your creativity and transform simple pool noodles into festive masterpieces!
Why Pool Noodles Are Your Secret Weapon for DIY Christmas Decor
Before diving into the individual projects, let’s talk about why pool noodles are an absolute game-changer for holiday crafting. First and foremost, they are incredibly inexpensive and readily available, especially during warmer months when you can often find them on sale. Their lightweight foam construction makes them easy to cut, shape, and handle, even for novice crafters. This flexibility allows them to be bent into circles, sliced into segments, or used as a sturdy base for various embellishments. Furthermore, their bright, often vibrant colors can either be incorporated into your design or easily covered with paint, fabric, or garland. The possibilities are truly endless, making pool noodles an economical and versatile foundation for countless festive creations. They’re also durable, meaning your handmade decorations can be stored and reused for many Christmases to come, adding an element of sustainability to your holiday preparations.
Essential Materials for Your Pool Noodle Christmas Crafts
Gathering your supplies is the first exciting step in any DIY project. For these pool noodle Christmas decorations, you’ll find most items are easy to acquire from craft stores, dollar stores, or even around your home. Here’s a comprehensive list of what you’ll need to bring these festive ideas to life:
- Pool Noodles: The star of our projects! Have a few on hand, varying in color if you wish, as they are central to all three crafts.
- Garland: Green Christmas garland, preferably wire-based for easy shaping, to wrap around your wreath.
- Garland Ties: Or floral wire, used for securing garland and attaching bows.
- Glittered Bow: A pre-made or DIY glittery bow to add a festive touch to your wreath.
- 9×9-inch Pine Board: A sturdy base for the candy lamp project. Can also be a thick piece of cardboard or wood.
- White Chalk Paint: For painting the pine board, providing a rustic, matte finish.
- Paintbrush: For applying the chalk paint evenly.
- White Duct Tape: Essential for creating the “candy stripe” effect on the candy lamp.
- Buffalo Snow: Also known as artificial snow, used for a soft, snowy base on the candy lamp.
- White Puffy Paint: To create a realistic “melted wax” effect on the faux candles.
- Tea Lights: Battery-operated LED tea lights are recommended for safety and longevity in the faux candles.
- Glitters: Fine or chunky glitter to add sparkle to your faux candles.
- Hot Glue Gun and Glue Sticks: Your best friend for securing various elements quickly and firmly.
- Utility Knife or Serrated Knife: For cutting pool noodles cleanly.
- Cutting Mat or Protected Surface: To protect your workspace.
- Ornaments (Optional): Small decorative ornaments to enhance the candle display.
- Tray (Optional): For arranging your faux candles.
Step-by-Step Guide to Festive Pool Noodle Christmas Decorations
Project 1: The Enchanting Garland Wreath
A classic symbol of holiday cheer, a wreath instantly welcomes guests and sets a festive tone. This pool noodle wreath offers a fantastic alternative to traditional straw or foam bases, making it lightweight and easy to customize. It’s perfect for your front door, a mantelpiece, or any wall that needs a touch of Christmas magic. The beauty of this wreath lies in its simplicity and the lush, full appearance it achieves with minimal effort.
Detailed Instructions for Your Garland Wreath
- Form the Wreath Base: Begin by taking two standard-sized pool noodles. Carefully bend each noodle into a circular shape. To connect the ends and form a sturdy ring, use strong duct tape or packing tape. Adhere the ends securely together, overlapping the tape for maximum hold. Repeat for the second noodle. Once both are formed, join them side-by-side using more tape to create a thicker, more substantial wreath base. This dual-noodle approach provides extra volume and a professional look.
- Wrap with Garland: Starting at any point, secure one end of your Christmas garland to the pool noodle base with a dab of hot glue or a piece of garland tie. Begin tightly wrapping the garland around the entire pool noodle ring, ensuring that no part of the green noodle is visible. Overlap the garland slightly with each wrap to create a full, rich texture. Continue until the entire base is completely covered, then secure the other end of the garland with hot glue or a tie. Fluff the garland slightly to give it a natural, bushy appearance.
- Add the Glittered Bow: Select a beautiful glittered bow that complements your holiday theme. Take two garland ties (or pieces of floral wire) and twist them together to create a stronger, longer tie. Insert the twisted ties through the back of the glittered bow, ensuring they are firmly attached. Position the bow at the top or bottom center of your wreath, then wrap the garland ties around the back of the wreath, twisting them securely to lock the bow in place. Adjust the bow’s position until it sits perfectly.
Customization Tips & Display Ideas for Your Wreath
To personalize your wreath, consider adding small ornaments, pinecones, berries, or even fairy lights intertwined within the garland for an extra sparkle. You could also use different colors of garland, like frosted white or silver, for a varied look. Hang your finished wreath on your front door to greet visitors, above your fireplace as a festive focal point, or even as a charming centerpiece on a large dining table with a candle in the middle (ensure the candle is in a safe holder).
Project 2: The Whimsical DIY Candy Cane Lamp
Bring a touch of playful charm to your holiday decor with this delightful candy cane lamp. This project cleverly transforms a simple red pool noodle into a giant, illuminated candy cane, perfect for adding a whimsical glow to any corner of your home. It’s an ideal accent for a children’s room, a festive entryway table, or as part of a larger display, evoking the nostalgic joy of classic Christmas treats.
Detailed Instructions for Your Candy Cane Lamp
- Prepare the Base: Take your 9×9-inch pine board and use your paintbrush to coat it evenly with white chalk paint. Chalk paint gives a beautiful, matte finish and adheres well to wood. Allow the paint to dry completely before proceeding to the next step. You might need a second coat for full coverage.
- Craft the Candy Cane Pillar: Select a red pool noodle. Using a utility knife or a serrated knife, carefully cut the red pool noodle to a length of approximately 3 feet. This will form the main body of your candy cane. Next, take your white duct tape and begin wrapping it diagonally around the red pool noodle. Start at one end and ensure the tape spirals upwards, creating distinct white stripes that mimic a classic candy cane pattern. Maintain an even spacing between the tape wraps for a neat and uniform look.
- Assemble the Lamp: Once your candy cane pillar is ready, apply a generous amount of hot glue to the bottom end of the pool noodle. Carefully center and adhere it firmly to the painted pine board. Hold it in place for a few moments until the glue sets.
- Add the Top Ornament and Lights: Secure a white ornament ball (or a large white pom-pom) to the very top of the candy cane pillar using hot glue. This adds a charming finishing touch. Then, gently insert a strand of warm white fairy lights into the top opening of the pool noodle. You can let some lights spill out or try to push them down to illuminate the entire candy cane from within, creating a magical glow.
- Create a Snowy Base: To complete the look, take some buffalo snow (artificial snow) and wrap it artfully around the base of the candy cane, where it meets the pine board. This adds a soft, snowy texture and helps to conceal any visible glue, giving the lamp a polished, winter wonderland feel.
Customization Tips & Display Ideas for Your Candy Cane Lamp
Experiment with different colored pool noodles for unique candy cane variations – green and white, or even blue and silver for a frosty look. You could also decorate the pine board base with stencils or additional glitter. This candy cane lamp looks wonderful placed on a console table in your entryway, on a side table in the living room, or even as a whimsical floor accent in a child’s bedroom during the holidays. Its gentle glow provides a cozy and inviting ambiance.
Project 3: Elegant Faux Pool Noodle Candles
Candles are synonymous with holiday warmth and ambiance, but real flames can pose a safety risk, especially in homes with children or pets. These faux pool noodle candles offer all the charm and glow without any of the worry. Crafted from various lengths of pool noodles and illuminated by battery-operated tea lights, they create a beautiful, melted-wax effect that’s both realistic and enchanting, perfect for tabletops, mantels, or windowsills.
Detailed Instructions for Your Faux Pool Noodle Candles
- Cut Pool Noodle Segments: Using a utility knife or serrated knife, cut your pool noodles into varying lengths to create a staggered candle display. A good combination would be two pieces at 4 inches, two pieces at 6 inches, and one piece at 8 inches. These different heights will add visual interest to your arrangement. Ensure your cuts are as straight as possible for a neat finish.
- Prepare for Tea Lights: At the top of each pool noodle segment, use a knife or a circular cutter to trim out a shallow indentation. The goal is to create a small recess where a battery-operated tea light can sit snugly and securely. Test each tea light to ensure it fits well and doesn’t wobble. You want the tea light to be flush or slightly recessed, creating the illusion of a candlewick.
- Add the Melted Wax Effect: This is where the magic happens! Take your white puffy paint and carefully apply it around the top edge of each faux candle, just below the tea light opening. Allow the paint to drip and gather slightly, mimicking the look of melted wax flowing down a real candle. Be creative with your drips, making some longer and some shorter for a natural appearance.
- Sprinkle Glitter: While the puffy paint is still wet, gently sprinkle some glitters (silver, gold, or iridescent work beautifully) over the “melted wax” areas. The glitter will adhere to the wet paint, adding a beautiful shimmer to your faux candles. Allow all the puffy paint and glitter to dry completely, which may take a few hours depending on the thickness of the paint application.
- Arrange and Decorate: Once fully dry, arrange your faux candles on a decorative tray or directly on your mantelpiece. Turn on the tea lights to enjoy their warm glow. Enhance the display by adding small Christmas ornaments, pinecones, faux berries, or sprigs of evergreen around the base of the candles. This creates a cohesive and festive centerpiece.
Customization Tips & Display Ideas for Your Faux Candles
Consider using pool noodles in different colors, then painting them white, red, or green to match your theme before adding the puffy paint. You could also use colored puffy paint or different glitter shades. These faux candles are incredibly versatile. Display them in a window for a charming glow, use them as a centerpiece on your dining table, line them along a mantel, or group them on a coffee table for an inviting atmosphere. They are safe for use anywhere, adding festive light without fire hazards.
Maximizing Your Holiday Decor with DIY Touches
Embracing DIY Christmas decor is more than just saving money; it’s about infusing your home with personal touches and creating lasting memories. When undertaking these projects, remember to work in a well-ventilated area, especially when using hot glue or paints. Always supervise children if they are assisting with crafts involving sharp tools or hot glue. Don’t be afraid to experiment with colors, textures, and additional embellishments. A holiday season filled with handmade decorations tells a story, your story, making your home feel uniquely festive and inviting. These pool noodle crafts are just the beginning; once you see how easy and rewarding they are, you’ll likely find inspiration for many more DIY projects.
Conclusion: Embrace the Spirit of DIY Christmas
This holiday season, let your creativity shine by transforming simple pool noodles into magnificent Christmas decorations. From the elegant garland wreath that graces your door to the whimsical candy cane lamp that illuminates your space and the safe, enchanting glow of faux candles, these projects offer a delightful way to personalize your home. Each craft is designed to be fun, accessible, and incredibly rewarding, allowing you to create stunning decor that reflects your unique style and festive spirit. Not only do these DIY ideas save you money, but they also provide an opportunity for family bonding and the creation of cherished holiday traditions. We hope these instructions, inspired by Ta-Day’s Crafts, empower you to embark on your own creative journey. So, grab your pool noodles, gather your supplies, and start crafting a Christmas filled with handmade joy and sparkle!
*All image credit belongs to Ta-Day’s Crafts via YouTube. Follow and subscribe to her channel for more inspiring DIY projects!