
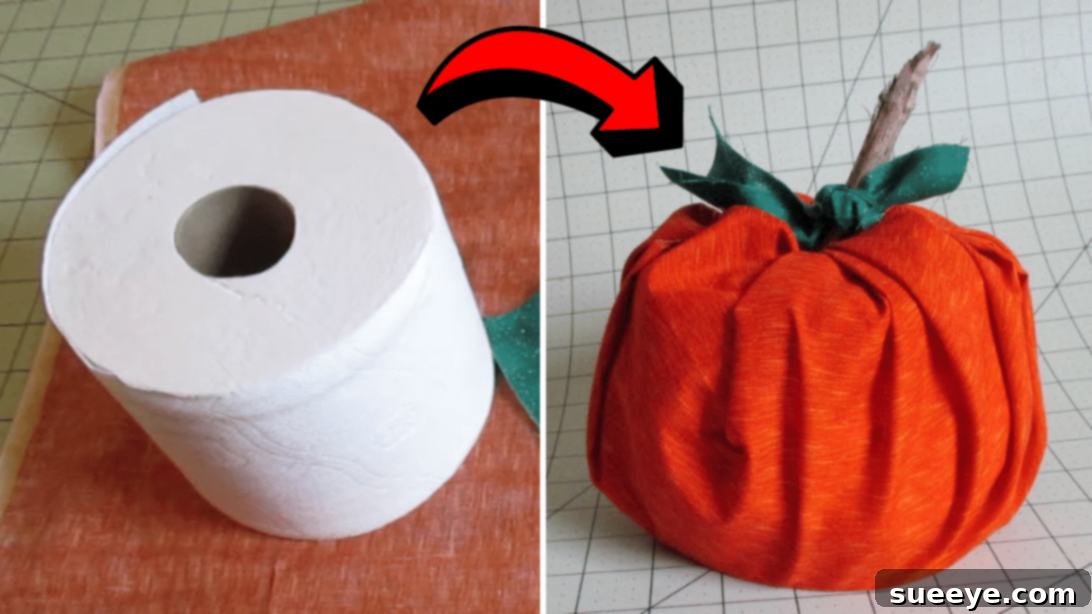
DIY No-Sew Toilet Paper Pumpkin: Crafting Sustainable & Stylish Fall Decor
Embracing the charm of the autumn season doesn’t have to break the bank or require advanced crafting skills. For enthusiasts of crafts and DIY projects, the most rewarding creations are often those that are budget-friendly, leveraging items already found around the house or easily sourced from nature. Imagine transforming a simple household staple into a delightful piece of seasonal decor! This is precisely the magic behind the ingenious toilet paper pumpkin idea, brilliantly shared by Debs Days on YouTube. Once I stumbled upon this brilliant tutorial, I knew it was a must-try project for its simplicity, charm, and innovative approach to repurposing.
RELATED: 20-Minute DIY Realistic Sock Pumpkin Sewing Tutorial
What truly sets this DIY toilet paper pumpkin apart is its remarkable ease of creation—absolutely no sewing is required, making it accessible for crafters of all skill levels. Beyond its effortless assembly, the project boasts an extraordinary level of practicality and sustainability. Unlike many seasonal decorations that are stored away for months, this pumpkin offers a unique benefit: once the festive fall season concludes, you can simply unwrap the fabric, set it aside for future creative endeavors, and use the toilet paper as you normally would. This clever design minimizes waste and maximizes utility, allowing you to repurpose and reuse nearly every component. It’s an eco-conscious craft that celebrates both creativity and sustainability, ensuring nothing goes to waste.
Why Choose the Toilet Paper Pumpkin for Your Fall Decor?
In a world increasingly conscious of environmental impact and mindful spending, the no-sew toilet paper pumpkin stands out as a beacon of smart crafting. This project isn’t just about making a cute decoration; it’s about embracing a philosophy of resourcefulness and sustainability. Here’s why this DIY pumpkin should be at the top of your fall crafting list:
- Unbeatable Affordability: Most of the materials you need are likely already in your home, making this an incredibly cost-effective way to refresh your seasonal decor without purchasing expensive supplies.
- Eco-Friendly & Sustainable: The ability to disassemble the pumpkin and use the toilet paper, while repurposing the fabric, champions a zero-waste approach. It’s a decorative item with a second life, significantly reducing its environmental footprint.
- Effortless Creation: Forget complicated patterns, stitching, or gluing. This project is genuinely “no-sew,” making it perfect for beginners, busy individuals, or anyone looking for a quick and satisfying craft.
- Versatile & Customizable: With a vast array of fabric options, you can tailor your pumpkin to perfectly match your existing home decor, whether your style is rustic, modern, elegant, or whimsical.
- Kid-Friendly Fun: The simplicity of the steps makes this an excellent activity for children and families. It’s a wonderful way to introduce younger ones to crafting and the concept of repurposing.
- Seasonal Charm: Perfect for autumn, Halloween, and Thanksgiving, these pumpkins add a cozy, inviting touch to any space, from mantelpieces and dining tables to entryways and windowsills.
Essential Materials for Your DIY Toilet Paper Pumpkin:
Gathering your supplies for this project is straightforward. You’ll be surprised at how few items are needed to create such a charming decorative piece. The beauty lies in the simplicity and accessibility of these common household and craft items.
- A Roll of Toilet Paper: The core of your pumpkin! A standard roll works best, but you can experiment with larger or smaller rolls for varied pumpkin sizes. The softer the roll, the easier it might be to create the desired “poofy” effect.
- Fabric, at least 18×18 inches: This will be the “skin” of your pumpkin. The size recommendation ensures enough material to fully cover and tuck around the toilet paper roll. Consider fabrics with autumn themes, solid colors that complement your decor, or interesting textures like flannel, cotton, or even an old scarf. The drape and thickness of the fabric will affect the final look.
- Scrap Green Fabric, about 3×8 inches: This small piece will serve as the pumpkin’s leaf or vine accent. Scraps of felt, cotton, or even ribbon in shades of green or brown work perfectly. You can also use real dried leaves for an authentic touch.
- A Twig, Stick, or Dowel: This will be your pumpkin’s stem. Look for a natural twig from your yard for an organic feel, or use a small wooden dowel, cinnamon stick, or even a wine cork for a different aesthetic.
Choosing your fabric is perhaps the most exciting part, as it dictates the personality of your pumpkin. Think about plaids, florals, rich solids, or even upcycled clothing like an old shirt! The possibilities are endless, allowing each pumpkin to be a unique reflection of your style.
Step-by-Step Guide: Crafting Your Easy No-Sew Toilet Paper Pumpkin
Get ready to transform simple materials into charming fall decor with these easy-to-follow instructions. The entire process is designed to be quick, enjoyable, and completely fuss-free.
Step 1: Preparing the Toilet Paper Roll for a Fuller Shape
The secret to a beautifully rounded, “poofy” pumpkin lies in this initial step. Begin by gently unrolling a small section of your toilet paper. Don’t unroll too much, just enough to start working with. Now, as you reroll it back onto itself, introduce a slight twisting motion. This isn’t about tightening the roll, but rather subtly disturbing the tightly wound layers, causing them to separate and expand slightly. The goal is to create a more plump, less rigidly cylindrical shape. Continue this twisting and rerolling process until the entire roll feels a bit softer and looks subtly puffed out. This technique gives the finished pumpkin a more organic, gourd-like appearance, rather than a perfect cylinder. Take your time with this step to ensure an even, airy texture throughout the roll.
Step 2: Draping and Tucking the Fabric
Now it’s time to give your pumpkin its vibrant skin. Lay your chosen fabric flat on a clean surface with the decorative side facing down. Ensure it’s spread out smoothly without any wrinkles. Carefully place your prepared, slightly “poofy” toilet paper roll directly in the center of the fabric. Begin by taking one corner of the fabric and bringing it up towards the central hole of the toilet paper roll. Gently tuck this corner into the core of the roll. Continue this process by systematically bringing each section of the fabric towards the middle. As you work your way around, you’ll naturally create pleats and folds in the fabric. This is desirable! These pleats will mimic the natural ridges of a pumpkin. Smoothly fold, gather, and tuck the fabric into the center opening of the toilet paper roll. Ensure the fabric is evenly distributed around the roll, creating a neat, rounded pumpkin shape. Once all the fabric edges are tucked in and secured within the roll’s core, set your partially formed pumpkin aside.
Step 3: Adding the Stem and Final Touches
The final touches bring your toilet paper pumpkin to life! Retrieve your chosen twig, stick, or dowel—this will be your pumpkin’s stem. Take your small piece of green fabric (or a real leaf) and artfully tie or wrap it around the base of your twig, securing it to resemble a pumpkin leaf or vine. Once your stem is adorned, carefully insert the twig down through the central hole of your fabric-wrapped toilet paper roll. Push it firmly but gently until it feels secure. The stem serves a dual purpose: it acts as a decorative element and, more importantly, it helps to hold all the tucked-in fabric edges securely in place, preventing them from unraveling. Adjust the fabric around the base of the stem to ensure a tidy finish. Take a moment to gently reshape your pumpkin if needed, ensuring the fabric is smooth and the pleats are appealing. Your no-sew toilet paper pumpkin is now complete!
Tips for Customizing Your Toilet Paper Pumpkin
While the basic tutorial provides a beautiful result, don’t hesitate to infuse your personal style into your toilet paper pumpkins. The possibilities for customization are vast, allowing you to create a truly unique collection of fall decor:
- Fabric Flair: Experiment with different fabric patterns and textures. Think rich velvets for a luxurious look, burlap for rustic charm, or vibrant cotton prints for a playful touch. Consider mixing and matching patterns if you’re making a cluster of pumpkins.
- Embellishments Galore: Add extra details like cinnamon sticks tied with twine for an aromatic stem, small faux leaves hot-glued around the base of the stem, or even a light dusting of glitter for a touch of sparkle. Buttons, beads, or small charms can also be added.
- Aromatherapy Pumpkins: Before inserting the stem, you can place a few drops of essential oils (like cinnamon, clove, or orange) onto the cardboard tube of the toilet paper roll. As the season progresses, your pumpkin will gently release a beautiful autumn scent.
- Varying Sizes: Don’t limit yourself to standard toilet paper rolls. You could try using jumbo rolls of toilet paper or even paper towel rolls (though these would create a taller, less squat pumpkin) to create pumpkins of varying sizes for a more dynamic display.
- Beyond Fall: While perfect for autumn, this concept can be adapted for other holidays. Use pastel fabrics and faux flowers for a spring centerpiece, or red and green fabric with a candy cane stem for Christmas.
The Eco-Friendly Advantage: Reusing and Repurposing
One of the most compelling aspects of the DIY toilet paper pumpkin is its commitment to sustainability. In a world increasingly focused on reducing waste, this craft offers a refreshing approach to seasonal decorating. The ingenious design allows for complete deconstruction once the fall season is over. The toilet paper can be unwrapped and used for its original purpose, ensuring zero waste of the core material. The fabric can then be gently unfolded, smoothed, and stored away, ready to be repurposed for next year’s pumpkin project, used in another craft, or even recycled if it’s no longer needed. This circular approach to crafting not only saves money but also minimizes your environmental footprint, proving that beautiful decor can also be responsible and practical.
Frequently Asked Questions (FAQs) about No-Sew Toilet Paper Pumpkins
Here are some common questions crafters often have about making these delightful pumpkins:
- Q: Can I use paper towels instead of toilet paper?
A: While possible, paper towel rolls are typically taller and wider, resulting in a more elongated, less traditional pumpkin shape. If you prefer a taller gourd, it could work, but you’d need a larger piece of fabric. - Q: What type of fabric works best?
A: Light to medium-weight fabrics like cotton, flannel, broadcloth, or even old scarves work wonderfully. Avoid very stiff fabrics that don’t drape well, or overly thin, sheer fabrics that might show the toilet paper through. - Q: How long does this project take?
A: Typically, each toilet paper pumpkin can be made in about 5-10 minutes, making it an ideal quick craft for last-minute decorating or crafting with kids. - Q: How can I store them if I want to keep them assembled?
A: If you choose not to unwrap them, store them in a dry, cool place away from direct sunlight to prevent fabric fading. A sturdy box will protect them from getting squashed. - Q: Can children make these?
A: Absolutely! This is a fantastic kid-friendly craft. Younger children might need help with the initial fabric tucking, but they’ll love choosing fabrics and adding the stem.
*All images and the original tutorial are credited to Debs Days via YouTube. We highly recommend visiting her channel and subscribing for more inspiring DIY projects and creative ideas!
Final Thoughts: Embrace the Joy of No-Sew Fall Decor
The no-sew toilet paper pumpkin tutorial, championed by Debs Days, offers more than just a craft; it provides a pathway to creative expression, sustainable living, and budget-friendly decor. This project perfectly encapsulates the spirit of autumn—warm, inviting, and full of natural beauty. Whether you’re a seasoned crafter or just starting your DIY journey, the simplicity and versatility of this pumpkin design will surely delight you. It’s an opportunity to transform everyday items into charming focal points for your fall celebrations, creating beautiful memories along the way. So, gather your materials, let your imagination lead the way, and enjoy crafting these wonderful, reusable decorations that add a touch of handmade warmth to your home this season. Share your unique creations with us – we’d love to see how you’ve brought your toilet paper pumpkins to life!