
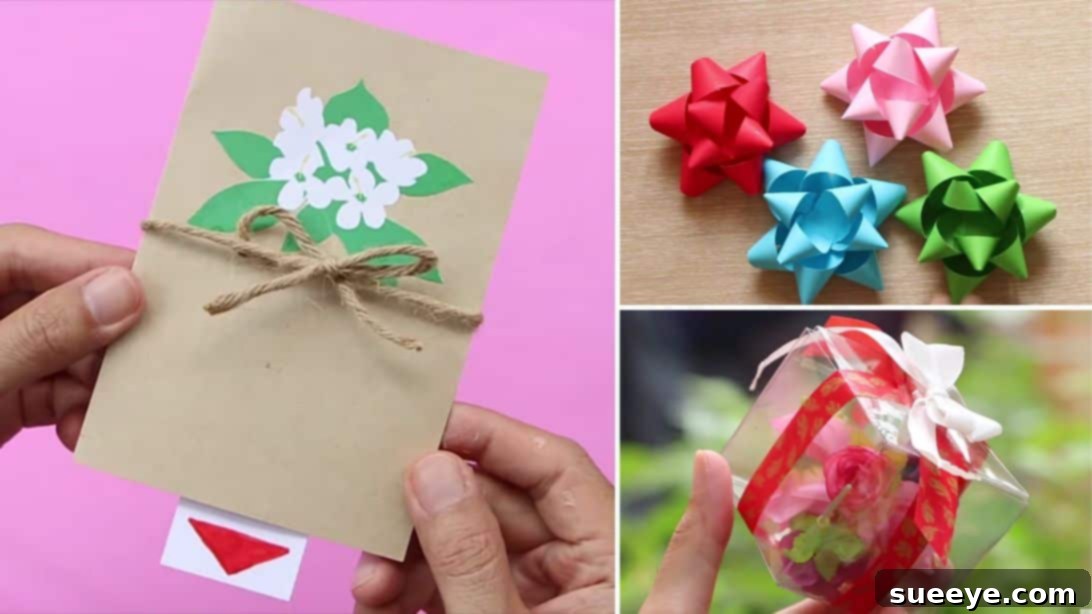
In a world increasingly focused on sustainability and personalization, the art of handmade gifting has never been more cherished. There’s an undeniable charm in presenting a gift that not only comes from the heart but also contributes positively to our planet. We’ve uncovered some truly ingenious and eco-conscious DIY gift ideas and hacks from the creative minds at Thaitrick on YouTube. These brilliant projects are not only incredibly inexpensive to make, often utilizing materials you might already have lying around, but they are also surprisingly simple and quick to assemble. Imagine transforming everyday recycled materials into adorable, professionally-looking gift accents and containers that your recipients will hardly believe are handmade!
This comprehensive guide will walk you through crafting beautiful star ribbons and innovative gift boxes using discarded plastic bottles. These clever tricks allow you to add a unique, personal touch to any present while embracing a sustainable approach. Whether you’re looking to elevate your gift wrapping game, find creative ways to repurpose plastic, or simply enjoy a rewarding crafting session, these ideas are perfect. Dive into the detailed instructions below, and for a visual walkthrough, be sure to watch the full video tutorial by Thaitrick, where every step is clearly demonstrated.
Essential Materials for Your DIY Gift Creations
One of the most appealing aspects of these DIY projects is their accessibility. Most of the materials required are either readily available around your home or can be purchased very affordably. Embracing recycled items like plastic bottles not only saves money but also gives a second life to materials that would otherwise contribute to landfill waste, making your gifts truly eco-friendly and thoughtful.
- Cardstock or Any Colored Paper/Ribbon: This will be the primary material for your charming star ribbons. While cardstock offers a nice rigidity and structure, any sturdy colored paper, patterned scrapbooking paper, or even decorative fabric ribbons can be adapted. Experiment with different textures, patterns, and colors to perfectly match your gift’s theme or the recipient’s personal style.
- Scissors: A good pair of sharp scissors is indispensable for precise cuts, especially when working with paper strips for the ribbons and the often tougher plastic bottles. For achieving even cleaner lines on plastic or for intricate details, a craft knife might also prove useful, but always remember to exercise extreme caution and use a protective cutting mat.
- Glue: A reliable craft glue is essential to secure the various components of your projects. Options include white school glue, clear craft glue, or even a hot glue gun (used carefully and sparingly for quicker adhesion). For the paper star ribbons, a quick-drying liquid craft glue works best, while for plastic bottle boxes, a stronger adhesive designed for plastics can enhance durability, though general craft glue can often suffice, especially if reinforced with ribbon.
- Plastic Bottles: These are the star of the show for our innovative gift boxes. Look for clean, empty plastic bottles of various sizes, such as those used for soda, water, or even some household cleaners (ensure they are thoroughly washed and dried). Their inherent cylindrical shape and flexible yet sturdy plastic make them ideal candidates for creative transformation. Different bottle sizes will naturally yield different box dimensions, offering versatility.
- Ribbon: Ribbons are the perfect finishing touch, adding decorative flair to both your star ribbons and plastic bottle gift boxes. Choose ribbons in complementary colors, varying widths, or even different materials like satin, grosgrain, sheer organza, or natural twine, to enhance the aesthetic appeal and overall elegance of your handmade creations.
Step-by-Step Guide to Crafting Unique Gift Embellishments and Boxes
How to Make a Charming Star Ribbon Gift Topper
Elevate any gift package with a bespoke star ribbon topper. These delightful embellishments add a touch of sophistication, texture, and thoughtfulness, making your presents truly stand out. They are surprisingly simple to create and allow for endless customization in terms of color, size, and material, ensuring each star is as unique as your gift.
- Prepare Your Paper Strips: Begin by meticulously cutting your chosen cardstock or decorative paper into even-width strips. For a balanced and attractive star, you’ll need five strips in total: three pieces should measure approximately 10 inches (about 25 cm) long, and the remaining two pieces should be slightly shorter, at about 9 inches (around 23 cm) long. Maintaining a consistent width across all strips is crucial for achieving a neat and professional-looking finish. For optimal precision, consider using a ruler and a craft knife on a cutting mat, or simply ensure your scissors are sharp and your cuts are steady.
- Form the First Loop: Take one of the paper strips you’ve prepared. Apply a small dab of glue precisely at the center of this strip. Carefully take one end of the strip, fold it over towards the glued center, and simultaneously give it a gentle twist. This twisting action is key to creating the distinctive “petal” or dimensional look of the star. Firmly adhere the twisted end to the glued spot, ensuring it holds its shape as a loop.
- Complete the Loop Pair: Repeat the twisting and adhering process with the other end of the same strip. This time, ensure you twist it in the opposite direction to create a symmetrical, figure-eight-like loop. The goal is to form two identical loops meeting elegantly at the strip’s center, forming a pleasing double-loop structure.
- Repeat for All Strips: Continue this looping and twisting method for all five of your prepared paper strips. Once all strips have been transformed into these elegant double loops, apply a small amount of glue to the back center of each completed piece. This will be the crucial point where they connect to form the star.
- Assemble the Star: Carefully stack the finished loops together. Arrange them strategically, placing the two slightly smaller (9-inch) strips on top of the three longer (10-inch) strips. Position them so that the loops interlock and spread out evenly, forming a beautiful five-pointed star shape, much like how flower petals would naturally overlap. Press firmly to ensure all glued parts adhere well and hold their position. Allow adequate time for the glue to dry completely before handling or attaching it to a gift, ensuring its durability.
These handmade star ribbons are incredibly versatile. They are perfect for adorning gift boxes, gift bags, handmade cards, scrapbooking projects, or even as festive decorations for parties and home decor. You can experiment with glitter paper, textured cardstock, patterned paper, or even thin fabric ribbons for varied and stunning effects. The possibilities for customization are truly endless!
Ingenious Gift Box from Plastic Bottles: Method 1 (Two-Piece Design)
Transforming ordinary plastic bottles into functional and attractive gift boxes is a brilliant testament to the power of upcycling and creative problem-solving. This method creates a two-piece box that is perfect for small trinkets, candies, jewelry, or other precious keepsakes, and it’s remarkably durable and reusable, offering a sustainable alternative to traditional gift packaging.
- Prepare the Bottle Sections: Select two clean, empty plastic bottles of roughly the same size and cylindrical shape. Carefully cut out the middle, cylindrical part of both bottles. You’ll want sections that are free from the curved top or bottom, aiming for a consistent height for your desired box. Ensure the edges are as straight and even as possible; a steady hand or a guide can help here.
- Flatten and Crease the First Piece: Take one of the cut plastic cylinders. Press it down flatly, creating two distinct creases on opposite sides. Then, use the handle of your scissors, a ruler, or a bone folder to firmly and precisely crease these seams. This process is crucial for establishing the initial structural integrity and crisp edges of your box.
- Form the Box Base: Gently open the plastic piece from its flattened state. Now, fold it the other way, ensuring that the two creases you just made are now aligned at the center of the flattened piece. Carefully crease the new side folds in the same manner as before, using the scissors handle or a ruler. When you open the plastic now, you should have a rectangular shape with four distinct vertical creases, perfectly ready to form the sides of your box.
- Assemble the Box: Gently shape the creased plastic into a rectangular or square box. Take the second plastic piece you cut earlier and repeat steps 2 and 3 to create an identical box shape. Now, carefully insert one shaped plastic piece inside the other. The slightly flexible nature of the plastic will allow them to nestle together snugly, forming a secure, enclosed box with one piece acting as the base and the other as the lid.
- Add Your Gifts and Decorate: Before pushing the inner piece completely into place, carefully put your small gifts inside the box. Once your items are secure, push the inner piece down fully to close the box, creating a tight seal. For a beautiful finish, tie a decorative ribbon around the completed box, securing it with a charming bow or knot. This not only adds aesthetic appeal but also provides an extra layer of security and reinforces the box’s structure.
DIY Gift Box from Plastic Bottles: Method 2 (Single-Piece Petal Closure)
This alternative method for crafting a gift box from a plastic bottle creatively utilizes the bottom section of the bottle, transforming it into a unique container with a charming “petal” closure. This design is both visually appealing and securely functional, making it an excellent way to repurpose an often-discarded part of the bottle and add an element of surprise to your gift presentation.
- Prepare the Bottle Base: Start with the bottom part of a clean plastic bottle that you have neatly cut out. This section typically has a sturdy, slightly concave base, which will naturally form the sturdy bottom of your new gift box. Ensure the cut edge is as straight and smooth as possible for the best results.
- Create the Closure Strips: Using your scissors, carefully cut straight down from the rim of the bottle base into evenly spaced vertical strips. The length of these strips will determine the height of your box’s “petals” or flaps when closed. Aim for strips that are about two-thirds of the total height you want your finished box to be, allowing ample overlap for closure. Ensure the cuts are as straight and consistent as possible to create uniform petals.
- Shape the Petals: Once you have a series of vertical strips all around the bottle’s circumference, gently curve the ends of each strip nicely. You can achieve this by lightly running the strip over a scissor blade (similar to how you would curl a ribbon) or by gently bending and shaping them with your fingers. This curving action is crucial as it helps them interlock smoothly and creates a softer, more elegant, and flower-like closure mechanism.
- Form the Closure: Begin pushing the curved strips down, one by one, carefully interlocking them over each other. Visualize them folding inwards towards the center of the box, creating an overlapping pattern that effectively covers the top opening. Continue this process methodically until all strips are pushed down and the top is completely covered, forming a secure and decorative closure. The inherent flexibility of the plastic makes this interlocking possible and creates a surprisingly sturdy lid.
- Final Decoration: To complete this charming gift box, wrap a decorative ribbon around the exterior. Position the ribbon strategically right around the point where the “petals” meet the base of the bottle. Tie a beautiful bow or knot to add a final flourish, which not only enhances the visual presentation but also helps to secure the petals even further, ensuring your gift remains safely inside.
Seven Handy DIY Gift Tips and Hacks for Every Occasion
Beyond the specific projects detailed above, there’s a whole world of DIY creativity that can make your gifts truly unforgettable. Infusing a personal touch not only makes your presents more special but also often aligns with more sustainable and budget-friendly practices. Here are some additional tips and hacks to elevate all your gift-giving occasions:
- Personalize with Handmade Tags: Move beyond generic store-bought tags by crafting your own from scrap paper, cardstock offcuts, or even repurposed materials like old magazine pages or cereal boxes. Hand-write the recipient’s name, add a small, heartfelt drawing, or stamp a custom message. This simple, thoughtful detail instantly elevates your gift and shows extra care.
- Embrace Natural Embellishments: Look to nature for beautiful, often free, and eco-friendly decorations. Sprigs of fresh rosemary or evergreen, dried orange slices, small pinecones, fragrant cinnamon sticks, or tiny pressed flowers can add an organic, rustic, and incredibly charming touch to your gift wrapping. Best of all, they are fully compostable or can be repurposed by the recipient!
- Reinvent with Fabric Scraps: Old scarves, attractive fabric remnants, or even attractive tea towels can be ingeniously used as unique, reusable gift wrap. Explore the Japanese art of Furoshiki (fabric wrapping), which offers a fantastic, zero-waste alternative to traditional paper. The fabric itself can even become an additional part of the gift, making it a two-in-one present.
- Batch Crafting for Efficiency: If you have multiple gifts to prepare, especially during holidays or for special events, consider adopting “batch crafting.” Dedicate a focused block of time to make several star ribbons or plastic bottle boxes at once. This approach streamlines the process, saves time, and helps ensure a consistent, high-quality output for all your presents, reducing last-minute stress.
- Incorporate Edible Delights: A small bag of homemade cookies, a custom tea blend, a jar of artisanal jam, or a handful of roasted nuts can be a wonderfully thoughtful complement to your main gift. Attach this edible treat to your beautifully wrapped package with a bit of twine or a small ribbon for an extra layer of warmth and generosity.
- DIY Gift Baskets on a Budget: Instead of purchasing expensive, pre-made gift baskets, unleash your creativity by assembling your own using repurposed containers. Decorative cardboard boxes, wicker baskets from thrift stores, or even our larger plastic bottle boxes (for smaller themed baskets) can serve as unique bases. Fill them with a curated selection of small, handmade, or budget-friendly items for a truly unique and personalized present.
- The Power of Presentation: Always remember that presentation is paramount. Even the simplest, most inexpensive gift can look luxurious and incredibly special with careful attention to detail. Crisp folds in wrapping paper, neatly tied ribbons, and a thoughtfully chosen color scheme can make all the difference, transforming an ordinary item into an extraordinary experience. Practice your wrapping and bow-tying techniques to achieve a polished look every time!
These brilliant tips and hacks from Thaitrick offer a fantastic opportunity to unleash your creativity, save money, and contribute to a more sustainable world. By utilizing recycled materials and simple techniques, you can transform ordinary items into extraordinary gifts that convey genuine care, thoughtfulness, and a personal touch. The joy of giving a handmade present, crafted with your own hands and infused with your unique style, is truly unparalleled and deeply appreciated by recipients.
We highly encourage you to explore their full video tutorial for even more clever and creative ideas and to see these fascinating hacks in action. Watch the video now to get inspired and empowered for your next gifting occasion, transforming the way you give and present gifts!
*All image credit for the inspiring projects shown belongs to Thaitrick via YouTube. Be sure to follow and subscribe to their channel for a continuous flow of innovative DIY content, crafting tutorials, and ingenious hacks!