
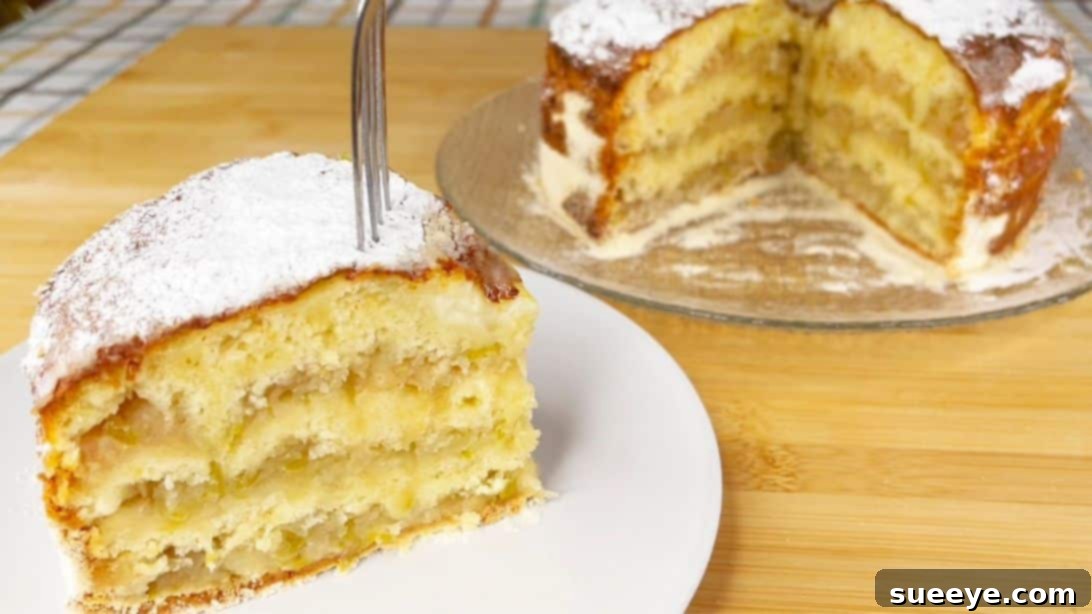
Unlock the secret to an irresistibly delicious and remarkably simple apple cake with this exceptional recipe! If you find yourself with an abundance of fresh apples, this is the perfect opportunity to transform them into a heavenly dessert that will impress everyone. Forget complicated baking processes; this unique apple cake, inspired by the culinary creators at lecker essen on Youtube, is designed for ease without compromising on flavor. It’s truly the tastiest and most straightforward apple cake recipe you’ll ever encounter, making it ideal for baking novices and seasoned pros alike. Light, fluffy, and infused with the sweet-tart essence of apples, it’s the ultimate companion for your morning coffee or afternoon tea. Get ready to bake a masterpiece with minimal effort!
The Ultimate Easy Apple Cake: A Delightful Culinary Journey
Baking doesn’t have to be a daunting task, especially when you have a recipe that simplifies the process while delivering extraordinary results. This particular apple cake recipe stands out not just for its incredible taste but also for its innovative, layered approach that ensures perfect moisture and texture every time. We’ll guide you through each step, offering insights and tips to ensure your apple cake turns out beautifully golden, wonderfully fragrant, and utterly delicious. From selecting the right apples to mastering the unique layering technique, you’re about to discover a baking experience that’s both rewarding and incredibly easy.
Why This Apple Cake Recipe is a Game-Changer
- Effortless Preparation: No complex mixing, just simple layering of dry ingredients and grated apples.
- Unique Texture: The combination of all-purpose flour and semolina creates a distinctive, satisfying crumb that’s both tender and slightly hearty.
- Unparalleled Moisture: A clever hot milk and butter infusion ensures every slice is incredibly moist and flavorful.
- Beginner-Friendly: Each step is clear, concise, and easy to follow, making it perfect for those new to baking.
- Versatile Delight: Perfect for any occasion, from a casual family treat to an elegant dessert for guests.
Essential Ingredients for Your Perfect Apple Cake
Gathering your ingredients is the first step towards baking success. This recipe uses readily available items, but a few key choices can make all the difference in the final taste and texture of your cake. Pay attention to the type of apples and the flour combination for optimal results.
- 5 Granny Smith Apples: Opt for slightly underripe apples. Their tartness beautifully balances the sweetness of the cake, preventing it from becoming overly rich. Granny Smith apples also hold their shape well when baked, contributing to a pleasant texture. If Granny Smith isn’t available, other firm, tart apples like Honeycrisp or Braeburn can be good alternatives.
- 1 Cup of Granulated Sugar: Provides the perfect level of sweetness, complementing the tartness of the apples and contributing to the cake’s golden-brown crust.
- 1 Cup of Semolina Flour: This is a key ingredient that sets this recipe apart. Semolina, made from durum wheat, adds a unique, slightly grainy texture and a lovely golden hue to the cake, while also helping to absorb moisture from the apples for a perfectly balanced crumb.
- 1 Cup of All-Purpose Flour: The foundation of our dry mixture, providing structure and lightness to the cake.
- 1.5 Tablespoons of Baking Powder: The primary leavening agent, ensuring your cake rises beautifully and achieves a light, airy texture.
- 1/8 Cup of Unsalted Butter: When melted with hot milk, this butter adds richness and helps create a tender, moist crumb throughout the cake.
- 1 Glass of Hot Milk: (Approximately 1 cup or 240ml) The warm milk combined with butter is poured over the cake layers, allowing the dry ingredients to hydrate evenly and creating an incredibly moist cake.
- Powdered Sugar (Optional): For a beautiful, elegant dusting on top, adding a final touch of sweetness and visual appeal.
Step-by-Step Instructions: Baking Your Apple Cake
Follow these detailed instructions to create your delightful apple cake. Each step is designed for simplicity and maximum flavor.
Step 1: Prepare Your Baking Environment
Begin by preheating your oven to 356 degrees F (180 degrees C). While the oven warms up, prepare a round baking pan, ideally 9-10 inches in diameter. Line the bottom of the pan with parchment paper, allowing a slight overhang to easily lift the cake once baked. You can also lightly grease the sides of the pan to prevent sticking. Proper preparation ensures your cake bakes evenly and releases effortlessly.
Step 2: Combine the Dry Ingredients
In a medium-sized mixing bowl, combine your dry ingredients: 1 cup of all-purpose flour, 1 cup of semolina flour, 1 cup of granulated sugar, and 1.5 tablespoons of baking powder. Whisk these ingredients thoroughly until they are well combined and uniform. This step is crucial for ensuring that the leavening agent and sugar are evenly distributed throughout the cake, contributing to a consistent rise and sweetness in every bite.
Step 3: Divide the Dry Mixture
Once your dry mixture is perfectly blended, divide it into four equal portions. You can do this by eye, or for precision, use a measuring cup. Set these portions aside in separate small bowls or on separate pieces of parchment paper. This precise division is key to the unique layering technique that defines this moist and flavorful apple cake.
Step 4: Prepare the Apples
Take your 5 Granny Smith apples and thoroughly wash them. You can peel them if you prefer a smoother texture, but leaving the skin on adds fiber, nutrients, and a rustic charm (just ensure they are well-washed). Using a box grater or a food processor with a grating attachment, grate all the apples into a clean bowl. Once all apples are grated, divide them into three equal parts. The grated apples will release their natural juices during baking, contributing immense moisture and a burst of fresh apple flavor to the cake.
Step 5: Master the Layering Technique
Now, let’s build your cake in layers within the prepared baking pan. This unique method is what makes the cake so incredibly moist and flavorful.
- Start by taking one of your divided dry mixtures and carefully pour it into the bottom of the round baking pan. Use a spoon or a spatula to gently spread it out evenly, forming the first dry layer.
- Next, take one part of your grated apples and evenly spread them over the dry mixture. Ensure the apples cover the entire surface without compacting them too much.
- Repeat this process: add another layer of the dry mixture, spread it, and then add another layer of grated apples.
- Continue alternating dry mixture and grated apples until you’ve used all the portions. You should end with a layer of the dry mixture on top. The result will be beautiful, distinct layers that will meld together wonderfully during baking.
Step 6: Infuse with Moisture
Once all your layers are assembled in the pan, grab a thin stick or the handle of a wooden spoon. Carefully poke numerous holes all over the surface of the cake, reaching down into the layers. Be generous with the holes; they don’t need to be perfectly spaced, but aim for a good distribution. These holes will act as channels for the liquid mixture, ensuring even moisture penetration throughout the cake layers and preventing any dry spots.
Step 7: Prepare the Liquid Infusion
In a small, heatproof bowl or measuring cup, pour your 1 glass of hot milk (approximately 1 cup). Add the 1/8 cup of butter to the hot milk. Stir gently until the butter completely melts and combines with the milk. The warmth of the milk helps the butter integrate smoothly, creating a rich, flavorful liquid that will transform your cake’s texture.
Step 8: Saturate the Cake
Carefully and evenly pour the warm milk and butter mixture over the entire surface of the layered cake in the pan. The liquid will seep into the holes you’ve created, saturating the dry layers and the grated apples. Let the cake sit for about 5-10 minutes before baking. This resting period allows the dry ingredients to begin absorbing the liquid, setting the stage for an incredibly moist and tender crumb.
Step 9: Bake to Golden Perfection
Carefully transfer the baking pan into your preheated oven. Bake for approximately 40-50 minutes at 356 degrees F (180 degrees C). Baking times can vary slightly depending on your oven, so keep an eye on it. The cake is done when the top is beautifully golden brown, and a wooden skewer or toothpick inserted into the center comes out clean or with moist crumbs attached (but no wet batter). The aroma of baked apples and sweet cake will fill your kitchen, signaling that a delicious treat is almost ready.
Step 10: Cool, Dust, and Serve
Once baked, remove the apple cake from the oven and place it on a wire rack to cool completely in the pan. Allowing it to cool fully is essential for the cake to set properly and prevents it from crumbling when removed. Once cooled, carefully remove the cake from the pan, using the parchment paper overhang to assist you. Transfer the apple cake to a serving plate. For a delightful finishing touch, sift some powdered sugar generously over the top of the cake. This adds a touch of elegance and extra sweetness. Slice and serve your homemade apple cake, and prepare for compliments!
Tips for Baking Success and Delicious Variations
Achieving the Perfect Apple Cake Every Time
- Measure Accurately: Especially with dry ingredients, precise measurements are crucial for the right texture. Use a kitchen scale for flour and semolina for the most accurate results.
- Don’t Overmix: While mixing dry ingredients, ensure they’re just combined. Overmixing can lead to a tougher cake.
- Know Your Oven: Ovens can vary. If your cake is browning too quickly, you can loosely tent it with foil during the last 10-15 minutes of baking.
- Cool Completely: Patience is key! A fully cooled cake is easier to slice and tastes even better as the flavors have time to meld.
Elevate Your Apple Cake with Creative Variations
This recipe is wonderfully versatile, allowing for delightful customizations to suit your palate:
- Spice It Up: Add 1 teaspoon of ground cinnamon or a pinch of nutmeg to the dry mixture for a warmer, spiced apple flavor.
- Nutty Crunch: Fold in a handful of chopped walnuts or pecans into the grated apples for an added layer of texture and nutty flavor.
- Vanilla Essence: A teaspoon of vanilla extract added to the milk mixture can enhance the overall sweetness and aroma of the cake.
- Citrus Zest: Grate the zest of half a lemon into the dry mixture or over the apples for a brighter, more aromatic cake.
- Different Apples: Experiment with a mix of tart and sweet apples, like a combination of Granny Smith and Fuji, for a more complex flavor profile.
Serving and Storage Suggestions
This easy apple cake is delightful on its own, but here are some ways to enjoy it even more:
- Classic Pairing: Serve warm or at room temperature with a scoop of vanilla ice cream, a dollop of whipped cream, or a drizzle of caramel sauce for an indulgent dessert.
- Breakfast or Brunch: Enjoy a slice with your morning coffee or as part of a brunch spread.
- Tea Time Treat: It’s the quintessential cake for afternoon tea, pairing perfectly with a hot beverage.
To store your apple cake, place any leftovers in an airtight container at room temperature for up to 3 days, or in the refrigerator for up to 5 days. For longer storage, you can freeze individual slices, well-wrapped, for up to 2-3 months. Thaw at room temperature before serving.
Inspired by this fantastic recipe? Explore more baking adventures with similar guides, perhaps from other talented creators like Just Cake It on Youtube, who also share wonderful dessert ideas.
Your New Favorite Apple Cake Awaits!
You now possess the knowledge to create an incredibly moist, flavorful, and easy apple cake that will undoubtedly become a staple in your recipe collection. This “Tastiest and Easiest Apple Pie Recipe,” as it’s often affectionately called, transcends traditional baking complexities, offering a straightforward path to homemade deliciousness. Whether you’re a seasoned baker looking for a quick and satisfying recipe or a beginner eager to impress, this apple cake is a triumph. So, preheat your oven, gather your Granny Smiths, and get ready to enjoy the delightful aroma and taste of your own freshly baked apple cake. Happy baking!