
Easy Leaves Quilt Pattern Tutorial: Crafting Beautiful Autumn Blocks
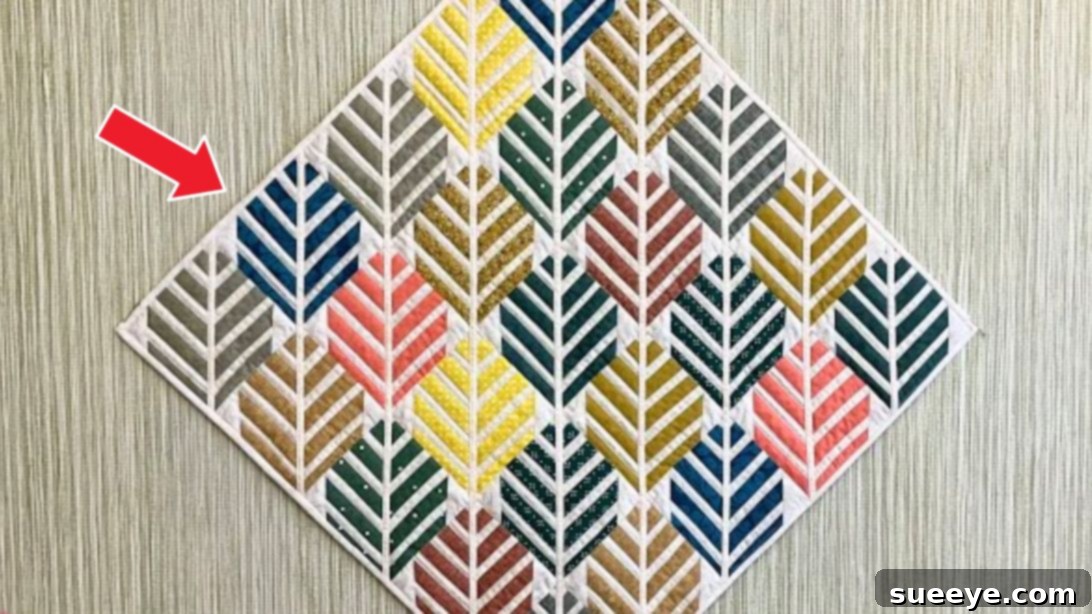
Embark on a delightful quilting journey with one of the most enchanting leaf quilt patterns available. While countless designs celebrate the beauty of foliage, this particular method, brilliantly showcased by The Melody of Sewing, stands out as an absolute favorite. Imagine creating a quilt block that not only captures the essence of a leaf but also beautifully renders its intricate veins – a detail that elevates it far beyond conventional patterns. The moment you combine these individual blocks, they seamlessly interlock to form a breathtaking, cohesive design, evoking the serene beauty of a forest floor in autumn or a vibrant spring garden.
Many quilters, upon first glance, might perceive this block as complex or challenging. However, appearances can be delightfully deceiving! This leaves quilt block, despite its sophisticated look, is surprisingly straightforward and accessible, even for those new to quilting. The steps are intuitive, easy to follow, and designed to guide you through the process with clarity. You don’t need years of experience to achieve stunning results; a willingness to learn and a love for fabric crafts are all you need to get started. Let’s dive into creating a masterpiece that will surely become a cherished part of your home decor or a heartfelt handmade gift.
Why Choose a Leaves Quilt Pattern for Your Next Project?
Leaf quilt patterns hold a special place in the hearts of many crafters due to their timeless appeal and versatility. They offer a unique way to bring the tranquility and beauty of nature indoors, regardless of the season. An easy leaves quilt pattern like this one is perfect for celebrating the vibrant hues of autumn, the fresh greens of spring, or even abstract interpretations of nature with unconventional color palettes. Beyond their aesthetic appeal, leaf blocks are fantastic for developing fundamental quilting skills, such as precise cutting, accurate seam allowances, and effective pressing techniques. Each block you create builds confidence, preparing you for more intricate designs down the line.
This specific pattern from The Melody of Sewing is particularly appealing because it allows for incredible design flexibility. You can choose to create a whole quilt, a charming table runner, decorative placemats, or even stunning throw pillows. The visual texture created by the “veins” adds an extra layer of interest, making your finished project truly unique. Whether you’re aiming for a rustic, modern, or traditional look, varying your fabric choices can dramatically alter the final outcome, allowing for endless creative possibilities. It’s a project that promises not only a beautiful finished item but also a deeply satisfying crafting experience.
Essential Materials for Your Easy Leaves Quilt Block
Before you begin sewing, gathering all your materials and tools is crucial for a smooth and enjoyable quilting process. For this easy leaves quilt block, you’ll need standard quilting cotton fabrics, which are durable and easy to work with. Pay attention to fabric quality, as it significantly impacts the final look and longevity of your quilt.
- 6 pieces of 1″ x 13″ strips of main fabric: These strips will form the primary color of your leaves. Consider using a variety of shades within the same color family (e.g., different greens for a spring look, or various reds, oranges, and yellows for an autumnal theme) to add depth and interest. High-quality quilting cottons with a tight weave are recommended for best results.
- 5 pieces of 3/4″ x 13″ strips of background fabric: This fabric will provide the contrast needed for your leaf design to pop. A solid, light-colored fabric like cream, white, or a very light gray often works best to make the leaf shapes stand out. Ensure this fabric also coordinates well with your main fabric choices.
- 4 pieces of 2″ background squares: These small squares are vital for shaping the corners of your leaf blocks, giving them their distinctive form. Using the same background fabric as your strips will maintain consistency in the design.
- 1″ wide background strip (length will vary based on project size): This strip is used to create the detailed “veins” within each leaf block. Having enough length to span across multiple blocks is essential.
Additional Essential Quilting Tools:
While not listed in the original materials, these tools are indispensable for any quilting project:
- Rotary Cutter, Self-Healing Mat, and Acrylic Rulers: Precision is paramount in quilting. A sharp rotary cutter with a self-healing mat and various acrylic rulers (especially a square-up ruler) will ensure your fabric pieces are cut accurately, leading to perfectly matching seams.
- Sewing Machine: A reliable sewing machine with a good 1/4-inch foot attachment is essential for consistent seam allowances.
- Good Quality Thread: Choose 100% cotton thread that matches or blends with your fabrics. Polyester threads can also be used, but cotton is traditional for quilting.
- Iron and Ironing Mat: Proper pressing is as important as accurate sewing. It helps set seams, flatten blocks, and ensures everything lays perfectly flat.
- Fabric Scissors: For snipping threads and occasional fabric cuts that don’t require the rotary cutter.
- Quilting Pins or Clips: To hold fabric pieces together securely before sewing.
- Seam Ripper: Every quilter needs one! It’s for those inevitable moments when a seam needs to be undone and re-sewn for perfection.
Having these tools ready will make your crafting experience much smoother and more enjoyable, allowing you to focus on the creative process of bringing your leaves quilt to life.
How to Make a Leaves Quilt Block: Step-by-Step Guide
This section will walk you through each step of creating your individual leaves quilt blocks, meticulously explaining the techniques for a flawless finish. Accuracy in cutting and sewing is key to achieving crisp lines and professional-looking blocks.
Step 1: Constructing Your Fabric Strip Sets
Begin by carefully aligning one 3/4″ x 13″ background fabric strip with one 1″ x 13″ main fabric strip, placing them right sides together. Use pins to secure them along the long edge if needed, ensuring they remain perfectly aligned. Sew these two strips together along one long edge using a precise 1/4-inch seam allowance. Repeat this process for all five background strips and five main fabric strips, creating five individual pairs. Once these pairs are sewn, take another 1″ x 13″ main fabric strip and sew it to the remaining edge of one of the main fabric strips from a previously created pair. Continue until all strips are sewn together into a single, cohesive unit often referred to as a “strip set.” The goal is to have a larger strip set with alternating main and background fabric strips. After sewing, press all seams flat. You can choose to press them open for less bulk or to one side (usually towards the darker fabric) for consistent seam direction throughout your project. Consistency in pressing is crucial for blocks to lie flat.
Step 2: Sub-cutting and Creating Angled Units
From the large strip set you created in Step 1, carefully cut five 5 3/4″ inch squares. Use your rotary cutter and ruler for maximum precision. As you cut these squares, pay close attention to the orientation of the seams within each square; ideally, you want the diagonal seams to run in opposite directions if possible when forming pairs later. This subtle detail can aid in nesting seams. Next, take two of these 5 3/4″ squares and place them right sides together. Using a fabric-marking pen or pencil, draw a diagonal line from one corner to the opposite corner. Secure the squares with pins to prevent shifting. Now, sew a seam 1/4″ away from both sides of the drawn diagonal line. This technique will yield two units from each pair. After sewing, carefully cut along the drawn diagonal line, separating the two units. Press each unit open, ensuring the seams are flat. Finally, trim each of these units into a precise 5 1/4″ square. A square-up ruler is invaluable for this step, as it helps maintain the perfect square shape and size, which is critical for the final block assembly.
Step 3: Shaping the Leaf Corners with Snowball Blocks
This step adds the distinctive pointed shape to your leaf blocks. Take your four 2″ background squares. On the wrong side of each square, draw a diagonal line from one corner to the opposite corner. Now, place one of these marked 2″ background squares onto the top corner of your 5 1/4″ unit from Step 2, aligning the raw edges. The drawn line on the small square should extend from the inner corner towards the outer corner of the larger block, forming the tip of the leaf. Sew directly on the drawn line. After sewing, carefully trim the excess fabric from the corner, leaving a 1/4-inch seam allowance. Press the background corner open, creating a neat, crisp point. Repeat this process for all corners of your blocks as indicated by the specific leaf design. This technique is often referred to as the “snowball” method or “stitch-and-flip” corner, and it’s fantastic for adding dimension and shaping to quilt blocks.
Step 4: Assembling Your Quilt Top
Once all your individual leaf blocks are prepared, it’s time to arrange them into your desired quilt top layout. Lay out all the blocks on a design wall or a large flat surface, experimenting with different orientations until you achieve a pleasing pattern. For this design, arranging the blocks so that all leaves point in the same direction or creating a swirling effect can be particularly effective. Once you are satisfied with the arrangement, sew the blocks together in rows. Pin carefully at each seam intersection to ensure precise matching, often “nesting” the seams by pressing adjacent seams in opposite directions to reduce bulk. After each row is complete, press the row seams to one side. Finally, sew the rows together, matching seam lines as accurately as possible. Again, pressing these long seams is crucial for a flat quilt top. At this stage, you have completed the main design of your quilt. You would then sandwich this quilt top with batting and backing fabric, preparing it for quilting.
Step 5: Adding the Distinctive Leaf Veins
This final step adds a unique and beautiful detail that truly makes this leaf pattern stand out – the veins. Take your 1″ wide background strip. Fold it in half lengthwise twice, pressing firmly with an iron after each fold to create sharp creases. This will result in a narrow, finished strip that will serve as the vein. Now, carefully position this folded strip on the middle of each leaf block, following the natural curve or direction you envision for the leaf’s central vein. You can use fabric glue or pins to temporarily secure it in place. Using a sewing machine, stitch along both long edges of the folded strip, attaching it securely to the leaf block. For best results, use a thread color that matches your background fabric, making the stitching almost invisible and allowing the strip itself to create the vein effect. This detail adds significant character and depth to each leaf, mimicking the natural world.
Finishing Your Quilt: Sandwiching, Quilting, and Binding
Once your quilt top is assembled and the leaf veins are in place, the next stage is to turn it into a complete, functional quilt. This involves three main steps: sandwiching, quilting, and binding.
Sandwiching Your Quilt:
The “quilt sandwich” consists of three layers: the quilt top you’ve just made, a layer of batting (the fluffy middle layer that provides warmth and texture), and a backing fabric. Lay your backing fabric wrong side up, smooth it out completely, and tape it to a clean floor or large table. Place the batting on top of the backing, ensuring it’s smooth and extends beyond the edges of the backing. Finally, place your quilt top, right side up, on top of the batting, again making sure it’s perfectly smooth and centered. Pin or baste these three layers together generously to prevent shifting during the quilting process. This can be done with safety pins (pin basting), long stitches (thread basting), or temporary adhesive sprays (spray basting).
Quilting Your Layers:
Quilting is the process of stitching through all three layers to hold them together and add texture. You can choose from various quilting methods:
- Straight Line Quilting: Using your sewing machine and a walking foot, stitch straight lines across your quilt. These can be parallel to your seams, diagonal across the blocks, or in a grid pattern.
- Free Motion Quilting: For more advanced quilters, this involves dropping the feed dogs on your sewing machine and moving the quilt freely to create swirls, loops, stipples, or other intricate designs.
- Hand Quilting: A traditional method using a needle and thread to create small, even stitches by hand. This adds a beautiful, heirloom quality to your quilt.
The quilting design can enhance the leaf pattern, perhaps by outlining the leaves or stitching around the veins to make them stand out even more.
Adding the Binding:
The final step is to bind your quilt, which finishes the raw edges and provides a durable, decorative border. Binding strips are typically cut from fabric, sewn together to create a continuous strip, pressed in half lengthwise, and then sewn to the outer edge of the quilt, first to the front and then wrapped around to the back and hand-stitched or machine-stitched down. This not only protects the edges but also frames your beautiful work, giving it a polished and professional finish.
Creative Variations and Design Ideas for Your Leaves Quilt
The beauty of quilting lies in its endless possibilities for personalization. This easy leaves quilt block, while stunning on its own, can be transformed into a myriad of unique designs. Don’t limit yourself to the initial layout; let your imagination soar!
Color Palette Exploration:
- Autumnal Harvest: Embrace classic fall colors—deep reds, burnt oranges, golden yellows, and rich browns—for a traditional autumn leaves quilt that evokes cozy warmth.
- Spring Awakening: Use a range of greens, from vibrant lime to deep forest, with pops of light blue or soft pink for a fresh, spring-themed quilt.
- Monochromatic Elegance: Choose various shades of a single color, such as blues or grays, for a sophisticated and modern aesthetic.
- Scrappy Delight: Utilize leftover fabric scraps for a truly unique and eco-friendly quilt, where each leaf tells its own story through a medley of prints and patterns.
Layout and Arrangement Ideas:
- Repeating Pattern: Simply repeat the blocks in a grid for a clean, uniform look, as suggested by the tutorial.
- Alternating Blocks: Alternate your leaf blocks with solid background blocks or complementary plain blocks to create visual breathing room and highlight the leaf design.
- Sashing and Borders: Add sashing (strips of fabric between blocks or rows) to frame each leaf, and wide outer borders to further enhance the quilt’s size and design.
- Diagonal Flow: Arrange blocks so the leaves appear to fall or drift diagonally across the quilt, creating a sense of movement.
- Center Medallion: Use a larger leaf block or a cluster of blocks as a central medallion, then build outward with smaller blocks or contrasting fabrics.
Beyond the Quilt:
This versatile leaf block isn’t just for full quilts! Consider using it for smaller projects:
- Table Runners and Placemats: Create a matching set for seasonal dining decor.
- Pillow Covers: A single, well-placed leaf block can make a striking decorative pillow.
- Wall Hangings: Display your leaf art proudly on a wall to add a touch of nature to any room.
- Tote Bags or Pouches: Integrate a leaf block into the design of a handmade bag for a personal touch.
There are plenty of other designs and applications you can explore with this amazing block. Watch the video below by The Melody of Sewing for more ideas and visual inspiration to fuel your creative spirit.
Leaves Quilt Block Tutorial Video Guide
For a dynamic visual walkthrough of each step, be sure to watch the comprehensive tutorial from The Melody of Sewing. Seeing the process in action can clarify any uncertainties and provide valuable tips that complement these written instructions. The video clearly demonstrates the precise cutting, sewing, and pressing techniques required to achieve these beautiful leaf blocks with their signature veining.
Creating this easy leaves quilt pattern is a rewarding experience that combines the precision of quilting with the artistic expression of nature’s beauty. With clear instructions, quality materials, and a bit of patience, you’ll soon have a stunning piece of fabric art to cherish. Happy quilting!
RELATED: Falling Leaves Quilt Block Tutorial