
DIY Backyard Fire Pit & String Lights: Create Your Cozy Outdoor Oasis
Are you dreaming of transforming your backyard into a captivating and cozy retreat? Imagine cool evenings spent gathered around a flickering fire, sharing stories, and making memories with loved ones. A DIY fire pit is the perfect centerpiece for such an outdoor haven, and it’s much easier to build than you might think! This guide, inspired by the fantastic video tutorial from @thenavagepatch on TikTok, will walk you through creating your own stunning brick fire pit. Beyond just the warmth of the flames, we’ll also explore how to elevate the entire ambiance with enchanting string lights, turning your outdoor space into a magical oasis.
This project is ideal for anyone looking to make a significant impact on their outdoor living area without extensive construction experience or a hefty budget. With just a few basic materials, readily available tools, and a dedicated weekend, you can craft a beautiful, functional, and durable fire pit. Get ready to embark on a rewarding DIY journey that culminates in a backyard perfect for relaxation, entertainment, and endless enjoyment.
Why Embark on a DIY Fire Pit Project?
Choosing to build your own fire pit offers a multitude of benefits that extend beyond mere cost savings:
- Budget-Friendly: Crafting your fire pit yourself can significantly reduce expenses compared to purchasing a pre-made unit or hiring professional landscapers. You control the cost of materials and labor (your own!).
- Personalized Design: A DIY approach allows you complete creative freedom. You can tailor the size, shape, and aesthetic to perfectly complement your backyard’s existing landscape and your personal style.
- Sense of Accomplishment: There’s immense satisfaction in stepping back and admiring a functional and beautiful structure you’ve built with your own hands. It’s a rewarding personal achievement.
- Enhanced Outdoor Living: A fire pit instantly becomes a natural focal point for gatherings, extending the usability of your backyard well into cooler evenings and seasons. It fosters conversation, provides warmth, and adds undeniable charm.
- Improved Property Value: A well-designed and safely constructed fire pit can be a desirable feature for potential homebuyers, subtly boosting your property’s appeal.
Essential Planning Steps for Your Fire Pit
Before any digging or brick laying begins, thorough planning is paramount. Thoughtful consideration of these key elements ensures both safety and the long-term enjoyment of your new outdoor feature.
Selecting the Perfect Location
The placement of your fire pit is crucial for safety and optimal use. Choose a spot that is:
- Clear of Flammable Structures: Ensure a significant clearance (typically 10-25 feet, but always check local fire codes) from your home, sheds, fences, trees, low-hanging branches, and any other combustible materials. Sparks and embers can travel further than you think.
- Level and Stable: The ground beneath your fire pit must be as flat and firm as possible. An uneven foundation can lead to an unstable structure over time, posing a safety risk. Prepare the area by clearing debris and compacting the soil.
- Protected from Strong Winds: While not always feasible, selecting a location with some natural wind protection (e.g., a slight dip in the terrain or a strategically placed retaining wall) can help prevent embers from scattering dangerously.
- Convenient and Accessible: Consider how easily you can access the fire pit for bringing firewood, cleaning, and for comfortable seating arrangements around it.
Determining the Ideal Size and Shape
The beauty of a DIY project lies in its customizability. When deciding on the dimensions for your fire pit, consider:
- Your Yard’s Proportions: A smaller backyard will likely benefit from a more compact fire pit, while larger spaces can accommodate grander, more expansive designs without feeling overcrowded.
- Anticipated Gatherings: How many people do you typically envision sitting around the fire? A larger gathering will require a wider diameter for comfortable seating and safe distancing from the flames.
- Seating Arrangements: Account for sufficient space around the fire pit to place chairs, benches, or other seating elements comfortably and safely. Allow at least 3-5 feet from the edge of the pit to the nearest seating.
The tutorial by @thenavagepatch showcases a classic circular design, which is both aesthetically pleasing and relatively straightforward to construct using curved retaining wall bricks or standard bricks arranged carefully.
Understanding Local Regulations and Permits
Before you begin any construction, it is imperative to check with your local municipality, county, or homeowner’s association (HOA). Many areas have specific regulations regarding outdoor burning, fire pit dimensions, required distances from property lines, or even mandate permits for permanent outdoor structures. Taking this crucial step ensures your project is fully compliant with all safety standards and local ordinances, preventing potential fines or the need to dismantle your work.
Essential Materials and Tools List
One of the most appealing aspects of this fire pit design is its reliance on readily available and relatively inexpensive materials. Here’s what you’ll need to gather to bring your backyard oasis to life:
Primary Materials:
- Bricks or Retaining Wall Blocks: These form the structural walls of your fire pit. The quantity required will depend on your desired diameter and height. Look for options specifically designed for outdoor use and landscaping, such as retaining wall blocks, paver stones, or even fire-rated bricks for the inner layer if you’re building a very intense fire pit. Interlocking retaining wall blocks are often a favorite for DIYers due to their ease of stacking and pleasing aesthetic.
- Landscape Adhesive (Construction Adhesive): This is a high-strength, weather-resistant adhesive crucial for securely bonding the bricks together. It needs to withstand outdoor elements and temperature fluctuations, ensuring a sturdy and long-lasting structure. Ensure it’s rated for masonry and outdoor use.
- Black Steel Fire Pit Ring/Insert: This is a vital safety and durability component. The steel ring forms the inner lining of your fire pit, protecting the masonry from the direct, intense heat of the fire. This prevents the bricks from cracking due to thermal shock and significantly extends the life of your fire pit. It also helps contain the fire safely within a designated area.
Recommended Tools and Safety Gear:
- Shovel and Rake: Indispensable for clearing the chosen area, leveling the ground, and preparing the foundation.
- Measuring Tape: Essential for accurate dimensions, ensuring your fire pit is the correct size and perfectly circular (or square).
- Spirit Level (long): Absolutely critical for ensuring each course of bricks is perfectly level, guaranteeing a stable and professional-looking finished product.
- Rubber Mallet: Useful for gently tapping bricks into their precise position without causing damage.
- Caulk Gun (for adhesive): If your landscape adhesive comes in tubes, a sturdy caulk gun will make application easy and efficient.
- Work Gloves: Protect your hands from rough materials, cuts, and adhesive.
- Safety Glasses: Always wear safety glasses when cutting bricks (if necessary) or applying adhesive to protect your eyes.
- Utility Knife: Handy for opening adhesive tubes or other general tasks.
Step-by-Step Directions: Constructing Your DIY Fire Pit
With your planning complete and materials gathered, it’s time to bring your vision to life. Follow these detailed steps, drawing inspiration from the practical and achievable approach demonstrated by @thenavagepatch, to build a sturdy and beautiful backyard fire pit.
Step 1: Preparing and Leveling Your Site
The foundation is everything. Once you’ve finalized your fire pit’s location and approximate dimensions, begin by clearing the chosen area. Use your shovel and rake to remove any grass, weeds, roots, large rocks, or other debris. The goal is to expose compact, bare soil. TikTok user @thenavagepatch emphasized the importance of flattening and leveling this ground. Use your long spirit level to meticulously check the area in multiple directions. Make any necessary adjustments by adding or removing soil, ensuring the surface is as flat and perfectly level as possible. A stable, level base is crucial for the overall integrity and safety of your fire pit.
Step 2: Laying the First Course of Bricks (The Foundation)
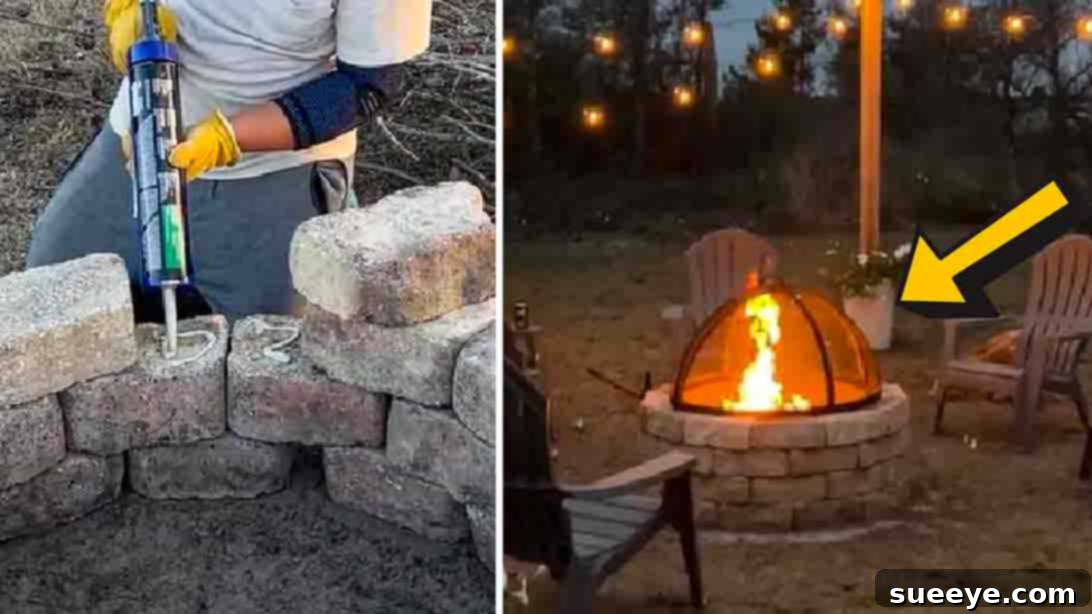
This is where your fire pit truly starts to take shape. Begin by arranging your first layer (or “course”) of bricks in your desired circular or square pattern directly on the prepared, level ground. It’s highly recommended to do a “dry run” first, placing all the bricks without adhesive. This allows you to confirm the exact shape, diameter, and fit before making anything permanent. Once you are completely satisfied with the layout, carefully apply a generous, continuous bead of landscape adhesive to the bottom of each brick before setting it firmly in place. Press down to ensure excellent contact with the ground. As you lay the first course, continuously check with your spirit level that each brick and the entire ring remain perfectly level. This initial course dictates the straightness and stability of all subsequent layers.
Step 3: Building Up the Walls with Subsequent Layers
With the first course securely in position, begin laying the second layer of bricks. For structural strength, it is crucial to stagger the bricks. This means each brick in the second course should be positioned so it overlaps the joint of the two bricks below it, similar to how bricks are laid in a wall. This staggering technique (also known as a running bond) significantly enhances the fire pit’s stability and resistance to lateral forces. Apply landscape adhesive generously between each brick in a course and between each course as you stack them. @thenavagepatch utilized four layers of bricks for his project, which provides an excellent height for a standard, comfortable fire pit. You can adjust the number of layers based on your aesthetic preferences and the specific dimensions of your chosen bricks, always ensuring structural integrity.
@thenavagepatch DIY Fire Pit and String Lights.
#firepit
#stringlights
#lightpoles
#backyard
#backyardvibes
#outdoorlife
#backyarddecor
#patiolights
#diy
#diybackyard
#diyfirepit
#diyproject
#diyprojects
#diyprojectsideas
#harttoolsclamps @harttoolsusa
#doitwithhart
#waterbeads♬ original sound – TheNavagePatch – DIY & Crafts
Step 4: Installing the Black Steel Fire Pit Ring
Once your brick structure has reached the desired height and the landscape adhesive has had sufficient time to cure (always refer to the adhesive manufacturer’s instructions, as curing times typically range from 24 to 72 hours), it’s time for the final, crucial step: inserting the black steel fire pit ring. This ring should fit snugly inside the completed brick enclosure. Its primary function is to create a durable and heat-resistant barrier between the intense flames of your fire and the surrounding masonry. This protection is vital for preventing the bricks from cracking due to thermal shock and for significantly extending the overall lifespan of your fire pit. Simply place the steel ring carefully inside your finished brick circle; its weight and snug fit will generally keep it in place.
Fire Pit Safety: Non-Negotiable Guidelines
While a backyard fire pit is a wonderful addition, safety should always be your absolute top priority. Adhering to these essential guidelines will ensure responsible and enjoyable use for years to come:
- Maintain Clearances: Strictly adhere to local fire codes regarding minimum distances from structures (homes, sheds, fences), low-hanging branches, and any other flammable materials. Typically, this ranges from 10 to 25 feet.
- Constant Supervision: Never, under any circumstances, leave a fire unattended. Even a momentary lapse can lead to dangerous situations.
- Emergency Preparedness: Always have a bucket of water, a garden hose connected and ready, or a fire extinguisher readily available within arm’s reach of the fire pit.
- Burn Appropriate Fuel: Only burn dry, seasoned firewood. Avoid treated lumber, trash, leaves, pine needles, or any accelerants like gasoline. These can produce toxic fumes, excessive smoke, and dangerous sparks.
- Monitor Wind Conditions: Refrain from using your fire pit on windy days. Strong gusts can easily carry embers and sparks long distances, potentially igniting unintended fires.
- Complete Extinguishment: Ensure the fire is completely out and the ashes are cold to the touch before leaving the area or going indoors. Douse with water and stir the ashes.
- Protect Children and Pets: Establish clear safety zones around the fire pit and supervise children and pets closely when a fire is burning. Educate them about fire safety.
- Consider a Spark Screen: For added safety, especially in areas prone to wind or if children/pets are present, consider adding a spark screen over your fire pit.
Enhancing the Ambiance with String Lights
The vision presented by @thenavagepatch beautifully demonstrates that the backyard update doesn’t end with the fire pit. Integrating string lights is a simple yet incredibly effective way to create a truly magical outdoor oasis. These “fairy lights” cast a warm, inviting glow that transforms the entire backyard into an enchanting space, perfect for evening gatherings, intimate conversations, or simply unwinding under the stars.
Tips for Installing Your Enchanting String Lights:
- Choose the Right Type: Always select outdoor-rated, waterproof, and durable string lights. LED options are energy-efficient and long-lasting.
- Support Structures: You can string lights by attaching them to existing structures like fences, pergolas, eaves, or sturdy tree branches. For open areas, follow the lead of the TikTok video and install dedicated light poles. These poles can be anchored in concrete or fitted into sturdy bases to create a beautiful canopy effect over your seating area.
- Strategic Placement: Drape the lights creatively to illuminate key areas such as seating zones, pathways, and, of course, around your new fire pit. The goal is to achieve a soft, diffused light that enhances the cozy atmosphere without being overly bright or harsh.
- Power and Safety: Ensure you have convenient access to outdoor-rated power outlets. Use outdoor extension cords if necessary, making sure they are rated for wet locations and properly secured to prevent tripping hazards.
- Dimmer Switches: For ultimate control over the mood and brightness, consider integrating a dimmer switch into your outdoor lighting setup. This allows you to adjust the intensity of the lights to perfectly match the occasion.
Combining the mesmerizing flickering glow of your new fire pit with the gentle twinkle of well-placed string lights creates an unparalleled backyard experience. It’s the perfect final touch that elevates a simple DIY project into a complete, inviting, and unforgettable outdoor retreat that you and your guests will adore.
Maintenance and Care for Lasting Enjoyment
To ensure your DIY fire pit remains a beautiful, functional, and safe centerpiece for countless seasons, a little routine maintenance goes a long way:
- Regular Ash Removal: Once the fire has completely extinguished and the ashes are cold (this can take 24-48 hours), scoop them out and dispose of them properly. Do not let ash accumulate too high, as it can impede airflow and make lighting future fires difficult.
- Inspect for Wear: Periodically, inspect your bricks and the adhesive joints for any signs of cracking, loosening, or damage caused by heat or weather. Address any minor repairs promptly to maintain the structural integrity and safety of your fire pit.
- Protective Covering: Invest in a high-quality, waterproof cover for your fire pit when it’s not in use. This will protect it from rain, snow, leaves, and debris, significantly extending its lifespan and keeping it clean and ready for your next gathering.
- Winterizing (in colder climates): In regions with harsh winters, consider extra measures. While your brick fire pit is generally durable, covering it thoroughly or even temporarily storing the steel ring indoors can prevent potential damage from repeated freeze-thaw cycles.
- Clean String Lights: Occasionally wipe down your outdoor string lights to remove dust, pollen, and cobwebs, ensuring they maintain their bright glow.
Transform Your Backyard into an Oasis Today!
Embarking on this DIY fire pit and string light project is more than just a home improvement task; it’s an investment in your lifestyle, your home’s appeal, and your capacity for memorable moments. Imagine countless cool evenings spent in the warmth of your own handcrafted fire pit, the air filled with laughter, good conversation, and perhaps the scent of roasting marshmallows, all bathed in the soft, magical glow of ambient string lights. @thenavagepatch has provided a fantastic and achievable blueprint for creating such an inviting space, proving that a little creativity and effort can yield extraordinary results.
So, gather your materials, follow these straightforward steps, prioritize safety, and get ready to enjoy countless cherished moments in your newly transformed backyard oasis. Thanks again to @thenavagepatch for sharing this inspiring and thoroughly fantastic DIY tutorial!