
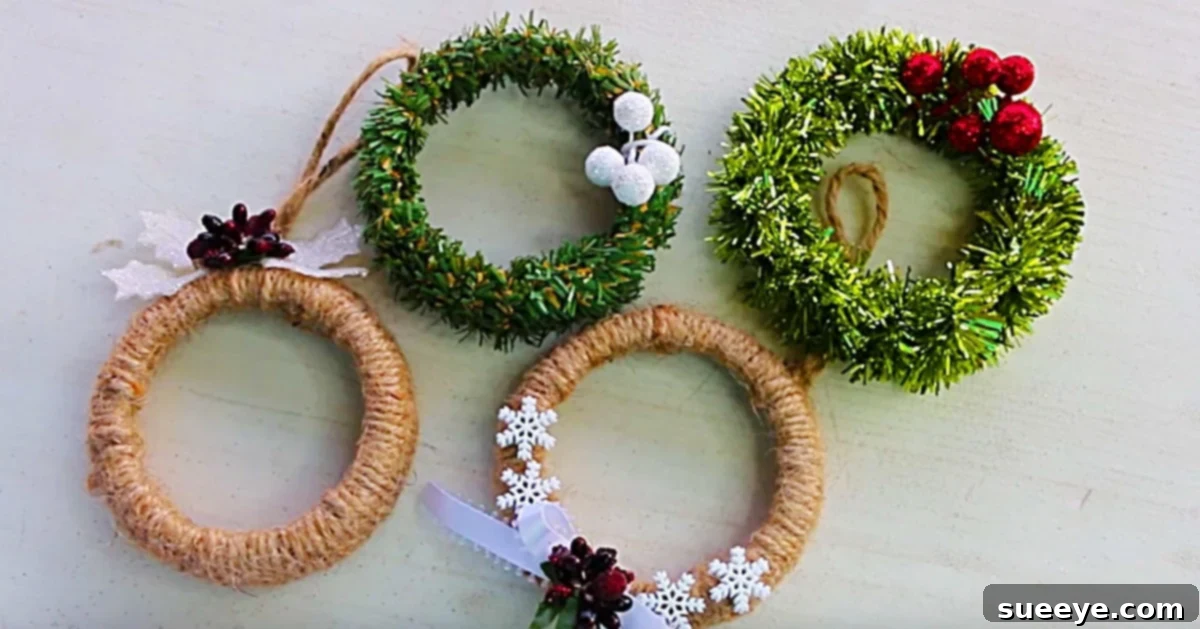
Transform Mason Jar Lids into Charming Rustic Christmas Wreath Ornaments
There’s an undeniable magic about crafting with Mason jars. Their versatility is truly endless, transforming from simple storage solutions to elegant decor pieces with just a touch of creativity. As a passionate crafter, I confess to having an abundance of Mason jar projects under my belt – from festive luminaries to unique gift packaging. This enthusiasm often leads to a delightful dilemma: a collection of beautiful jars, but also a growing stash of solitary Mason jar lids. If you’ve ever found yourself with a box full of these orphaned metal bands, then you’re in for a treat with this incredibly charming and incredibly easy DIY project!
I recently stumbled upon a brilliant tutorial on YouTube that offered the perfect solution for those forgotten lids: turning them into adorable miniature Christmas wreath ornaments. Not only does this project help declutter my craft room, but it also taps into my deep affection for Christmas wreaths. While I love crafting grand, festive wreaths for my doors and walls, the idea of these quaint, miniature versions had never crossed my mind until now. They offer a unique rustic farmhouse aesthetic, perfect for adding a touch of handmade warmth to any holiday decor scheme.
This project is ideal for anyone looking to add a personalized, budget-friendly touch to their holiday decorations. It’s also a fantastic way to engage children in a fun, creative activity, or to create meaningful, handcrafted gifts for loved ones. The beauty lies in its simplicity and the freedom it offers for customization. Let’s dive into how you can easily create these delightful Mason Jar Lid Wreath Ornaments and infuse your home with a rustic, handmade spirit this Christmas season.
The Enduring Appeal of Mason Jar Crafts
Mason jars have transcended their original purpose of food preservation to become a beloved staple in the DIY and home decor communities. Their clear glass, iconic shape, and durable nature make them perfect canvases for a myriad of creative endeavors. From practical organization solutions in the pantry and bathroom to decorative elements like vases, candle holders, and terrariums, their adaptability is unmatched. Crafters are drawn to Mason jars for several reasons: they are readily available, relatively inexpensive, and their classic design effortlessly complements a wide range of decor styles, from modern minimalist to cozy farmhouse. This makes them a go-to item for anyone looking to add a personal touch to their home without breaking the bank. The satisfaction of transforming an everyday object into something beautiful and functional is a core reason why Mason jar crafts continue to captivate enthusiasts worldwide.
Solving the Leftover Lid Dilemma
Any seasoned Mason jar crafter will likely relate to the “leftover lid dilemma.” Many projects utilize only the jar itself, leaving behind an accumulation of metal bands and flat lids. While these can be saved for future canning or other specific projects, they often end up sitting unused, taking up valuable craft space. This DIY Mason Jar Lid Wreath Ornament project offers an elegant and practical solution. Instead of viewing these lids as remnants, we can see them as the perfect foundation for new, beautiful creations. Repurposing these items not only reduces waste but also sparks a unique creative challenge, encouraging us to think outside the box and find new uses for common household objects. It’s an eco-conscious approach to crafting that aligns perfectly with the spirit of handmade goods.
Discovering the Charm of Mini Wreaths for Holiday Decor
While grand, statement-making wreaths undoubtedly add a majestic touch to entryways and fireplace mantels, there’s a special, understated charm to miniature wreaths. These smaller versions offer incredible versatility that larger wreaths simply can’t match. They can adorn a Christmas tree, serve as unique gift toppers, or be hung individually on cupboard knobs, window latches, or even used as charming napkin rings for a festive dinner table. Their compact size makes them perfect for filling small spaces with holiday cheer, creating delightful little pops of festive color and texture throughout your home. This project, specifically, allows you to craft numerous mini wreaths quickly and affordably, ensuring every corner of your home can reflect the cozy, rustic farmhouse aesthetic you desire.
Gathering Your Materials: Rustic Farmhouse Christmas Decor Essentials
One of the best aspects of this DIY project is how budget-friendly and accessible the materials are. You don’t need expensive or specialized tools; most items can be found at your local dollar store or craft supply retailer. To get started on your rustic farmhouse Christmas decor, gather the following:
- Mason Jar Lid Bands: These are the star of our project! Use standard or wide-mouth lid bands. The more you have, the more ornaments you can make.
- Small Christmas Garland Tinsel: I found excellent, affordable options at Dollar Tree. Look for traditional green, silver, or even gold tinsel garlands. You’ll need approximately three feet of garland tinsel per lid band, so grab a few rolls!
- Thick Pipe Cleaners: These are useful for shaping, securing, and even creating hangers. You can choose green to blend with the garland or a contrasting color for added effect.
- Rustic Rope Twine: This adds to the farmhouse charm and can be used for hanging the ornaments or for decorative bows. Jute twine or natural hemp rope works wonderfully.
- Hot Glue Gun and Glue Sticks: Your trusty hot glue gun is essential for securely attaching the garland and any embellishments. Ensure you have plenty of glue sticks on hand.
- Tiny Christmas Balls or Other Embellishments: I found miniature Christmas balls at Michael’s craft store, but the possibilities are endless. Consider small berries, mini pinecones, faux snow, buttons, or small bows.
- Scissors: For cutting garland, twine, and pipe cleaners.
Step-by-Step Tutorial: Crafting Your Mason Jar Lid Wreath Ornaments
Creating these rustic wreath ornaments is incredibly simple. Follow these steps to bring your vision to life:
Step 1: Preparing Your Mason Jar Lid Bands
First, ensure your Mason jar lid bands are clean and dry. If they have any sticky residue from labels, a quick wash with warm, soapy water and a good rinse will take care of it. These bands will serve as the sturdy base for your miniature wreaths, so having them ready is key.
Step 2: Wrapping with Christmas Garland Tinsel
This is where the magic begins! Take one end of your chosen Christmas garland tinsel and secure it to the inside edge of a Mason jar lid band using a dab of hot glue. Hold it in place for a few seconds to ensure it’s firmly attached. Now, begin wrapping the garland tinsel tightly and evenly around the entire lid band. Overlap the tinsel slightly as you go to ensure full coverage and a lush, full appearance. Continue wrapping until the entire band is covered in the festive garland. Once you reach the starting point, cut the garland, leaving a small tail. Secure this end firmly to the lid band with another dab of hot glue. Each wreath typically requires about three feet of garland tinsel for optimal fullness.
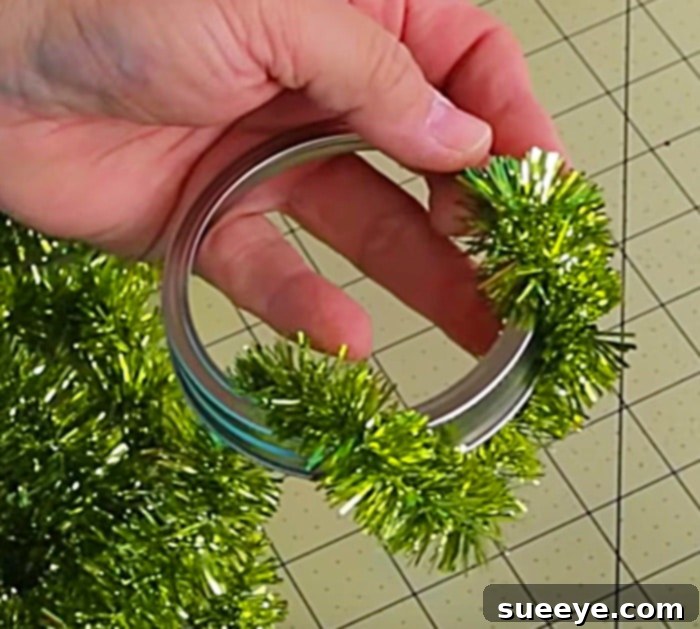
Step 3: Embellishing Your Miniature Wreath
Now comes the fun part – personalizing your wreath! This is where you can truly let your creativity shine. I chose to add some tiny Christmas balls I found at Michael’s, carefully attaching them with hot glue at various points around the garland. However, the possibilities for embellishments are limitless:
- Miniature Berries: Faux cranberries or red holly berries add a traditional touch.
- Small Bows: Made from plaid ribbon, burlap, or festive fabric scraps for a charming accent.
- Buttons: Vintage or rustic-looking buttons can add a whimsical or antique feel.
- Mini Pinecones: Gathered from nature or purchased from a craft store, these are perfect for a natural, rustic look.
- Faux Snow or Glitter: For a sparkling, winter wonderland effect.
- Personalized Tags: Small wooden tags or cardstock labels with names or holiday messages.
- Tiny Charms: Bells, stars, or other small metal charms.
Experiment with different arrangements until you achieve a look you love. Remember to use hot glue sparingly but effectively to secure your chosen embellishments.
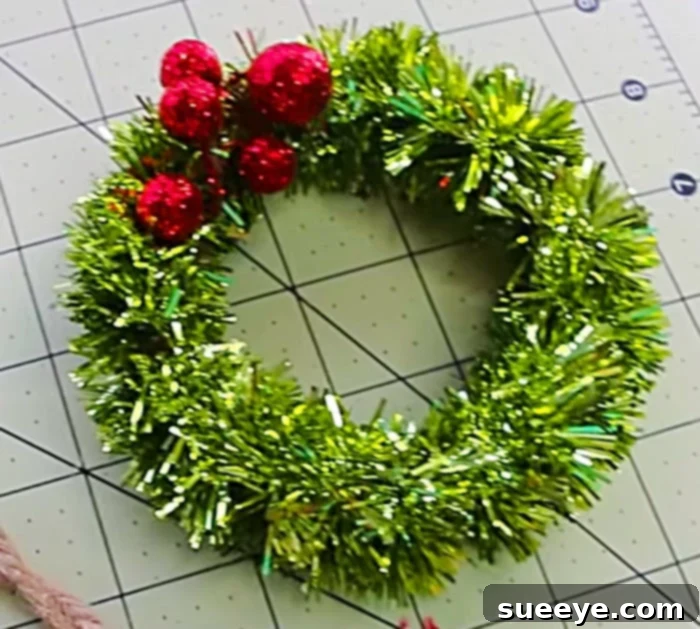
Step 4: Adding a Hanger for Your Ornament
To turn your beautiful mini wreath into a hangable ornament, you’ll need to add a loop. Cut a piece of rustic rope twine or a thin ribbon about 6-8 inches long. Form it into a loop and tie the ends together in a knot. Secure this knot to the top of your wreath using a dab of hot glue, tucking it into the garland so it’s discreet. Alternatively, you can use a pipe cleaner. Twist a pipe cleaner into a loop and secure its ends to the back of the wreath. If you prefer a more seamless look, you can also thread a decorative hook through the top garland without a separate hanger.
Customization and Creativity: Your Wreath, Your Style
One of the most exciting aspects of crafting is the freedom to make each piece uniquely your own. There is truly no “right or wrong” way to create these DIY Mason Jar Lid Wreath Ornaments. The rustic farmhouse style is just one of many possibilities:
- Themed Garlands: Instead of traditional tinsel, consider using burlap ribbon, thin fabric strips, yarn, or even colorful pipe cleaners wrapped tightly for a different texture and look.
- Color Palettes: Experiment beyond traditional green and red. Think elegant silver and gold, whimsical pastels, or bold and bright colors for a modern twist.
- Natural Elements: Incorporate small acorns, dried orange slices, cinnamon sticks, or sprigs of faux evergreen for a truly organic feel.
- Glitter and Sparkle: Apply glitter glue or spray adhesive followed by loose glitter for a dazzling, festive finish.
- Layered Look: Combine different types of garlands or ribbons on a single lid band for added depth and visual interest.
- Personalized Touches: Add small letter beads to spell out names or holiday words, or attach tiny photographs for a sentimental ornament.
Let your imagination be your guide. These ornaments are a fantastic opportunity to express your personal style and create decorations that truly resonate with your home’s aesthetic.
Where to Display Your Rustic Treasures
Once your Mason Jar Lid Wreath Ornaments are complete, the fun continues with finding the perfect spots to showcase them:
- Christmas Tree: The most obvious choice! They will add a beautiful rustic touch amidst your other ornaments.
- Gift Toppers: Tie one onto a wrapped present for an extra special, handmade touch that doubles as a keepsake.
- Garlands: String several together with twine to create a festive garland for a mantel, doorway, or staircase.
- Door Knobs and Cabinet Pulls: Hang them on interior door knobs or kitchen cabinet pulls for subtle holiday cheer throughout your home.
- Window Accents: Drape them from window latches or tie them to curtain rods.
- Tabletop Centerpieces: Arrange a few around a candle or within a decorative bowl as part of a festive centerpiece.
- Wreath Enhancements: Add them to a larger, store-bought wreath for an extra layer of homemade charm.
Their compact size means they can fit almost anywhere, allowing you to spread holiday joy throughout every room.
Why This Project is Perfect for the Holidays
Beyond being aesthetically pleasing, this DIY Mason Jar Lid Wreath Ornament project offers numerous benefits, making it an ideal holiday craft:
- Affordability: Most materials can be sourced very cheaply, especially if you utilize items from dollar stores and your existing craft stash.
- Eco-Friendly: It’s a wonderful way to repurpose materials that might otherwise go unused, promoting sustainability in your crafting.
- Beginner-Friendly: No advanced crafting skills are required. If you can wrap and glue, you can make these!
- Great for Group Activities: Perfect for a craft night with friends, a family activity with children, or even a school project. Everyone can contribute their unique flair.
- Meaningful Handmade Gifts: Handcrafted gifts carry a special sentiment. These ornaments make thoughtful presents for teachers, neighbors, co-workers, or as stocking stuffers.
- Quick to Make: Once you get the hang of it, you can churn out several of these in a short amount of time, making them perfect for last-minute decorating or gifting.
Tips for Success
- Safety First with Hot Glue: Always exercise caution when using a hot glue gun, especially if crafting with children. Low-temp glue guns are a good option for kids.
- Prepare Your Materials: Having all your garland pre-cut and embellishments ready before you start wrapping will make the process smoother and more efficient.
- Practice Makes Perfect: Don’t worry if your first few attempts aren’t exactly as envisioned. Crafting is a journey, and each piece is unique.
- Experiment with Adhesives: While hot glue is fast, for very delicate embellishments, a clear craft glue might offer more precision, though it will take longer to dry.
- Storage: When the holidays are over, store your beautiful ornaments carefully in tissue paper or individual bags to protect them for years to come.
These Mason Jar Lid Wreath Ornaments are a testament to the fact that beautiful, heartwarming holiday decor doesn’t have to be expensive or complicated. They offer a gorgeous, rustic touch to your home, a delightful way to repurpose materials, and the immense satisfaction of creating something beautiful with your own hands. I truly hope you enjoy making these as much as I did. They are a simple project that yields impressive results, proving that often, the most cherished decorations are the ones made with love. Happy crafting and happy holidays!