
Irresistible Fudgy Chocolate Crinkle Cookies: The Ultimate Holiday Treat Recipe
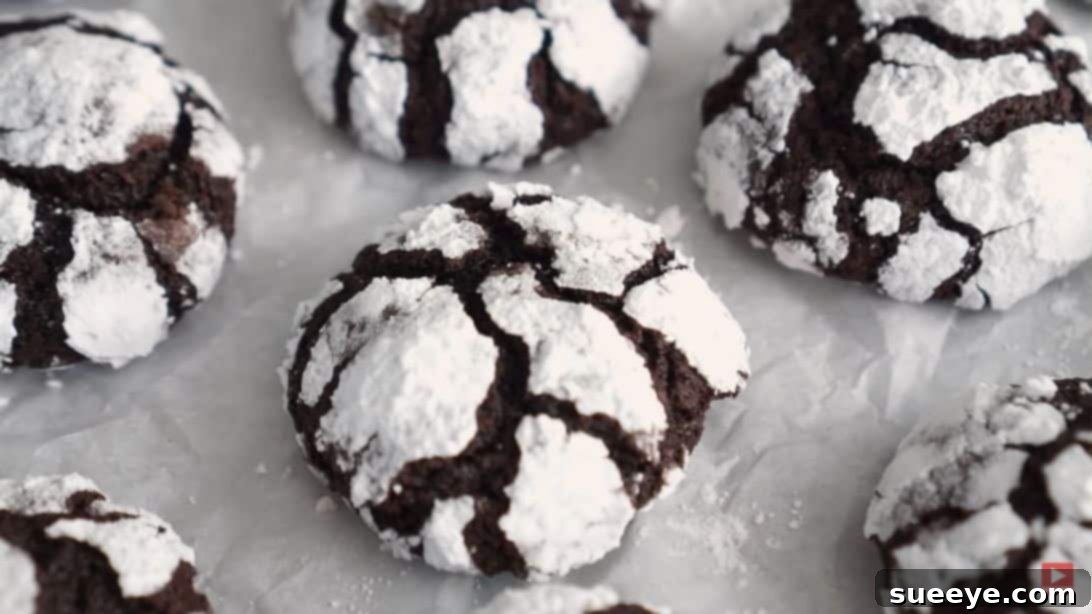
There’s something truly magical about the aroma of freshly baked cookies filling your home, especially during the holidays. Among the myriad of festive delights, the classic chocolate crinkle cookie stands out with its enchanting crackled surface dusted with powdered sugar, hinting at the rich, fudgy interior within. These cookies are not just a treat for the taste buds; they’re a feast for the eyes, making them a perfect addition to any holiday platter, potluck, or cozy evening by the fire.
Inspired by the fantastic recipe from Preppy Kitchen, this guide will walk you through creating a batch of chocolate crinkle cookies that are so soft, so fudgy, and so deeply chocolatey, they taste like a brownie in cookie form. Whether you’re a seasoned baker or just starting your culinary journey, this straightforward recipe promises delicious results that will undoubtedly bring smiles to everyone who tries them. Get ready to bake a batch of pure chocolate bliss!
The Enchanting Allure of Chocolate Crinkle Cookies
Chocolate crinkle cookies are more than just a dessert; they are a tradition. Their distinctive appearance, with fissures revealing the dark chocolate dough beneath a snowy white coating, is instantly recognizable and always a crowd-pleaser. This unique texture and visual appeal are achieved through a clever combination of ingredients and a specific chilling and baking process. The generous coating of powdered sugar prevents the dough from spreading too rapidly in the oven, allowing the cookies to puff up and then crack as they bake, creating that signature “crinkle” effect. The result is a perfect balance of sweetness, deep chocolate flavor, and an incredibly soft, chewy, brownie-like texture that makes them truly irresistible.
Ingredients for Your Perfect Batch of Fudgy Crinkle Cookies
Gathering high-quality ingredients is the first step towards baking success. Here’s what you’ll need to create these delectable chocolate crinkle cookies:
- 2 cups (approx. 8.46 oz or 240g) of all-purpose flour
- 2 teaspoons of baking powder
- ¾ teaspoon of salt
- 1¾ cups (approx. 350g) of granulated sugar
- ½ cup (120ml) of vegetable oil (or another neutral oil like canola or grapeseed)
- 4 large eggs, at room temperature
- 1 cup (approx. 90g) of unsweetened cocoa powder (Dutch-processed for a darker, milder chocolate flavor is recommended)
- 2 teaspoons of vanilla extract
- 1 teaspoon of espresso powder (optional, but highly recommended for enhancing chocolate flavor)
- 1 cup (approx. 120g) of powdered sugar (confectioners’ sugar) for coating
Key Ingredient Notes & Tips:
- All-Purpose Flour: When measuring flour by volume (cups), always “fluff” it up with a spoon before gently spooning it into your measuring cup. Level off the top with a straight edge. Do not pack it down, as this can lead to too much flour and dry cookies. Using a kitchen scale for accuracy (8.46 oz or 240g) is always best.
- Baking Powder & Salt: These leavening agents and flavor enhancers are crucial. Ensure your baking powder is fresh for optimal rise.
- Granulated Sugar: Provides sweetness and helps create a tender crumb.
- Vegetable Oil: Using oil instead of butter contributes to the cookies’ incredibly moist and fudgy texture, as oil is 100% fat, unlike butter which contains water.
- Eggs: Room temperature eggs incorporate better into the batter, creating a smoother, more emulsified dough. If you forget to take them out, place them in a bowl of warm water for 5-10 minutes.
- Cocoa Powder: Unsweetened cocoa powder is essential. Dutch-processed cocoa powder will yield a darker cookie with a slightly milder, less acidic chocolate flavor, enhancing the “brownie-like” quality. Natural cocoa powder will work too, resulting in a lighter-colored cookie with a more intense chocolate tang.
- Vanilla Extract: A staple in baking, vanilla complements and deepens the chocolate flavor. Use a good quality pure vanilla extract.
- Espresso Powder: This is an optional but highly recommended secret ingredient! It doesn’t make your cookies taste like coffee; instead, it remarkably intensifies and enriches the chocolate flavor, making it more pronounced and complex.
- Powdered Sugar: This is for the iconic coating. Ensure it’s fresh and lump-free for the best crinkle effect. Do not substitute with granulated sugar.
Step-by-Step Guide: How to Bake Chocolate Crinkle Cookies
Follow these detailed steps to achieve perfect, fudgy chocolate crinkle cookies every time:
Step 1: Prepare Your Dry Ingredients
In a large mixing bowl, sift together the all-purpose flour, baking powder, and salt. Sifting is an important step as it helps to aerate the flour, preventing lumps and ensuring that the leavening agents are evenly distributed throughout the mixture. This contributes to a lighter, more tender cookie. Once sifted, whisk these dry ingredients together thoroughly to combine them well, then set the bowl aside.
Step 2: Create the Wet Base
Using the bowl of a stand mixer fitted with the paddle attachment, or a large bowl with a hand mixer, combine the vegetable oil and granulated sugar. Beat them together on medium speed for about 2-3 minutes until the mixture is light in color and fluffy. It might appear slightly grainy due to the sugar crystals, but it should be well combined. Remember to stop the mixer occasionally and scrape down the sides and bottom of the bowl with a rubber spatula to ensure all ingredients are incorporated evenly.
Step 3: Incorporate the Cocoa and Espresso
Add the unsweetened cocoa powder into the wet mixture. Begin mixing on a low speed to avoid a “cocoa cloud” exploding from the bowl. Mix until just combined, scraping down the bowl halfway through. If you’ve opted to use espresso powder, this is the perfect time to add it in alongside the cocoa powder, allowing its flavor to infuse deeply into the chocolate base. Continue mixing until no streaks of dry cocoa powder remain.
Step 4: Add Eggs and Vanilla
With the mixer running on low speed, add the eggs one at a time. It’s crucial to incorporate each egg fully before adding the next. This allows for proper emulsification, leading to a smoother, more cohesive dough. After all the eggs have been incorporated, stir in the vanilla extract until just combined. The mixture should look glossy and well-blended.
Step 5: Mix in the Dry Ingredients
Carefully add the reserved flour mixture (from Step 1) into the wet ingredients. Mix on the lowest speed possible until the flour is just incorporated. It’s incredibly important not to overmix the dough at this stage, as overmixing can develop the gluten in the flour, leading to tough and chewy cookies rather than the desired soft and fudgy texture. As soon as you see no more dry streaks of flour, stop mixing. Give the bowl a final scrape down to ensure everything is thoroughly combined.
Step 6: Chill the Dough – A Crucial Step!
Once your dough is mixed, cover the bowl tightly with plastic cling wrap. Refrigerate the dough for a minimum of 4 hours, or ideally, overnight. This chilling period is absolutely crucial for several reasons: it allows the dough to firm up, making it much easier to handle and roll; it prevents the cookies from spreading too much during baking; and it gives the flavors a chance to meld and deepen, resulting in a more delicious and complex cookie. Do not skip this step!
Step 7: Preheat and Scoop
Once your dough is thoroughly chilled and you’re ready to bake, preheat your oven to 350°F (175°C). Line several baking sheets with parchment paper. This prevents sticking and makes cleanup easier. Using a small ice cream scoop (about 1.5 tablespoons) or a regular tablespoon, scoop out portions of the chilled dough. Roll each portion into a smooth, approximately one-inch ball with your clean palms. The cold dough will be slightly stiff but should be workable.
Step 8: Roll in Powdered Sugar
Place the powdered sugar in a shallow bowl. Generously roll each dough ball in the powdered sugar, ensuring it’s completely coated. Don’t be shy here; a thick coating is what creates that beautiful, prominent crinkle effect. Once coated, place the dough balls on your prepared baking sheets, leaving about 2 inches of space between each cookie to allow for a little spread.
Step 9: Bake to Perfection
Bake the cookies in your preheated oven for about 10 to 12 minutes. The exact baking time can vary slightly depending on your oven. You’ll know they are ready when the edges are set and slightly firm, but the centers still look soft and perhaps a little underbaked. The residual heat from the baking sheet will continue to cook the centers once they are removed from the oven, ensuring that signature fudgy texture. Overbaking will lead to dry cookies, so err on the side of slightly underbaked for maximum fudginess.
Allow the cookies to cool on the baking sheet for a few minutes before transferring them to a wire rack to cool completely. This helps them set and prevents them from breaking apart.
Expert Tips for Unforgettable Chocolate Crinkle Cookies
- Don’t Overmix: As mentioned, overmixing develops gluten, making cookies tough. Mix until just combined.
- Embrace the Chill: Seriously, don’t rush the chilling. It’s the secret to thick, fudgy cookies that hold their shape and develop deep flavor.
- Generous Powdered Sugar Coating: The more powdered sugar, the more dramatic the crinkle! Make sure the balls are fully covered.
- Even Scooping: Use a cookie scoop for uniform size, which ensures even baking.
- Proper Storage: Store cooled cookies in an airtight container at room temperature for up to 5-7 days. They tend to get even fudgier on the second day!
- Freezing Dough: You can freeze the rolled and powdered sugar-coated dough balls on a baking sheet until solid, then transfer them to a freezer-safe bag. Bake directly from frozen, adding a minute or two to the baking time.
- Flavor Variations: Feel free to experiment! Add a pinch of cinnamon, a hint of peppermint extract, or even some mini chocolate chips to the dough for extra texture and flavor.
Frequently Asked Questions (FAQs) About Crinkle Cookies
Q: Why did my chocolate crinkle cookies spread too much and lose their shape?
A: The most common reason for excessive spreading is insufficient chilling of the dough. The fat in the dough (oil) will melt quickly in the oven if not firm enough, causing the cookies to flatten. Ensure your dough chills for at least 4 hours, or preferably overnight. Also, make sure your oven temperature is accurate; an oven that’s too cool can also cause spreading.
Q: My crinkles aren’t very prominent. What went wrong?
A: For distinct crinkles, two things are key: adequate chilling of the dough and a generous coating of powdered sugar. A thick layer of powdered sugar prevents the cookie’s surface from drying out too quickly, allowing the dough to expand and crack as it bakes. Don’t be shy with the powdered sugar – roll those dough balls until they’re fully white!
Q: Can I use butter instead of vegetable oil?
A: While you can substitute melted butter for vegetable oil, keep in mind that the texture will be slightly different. Oil-based cookies tend to be incredibly moist and fudgy, while butter-based cookies might have a slightly cakier texture and a richer buttery flavor. If you do use butter, ensure it’s melted and cooled to avoid cooking the eggs when added.
Q: How long do chocolate crinkle cookies stay fresh?
A: When stored in an airtight container at room temperature, chocolate crinkle cookies will stay wonderfully fresh and fudgy for 5 to 7 days. They are often best on the second day when the flavors have fully developed and the texture has softened even further.
Q: Can I freeze baked chocolate crinkle cookies?
A: Yes, absolutely! Baked and completely cooled chocolate crinkle cookies freeze beautifully. Place them in a single layer on a baking sheet until frozen solid, then transfer them to a freezer-safe airtight container or bag for up to 2-3 months. Thaw at room temperature when ready to enjoy.
The Joy of Baking Fudgy Chocolate Crinkle Cookies
There’s an undeniable joy that comes from baking, especially when the end result is as delightful as these soft and fudgy chocolate crinkle cookies. Their rich flavor, irresistible texture, and festive appearance make them a perfect treat for any occasion, from quiet family evenings to grand holiday celebrations. So, roll up your sleeves, gather your ingredients, and immerse yourself in the delightful process of creating these culinary gems. Share them with loved ones, or simply savor them yourself with a warm cup of coffee or milk. Happy baking!