
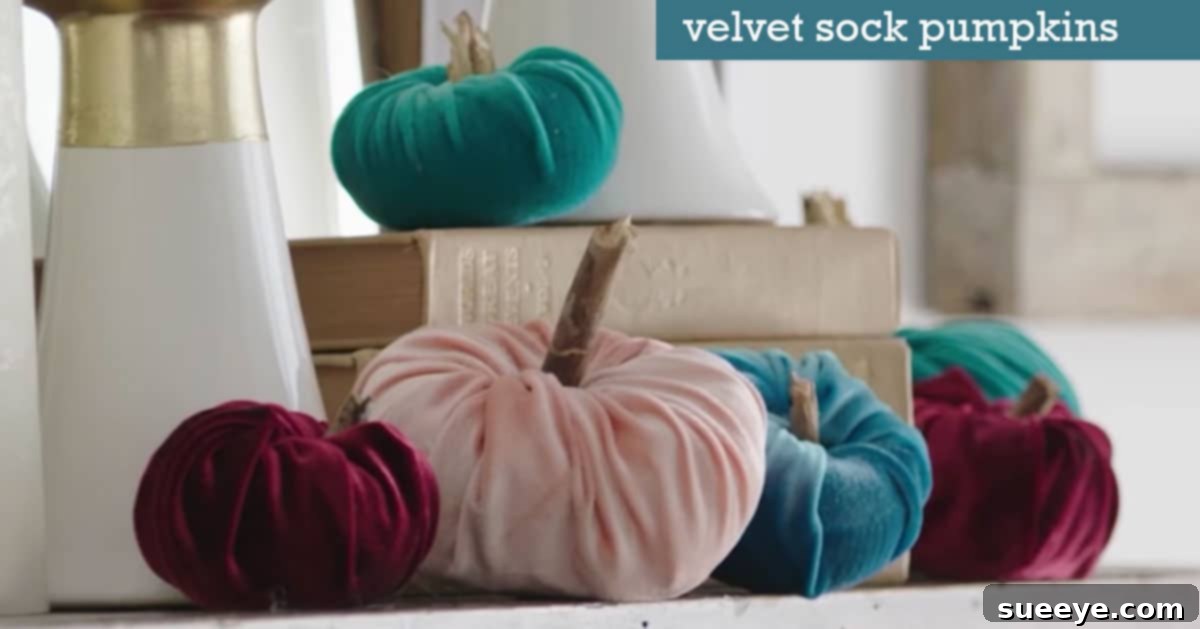
DIY Velvet Sock Pumpkins: Crafting Elegant Fall & Thanksgiving Decor with Ease
As the crisp autumn air settles in and leaves begin their vibrant transformation, our thoughts naturally turn to the warmth and charm of fall decor. This Thanksgiving, why not infuse your home with an elegant touch that’s both luxurious in appearance and remarkably simple to create? Introducing DIY velvet sock pumpkins – a crafting project that perfectly balances sophisticated aesthetics with effortless execution. When it comes to decorating for the busiest season of the year, ease is always a top priority. Between holiday cooking, gift shopping, and festive gatherings, a time-saving project that yields stunning results is an absolute godsend. These plush, jewel-toned pumpkins are exactly that: beautiful, quick, and incredibly satisfying to make.
Imagine your dining table, mantelpiece, or entryway adorned with these charming, soft sculptures. Mixed in with flickering candlesticks, garlands, and other autumnal accents, they create a rich, inviting atmosphere. The secret to their opulent look lies in the choice of fabric – velvet. Available in a spectrum of gorgeous jewel tones, earthy browns, deep greens, and classic oranges, velvet instantly elevates these humble sock pumpkins into pieces of art. The best part? You don’t need a sewing machine, specialized skills, or hours of dedicated crafting time. If you can cut, roll, stuff, and glue, you’re all set to create an entire patch of these delightful decorations in no time.
This project is so straightforward that it’s ideal for crafters of all ages and skill levels. Even children can enthusiastically participate, helping to stuff the socks or choose the perfect sticks for stems, fostering wonderful family memories without the stress of complicated steps. There’s minimal mess involved, and absolutely no artistic talent is required to achieve a professional-looking result. Another fantastic benefit of these velvet sock pumpkins is their durability. Unlike fragile ceramic or glass decor, these soft pumpkins are virtually unbreakable, making them a safe choice for homes with active kids or playful pets. They’re much more likely to survive the holiday season – and beyond – ensuring you have beautiful decor ready for next year. Let’s dive into the simple supplies you’ll need to bring these adorable creations to life.
Essential Supplies for Your Velvet Sock Pumpkins
Gathering your materials is the first exciting step in any DIY adventure. For these velvet sock pumpkins, the supply list is short, inexpensive, and readily available. You might even have some of these items lying around your home already!
- Tube Socks: The foundation of your pumpkin. Opt for knee-high tube socks for a good amount of material to work with. White or light-colored socks are generally best, as they won’t show through lighter velvet fabrics. You can experiment with different sock thicknesses and lengths to create pumpkins of varying sizes and shapes, adding visual interest to your decor arrangements.
- Velvet Fabric: This is where the magic happens! Choose velvet fabric in rich jewel tones like sapphire blue, emerald green, ruby red, or amethyst purple for a truly luxurious look. Earthy tones like burnt orange, deep brown, or olive green are also fantastic for classic fall vibes. You don’t need much – fabric scraps, old velvet clothing (like a skirt or a throw pillow cover), or even inexpensive velvet remnants from a craft store will work perfectly. The plush texture of velvet is key to the upscale appearance of these pumpkins.
- Cotton Batting or Stuffing: This is what gives your pumpkins their soft, plump form. Standard polyester fiberfill (often used for pillows or stuffed animals) is ideal, but you could also use cotton batting, fabric scraps cut into small pieces, or even old t-shirt material for stuffing. Ensure it’s clean and relatively evenly distributed for the best shape.
- Hot Glue Gun & Glue Sticks: Your primary tool for this no-sew project. A hot glue gun provides a strong, fast-drying bond, securely holding the velvet fabric in place and attaching the stem. Always exercise caution when using a hot glue gun, especially if crafting with children.
- Sticks (for the stems): To give your pumpkins an authentic, natural look. Scavenge for small twigs or branches from your yard, making sure they are clean and dry. For an extra aromatic touch, cinnamon sticks can be used, adding a delightful scent to your decor. Other creative alternatives include small wine corks, sturdy paper towel roll pieces wrapped in twine, or even miniature faux leaves or berries found at craft stores.
Crafting Your Elegant Velvet Sock Pumpkins: A Simple Guide
Now that you have all your supplies, let’s get down to the fun part – creating these beautiful pumpkins. The process is incredibly straightforward, perfect for a relaxing afternoon craft session.
- Prepare Your Sock Base: Start by taking one tube sock. You’ll need to create a closed bottom for your pumpkin. If your sock has a clear heel, you can cut off the very end of the toe section, just below the heel. Then, simply roll up the raw edge tightly, creating a secure, round base. Alternatively, you can tie off the open toe end with a rubber band or a piece of string, or even apply a line of hot glue to seal it. The goal is to create a snug pouch for the stuffing.
- Stuff for Shape: Begin to gently stuff the prepared sock with your cotton batting or fiberfill. Don’t overstuff it initially; you want to achieve a soft, malleable shape that can be easily manipulated. As you stuff, gently push and shape the batting to form a round or slightly oblong pumpkin shape. Aim for a firm but not rigid feel. You can even use your fingers to create subtle indentations around the sides of the pumpkin as you stuff, mimicking the natural ridges of a real pumpkin.
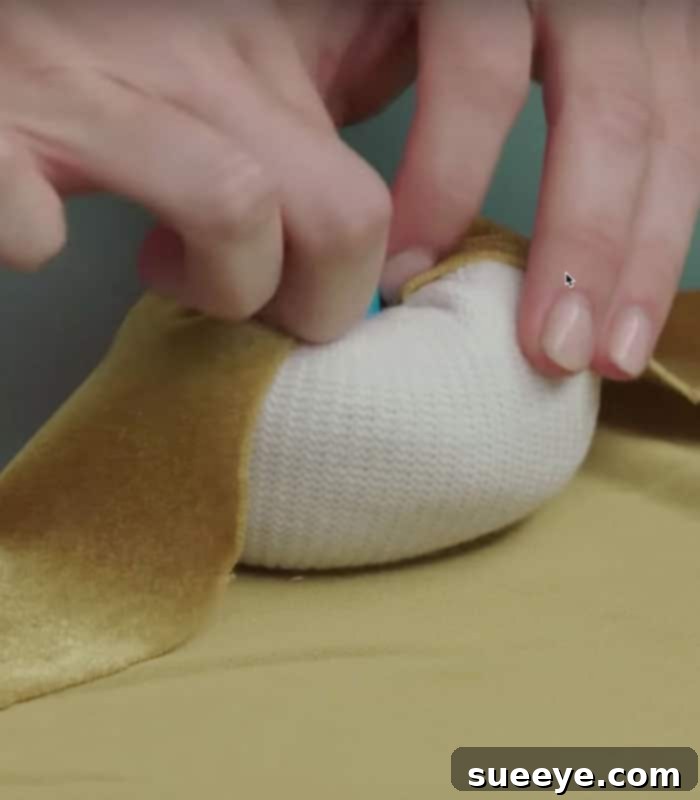
- Envelop in Velvet: Now for the luxurious velvet layer. Cut a square or rectangular piece of velvet fabric. The size will depend on the size of your stuffed sock; you want enough fabric to fully wrap around the sock with some overlap. Place your stuffed sock in the center of the velvet fabric. Gather the edges of the velvet up and around the top opening of the sock, pulling it taut to cover the entire sock. The goal is to completely conceal the sock underneath the velvet.
- Secure the Velvet: Once the velvet is gathered around the top, carefully tuck the raw edges of the fabric into the top opening of the stuffed sock. Use your hot glue gun to apply small dots of glue to secure the velvet in place as you tuck and fold, ensuring a smooth, seamless finish. Work your way around the opening, making sure all raw edges are hidden and the velvet is pulled taut for a neat appearance. The more neatly you tuck and glue, the cleaner your pumpkin will look.
- Add the Natural Stem: Select a stick or cinnamon stick that is proportionate to the size of your pumpkin. Apply a generous amount of hot glue to one end of the stick. Carefully press the glued end firmly into the center of the gathered and secured velvet at the top of your pumpkin. Hold it in place for a few seconds until the glue sets and the stem is stable. You can add a bit more glue around the base of the stem for extra reinforcement if needed.
- Optional Embellishments: For an added touch of charm, consider tying a piece of twine or a small ribbon around the base of the stem. You can also glue on small faux leaves, berries, or even a tiny pinecone to enhance the autumnal theme. Get creative and personalize your pumpkins to match your specific decor style!
That’s it! In just a few simple steps, you’ve transformed ordinary socks and fabric into elegant, festive decor. This project is so simple, even my kids were allowed to get involved in the helping part. There is very little mess, no artistic talent required here. I finished a whole patch of these delightful pumpkins in under an hour, freeing up valuable time to start shopping early for the holidays or simply relax and enjoy the season. I just love mine, and I know you will too. Learn how to make some for yourself and witness how quickly they elevate your seasonal home decor.
Tips for Perfect Velvet Pumpkins Every Time
While the process is straightforward, a few clever tips can elevate your velvet sock pumpkins from good to absolutely fabulous:
- Varying Sizes and Heights: Create a collection of pumpkins in different sizes for a more dynamic display. Use ankle socks for smaller pumpkins and knee-high or even thigh-high socks for larger, more substantial ones. This variation adds depth and interest to any arrangement.
- Mix and Match Textures: While velvet is undeniably luxurious, don’t be afraid to experiment with other fabrics. Faux fur, plaid flannel, corduroy, or even sweater-knit fabrics can add unique textures and visual interest to your pumpkin patch, creating a truly eclectic and rich fall display.
- Embrace the Indentations: For a more realistic pumpkin look, gently tie string or yarn around the stuffed sock before wrapping it in velvet. This creates natural-looking ridges that mimic real pumpkins. Remove the string once the velvet is glued in place.
- Safety First with Hot Glue: Always use your hot glue gun on a heat-resistant surface and be mindful of your fingers. If crafting with children, supervise closely or handle the gluing steps yourself.
- Source Creative Stems: Beyond twigs and cinnamon sticks, consider using wine corks, small wooden spools, or even old chess pieces as unique and interesting stems. These unexpected elements can add a personal touch to your pumpkins.
Decorating Your Home with Velvet Sock Pumpkins
Once your beautiful velvet sock pumpkins are complete, the fun continues with styling them throughout your home. Their versatile elegance makes them perfect for almost any space:
- Stunning Centerpieces: Arrange a cluster of varying sized pumpkins in the center of your Thanksgiving dining table or coffee table. Mix them with greenery, candles, and perhaps some fall foliage for a breathtaking focal point.
- Cozy Mantel Decor: Line your fireplace mantel with a row of pumpkins, interspersed with twinkling fairy lights and autumnal garlands. The soft texture of the velvet will create a warm and inviting glow.
- Shelf and Bookshelf Accents: Add pops of color and texture to your shelves and bookcases. Group smaller pumpkins with books, vases, and other decorative objects to create charming vignettes.
- Welcoming Entryway: Place a few velvet pumpkins on a console table in your entryway to greet guests with festive cheer. Combine them with a rustic tray or a decorative bowl.
- Kid-Friendly Rooms: Since these pumpkins are soft and unbreakable, they’re perfect for decorating children’s bedrooms or play areas without worry. They add a festive touch that’s safe for little hands.
- Thoughtful Handmade Gifts: These exquisite pumpkins make wonderful hostess gifts, thank-you presents, or small tokens for friends and family during the holiday season. A handmade gift carries so much more meaning!
Beyond Thanksgiving: Seasonal Versatility
While perfect for fall and Thanksgiving, these velvet sock pumpkins aren’t limited to a single season. By simply changing your fabric colors and embellishments, you can adapt them for various holidays and year-round decor:
- Halloween Charm: Use black, deep purple, or dark orange velvet, and add spooky-cute embellishments like tiny spiderwebs or plastic spiders for a sophisticated Halloween touch.
- Winter Wonderland: Opt for white, silver, or icy blue velvet, and swap natural sticks for glittery branches or faux evergreen sprigs. These would make beautiful “snowball” decor!
- Christmas Elegance: Red, forest green, or gold velvet pumpkins can instantly transform into festive Christmas decor. Add a touch of holly, berries, or small ornaments to their stems.
- Spring & Summer Freshness: Pastel velvets (blush pink, mint green, sky blue) with floral embellishments can transition these pumpkins into delightful spring or summer accents, proving their versatility extends far beyond autumn.
The Enduring Joy of Handmade Decor
In a world of mass-produced goods, there’s an undeniable satisfaction that comes from creating something beautiful with your own hands. DIY projects like these velvet sock pumpkins offer more than just decorative items; they provide a creative outlet, a sense of accomplishment, and a personal touch that truly makes a house a home. This particular craft is a testament to the fact that elegant decor doesn’t have to be expensive or complicated. It’s about clever ideas, readily available materials, and a little bit of creative spirit.
Having these pumpkins done in an hour sure has freed up my time to start shopping early for the holidays, but more importantly, it filled my home with a unique charm that store-bought items simply can’t replicate. Also loving the fact that this Thanksgiving decor item is not breakable, therefore much more likely to survive until next year. If you have kids or grandkids, these pumpkins should even be safe for their little hands. If my boys decide these are footballs, then probably not… We shall see. But for now, they are perfectly safe and stunning additions to our festive home.
Embrace the joy of crafting this season. These DIY velvet sock pumpkins are not just decorations; they’re an expression of your creativity, a thoughtful addition to your home, and a delightful project to share with loved ones. So gather your supplies, set aside a little time, and prepare to be amazed at how easily you can create such luxurious-looking fall and Thanksgiving decor. You’ll love the results, and your home will thank you for the extra touch of handmade elegance.