
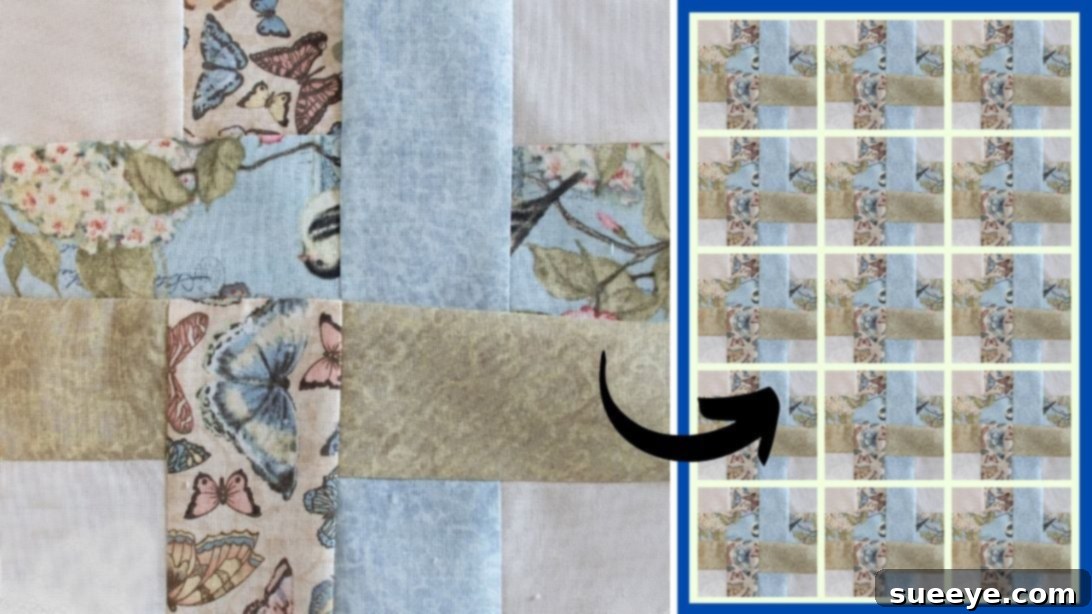
Embark on a delightful quilting journey with the timeless elegance of the Ribbon Weave Quilt Block. Whether you’re a seasoned quilter looking for a refreshing project or a beginner eager to dive into the world of fabric artistry, this classic pattern offers both simplicity and stunning visual appeal. Often, the biggest hurdle in starting a new quilt is deciding on a design. When in doubt, a classic like the ribbon weave is always a perfect choice, promising a beautiful outcome that looks intricate but is surprisingly easy to construct. Its charming woven effect is incredibly versatile, making it an ideal candidate for a thoughtful handmade gift or a cherished addition to your home decor.
The beauty of the Ribbon Weave Quilt Block lies in its straightforward construction. You only need a background fabric and four different complementary or contrasting colors/patterns to bring this design to life. However, for those who love variety and a vibrant splash of color, a jelly roll offers an excellent opportunity to mix and match an array of fabrics, making your quilt truly unique and lively. The flexibility in fabric choice allows for endless creative possibilities, enabling you to tailor your quilt’s aesthetic to any style or occasion.
This comprehensive guide will walk you through every step of creating a beautiful Ribbon Weave Quilt Block, from selecting your materials to the final pressing. For a truly immersive experience and visual guidance, we highly recommend following along with the insightful video tutorial by Jacque Russell Creates on YouTube. Her expertise will help illuminate each step, ensuring your quilting adventure is smooth and rewarding.
Essential Materials for Your Ribbon Weave Quilt Block
Before you begin sewing, gathering all your materials is crucial for a smooth and enjoyable quilting process. High-quality tools and fabrics will not only make your work easier but also contribute significantly to the final look and durability of your quilt. Here’s a detailed list of what you’ll need:
- Fabric for the Background: You’ll need 4 squares of your chosen background fabric, each precisely cut to 2.5 x 2.5 inches. This fabric will provide the foundational contrast for your “ribbons.” Consider a solid or a subtle tone-on-tone print to allow your colored fabrics to truly pop.
- Colored Fabrics (Squares): Select 4 different colors or patterns of fabric. Each of these should be cut into 2.5 x 2.5 inch squares. These will be integral to forming the interwoven appearance of the block. Choosing fabrics with varying values (light, medium, dark) can enhance the woven illusion.
- Colored Fabrics (Rectangles): Choose 4 additional different colors or patterns of fabric. These should be cut into 2.5 x 4.5 inch rectangles. These longer pieces are the “ribbons” themselves, creating the elongated segments of the weave. Ensure these fabrics complement or contrast with your square fabrics for a harmonious design.
- Quilter’s Ruler: A clear acrylic ruler with precise measurements is indispensable for accurate cutting. A ruler at least 6×12 inches is often versatile for these types of cuts.
- Marking Pen, Pencil, or Chalk: Essential for marking seam lines or placement points on your fabric. Choose a tool that is easily visible on your chosen fabrics and disappears or washes out without leaving a trace.
- Scissors or Rotary Cutter and a Cutting Mat: For precise and efficient fabric cutting, a rotary cutter paired with a self-healing cutting mat is highly recommended. It provides cleaner edges and faster cutting than traditional scissors, especially for multiple pieces. Always remember to use a sharp blade and exercise caution for safety.
- Iron, for Pressing: A good iron is a quilter’s best friend. Pressing seams correctly is as important as sewing them accurately. It ensures your blocks lie flat, your points match, and your finished quilt has a professional appearance.
- Sewing Machine: Any basic sewing machine capable of a straight stitch will work perfectly. Ensure it’s in good working order, with a fresh needle and good quality thread that matches or complements your fabrics.
Tip on Fabric Selection: Don’t be afraid to experiment with your fabric choices! While coordinating colors create a cohesive look, using a jelly roll (pre-cut strips of various fabrics) can introduce an exciting element of surprise and eclectic charm to your ribbon weave, making each block uniquely vibrant.
Step-by-Step Guide to Crafting Your Ribbon Weave Quilt Block
Creating this beautiful block is a rewarding process. Follow these detailed steps carefully to ensure accuracy and a stunning result. Remember, precision in cutting and sewing is key to a polished finish.
Step 1: Preparing and Arranging Your Fabric Pieces
The first crucial step is to meticulously cut all the fabric pieces required for a single block. Accuracy here is paramount, as it directly impacts how well your pieces will fit together. Once cut, the layout phase begins, where you’ll visualize the “weave” before a single stitch is made.
- Start by taking your four 2.5 x 2.5 inch background squares. These will form the corners of your block. Place one background square at each of the four corners of your designated workspace (a cutting mat or a large table).
- Next, locate one of your 2.5 x 2.5 inch colored squares. Place this colored square immediately beside the top-left background square. This initiates the ‘ribbon’ path.
- Take one of your 2.5 x 4.5 inch colored rectangles. Position this rectangle next to the colored square you just placed. Ensure it aligns perfectly, creating a continuous line.
- Now, find the matching 2.5 x 2.5 inch colored square for the rectangle you just placed (i.e., if your rectangle was red, find the red square). Place this square at the bottom, directly below the background square in the top-right corner, leaving some space as demonstrated in the video tutorial by Jacque Russell Creates. This creates the visual ‘turn’ of the ribbon.
- Finally, place another 2.5 x 4.5 inch colored rectangle directly under the top-right background square. This piece should also be the same color as the previous square and rectangle, continuing the ribbon.
This initial arrangement is critical for visualizing the pattern. Take your time to ensure all pieces are oriented correctly and the intended “weave” is clear. This preliminary layout helps to prevent errors before you start sewing.
Step 2: Completing the Layout and Beginning to Sew
With the initial pieces laid out, it’s time to complete the arrangement and begin the sewing process. This step involves filling in the remaining gaps to finalize the block’s design and then carefully stitching the individual units together.
- Identify the matching 2.5 x 2.5 inch colored square for the ribbon you’re creating. This square will be placed below the background square that is located at the opposite corner (bottom-right). This completes the visual flow of one ribbon segment.
- Proceed to place the remaining fabric pieces into the empty spaces until your entire block arrangement is complete and mirrors the ribbon weave pattern. Double-check that all colors and sizes are in their correct positions according to the design you envision or the video tutorial.
- Once your block is fully laid out, begin the sewing process. A common and efficient method is to sew in rows or by pairing adjacent pieces. Start by sewing the individual squares together, usually in pairs, and then attach the rectangle pieces beside them. Maintain a consistent 1/4 inch seam allowance throughout all your sewing. This precision is vital for ensuring your block measures correctly when finished.
- To save time and thread, consider using the “chain piecing” technique. This involves feeding one set of fabric pieces through your sewing machine, then immediately feeding the next set without cutting the thread in between. This creates a chain of sewn units that can be separated later.
As you sew, pay close attention to your seam allowance. An accurate 1/4 inch seam is the foundation of a perfectly pieced quilt block. Use a seam guide on your machine if available, or mark your 1/4 inch line on your machine’s throat plate with masking tape.
Step 3: Assembling Units and The Importance of Pressing
After piecing the smaller units, the next stage is to sew these units together to form the complete block. This step also heavily emphasizes the critical technique of pressing, which makes all the difference in the final quality of your quilt.
- Continue sewing the rest of the individual units of your block together, following the layout you established in Step 1. Focus on creating accurate seams and ensuring your pieces align well.
- Once you have several smaller units sewn, begin joining them to create larger sections of the block. For example, if you’ve sewn two squares to a rectangle, you might then sew that strip to another square or rectangle.
- As you sew these larger units together, it’s incredibly important to stop frequently and press your seams. The general rule of thumb in quilting is to press seams towards the darker fabric. This helps prevent the seam allowance from showing through lighter fabrics, creating a cleaner look. Pressing also flattens your block, removes bulk, and helps ensure your subsequent seams will be more accurate. Do not “iron” by sliding the iron back and forth; instead, “press” by lifting the iron and placing it down firmly, then lifting again.
- After all units have been sewn together and the entire block is complete, give it a final, thorough press. Lay the block flat on your ironing board, gently stretch it if needed to square it up, and press firmly until it is perfectly flat and crisp. This final press sets the stitches and prepares your block for assembly into a larger quilt.
Pressing is often overlooked by beginners, but it’s arguably one of the most vital steps in quilting. Well-pressed seams lead to flatter blocks, better matching points, and a more professional-looking finished project.
Expanding Your Project: From Single Block to Full Quilt
Once you’ve mastered the creation of a single Ribbon Weave Quilt Block, the real fun begins: making more blocks and assembling them into a beautiful, finished quilt. This is where your individual creativity truly shines, as you decide on the size, layout, and finishing touches for your masterpiece.
Making More Blocks
The first step to a full quilt is repetition. Create as many Ribbon Weave Quilt Blocks as you need to achieve your desired quilt size. As you make more blocks, you’ll find your speed and accuracy improving. Consider making blocks in batches: cut all fabrics for multiple blocks at once, then chain piece the similar units together for maximum efficiency.
Assembling Your Quilt Top
Once you have a collection of blocks, it’s time to arrange them. Lay all your finished blocks out on a design wall, the floor, or a large table. Experiment with different arrangements until you find a layout that pleases your eye. The Ribbon Weave pattern offers a striking visual when blocks are rotated, creating a dynamic, flowing effect.
- Sewing Blocks into Rows: Stitch your blocks together into horizontal rows, maintaining that consistent 1/4 inch seam allowance.
- Adding Sashing: For a more defined look, you might choose to add “sashing” – strips of fabric sewn between your blocks and rows. Sashing can provide visual breathing room, separate busy patterns, and add an additional design element.
- Joining Rows: Once your rows are complete (with or without sashing), carefully sew the rows together, paying close attention to matching your seams and points. Again, press your seams as you go, often pressing seams in opposing directions from row to row to help them nest together neatly.
- Adding Borders: To frame your quilt top and increase its size, consider adding borders. Borders can be a simple single strip or multiple strips of varying widths and colors, adding another layer of design and sophistication to your quilt.
The Quilting Process: Batting, Backing, and Finishing
With your quilt top complete, you’re ready for the “quilt sandwich” and the actual quilting process.
- Batting: Choose a batting that suits your preferences – cotton, wool, or a blend – which will provide warmth and loft to your quilt.
- Backing: Select a fabric for the back of your quilt. This can be a single wide fabric or pieced together from standard width fabrics.
- Layering: Create your quilt sandwich by laying the backing fabric face down, followed by the batting, and then your quilt top face up. Secure these layers with basting pins or spray to prevent shifting during quilting.
- Quilting: This is the process of stitching through all three layers to hold them together and add texture. You can quilt by hand for a traditional, soft look, or by machine using straight lines, free-motion designs, or a combination. The quilting pattern you choose can dramatically enhance the ribbon weave design.
- Binding: The final step is to bind your quilt. This involves cutting strips of fabric, joining them, and sewing them around the raw edges of your quilt to create a neat, durable finish. This also adds another decorative element.
Tips and Tricks for a Successful Quilting Journey
Quilting is a journey of learning and creativity. Here are some extra tips to help ensure your Ribbon Weave Quilt project, and future projects, are successful and enjoyable:
- Pre-wash Your Fabrics: While some quilters skip this, pre-washing your fabrics can prevent shrinkage and color bleeding after your quilt is finished. If you do pre-wash, press your fabrics thoroughly before cutting.
- Invest in Good Tools: Sharp rotary blades, quality rulers, and a well-maintained sewing machine make a significant difference in the accuracy and enjoyment of your quilting.
- Accurate Seam Allowance: Consistently sewing a perfect 1/4 inch seam is the cornerstone of successful piecing. Practice on scraps if needed, or use a 1/4 inch foot on your machine.
- Press, Don’t Iron: As mentioned, pressing is crucial. Ironing can distort your fabric, while pressing lifts and places the iron, setting seams flat without stretching.
- Square Up Your Blocks: After completing each block, use a square ruler to trim it down to its exact unfinished size (e.g., if your finished block is 8.5 inches, you’ll trim it to that size plus seam allowance, perhaps 9 inches unfinished). This ensures all blocks are uniform and will fit together perfectly.
- Embrace Imperfection: Especially as a beginner, don’t strive for absolute perfection. Every stitch tells a story, and slight imperfections add character. Focus on enjoying the process!
- Organize Your Scraps: Quilting generates a lot of fabric scraps. Keep them organized by color or size, as they can be perfect for future ribbon weave blocks or other scrap-friendly projects.
- Watch Tutorials: Videos like the one from Jacque Russell Creates are invaluable. They offer visual clarity that static instructions sometimes can’t. Don’t hesitate to watch a step multiple times if you’re unsure.
- Join a Community: Connect with other quilters online or in person. They can offer advice, inspiration, and support, making your quilting journey even more enriching.
Easy Ribbon Weave Quilt Block: A Perfect Tutorial for Beginners
The Ribbon Weave Quilt Block truly stands out as an ideal project for those new to quilting, offering a fantastic learning experience without being overwhelming. Its repetitive nature allows you to hone your cutting, piecing, and pressing skills, building confidence with each block you complete. The visual reward of seeing the “ribbons” come together is incredibly motivating, proving that even with simple shapes, stunning results are within reach.
By following this detailed tutorial, leveraging the visual guidance from Jacque Russell Creates, and applying the essential tips for success, you’re well-equipped to create not just a single beautiful block, but an entire quilt that showcases your newfound skills and creativity. Dive into your fabric stash, gather your tools, and embark on this satisfying craft. The joy of creating something beautiful with your own hands is truly immeasurable.
*All image credit belongs to Jacque Russell Creates via YouTube. Follow and subscribe to her channel for more inspiring quilting tutorials and creative projects!