
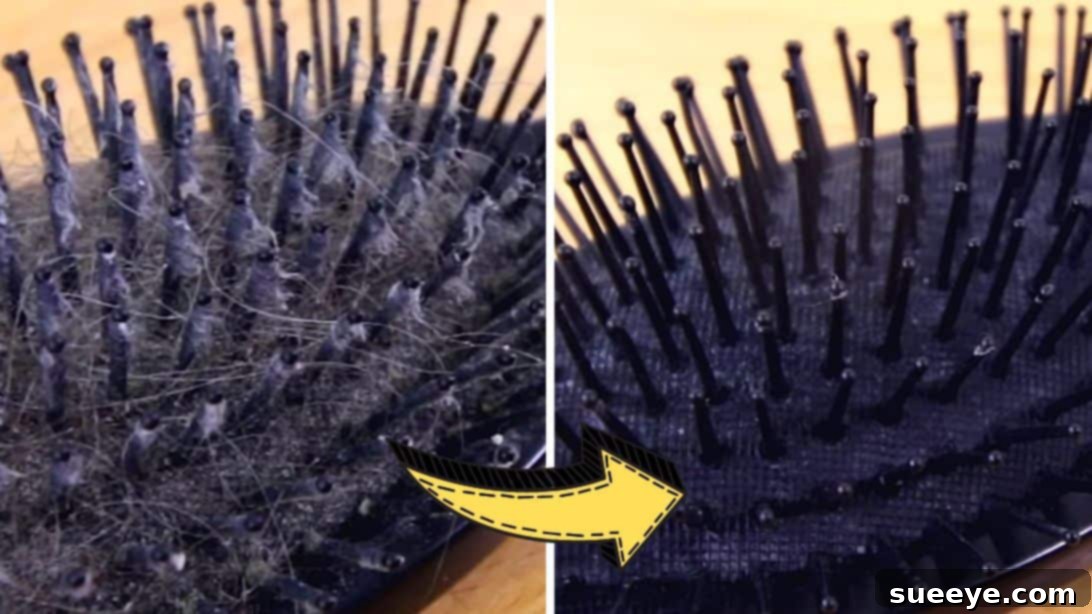
The Ultimate 5-Minute Hairbrush Cleaning Hack for Healthier, Shinier Hair
A hairbrush is an indispensable tool in our daily beauty and hygiene routines, serving as our first line of defense against tangles and a key instrument for styling. Yet, despite its constant contact with our hair, it’s one of the most overlooked items when it comes to regular cleaning. Over time, hairbrushes accumulate a surprising amount of dust, natural oils from our scalp, residual hair products, dead skin cells, dandruff, and stray hairs. This insidious buildup not only makes your brush look unsightly but can also significantly impact its effectiveness and even compromise your hair’s health and cleanliness.
Traditional hairbrush cleaning often feels like a tedious chore. The mere thought of spending countless minutes painstakingly plucking out tangled strands, only to then scrub away the stubborn grime, is enough to deter most. Many of us have experienced the frustration of struggling to remove deeply embedded hairs, often resorting to less-than-effective methods that leave our brushes only partially clean. However, what if there was a simple, yet remarkably effective, trick to slash your cleaning time dramatically? This ingenious cleaning hack, originally popularized by Clean My Space on YouTube, promises to transform your dreaded cleaning session into a quick and satisfying task. With just a few common household items, you can achieve a spotless brush, rejuvenating both your tool and your hair care regimen.
Why a Clean Hairbrush is Crucial for Your Hair Health
Understanding the importance of a clean hairbrush goes beyond mere aesthetics. A dirty brush harbors a multitude of substances that can negatively affect your hair and scalp. Each stroke with a grimy brush redeposits old oils, product residue, and dead skin back onto your freshly washed hair, making it appear dull, greasy, and prone to buildup. This creates a vicious cycle where your hair never truly feels clean, even after shampooing. Furthermore, the accumulation of dirt and moisture within the bristles can create an ideal breeding ground for bacteria and fungi, potentially leading to scalp irritation, dandruff, or even more serious dermatological issues. Regular cleaning is not just about extending the life of your brush; it’s a vital step towards maintaining vibrant, healthy, and genuinely clean hair.
Imagine styling your hair with a brush that’s free from all this hidden debris. Your hair will be smoother, shinier, and your styling products will perform better without interference from old residue. A clean brush glides more easily through your strands, reducing snagging and breakage. It’s an essential component of a holistic hair care routine that prioritizes both beauty and hygiene, helping you achieve your best hair day, every day.
The Genius Hack Revealed: Materials You’ll Need
One of the beauties of this transformative hairbrush cleaning method is that it requires only a handful of readily available items. You likely already have most, if not all, of these materials within arm’s reach in your home, making this hack incredibly convenient and accessible. Gather these simple tools to embark on your journey to a perfectly clean hairbrush:
- Pen or Similar Tool: A standard ballpoint pen works perfectly due to its slender shaft and slightly rounded tip, making it ideal for navigating between bristles. Alternatively, any similar sturdy, narrow object like a pencil, a chopstick, or even the handle of a rat-tail comb can be used to effectively dislodge trapped hair.
- Sharp Scissors: A small pair of sharp scissors, such as craft scissors, embroidery scissors, or even nail scissors, is ideal. Their precision and sharp blades will allow you to make clean, efficient cuts through compacted hair without damaging the delicate bristles of your brush.
- Old Toothbrush: An old toothbrush that’s no longer suitable for dental hygiene is perfect for this task. Its small head and array of firm bristles are excellent for reaching into tight spaces and scrubbing away grime, oil, and product buildup from around the base of your hairbrush bristles.
- Shampoo: Any shampoo you have on hand will work effectively. Just as it’s formulated to clean your hair, it’s excellent at breaking down natural oils and product residue accumulated on your brush, leaving it fresh and clean.
- Warm Water: Warm water is essential as it helps to loosen dirt, dissolve stubborn product residue, and activate the shampoo’s cleaning agents. This facilitates a more efficient and thorough washing process, ensuring all contaminants are easily lifted away.
Step-by-Step Guide: Effortless Hairbrush Cleaning
Follow these simple, yet highly effective, steps to thoroughly clean your hairbrush in mere minutes, transforming it from grimy to gleaming. This method is designed to be quick, efficient, and incredibly satisfying, making regular brush maintenance a breeze.
Step 1: Efficient Hair Removal
The most notoriously time-consuming and frustrating part of hairbrush cleaning is typically wrestling with the matted, tangled hair strands deeply embedded within the bristles. This ingenious hack dramatically streamlines this process. Begin by taking your pen or your chosen similar slender tool. Gently insert the tip of the pen into the bristles, running it through the middle of the hairbrush, creating a distinct line or furrow. The primary goal here is to carefully lift and prop up the compacted hair from the very base of the bristles, making it accessible for the next step. Repeat this motion in several parallel lines across the brush head, effectively dividing the large, stubborn clump of hair into more manageable sections. For larger paddle brushes, you might create a grid-like pattern. Once the hair is sufficiently lifted and standing proud from the brush base, take your sharp scissors. Carefully cut through the elevated hair strands in a straight line, essentially bisecting or sectioning the large, tangled mass. For brushes with a rectangular or oval shape, one long cut down the middle and a few perpendicular cuts will create smaller, easier-to-handle squares or strips. For round brushes, cutting around the circumference can be more effective. This strategic cutting action significantly breaks the tension within the matted hair, allowing for much easier removal than plucking individual strands.
After making your strategic cuts, you’ll immediately notice that the hair is now much easier to grab and pull out. You can use your fingers, the pen itself, or even a fine-toothed comb to gently lift and extract the now-separated hair clumps. You’ll be amazed at how easily the hair comes away in larger, cohesive sections, rather than needing to be painstakingly plucked out strand by strand. This crucial first step significantly reduces the physical effort and time spent on hair removal, setting the stage perfectly for the deep cleaning process that follows.
Step 2: Deep Cleansing and Thorough Drying
With all the loose hair efficiently removed, it’s time to tackle the lingering dirt, natural oils, dead skin cells, and product residue that coats the bristles and brush base. First, set aside the hair you’ve removed from the brush. Next, prepare your specialized cleaning solution: in a bowl or suitable container, mix a generous amount of your chosen shampoo with warm water. The warmth of the water plays a vital role in helping to break down stubborn greasy buildup, while the shampoo, designed specifically to cleanse hair, acts as a powerful degreaser and dirt-lifter for your brush. Submerge your hairbrush completely into this shampoo mixture, ensuring that all the bristles and the entire base of the brush head are fully immersed, allowing the solution to penetrate and loosen grime.
Now, take your old toothbrush. This is where its small size, agile head, and firm bristles become absolutely invaluable. Vigorously scrub the hairbrush, paying close attention to the base of the bristles, which is typically where dirt, oil, and product often accumulate most heavily and stubbornly. Work the toothbrush meticulously around each bristle, gently yet firmly scrubbing the entire surface of the brush head. Depending on how much grime has been trapped and how long it’s been since the last clean, this thorough scrubbing process might take a few minutes. You’ll observe the water in your bowl starting to get cloudy as the embedded dirt, oils, and residues lift away from the brush. For brushes with wooden handles or bases, exercise caution: avoid prolonged soaking, focusing the scrubbing mainly on the bristles and quickly rinsing the handle to prevent potential water damage or warping.
Once you’re completely satisfied that your brush is sparkling clean and all visible grime has been removed, rinse it thoroughly under running warm water. It’s crucial to wash away all traces of shampoo and any remaining loosened dirt. Shake off any excess water vigorously. The final and absolutely crucial step is to allow your hairbrush to dry completely. Place it bristle-side down on a clean towel, on a drying rack, or hang it in a well-ventilated area, away from direct sunlight or intense heat. Ensuring it dries completely is vital to prevent mildew, mold, and bacterial growth. Once fully dry, your hairbrush will be as good as new, ready to provide optimal detangling, styling, and hygiene benefits for your hair.
The Tangible Benefits of a Consistently Clean Hairbrush
Embracing this quick and effective hairbrush cleaning hack offers a multitude of benefits that extend far beyond mere aesthetics, positively impacting your hair health and overall beauty routine:
- Improved Hair Health: Regularly cleaning your brush eliminates the transfer of old oils, product buildup, dead skin cells, and microscopic debris back onto your clean hair. This directly translates to less greasiness, better product absorption, and a significantly healthier scalp environment, reducing potential irritations.
- Enhanced Shine and Volume: Without a layer of residue clinging to your strands, your hair can naturally achieve its optimal shine and volume, looking more vibrant, lively, and feeling lighter.
- Better Styling Performance: A clean brush detangles hair more effectively and distributes the scalp’s natural oils and any applied styling products more evenly. This leads to smoother, more polished styles, significantly less frizz, and easier overall hair manageability.
- Extended Brush Lifespan: Regular cleaning prevents the accumulation of corrosive substances and excessive hair buildup that can strain, bend, or damage bristles and the brush base, ultimately prolonging the life of your valuable hair tools and saving you money.
- Superior Hygiene: This method significantly reduces the presence of bacteria, fungi, and dust mites that can thrive in dirty brushes. This contributes to vastly better scalp health, prevents potential skin issues, and ensures your styling tool is always sanitary.
- Reduced Hair Breakage: A hairbrush free of tangled hair and debris glides through your hair more smoothly, minimizing snagging, pulling, and reducing the likelihood of hair breakage, especially for fragile hair types.
How Often Should You Clean Your Hairbrush?
The ideal frequency for cleaning your hairbrush depends on several factors, including your hair type, how often you use styling products, how much hair you shed, and your overall lifestyle. However, some general guidelines can help you maintain optimal brush hygiene:
- Weekly Quick Clean (Hair Removal): For most individuals, a quick hair removal session (performing only Step 1 of this hack) once a week is highly recommended. This prevents hair from becoming too deeply embedded and makes subsequent deep cleaning efforts much easier and faster.
- Monthly Deep Clean (Full Hack): A full deep clean (both Step 1 and Step 2) is ideal once a month. If you frequently use a lot of styling products (e.g., hairspray, mousse, dry shampoo), have particularly oily hair, or experience significant hair shedding, you might consider performing a deep clean every two weeks to keep buildup at bay.
- As Needed: Always trust your senses. If you notice visible buildup of dust or product, an unpleasant or musty smell emanating from your brush, or if the bristles feel sticky, stiff, or greasy, it’s definitely time for a thorough clean, regardless of your scheduled routine.
Consistency is paramount to maintaining a hygienic and effective hairbrush. Incorporating this simple yet powerful hack into your regular beauty routine will make consistent cleaning less of a chore and more of a quick, satisfying task, ensuring your hair always looks and feels its best.
Additional Tips for Hairbrush Maintenance and Longevity
To keep your hairbrush cleaner for longer periods between deep cleans and to maximize its lifespan, consider adopting these simple habits into your daily or weekly routine:
- Remove Loose Hair Daily: After each use, take a brief moment to manually pull out any easily accessible loose hairs caught in the bristles. This small step significantly prevents hair from accumulating and forming dense, hard-to-remove clumps over time.
- Avoid Over-Product Application: Using excessive amounts of styling products can quickly lead to their transfer and residue buildup on your hairbrush. When possible, apply styling products sparingly and directly to your hair, rather than brushing them through heavily.
- Store Properly: Always keep your hairbrush in a clean, dry place. Ideally, store it in a drawer, standing upright in a clean container, or hanging from a hook. Avoid leaving it face down on dusty surfaces, countertops, or in humid environments like a shower caddy, which can encourage bacterial growth.
- Consider Brush Type Specifics: Different types of hairbrushes may require slightly varied care. Natural boar bristle brushes, for instance, might need gentler cleaning and less prolonged soaking than robust synthetic paddle brushes or vented brushes, as wood can be sensitive to excessive moisture. Always check manufacturer instructions if available for specialized brushes.
- Have a Backup Brush: For brushes that take longer to dry, having a second brush on hand allows you to rotate them, ensuring you always have a clean, dry brush ready for use.
Embrace a Cleaner, Healthier Hair Routine Today!
Say goodbye to those hours traditionally spent painstakingly trying to clean your hairbrush. This clever 5-minute hack, courtesy of Clean My Space, is a genuine game-changer. It transforms a daunting and often-ignored task into a simple, efficient, and highly satisfying part of your regular beauty regimen. By regularly cleaning your hairbrush using this easy, two-step method, you not only ensure the longevity and peak effectiveness of your essential styling tool but also significantly contribute to the health, natural shine, and overall cleanliness of your hair. Stop unknowingly re-applying old dirt, oils, and product to your fresh locks. Embrace this simple yet powerful trick and immediately experience the tangible benefits of a truly clean, hygienic hairbrush. Your hair, and your scalp, will undoubtedly thank you for it!
*Many thanks to Clean My Space via YouTube for inspiring this ingenious cleaning method and for the illustrative images used throughout this guide. If you found this tip invaluable and effective, we highly recommend exploring her channel for more brilliant home organization and cleaning hacks that simplify daily life!