
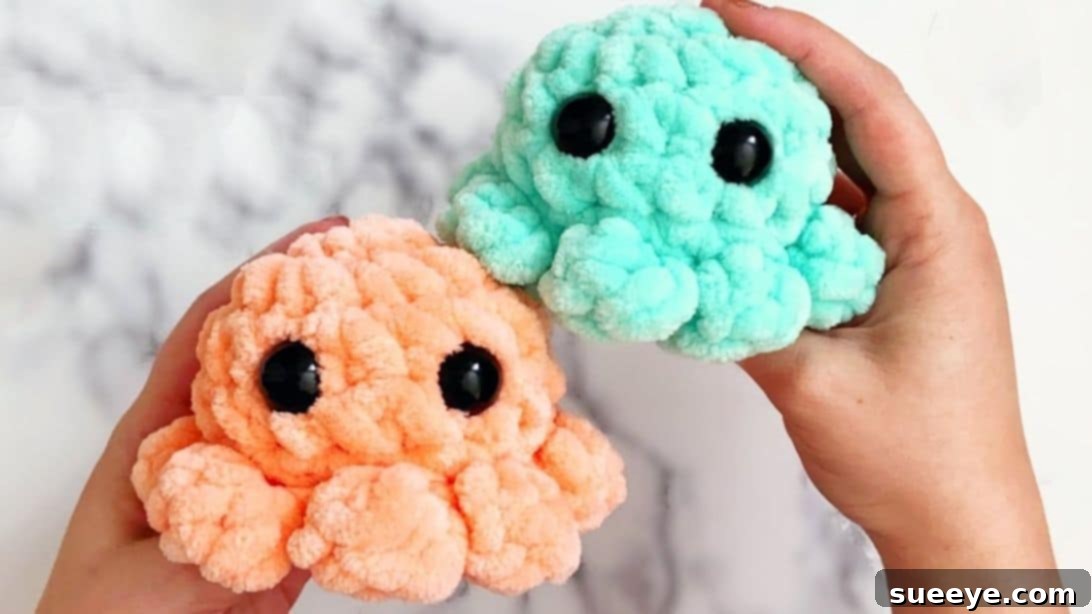
Create Your Own Adorable Amigurumi Baby Octopus: A Beginner’s Guide
Crochet is more than just a hobby; it’s a delightful journey into the world of creativity, offering a relaxing escape and the immense satisfaction of crafting something beautiful with your own hands. From cozy blankets and stylish sweaters to intricate home décor, the possibilities are truly endless when you master the art of working with yarn. Among the myriad of projects available, amigurumi – the Japanese art of crocheting small stuffed animals – stands out for its charming appeal and the joy it brings to both makers and recipients.
If you’re looking for a project that’s not only fun and engaging but also results in an incredibly cute and heartwarming creation, then this baby octopus crochet tutorial is perfect for you. Designed by the talented All From Jade, this project teaches you how to craft an endearing little octopus that makes a wonderful gift for loved ones, a charming addition to a nursery, or simply a delightful companion for yourself. The instructions below will guide you through each step, ensuring a smooth and enjoyable crocheting experience. For a visual reference, make sure to watch the accompanying video tutorial at the end of this guide.
Why Crochet a Baby Octopus? The Charm of Amigurumi
The allure of crocheting a baby octopus goes beyond just its cute appearance. This project offers numerous benefits, making it an excellent choice for crocheters of all skill levels, especially beginners:
- Stress Relief and Mindfulness: The repetitive motion of crochet can be incredibly meditative, helping to reduce stress and promote a sense of calm and focus.
- Perfect Handmade Gift: A handmade octopus is a thoughtful and personalized gift for baby showers, birthdays, or just because. Its soft texture and gentle tentacles are often cherished.
- Nursery Decor: These adorable creatures make a fantastic addition to any nursery or child’s room, adding a touch of whimsy and handcrafted charm.
- Beginner-Friendly: While it may look intricate, this project primarily uses basic crochet stitches, making it an excellent way for newcomers to practice foundational techniques while creating something truly rewarding.
- Portable Project: Once you have your materials, this project is easily portable, allowing you to crochet anywhere, anytime – on commutes, during travel, or simply relaxing at home.
Embark on this creative adventure and discover the joy of bringing your very own little eight-legged friend to life!
Materials for Your Amigurumi Octopus: Gather Your Crafting Essentials
Before diving into the crocheting process, ensure you have all the necessary supplies. Having everything organized will make your crafting session much more enjoyable and efficient.
- A pair of sharp scissors: Essential for cutting yarn tails neatly.
- A yarn needle (also known as a tapestry needle): Crucial for weaving in ends and assembling parts, giving your octopus a polished finish.
- A few stitch markers: These inexpensive tools are invaluable for marking the beginning of rounds or specific stitches, helping you keep track of your progress, especially in spiral crochet. If you don’t have official markers, don’t worry! Bobby pins, small pieces of scrap yarn, or even paper clips work just as well as temporary markers.
- Some polyester stuffing: This soft, hypoallergenic filling is what gives your octopus its plump, cuddly shape. Ensure you have enough to make your octopus firm but squishy.
- Crochet thread or yarn: The star of your project! Choose a smooth, durable yarn in your preferred color. Acrylic or cotton yarns are often recommended for amigurumi due to their ease of use, stitch definition, and washability.
- Crochet hook: The size of your hook will depend on the weight of your yarn and how tight you want your stitches. Generally, a hook slightly smaller than what’s recommended for your yarn is used for amigurumi to ensure tight stitches, preventing stuffing from showing through.
- Safety eyes: These plastic eyes come with a backing (washer) that secures them firmly in place, making them safe for children’s toys. Choose a size that complements the overall scale of your octopus.
Step-by-Step Guide: Crafting Your Amigurumi Octopus
Step 1: Laying the Foundation – The Octopus Head Beginning
The journey begins with creating the base of your octopus’s head, which will be worked in continuous rounds. Precision in these initial steps is key to achieving a neat and shapely finished product.
First, create a slip knot. Hold the yarn tail in one hand and wrap the working yarn around two fingers of your other hand, forming an “x” on the palm side. Turn your hand over, insert your crochet hook under the first loop, then catch the second loop and pull it underneath the first. Lift your crochet hook, gently remove your fingers, and pull the yarn tail to tighten the knot. This forms your initial loop for starting.
Now, create your first chain stitch by yarning over the hook and pulling it through the loop on your hook. Repeat this process to create a second chain stitch. You’ll now work into the second chain from your hook. Insert your hook into this second chain, yarn under, and pull a loop through the chain. You should now have two loops on your hook. Yarn over again and pull through both loops. This completes your first single crochet (sc) stitch.
Return to the very same chain stitch where you just worked, insert your hook, yarn under, and pull through the chain (two loops on hook). Yarn over and pull through both loops on your hook. Continue this method, working a total of 8 single crochet stitches into that initial second chain. This creates a small circle that will form the top of your octopus’s head. After completing all 8 stitches, gently pull the yarn tail (the one from your slip knot) to tightly close the opening at the center, forming what is often referred to as a “magic ring” or “magic circle effect.”
To mark the start of your subsequent rounds, find the very last stitch you made. Insert your hook into it and make a single crochet stitch. Pull the loop up slightly to make it larger and immediately place a stitch marker into this loop. This marks the beginning of your next round and is crucial for keeping track of your progress when working in a spiral.
Step 2: Shaping and Bringing Your Octopus to Life
This stage involves increasing stitches to shape the head, adding the safety eyes, and then decreasing to start closing the head, creating the distinctive spherical form of your octopus.
Continuing from where you left off, remove the stitch marker from the loop. Go back into the same stitch where you just made your marked single crochet (the first stitch of the previous round). Make another single crochet in this same stitch. This is your first increase. Repeat this process around the entire round, making two single crochet stitches in each stitch from the previous round. By the time you reach your stitch marker again, you will have a total of 16 stitches. Once you’ve completed this round, pull the yarn tails tightly again to ensure the center remains secure and make your first single crochet stitch of the new round. Place your stitch marker into this stitch.
Now, continue working single crochet stitches around, making one single crochet in each stitch for the next 5 rounds. This will create the cylindrical body of the octopus head, allowing it to gain height without increasing in circumference. Always move your stitch marker up to the first stitch of each new round to maintain your place.
After completing these 5 rounds, pause your crocheting. Pull the working loop up to make it large, preventing any unraveling. It’s time to place the safety eyes. Carefully position the eyes between the last two completed yarn rounds (or wherever you prefer, as long as they are on the opposite side of your stitch marker, ensuring they are facing forward). Count approximately 3 spaces between the two eyes to achieve a balanced look. Once you’re satisfied with their placement, attach the washers firmly to the back of the safety eyes from the inside of your work. These washers lock the eyes in place, making them secure and safe.
With the eyes in place, we’ll begin the decreasing rounds to shape the top of the head. Strategically place 8 stitch markers on every other front loop around your current round. Now, insert your crochet hook into the loop again. You will be working decreases using the back loops only. To perform a decrease (invisible decrease is often preferred for amigurumi), insert your crochet hook into the next back loop, yarn over, and pull through (you’ll have two loops on your hook). Then, without completing that stitch, insert your hook into the next back loop (the one without a stitch marker), yarn over, and pull through (you’ll now have three loops on your hook). Yarn over and pull through all three loops. This completes one decrease. Repeat this decreasing method around your work, making 6 rounds of decreases in total. As you decrease, the opening will gradually close. Remove the stitch markers as you complete the decreases.
Once you’ve completed the decrease rounds, make a slip stitch to finish off the round. Leave the working loop a bit loose, then cut the excess yarn, leaving a tail of about 6-8 inches. Pull this yarn tail completely through the remaining loop on your hook to secure it.
Step 3: Completing the Head and Crafting Adorable Tentacles
The final stage brings your octopus to life by stuffing, neatly closing the head, and then adding its signature curly tentacles.
Before fully closing the head, generously stuff the octopus’s head with polyester filling. Ensure it’s evenly distributed and firm enough to hold its shape but still soft and squeezable. A well-stuffed head will give your octopus a pleasing form.
Now, it’s time to close the opening. Using the yarn tail you left earlier and your yarn needle, you will sew through only the front loops of the remaining stitches around the opening. Insert your crochet hook (or yarn needle) from the outside of the head, going inwards through the front loop of a stitch, and pull the yarn tail through. Repeat this stitching process around the entire opening, going through each front loop. Once you’ve reached the beginning of your sewing, gently pull the yarn tail to gather and tightly close the opening. This technique creates a very neat and almost invisible closure.
To hide the yarn tail, insert your yarn needle into the head, emerge a few stitches away, pull the tail tight, and then carefully snip off the excess yarn close to the head. The yarn end will recede into the stuffing, becoming invisible.
Next, we move on to the fun part: crafting the tentacles! The method described here creates a charming, curly effect. Identify the front loops left from when you started the head (where you made your first round of 8 single crochets and subsequent increases). These loops are the base for your tentacles. Pull your crochet hook through one of these front loops, yarn over, and pull a loop through. You should now have two loops on your hook.
Insert your crochet hook into the same stitch where the yarn is joined, yarn over, and pull through the front loop. You will end up with three loops on your hook. Now, yarn over and pull through only the first two loops on your hook. You will have two loops remaining. Repeat this action: yarn over and pull through only the first two loops. Continue this process, always pulling through only the first two loops, until you have created a series of small, interconnected bobble-like stitches. This continuous working of stitches and pulling through the first two loops is what creates the characteristic curl of the tentacles.
Once you are satisfied with the length and curl of your first tentacle (aiming for about 8 mini bobble stitches as described for each tentacle), insert your hook into the next available front loop on the octopus’s head and make a slip stitch to secure the base of this tentacle. Repeat this entire tentacle-making process for each of the remaining front loops, until you have a total of 8 adorable, curly tentacles. As you go along, remove any remaining crochet markers.
After all 8 tentacles are complete, remove your crochet hook. You should have two yarn tails (the one from starting the tentacle work and the one from the last tentacle). Tie these two yarn tails together securely with a knot. Using your yarn needle, insert both tied yarn tails back through the head of the octopus, similar to how you hid the main head closure tail. Emerge a few stitches away, pull tight, and carefully cut the excess ends of the yarn tails. This ensures all loose ends are neatly hidden, giving your octopus a professional and complete look.
Essential Tips for Crochet Success
To ensure your baby octopus project turns out beautifully and to enhance your overall crocheting experience, keep these helpful tips in mind:
- Maintain Consistent Tension: Even tension is crucial in amigurumi to create uniform stitches and a smooth fabric. Practice will help you achieve this. If your stitches are too loose, the stuffing might show through; if too tight, it can be difficult to work into them.
- Use a Smaller Hook: For amigurumi, it’s generally recommended to use a crochet hook that is one or two sizes smaller than what the yarn label suggests. This creates a denser fabric with no gaps, preventing the stuffing from peaking through.
- Count Your Stitches: Always count your stitches at the end of each round. This habit is vital for maintaining the correct shape and preventing errors that can be frustrating to fix later. Stitch markers are your best friend here!
- Stuff Firmly but Evenly: Stuffing plays a significant role in the final shape of your amigurumi. Add small amounts of stuffing at a time, pushing it into all areas, especially the head, to avoid lumps and ensure a smooth, well-formed appearance.
- Weave in Ends Securely: Loose ends can unravel and detract from the finished look. Take your time to weave in all yarn tails securely into the inside of your work using a yarn needle.
- Watch the Video Tutorial: If any step feels unclear, don’t hesitate to refer to the accompanying video tutorial. Visual demonstrations can clarify techniques that are harder to grasp from written instructions alone.
- Don’t Be Afraid to Undo: Even experienced crocheters make mistakes. If something doesn’t look right, don’t be afraid to unravel a few stitches or even a whole round. It’s part of the learning process and ensures a better final product.
Conclusion: Your Handmade Octopus Awaits!
Congratulations! You’ve successfully navigated the wonderful world of amigurumi to create your very own charming baby octopus. This project not only allows you to hone your crochet skills but also provides a tangible representation of your creativity and patience. Whether you plan to keep your new cephalopod friend, gift it to a loved one, or simply enjoy the satisfaction of a handmade item, this little octopus is sure to bring a smile to anyone’s face.
The beauty of crochet lies in its endless possibilities, and this baby octopus is just one of many delightful creations waiting to be discovered. We hope this detailed guide has inspired you to continue your crocheting journey and explore more intricate and fun projects. Remember, every stitch is a step towards mastering this beautiful craft.
*All images and the original tutorial are credited to All From Jade via YouTube. We highly recommend visiting her channel and subscribing for more amazing crochet ideas and tutorials!