
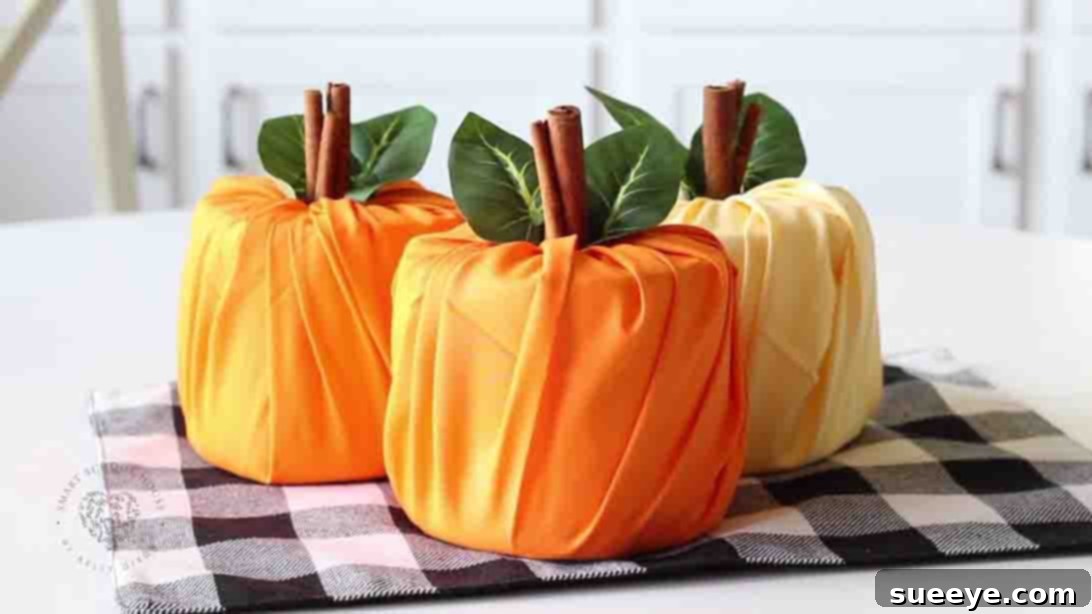
Create Charming Fall Decor: Easy DIY Toilet Paper Pumpkins Tutorial
Are you searching for that perfect blend of simplicity, charm, and autumn warmth to elevate your home decor? Dive into the delightful world of DIY with these incredibly easy toilet paper pumpkins, a brilliant craft inspired by the creative genius of Kelly Dixon on YouTube. This project isn’t just a craft; it’s an invitation to infuse your living space with the cozy spirit of fall, complete with the comforting aroma of cinnamon. Imagine transforming everyday household items into adorable, fragrant decorations that instantly make your home feel more inviting and seasonally appropriate.
This DIY isn’t just quick and easy; it’s a fantastic way to add a personal touch to your autumn decorations without breaking the bank. The materials are incredibly accessible, likely items you already have around your house or can find with ease. From a festive centerpiece on your dining table to a charming accent in your bathroom, these toilet paper pumpkins promise to bring a smile to your face and a lovely scent to your home. They are particularly wonderful for creating a welcoming atmosphere during the cooler months, adding a touch of rustic elegance or playful charm wherever they’re placed. What are you waiting for? Let’s gather our supplies and start crafting these delightful pumpkins today!
Why Choose DIY Toilet Paper Pumpkins for Your Fall Decor?
Beyond their undeniable cuteness, these DIY toilet paper pumpkins offer a multitude of benefits, making them an ideal choice for anyone looking to embrace the autumn season with creativity and flair:
- Cost-Effective Decor: With toilet paper rolls and fabric scraps as primary materials, this project is incredibly budget-friendly. You won’t need to spend a fortune on store-bought decorations when you can create stunning pieces with items you already own or can easily source.
- Beginner-Friendly Craft: No advanced crafting skills are required! The steps are straightforward and simple enough for crafters of all ages and experience levels, making it a perfect weekend activity for families.
- Highly Customizable: The beauty of this DIY lies in its versatility. You can choose fabrics that match your existing home decor, experiment with various colors and patterns, and add unique embellishments to truly make each pumpkin your own.
- Eco-Friendly Repurposing: Give new life to empty toilet paper rolls or fabric remnants. This project is a wonderful example of sustainable crafting, reducing waste while creating something beautiful.
- Infused with Natural Scents: The use of real cinnamon sticks isn’t just for aesthetics; it naturally diffuses a warm, inviting fragrance throughout your home. This subtle scent enhances the cozy autumn atmosphere, making your space feel even more welcoming.
- Quick & Satisfying: In just minutes, you can transform simple materials into a beautiful decoration. The instant gratification of seeing your finished pumpkin makes this a particularly rewarding project.
Materials You’ll Need
One of the best aspects of this DIY project is the simplicity and accessibility of the required materials. Most items can be found around your house or easily purchased at craft stores, fabric shops, or even dollar stores. Here’s what you’ll need to get started:
- Rolls of Toilet Paper: Any standard-sized roll will work. The fuller the roll, the more robust and rounded your pumpkin will appear. You’ll need one roll per pumpkin.
- Fat Quarter Cuts of Fabric: These are pre-cut pieces of fabric, usually 18 by 22 inches, readily available at craft and fabric stores.
- Choosing Your Fabric: Opt for autumn-inspired colors such as oranges, browns, deep reds, yellows, and greens. Plaids, subtle patterns, or even solid colors with interesting textures (like flannel or linen) work beautifully. Consider coordinating colors with your home’s existing decor or mixing and matching for a vibrant display.
- Alternatives: If you don’t have fat quarters, any fabric scrap large enough to cover a toilet paper roll with excess for tucking (roughly 18×18 inches or more) will suffice. Old scarves, pillowcases, or even large bandanas can be repurposed.
- Cinnamon Sticks: These are essential for creating the pumpkin “stem” and, more importantly, for infusing your home with a delightful fall fragrance.
- Alternatives: If cinnamon sticks aren’t available or preferred, you can use small branches or twigs collected from outside, faux pumpkin stems from craft stores, or even small pieces of wood dowel. Just ensure they are sturdy enough to be inserted into the toilet paper roll.
- Silk Leaves: These add a delicate and realistic touch to your pumpkins, mimicking a real pumpkin’s foliage.
- Choosing Your Leaves: Look for silk leaves in classic fall colors like deep red, orange, or golden yellow. Craft stores typically offer a wide variety in bundles.
- Alternatives: Small felt leaves, cut-out paper leaves, or even dried leaves (though these can be fragile) can also be used. Small faux berry sprigs or pieces of twine tied into a bow can also serve as charming embellishments.
Step-by-Step Directions: Crafting Your Toilet Paper Pumpkins
Follow these simple instructions to transform your materials into charming fall pumpkins. The process is so straightforward, you’ll be making a whole patch in no time!
Step 1: Preparing Your Fabric and Toilet Paper Roll
Begin by laying your chosen fat quarter fabric flat on a clean surface. Ensure the side you want to be visible on your pumpkin is facing down. Carefully center a roll of toilet paper on top of the fabric. The goal here is to have an even amount of fabric extending beyond all sides of the toilet paper roll, which will be gathered and tucked in later.
Step 2: The Art of Gathering and Tucking
Once the toilet paper roll is centered, begin to gather the edges of the fabric. Start with one side, pulling the fabric up and over the top of the toilet paper roll, pushing it gently but firmly into the center cardboard tube. Continue this process all the way around the roll, gathering and tucking the fabric into the central core. As you tuck, gently shape the fabric around the roll to create the characteristic pumpkin “lobes” or indentations. The more evenly you gather and tuck, the rounder and more defined your pumpkin shape will be. Don’t worry if it’s not perfect on the first try; fabric is forgiving, and you can adjust it until you’re happy with the shape.
Step 3: Adding the Natural Stem
Now it’s time to add the “stem” of your pumpkin. Take three pieces of cinnamon sticks (or your chosen branches/twigs). Group them together and insert them firmly into the center hole of the toilet paper roll, where you’ve tucked in all the fabric edges. Pushing them down securely will help hold the fabric in place and give your pumpkin a stable, natural-looking stem. The cinnamon sticks will also begin to release their delightful aroma, instantly filling your space with the scents of autumn.
Step 4: The Finishing Touch – Silk Leaves
With the stem in place, take your silk leaves. Gently tuck the base of the silk leaves around the cinnamon stick stem. You can use one or two leaves, positioning them to look as if they’re naturally growing from the pumpkin. This step adds a beautiful, realistic detail that completes the pumpkin’s look. If your leaves feel a bit loose, a tiny dab of hot glue or fabric glue can secure them, though usually, the snug fit around the cinnamon sticks is enough.
Step 5: Displaying Your Beautiful Creations
Congratulations! Your DIY toilet paper pumpkin is finished. Repeat these steps to create a collection of pumpkins in various colors and patterns. Once you have your charming pumpkin patch, simply place them wherever you desire around your house. They are perfect for adding a cozy, festive touch to any room. Your DIY toilet paper pumpkin project is complete, ready to delight both you and your guests!
Tips for a Perfect Pumpkin Patch
To ensure your toilet paper pumpkins turn out beautifully and last throughout the season, consider these helpful tips:
- Fabric Selection Matters: While most fabrics work, cotton and flannel are particularly easy to work with due to their slight stretch and forgiving nature. Thicker fabrics like burlap might require more effort to tuck, while very thin fabrics might show the toilet paper print underneath.
- Achieving the Right Shape: Don’t be afraid to gently manipulate the fabric after tucking to create more pronounced “lobes” or a rounder pumpkin shape. A bit of gentle coaxing can make a big difference.
- Enhancing the Scent: If you want to boost the cinnamon aroma, you can add a few drops of cinnamon essential oil to the inside of the toilet paper roll before wrapping, or directly onto the cinnamon sticks.
- Securing Elements: For a more permanent display, a tiny dab of hot glue can secure the fabric edges inside the toilet paper roll and keep the cinnamon sticks and silk leaves firmly in place. This is especially useful if you’re concerned about curious hands or pets.
- Mix and Match: Don’t feel confined to a single fabric pattern or color. A collection of pumpkins in complementary yet varied fabrics creates a more dynamic and visually interesting display.
- Involving Children: This is a fantastic craft for kids! Let them choose their fabrics and help with the tucking and decorating. Supervise them with any sharp objects or hot glue.
Creative Variations & Customization Ideas
While the basic tutorial provides a wonderful foundation, there are countless ways to customize your toilet paper pumpkins to perfectly match your personal style and home decor:
- Color Palettes: Beyond traditional autumn oranges, consider muted tones like sage green, cream, and dusty blue for a farmhouse chic look. Jewel tones such as deep plum and emerald can add a touch of elegance, while black and white fabrics offer a modern, sophisticated twist.
- Fabric Textures: Experiment with different fabric textures for added visual interest. Velvet offers a luxurious feel, burlap provides a rustic charm, flannel exudes coziness, and even lace overlays can add an unexpected delicate touch.
- Unique Stems: Instead of cinnamon sticks, try painting small twigs white or gold for a sophisticated look. Use decorative branches with faux berries, or even wine corks for an upcycled, quirky stem.
- Embellishments Galore:
- Ribbons & Twine: Tie small bows around the stem with natural twine, burlap ribbon, or velvet ribbon.
- Buttons & Beads: Hot glue small decorative buttons or beads onto the pumpkin fabric for subtle texture.
- Mini Pinecones: Attach tiny pinecones for an extra touch of nature.
- Glitter & Paint: For a bit of sparkle, add a light dusting of glitter glue or subtle gold/silver paint accents to the fabric or leaves.
- Themed Pumpkins: Create themed pumpkins for specific holidays. For Halloween, use black, orange, and purple fabrics with spider web or bat embellishments. For Thanksgiving, incorporate fall harvest colors and small faux corn or gourds.
Where to Display Your Charming Creations
These versatile toilet paper pumpkins are perfect for almost any area of your home. Here are some ideas to inspire your seasonal styling:
- Entryway Table: Create a welcoming first impression by arranging a cluster of pumpkins on your entryway table alongside a vase of fall flowers or a scattering of real acorns.
- Mantlepiece Magic: Line your fireplace mantle with a row of pumpkins, interspersed with candles, garlands, and other autumnal accents for a cozy focal point.
- Dining Table Centerpiece: Group several pumpkins of varying sizes and colors in the center of your dining table for an inviting and fragrant centerpiece, perfect for family meals or entertaining.
- Bathroom Bliss: As originally suggested, these pumpkins are fantastic for adding warmth and coziness to your bathroom vanity or shelves. The cinnamon scent will subtly refresh the space.
- Shelves and Bookcases: Tuck a pumpkin or two onto shelves or within bookcases to break up the lines and add a pop of seasonal color.
- Windowsills: Place them on windowsills to bring a touch of fall charm to every room, especially if they catch natural light.
- Bedroom Accents: Add a small pumpkin to your nightstand or dresser for a subtle, comforting autumn presence in your personal space.
- Office Desk: Brighten up your workspace with a charming pumpkin to keep the fall spirit alive even while you’re working.
Embracing the Autumn Season with DIY Decor
The act of crafting these toilet paper pumpkins is more than just making a decoration; it’s about embracing the spirit of autumn. Fall is a season of warmth, comfort, and transition, and decorating our homes plays a significant role in creating that cozy “hygge” atmosphere. Handmade decor like these pumpkins adds a layer of personal touch and authenticity that store-bought items often lack. Each time you glance at your creations, you’ll be reminded of the joy of making and the beauty of the season. They evoke feelings of harvest, family gatherings, and the simple pleasures of cooler weather and warm drinks.
So, grab your supplies, put on some cozy fall music, and let your creativity flow. In just a few minutes, you’ll have transformed simple household items into beautiful, fragrant fall decorations that bring warmth and cheer to every corner of your home. This project is a testament to how simple ideas can yield stunning results, proving that beautiful home decor doesn’t have to be complicated or expensive. A big thank you once again to Kelly Dixon for sharing this wonderfully simple yet impactful DIY tutorial. Happy crafting, and enjoy the delightful ambiance your new toilet paper pumpkins will bring!