
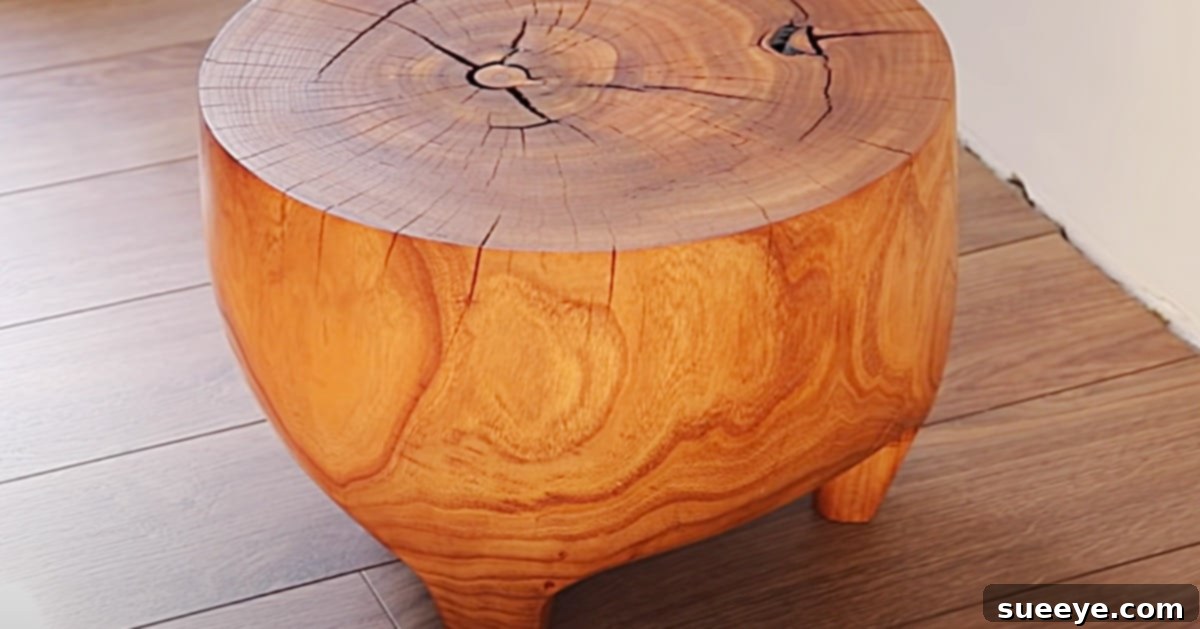
How To Make An End Table From A Tree Stump: A Comprehensive DIY Guide
There’s an undeniable allure to natural wood furniture that captivates homeowners and design enthusiasts alike. Its organic beauty, unique grain patterns, and timeless appeal add a touch of warmth and authenticity to any space. While mass-produced items from big-box stores dominate the modern market, the desire for handcrafted, one-of-a-kind pieces is growing. The good news is, you don’t always need to search endlessly or pay a premium for custom woodworking. With a little creativity and effort, you can craft your own stunning furniture, imbuing your home with a personal touch that store-bought items simply can’t replicate.
Among the myriad of DIY wood projects, transforming a humble tree stump into a functional and beautiful end table stands out as a particularly rewarding endeavor. It’s a testament to sustainable living, repurposing natural materials, and creating something truly unique from the raw beauty of nature. My personal journey into this fascinating craft began when I stumbled upon an incredible tutorial on YouTube. Chester’s comprehensive guide, “Table from a Tree Stump,” completely captivated me. His dedication to finding the perfect stump, his ingenious methods for refining the wood, and the exquisite final product truly showcased the potential hidden within a simple piece of timber. This project isn’t just about building a table; it’s about connecting with nature and celebrating the artistry of woodworking.
Why Choose a Tree Stump for Your Next DIY Project?
Opting for a tree stump as the foundation for an end table offers a plethora of benefits that extend beyond mere aesthetics:
- Unparalleled Uniqueness: No two tree stumps are identical. Each possesses its own distinctive shape, size, bark texture, and internal grain patterns, ensuring your finished table will be a singular work of art.
- Eco-Friendly and Sustainable: By repurposing a fallen tree or a stump from a cleared area, you’re embracing sustainability. You’re giving new life to a natural resource that might otherwise go to waste, reducing demand for new timber and minimizing environmental impact.
- Rustic Charm and Natural Beauty: A tree stump table effortlessly brings the outdoors in, creating a grounding, natural focal point. Its rustic appeal can complement various interior design styles, from farmhouse and bohemian to modern and industrial.
- Durability and Longevity: Properly prepared and sealed, a solid wood stump table can withstand years of use, often outlasting manufactured furniture due to its robust, natural composition.
- Cost-Effective: Depending on your access to natural resources, the primary material – the tree stump – can be acquired for free or at a very low cost, making this a budget-friendly DIY project.
- A Rewarding Creative Process: The satisfaction of transforming a raw piece of wood into a functional and beautiful furniture item is immense. It’s a hands-on project that allows you to develop woodworking skills and express your creativity.
Sourcing and Selecting the Perfect Tree Stump
The success of your tree stump table project heavily relies on choosing the right stump. This isn’t just about size; it’s about the type of wood, its condition, and how it will age.
Considerations for Stump Selection:
- Wood Species: Hardwoods like oak, maple, walnut, cherry, and ash are generally preferred for furniture due to their density, durability, and beautiful grain. Softer woods like cedar or pine can also work, especially if you prefer a lighter, more aromatic table, but they might be more susceptible to dents. Each wood type offers a unique color and texture.
- Size and Shape: Think about the desired height and diameter of your end table. Most end tables are between 18-24 inches tall. Consider the space where the table will reside and ensure the stump’s diameter is appropriate. Look for a stump that has a relatively flat top and bottom, or one that can be easily leveled.
- Condition: Inspect the stump for signs of decay, insect infestation, or excessive cracking. While small cracks can add character and be filled, a stump that is heavily rotted or riddled with pests should be avoided.
- Moisture Content: This is perhaps the most crucial factor. Freshly cut (green) wood contains a significant amount of moisture. If not properly dried, it will crack and warp as it dries, potentially ruining your project. Ideally, you want a stump that has been naturally air-drying for several months to a year, or even longer. If you have to use a green stump, be prepared for a long drying process and potential challenges with cracking.
Where to Find Your Stump:
- Fallen Trees: Local forests or private lands (with permission) often have fallen trees or recently cut stumps.
- Arborists and Tree Removal Services: These professionals often have stumps they need to dispose of and might be willing to give or sell them at a low cost.
- Local Sawmills: They sometimes have large wood disc cut-offs that could serve as excellent table tops.
- Online Marketplaces: Check local listings on platforms like Craigslist or Facebook Marketplace; people often give away or sell wood.
Essential Tools and Materials
Just as Chester meticulously prepared for his project, having the right tools on hand is vital for a smooth and safe woodworking experience. Here’s an expanded list of what you’ll likely need:
Tools:
- Circular Saw: Essential for making straight cuts to level the top and bottom of the stump and for shaping the sides or carving legs. A chainsaw can also be used for initial rough cuts on very large stumps.
- Hammer: Useful for general tasks, including bark removal if using a chisel or prying tools.
- Chisel Set: Indispensable for bark removal, refining contours, or carving intricate details. A variety of sizes will be beneficial.
- Hand Saw (Regular Saw): For smaller, more precise cuts that a circular saw might be too cumbersome for, or for initial cuts if you don’t have a power saw.
- Electric Sander (Orbital or Belt Sander): Crucial for achieving a smooth, refined surface. Start with a belt sander for rapid material removal and then switch to an orbital sander for finer grits.
- Grinding Wheel (Optional but Recommended): If you plan to carve legs or heavily contour the stump, a grinder with a wood shaping disc can significantly speed up the process.
- Measuring Tape and Pencil: For accurate measurements and marking cuts.
- Level: To ensure your table’s top and bottom surfaces are perfectly flat.
- Clamps: To secure the stump if needed during cutting or shaping (though its weight often makes this less critical).
- Safety Glasses, Hearing Protection, and Gloves: Non-negotiable for any woodworking project, especially when using power tools.
- Wire Brush: For thorough bark removal and cleaning the wood surface.
Materials:
- A Tree Stump: The star of your project!
- Varnish, Polyurethane, or Wood Oil: Your chosen finishing product to protect the wood and enhance its natural beauty.
- Various Grit Sandpaper: Ranging from coarse (60-80 grit) for initial shaping and bark removal to fine (180-220 grit, or even higher like 320-400 for an extra smooth finish).
- Wood Filler (Optional): To fill any significant cracks or voids in the wood. Choose a color that matches or complements your stump.
- Wood Stabilizer (Optional but Recommended for Green Wood): Products like Pentacryl or Anchorseal can help minimize cracking during the drying process of green wood.
- Mineral Spirits or Denatured Alcohol: For cleaning the wood surface before applying finish.
- Clean Rags or Applicators: For applying finishes.
Step-by-Step Directions: Crafting Your Tree Stump Table
The video tutorial that shows the making of this tree stump table project by Chester offers a fantastic visual guide, showcasing the transformation from raw wood to a finished piece. His methodical approach highlights the dedication required for such a project.
1. Preparing the Stump: Cleaning and Drying
Once you’ve selected your ideal tree stump and brought it to your workshop, the first critical step is preparation. If your stump is still ‘green’ (freshly cut), it needs to dry thoroughly. This can take several months to over a year, depending on the wood species, size, and humidity. Place it in a well-ventilated, shaded area, away from direct sunlight, which can cause rapid, uneven drying and severe cracking. Applying a wood stabilizer or end-grain sealer can significantly reduce checking (cracks) during this period.
Next, clean the stump. Remove any dirt, loose debris, or embedded stones. A wire brush can be very effective here. If the bark is still attached, you’ll need to decide whether to remove it or leave it on. While leaving bark on offers a more rustic look, it can harbor insects and tends to flake off over time. For a durable, clean finish, bark removal is usually recommended. Use a hammer and chisel, or even a robust scraper, to carefully peel away the bark. This can be a strenuous process, but it reveals the beautiful wood underneath.
2. Shaping and Leveling the Stump
After Chester removes the bark, he embarks on the transformative process of shaping. This stage is where your raw stump truly begins to resemble a piece of furniture.
Leveling the Top and Bottom: Using a circular saw (or a chainsaw for larger stumps), make precise, level cuts to both the top and bottom surfaces of your stump. This ensures the table will sit steadily and have a flat surface for use. A spirit level is essential to check your cuts. If using a chainsaw, you might need to follow up with a circular saw or hand plane for a flatter finish.
Contouring the Sides and Carving Legs: Chester’s design brilliantly incorporates carved legs directly from the stump itself. This requires careful marking and skilled use of a circular saw and chisels. First, mark out the desired shape of your legs on the sides of the stump. Then, with the circular saw, make parallel cuts down to the depth of your planned leg design. Use a chisel to remove the excess wood between these cuts, gradually refining the shape of the legs and the overall contour of the stump. This is where patience and an artistic eye come into play. If carving legs seems too daunting, you can opt for a simpler design, leaving the stump as a solid cylinder, or attach separate furniture legs later.
3. Sanding for a Silky Smooth Finish
After the shaping is complete, a significant amount of sanding is required to achieve a smooth, touchable surface that truly highlights the wood’s natural beauty. This is a multi-stage process:
- Coarse Grit (60-80): Begin with a coarse grit sandpaper on your electric sander to remove any saw marks, chisel marks, and rough imperfections. This stage removes material quickly.
- Medium Grit (100-120): Progress to a medium grit to remove the scratches left by the coarse sandpaper.
- Fine Grit (150-180): Continue with a fine grit to smooth the surface further, preparing it for the finish.
- Very Fine Grit (220-320, optional 400): For an exceptionally smooth, professional-grade finish, do a final pass with very fine grit sandpaper. Always sand with the grain of the wood to avoid noticeable scratches. After each grit, wipe down the stump with a clean, slightly damp cloth or tack cloth to remove all dust, as dust can interfere with the finish.
4. Applying the Protective Finish
Chester then makes the final cut that gets the table to the exact size he needs, and after extensive sanding, he applies varnish. The transformation is astounding, as the natural luster of the wood truly pops, revealing rich, deep tones and intricate grain patterns.
The finishing step is where your hard work truly shines. This layer protects the wood from moisture, spills, and wear, while also enhancing its natural color and grain.
- Choose Your Finish:
- Varnish/Polyurethane: Offers excellent durability and water resistance. It creates a protective film on the surface. Apply thin, even coats, allowing sufficient drying time between applications (check product instructions). Lightly sand with very fine sandpaper (e.g., 320 grit) between coats for optimal adhesion and smoothness.
- Wood Oil (e.g., Tung Oil, Linseed Oil): Penetrates the wood fibers, offering a more natural look and feel. It doesn’t form a film but hardens within the wood. Multiple coats are needed, and reapplication might be necessary periodically.
- Wax: Provides a soft, natural sheen and some protection, but is less durable than varnish or oil. Often used as a top coat over oil.
- Application: Apply your chosen finish according to the manufacturer’s instructions, usually with a brush, foam applicator, or clean cloth. Ensure good ventilation. Allow each coat to dry completely before applying the next. You’ll likely need 2-4 coats for adequate protection.
- Curing: Remember that while a finish may feel dry to the touch in hours, it often takes several days or even weeks to fully cure and reach its maximum hardness. Handle your new table with care during this period.
Optional Enhancements and Design Ideas
Once the basic table is complete, consider these additions to further customize your creation:
- Casters: Attach heavy-duty casters to the bottom for easy mobility, especially if your table is quite heavy.
- Glass Top: For a sleeker, more protected surface, have a circular or custom-shaped glass top cut to size and place it on top of the stump. This also allows the natural wood grain to be admired without direct exposure to spills.
- Resin Inlays: If your stump has natural cracks or voids, consider filling them with epoxy resin, perhaps tinted with pigment, to create stunning, durable inlays that highlight the wood’s imperfections.
- Metal Accents: Integrate metal bands around the base or top, or add decorative metal feet to complement a modern or industrial aesthetic.
- Leg Attachments: If you didn’t carve legs, you can attach pre-made metal or wooden legs to the bottom for a different look.
Caring for Your New Tree Stump Table
To ensure your handcrafted table remains beautiful for years to come, some basic maintenance is recommended:
- Clean Gently: Wipe regularly with a soft, dry cloth. For spills, use a damp cloth and mild soap, then dry immediately. Avoid harsh chemical cleaners.
- Protect from Moisture and Heat: Use coasters under drinks and placemats under hot items to prevent rings and damage to the finish.
- Avoid Direct Sunlight: Prolonged exposure to direct sunlight can cause fading and drying.
- Reapply Finish: Depending on the type of finish and usage, you may need to reapply a fresh coat of varnish, oil, or wax every few years to maintain protection and luster.
Conclusion
This project was nothing short of amazing, and Chester has truly become a hero for inspiring countless DIY enthusiasts, including myself. Crafting a table from a tree stump is more than just a woodworking project; it’s an artistic journey that connects you with nature and results in a truly unique, functional piece of art. It embodies sustainability, creativity, and the immense satisfaction of creating something beautiful with your own hands. So, next time you see a discarded tree stump, don’t just see a piece of wood; envision the stunning, personalized end table it could become in your home.