
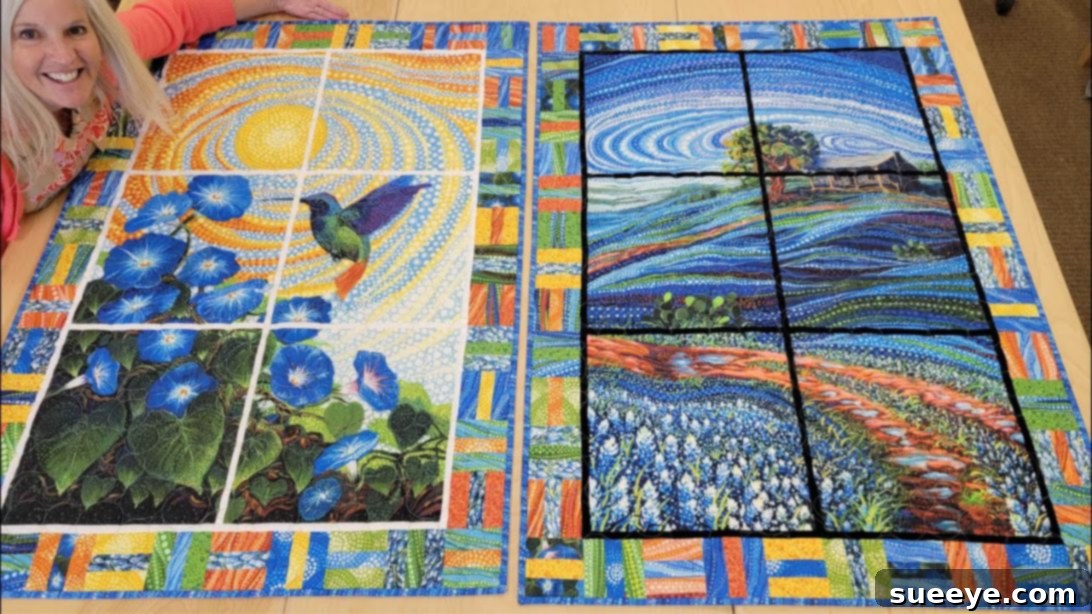
Master Donna’s “French Door” Panel Quilt: An Easy Tutorial for All Skill Levels
Embark on a delightful quilting journey with panel quilts – one of the most straightforward yet visually striking projects you can undertake. Whether you’re a seasoned quilter or just threading your first needle, panel quilts offer immense satisfaction, transforming beautiful fabric panels into stunning masterpieces. They are not only a joy to create but also make incredibly thoughtful, handmade gifts. If you’ve been searching for the perfect starter project or a quick, fulfilling sew, look no further! This comprehensive guide, inspired by the fantastic video tutorial from Jordan Fabrics on YouTube, will walk you through creating Donna’s gorgeous “French Door” Panel Quilt. Don’t worry about making mistakes; this project is designed for simplicity, allowing even absolute beginners to achieve a professional-looking finish on their very first attempt.
The Irresistible Charm of Panel Quilts: Why They’re Perfect for You
Panel quilts stand out in the quilting world for several compelling reasons. Their primary appeal lies in their ability to deliver high-impact results with relatively low effort. A single fabric panel often features a pre-designed scene, intricate illustration, or a series of coordinated blocks, providing an instant focal point for your quilt. This eliminates the need for complex piecing patterns, allowing you to focus on accurate cutting and sewing, which are fundamental skills for any quilter.
For beginners, panel quilts are a confidence booster. They provide immediate visual gratification as your quilt quickly takes shape, keeping motivation high. Experienced quilters appreciate them for their speed and versatility, offering a quick project between more elaborate undertakings or a canvas for showcasing beloved fabrics. Furthermore, the inherent beauty of a well-chosen panel means your finished quilt will always look professionally designed, making it an ideal candidate for heartfelt gifts for birthdays, holidays, or any special occasion. Imagine the delight of a loved one receiving a handmade quilt featuring a charming scene or a vibrant collection of motifs!
Essential Materials for Your Quilting Adventure
Gathering your materials beforehand ensures a smooth and enjoyable crafting experience. Here’s what you’ll need to create Donna’s “French Door” Panel Quilt, along with a few considerations for each item:
- Quilt Fabric Panels: Choose a panel design that inspires you. The “French Door” design often uses a panel that can be cut into segments, or you can adapt any panel. Consider the scale and color palette.
- Background Fabric: This fabric will serve as the sashing between your panel segments and along the outer edges, providing contrast and cohesion. A solid, blender, or subtle print works best to let the panel shine.
- Charm Squares: These 5-inch x 5-inch pre-cut fabric squares are perfect for creating the decorative border. They offer a quick and easy way to add variety and texture without cutting individual small pieces.
- Scissors or Rotary Cutter and a Cutting Mat: While scissors are fine for small cuts, a rotary cutter and self-healing mat are highly recommended for precision and speed, especially for long, straight cuts.
- Ruler: A clear acrylic quilting ruler is indispensable for accurate measuring and cutting with your rotary cutter.
- Needle and Thread: Choose a high-quality 100% cotton thread that complements your fabrics. A neutral color like white, cream, or light gray is often versatile.
- Fabric Pins: Essential for holding fabric layers together securely before sewing.
- Iron and Ironing Board: Crucial for pressing seams open and flat, ensuring your quilt lies smoothly and accurately.
- Sewing Machine: A reliable sewing machine will be your best friend for piecing your quilt together efficiently.
Step-by-Step Guide: Crafting Your “French Door” Panel Quilt
Now, let’s dive into the exciting part – bringing your panel quilt to life! Follow these detailed instructions, keeping an eye on the Jordan Fabrics video for visual guidance.
Step 1: Preparing Your Panels and Adding Vertical Sashing
Begin by ensuring your fabric panel is perfectly smooth. Give it a thorough press with a hot iron to remove any creases or wrinkles. This crucial step prevents distortions and ensures accurate cutting. Next, carefully trim the raw edges of your panel to create perfectly straight lines. A clever trick to achieve this with ease is to fold your panel in half lengthwise, aligning the edges, and then trim. This helps you find the true center and ensures symmetry. Once trimmed, cut the panel straight down the middle. Unfold the two halves, then rotate and stack them neatly, aligning all edges. Now, cut these stacked pieces equally into thirds. You should now have six identical or mirrored panel segments, depending on your initial cut and fabric design.
With your panel segments ready, turn your attention to the background fabric. Cut this fabric into strips of a consistent width (e.g., 2 inches or as desired for your sashing). These strips will form the “sashing” that frames your panel pieces. Begin by placing a background strip vertically in between each panel segment, and also on the outermost left and right sides of your layout. Pin these pieces together with right sides facing, and start stitching them using a precise ¼-inch seam allowance. This consistent seam allowance is vital for the overall alignment of your quilt.
Step 2: Joining Rows with Horizontal Sashing
As you complete each seam, take a moment to press it open. This isn’t just about making your fabric flat; it helps to reduce bulk at the seams, ensuring your quilt top lies perfectly flat and preventing puckering. A common technique is to press the seam allowance towards the darker fabric, as this helps prevent the lighter fabric from showing through. Once all your vertical seams are pressed, iron the entire row flat and smooth. Now, you’ll prepare the long background fabric strips that will run horizontally between each of your panel rows, effectively joining them together.
Cut these horizontal sashing strips to the appropriate length, matching the width of your completed vertical rows. Carefully sew these sashing strips to the top and bottom of each panel row. As you attach these, you’ll also be sewing the rows themselves together. Maintain that consistent ¼-inch seam allowance throughout this process. Continue to press each new seam open as you go, always pressing towards the darker fabric. Once all rows are joined and all horizontal sashing is in place, give your entire quilt top another thorough press to ensure everything is perfectly flat and smooth, ready for the next step.
Step 3: Crafting the Patchwork Border and Finishing Touches
To add a beautiful decorative frame to your “French Door” quilt, you’ll now create patchwork border blocks using your charm squares. The Jordan Fabrics video demonstrates various ways to assemble these small blocks, so refer to it for creative inspiration and detailed instructions on piecing them. Once your individual border blocks are made, lay them out around the bottom edge of your main quilt panel. Experiment with different arrangements until you find a design that pleases your eye. Once satisfied, sew these blocks together to form a cohesive border strip. After sewing, carefully trim off any excess fabric from the border strip to ensure it aligns perfectly with the length of your quilt’s edge.
Now, sew this completed patchwork border strip to the bottom edge of your panel quilt. Press the seam open flatly, just as you’ve done with previous seams, to maintain a smooth finish. Repeat this entire process for the remaining three sides of your quilt, creating and attaching a unique patchwork border to each edge. Once all borders are sewn and pressed, your quilt top is complete! The final steps involve layering your quilt top with batting and backing fabric, quilting it (either by machine or hand) to hold the layers together, and finally, adding a binding around the edges for a clean, durable finish. How you choose to quilt and bind is entirely up to you – unleash your creativity and complete your masterpiece!
Expert Tips for a Flawless Panel Quilt
Achieving a beautiful, professional-looking quilt involves more than just following steps. Here are some pro tips to elevate your quilting game:
Precision is Paramount
The saying “measure twice, cut once” is a quilter’s mantra. Accurate cutting is the foundation of a successful quilt. Even a slight deviation in your ¼-inch seam allowance can lead to misaligned blocks and wavy borders. Use a fresh rotary blade, a non-slip ruler, and a reliable cutting mat. Take your time, and don’t rush the cutting process.
The Power of Pressing (Not Ironing!)
There’s a subtle but important distinction between ironing and pressing in quilting. Ironing involves sliding the iron, which can stretch and distort fabric. Pressing, on the other hand, involves lifting and placing the iron directly onto the seam to flatten it. Always press your seams after each step, ensuring they are consistently pressed open or to one side (usually the darker fabric) as recommended. This creates crisp, flat blocks and minimizes bulk.
Fabric Choice Matters
While the panel is your star, the background fabric and charm squares play crucial supporting roles. Choose fabrics that complement the panel’s colors and theme. Consider contrast and how the different elements will visually interact. High-quality 100% cotton quilting fabric is recommended as it’s durable, easy to work with, and holds its shape well.
Thread Selection and Tension
Use good quality cotton or polyester thread that matches or blends with your fabrics. Ensure your sewing machine’s tension is correctly adjusted for your fabric layers. Test it on a scrap piece before you begin sewing your quilt to avoid puckering or loose stitches.
Don’t Forget the Batting and Backing
While this tutorial focuses on the quilt top, remember that a complete quilt requires batting (the middle insulating layer) and backing fabric. Choose batting suitable for your desired warmth and drape. The backing fabric can be a simple wide-back or pieced from regular fabric. Ensure these layers are squared up and ready for quilting once your top is finished.
Personalize Your Creation: Beyond the Basic Panel Quilt
The beauty of quilting lies in its endless possibilities for customization. While Donna’s “French Door” design provides a fantastic blueprint, don’t hesitate to infuse your personality into your project. Experiment with different widths for your background sashing strips to alter the visual impact. You could introduce a third complementary color for the sashing to add another layer of depth. For the patchwork border, consider varying the arrangement of your charm squares or incorporating different sized squares and rectangles to create a unique frame. Explore adding embroidery, appliqué elements, or even different quilting motifs to enhance your design. With panel quilts, the core structure is simple, leaving ample room for your creative expression to truly shine.
Caring for Your Handmade Quilt
Once your beautiful “French Door” Panel Quilt is complete, proper care will ensure its longevity and preserve its vibrant colors. Most cotton quilts can be machine washed on a gentle cycle with cold water and a mild detergent. Avoid harsh chemicals or bleach. Tumble dry on low heat or, ideally, lay flat to dry to prevent stretching and prolong the life of your stitches. With gentle care, your handmade quilt will be a cherished item for years to come.
Embrace Your Quilting Journey!
There’s a unique sense of accomplishment that comes with creating something beautiful with your own hands. Donna’s “French Door” Panel Quilt, guided by Jordan Fabrics’ clear instructions, offers an accessible and incredibly rewarding project for anyone eager to explore the world of quilting. So, gather your fabrics, fire up your sewing machine, and prepare to be amazed at what you can create. Your next favorite quilt, or perhaps the perfect gift, is just a few seams away. Happy quilting!
*All image credit belongs to Jordan Fabrics via YouTube. Follow and subscribe to their channel for more inspiring tutorials and expert quilting advice!