
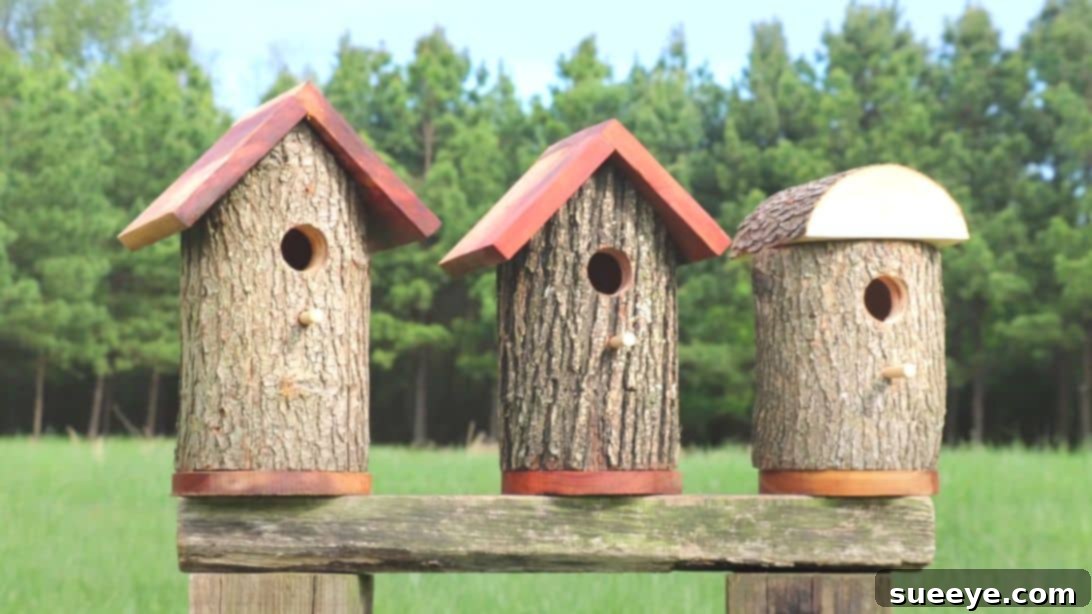
Are you searching for a rewarding weekend project that combines craftsmanship with nature? Look no further! Creating a stunning and rustic DIY log birdhouse is an incredibly satisfying endeavor, and this guide will walk you through every step. Imagine providing a charming, natural habitat for local wild birds right in your own backyard or garden. This unique birdhouse, crafted from a simple log, not only offers a safe haven for your feathered friends but also adds an undeniable touch of rustic beauty to your outdoor space. While it looks remarkably custom and intricate, you’ll be surprised at how straightforward the process can be, especially with the clear, detailed instructions we’ve compiled, inspired by expert woodworker Bill Rosener’s excellent tutorial.
Our comprehensive guide breaks down the entire process, from selecting the perfect log to the final touches that make your birdhouse truly special. We’ll explore various methods for preparing the log, ensuring you can tackle this project regardless of your tool availability. Whether you’re a seasoned DIY enthusiast or just starting your woodworking journey, this project is accessible and incredibly rewarding. Get ready to transform a piece of natural wood into a captivating home for birds, enhancing both your landscape and local wildlife.
Craft Your Own Unique Log Birdhouse: A Step-by-Step DIY Guide
Embrace the charm of natural materials by building a handmade birdhouse from a simple log. This project is not just about construction; it’s about connecting with nature, fostering local wildlife, and adding a beautiful, one-of-a-kind feature to your garden. We’ll guide you through the process, ensuring you have all the information needed to create a durable, attractive, and bird-friendly dwelling.
Essential Materials for Your Log Birdhouse Project
Gathering the right materials and tools is the first crucial step towards a successful log birdhouse build. The beauty of this project lies in its simplicity and the utilization of natural resources. Here’s what you’ll need to get started:
- Wood Log: Choose a log that is sturdy, free of excessive rot, and appropriately sized for the birds you wish to attract. A diameter of 6-10 inches and a length of 10-15 inches is often ideal for common backyard birds like wrens, chickadees, or nuthatches. Hardwoods like oak, maple, or cherry are durable, but softer woods like pine or cedar can also work well, especially if properly sealed. Ensure the log is well-seasoned (dried) to prevent cracking and warping after construction.
- Wood Pieces: You’ll need various scrap wood pieces for the roof and the base. Cedar or pine planks, about 1/2 to 3/4 inch thick, work wonderfully. Consider reclaimed wood for an even more rustic and eco-friendly approach.
- Nails or Screws: Stainless steel or galvanized screws (e.g., 1.5 to 2 inches) are recommended for their resistance to rust, which is crucial for outdoor projects. Nails can also be used, but screws generally provide a stronger and more secure hold, especially for the roof and base.
- Drill: A cordless power drill will be indispensable for pre-drilling holes, creating the entrance hole, and attaching components. Ensure you have a variety of drill bit sizes, including a large spade bit or hole saw for the bird entrance.
- Saws: Depending on your preferred method for hollowing the log, you might need a:
- Bandsaw: Excellent for precise and controlled cuts, especially for making the initial hollowing cuts.
- Handsaw or Chainsaw: Suitable for rougher cuts and larger logs. A chainsaw requires extra caution and experience.
- Chisel and Mallet: An alternative or supplementary tool for hollowing out the log’s interior, particularly if you’re working manually or refining saw cuts.
- Marking Pen or Pencil: For accurately marking cut lines, drill points, and angles on your log and wood pieces.
- Safety Gear: Always prioritize safety! This includes safety glasses, hearing protection (especially for chainsaws), gloves, and sturdy footwear.
- Optional Materials for Finishing:
- Sandpaper (various grits): For smoothing rough edges.
- Wood Glue: To reinforce joints (ensure it’s exterior-grade).
- Exterior Wood Sealant or Paint: To protect the birdhouse from elements and extend its lifespan. Choose non-toxic, bird-safe options.
- Hanging Hardware: If you plan to hang your birdhouse, consider eye hooks, sturdy chain, or a mounting bracket.
Step-by-Step Guide to Building Your Log Birdhouse
Now that you have your materials ready, let’s dive into the exciting process of crafting your very own log birdhouse. Follow these detailed steps to ensure a beautiful and functional home for your feathered visitors.
Step 1: Preparing the Log – Shaping the Roof and Hollowing the Interior
The first step involves shaping the top of your log to accommodate the roof and then hollowing out the interior to create the nesting chamber. This is where precision and safety are paramount.
Cutting the Roof Angles:
Begin by preparing the top of your log for the roof. You’ll need to cut two opposing 45-degree angles on the top surface. These angled cuts will allow your roof pieces to sit flush, creating a classic gable roof design that is both aesthetically pleasing and functional for shedding rain.
- Measure and Mark: Use your marking pen or pencil to clearly mark the center line on the top of the log. From this center line, measure and mark the points for your 45-degree cuts. A protractor or a pre-made template can be incredibly helpful here to ensure accuracy. Consistency in these angles is key for a well-fitting roof.
- Making the Cuts: Carefully make these cuts using your chosen saw. A handsaw allows for controlled, albeit slower, cutting, while a bandsaw offers precision and speed. If using a chainsaw, exercise extreme caution and ensure the log is securely clamped. The goal is to create a V-shape channel at the top, perfectly angled for the roof panels.
Hollowing Out the Log’s Interior (Creating the Nesting Chamber):
This is arguably the most critical part of the project, as it creates the actual living space for the birds. There are several effective methods for hollowing out your log, depending on the tools you have available and your comfort level with each:
- Bandsaw Method (Precision and Efficiency):
If you have access to a bandsaw, this method offers great precision. Start by making a series of parallel cuts from the top of the log down into the core, leaving a wall thickness of about 1 to 1.5 inches. Once these cuts are made, you can either make perpendicular cuts to remove the inner sections or carefully chisel them out. The bandsaw allows you to create a relatively smooth inner cavity quickly and efficiently. Always ensure your hands are clear of the blade and use appropriate push sticks.
- Handsaw or Chainsaw Method (Manual Dexterity):
For those using handsaws or chainsaws, the approach is slightly different. First, draw and mark the desired shape of the interior chamber on the flat top of the log. This will typically be a square or rectangular outline. Carefully make four deep cuts along these marked lines, essentially creating a square or rectangular plug in the center. Once these cuts are made, you can either try to pry out the central piece (which might require additional cross-cuts) or make further cuts to break it down. You’ll then need a chisel and mallet to clean out the remaining material and smooth the interior walls. This method is more labor-intensive but achievable.
- Large Drill Bit / Hole Saw Method (Controlled Hollowing):
Another excellent option is to use a large spade bit, auger bit, or a hole saw attached to a powerful drill. Start by drilling a series of overlapping holes within the marked interior area. This will progressively remove material from the core. Once you’ve drilled as much as possible, use a chisel and mallet to clean out the remaining wood between the holes and smooth the interior. This method is particularly effective for creating a cylindrical chamber.
- Router Method (For Finer Control):
If you possess a router, especially with a plunge base, you can create a very clean and precise cavity. Secure the log firmly and use a straight bit to rout out the interior, taking shallow passes until you reach the desired depth and wall thickness. This method offers excellent control over the shape and smoothness of the inner chamber.
Regardless of the method chosen, aim for an interior cavity that is roughly 4-6 inches in diameter and 6-10 inches deep. Leave a solid bottom of at least 1-2 inches. Smooth the interior as much as possible to prevent sharp edges that could harm the birds. Remember to always work safely and wear appropriate personal protective equipment.
Step 2: Constructing the Roof, Base, and Mounting System
With the log body prepared, it’s time to add the functional elements that turn it into a complete birdhouse: the entrance, roof, base, and a way to mount it securely.
Drilling the Entrance Hole:
The entrance hole is vital for the birds. Its size will determine which species can use your birdhouse. Use a spade bit or hole saw to drill a neat, circular hole on the front face of your log birdhouse. For common small birds like chickadees or wrens, a hole diameter of 1 to 1.5 inches is typically suitable. Position the hole slightly above the center of the log, ensuring there’s enough room for nesting material below it. Smooth the edges of the hole with sandpaper to prevent injury to the birds.
Crafting and Attaching the Roof:
The roof protects the nesting birds from rain, snow, and predators. Cut two pieces of wood (e.g., cedar or pine) at an angle that matches the 45-degree cuts you made on the log. These pieces should be slightly larger than the top opening of the log to provide an overhang of at least 1-2 inches on all sides. This overhang is crucial for protecting the entrance hole and the interior from direct rain and sun.
- Assemble the Roof: If desired, you can join the two roof pieces at their peak with wood glue and small nails/screws before attaching them to the log. This creates a more stable unit.
- Attach to Log: Carefully align the assembled roof (or individual panels) onto the angled cuts of the log. Pre-drill pilot holes to prevent splitting the wood, then secure the roof firmly in place using exterior-grade screws or nails. Ensure the roof is stable and watertight.
Creating a Sturdy Base:
The base provides stability and a floor for the nesting cavity. Cut a circular or square piece of wood that is slightly larger than the bottom diameter of your log. This will give it a finished look and ensure stability. Ensure the base has small drainage holes (1/4 inch) drilled into it to prevent water accumulation, which can lead to mold and unhealthy conditions for birds.
- Attach the Base: Center the base piece on the bottom of the log. Use pilot holes and screws to securely attach the base to the log. You can also apply a bead of exterior-grade wood glue before screwing for added durability.
Adding a Mounting System:
To prepare your birdhouse for installation, you’ll need a way to attach it. A common and sturdy method is to attach a long piece of wood to the back of the birdhouse. This mounting strip should extend below the base of the birdhouse, allowing you to secure it to a tree, post, or wall.
- Prepare Mounting Strip: Select a piece of sturdy wood, approximately 1-2 inches thick and 2-3 inches wide, long enough to extend a few inches below the birdhouse’s base.
- Attach to Birdhouse: Align the mounting strip vertically along the back of the log birdhouse. Pre-drill holes through the strip and into the log, then secure it firmly with screws. Ensure the screws penetrate deeply enough for a strong hold.
Step 3: Finishing Touches and Placement
With the construction complete, a few final touches will ensure your log birdhouse is durable, attractive, and ready for its first residents.
- Sanding and Sealing: Lightly sand any rough edges or splinters, especially around the entrance hole and inside the cavity, to protect birds. Apply an exterior-grade, non-toxic wood sealant or stain to the entire birdhouse, excluding the interior of the nesting cavity. This will protect the wood from weathering and significantly extend the lifespan of your birdhouse. Allow it to dry completely before placing it outdoors.
- Placement Considerations:
- Height: Most birdhouses should be mounted 5-15 feet above the ground, depending on the bird species you hope to attract.
- Orientation: Face the entrance hole away from prevailing winds (usually north or east) to protect against harsh weather.
- Predator Protection: Avoid placing the birdhouse too close to branches or structures that predators (like cats or raccoons) could easily access. Consider adding a predator guard around the entrance hole.
- Shade and Shelter: Position the birdhouse in a location that receives partial shade during the hottest part of the day to prevent overheating.
Embracing Nature: The Charm of DIY Birdhouses from Natural Logs
Building a birdhouse from a natural log offers a multitude of benefits beyond just providing a home for birds. It’s a testament to sustainable crafting, utilizing readily available resources to create something functional and beautiful. These unique dwellings blend seamlessly into any natural landscape, offering a rustic aesthetic that manufactured birdhouses often lack.
The appeal of a natural log birdhouse extends to the birds themselves. The organic texture and insulation provided by a thick log mimic the natural tree cavities that many bird species seek for nesting. This can make your handmade birdhouse particularly attractive to a wide variety of cavity-nesting birds, contributing to local biodiversity and providing endless opportunities for birdwatching.
This project is also a fantastic way to engage in hands-on learning, develop woodworking skills, and foster an appreciation for the environment. Each log is unique, meaning every birdhouse you create will have its own distinct character, reflecting the natural beauty of the wood and your personal touch. From the selection of the log to the final placement in your garden, the entire process is deeply connected to nature.
We are incredibly grateful to Bill Rosener via YouTube for inspiring this fantastic project and sharing his expertise. His original tutorial provides excellent visual guidance, and we highly recommend visiting his channel for more innovative woodworking ideas and to support creators who share their passion. If you loved the idea of crafting this rustic log birdhouse, you’ll undoubtedly find more engaging projects to try on his channel!
Maintaining Your Log Birdhouse for Lasting Enjoyment
To ensure your log birdhouse remains a safe and healthy environment for birds year after year, regular maintenance is essential:
- Annual Cleaning: After the nesting season is over (typically late summer or early fall), clean out old nests and debris. This prevents the buildup of parasites and makes the birdhouse ready for new occupants next spring. Remove the base if possible for easier cleaning, or use a narrow brush and scraper.
- Inspect for Damage: Periodically check the birdhouse for any signs of wear, rot, or damage from pests. Repair any loose components, reapply sealant if necessary, and ensure drainage holes remain clear.
- Pest Control: Monitor for wasp nests or other unwanted inhabitants. Remove them carefully when the birdhouse is not in use by birds.
Crafting a DIY log birdhouse is more than just a project; it’s an investment in your local ecosystem and a beautiful addition to your home. Enjoy the process, and soon you’ll be enjoying the delightful sight and sounds of birds making your handmade log birdhouse their home!