
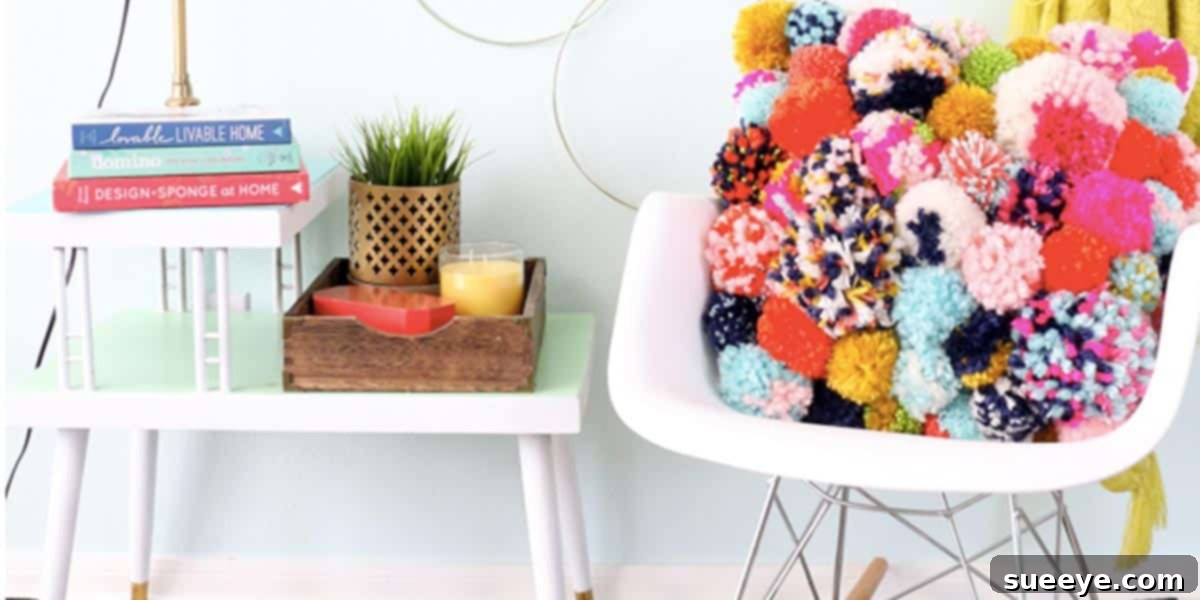
Transform Your Home with Vibrant DIY Pom-Pom Pillows: An Easy Crafting Guide
Are you searching for a delightful way to inject personality, comfort, and a burst of color into your living space? Look no further than the charming world of DIY pom-pom pillows! These whimsical and wonderfully unique decorative accents are not just simple to make; they’re a powerful statement piece that can instantly elevate any room. Whether your home decor leans towards bohemian chic, modern minimalist, or playfully eclectic, a handcrafted pom-pom pillow can seamlessly integrate and add that much-needed touch of joy and coziness.
Imagine sinking into your sofa, surrounded by plush, vibrantly textured cushions that reflect your personal style and creativity. Pom-pom pillows offer exactly this experience. They’re more than just functional; they’re conversation starters, mood enhancers, and a testament to the warmth of a handmade home. This comprehensive guide will walk you through the journey of creating these captivating pieces, providing tips, inspiration, and all the essential information you need to get started on your own colorful adventure.
The Irresistible Allure of Pom-Pom Decor
What makes pom-poms so universally appealing? Perhaps it’s their playful, soft texture, or the infinite possibilities they offer in terms of color and arrangement. Pom-poms evoke a sense of carefree joy and nostalgia, reminiscent of childhood crafts and cozy sweaters. When integrated into home decor, especially on pillows, they soften hard lines, add tactile interest, and bring a vibrant energy that ready-made items often lack. Each pom-pom, with its fluffy, spherical charm, contributes to a larger tapestry of comfort and style, making your space feel more inviting and distinctly ‘you’.
Beyond their aesthetic appeal, crafting pom-poms can be a wonderfully therapeutic activity. It’s a repetitive, meditative process that allows you to unwind, de-stress, and channel your creativity into something tangible and beautiful. This makes pom-pom projects not just about the end product, but also about the enjoyable journey of creation itself.
Unlock Your Creativity: Crafting Your Own Pom-Poms
One of the most appealing aspects of creating pom-pom pillows is the sheer simplicity of making the pom-poms themselves. You don’t need specialized skills or complicated tools; just yarn, scissors, and a little patience. This accessibility makes it a perfect project for crafters of all experience levels, from absolute beginners to seasoned DIY enthusiasts. The process is incredibly versatile – you can make pom-poms while relaxing on the couch, catching up on your favorite shows, or even during a quiet moment waiting at an appointment. It’s a craft that fits seamlessly into your daily life, offering a creative outlet that’s both enjoyable and productive.
Choosing Your Yarn: The Foundation of Fluffiness
The type of yarn you select will significantly impact the look and feel of your pom-poms. For luscious, full, and chunky pom-poms, opt for thicker yarns such as bulky or super bulky acrylic, wool, or a blend. These yarns yield larger, more robust pom-poms with less winding, saving you time and effort. However, don’t shy away from lighter weight yarns! Using multiple strands of worsted weight yarn simultaneously can also create a beautiful, dense pom-pom with a more refined texture. Experiment with different fiber contents – acrylic offers a wide range of vibrant colors, is durable, and often more budget-friendly, while wool provides a classic, natural texture with excellent bounce. Consider variegated yarns for multi-colored pom-poms with minimal effort, or mix and match solid colors for a truly personalized palette that perfectly matches your decor.
Effortless Pom-Pom Making Techniques
There are several tried-and-true methods for creating pom-poms, each with its own advantages and learning curve:
- Traditional Cardboard Method: This classic technique involves cutting two donut-shaped cardboard pieces, carefully winding yarn around them, and then cutting through the loops before tying a strong piece of yarn tightly around the center. It’s an incredibly budget-friendly approach and perfect for utilizing leftover yarn scraps.
- Pom-Pom Makers: For ultimate ease, consistent results, and faster production, specialized pom-pom makers are a fantastic tool. These clever gadgets, available in various sizes at craft stores or online, simplify the winding, cutting, and tying process, making it much more efficient, especially when you need to create a large quantity of pom-poms for a full pillow.
- Fork Method: For smaller, daintier pom-poms that are perfect for adding subtle accents or intricate patterns, winding yarn around the tines of a kitchen fork is a surprisingly effective and quick method. It’s a handy trick for miniature fluff balls.
- Hand-Winding: If you don’t have any tools handy, simply winding yarn around your fingers (for medium-sized pom-poms) or a small, sturdy object (like a phone or a piece of cardboard) can work in a pinch. This method requires a bit more care to ensure even winding but is a great impromptu option.
No matter which method you choose, the key is to wind enough yarn to ensure a dense, full, and luxurious pom-pom. A sparsely wound pom-pom tends to look straggly and less appealing. Once wound, carefully cut through the loops, and then tie a strong piece of yarn tightly around the center to secure the shape. A final, meticulous trim will give your pom-pom a perfect, spherical, and professional-looking finish.
Designing Your Pom-Pom Pillow: Color, Texture, and Harmony
This is where your artistic vision truly comes to life! The beauty of DIY pom-pom pillows lies in the endless possibilities for customization. You are the designer, and your imagination is the only limit to creating a unique piece that perfectly complements your home.
Color Palette Perfection
Color is arguably the most impactful element of your pom-pom pillow, dictating its mood and how it interacts with its surroundings. Do you want to create a vibrant focal point, or a subtle accent that complements your existing decor? Here are some inspiring ideas for your color scheme:
- Bold and Bright: Embrace a kaleidoscope of primary and secondary colors for a playful, energetic look. Think fuchsia, turquoise, sunny yellow, and lime green – perfect for adding a bohemian vibe or a touch of whimsy to a child’s room.
- Monochromatic Chic: Choose varying shades of a single color (e.g., light blue, medium blue, navy) for a sophisticated yet textured effect. This works wonderfully in modern, minimalist, or coastal-inspired settings, adding depth without visual clutter.
- Earthy and Neutral: Opt for a serene palette of cream, beige, grey, taupe, and soft greens for a calming, natural aesthetic. These tones blend seamlessly with rustic, Scandinavian, or farmhouse-inspired interiors, providing comfort and understated elegance.
- Gradient Effect: Arrange pom-poms from lightest to darkest or vice versa across your pillow for a visually appealing and artistic gradient. This can create a smooth transition of color that is both captivating and harmonious.
- Seasonal Tones: Create pillows for different seasons – warm reds, oranges, and browns for autumn; cool blues and silvers for winter; delicate pastels for spring; and bright, tropical hues for summer. This allows you to easily refresh your decor with the changing year.
Don’t be afraid to experiment! Hold different yarn colors together to see how they interact before committing. Consider the dominant colors already present in your room and decide if you want the pillow to blend in harmoniously or stand out as a captivating statement piece.
The Pillow Base: Your Canvas
You have two main, straightforward options for your pillow base, each offering convenience and control:
- Ready-Made Pillow Cover and Insert: This is often the quickest and easiest route. Select a plain, solid-colored pillow cover (white, cream, or a neutral color works best to allow your vibrant pom-poms to truly shine). Ensure the fabric of the cover is sturdy enough to securely hold the weight and texture of the attached pom-poms. Pair it with a suitable pillow insert for immediate plumpness.
- DIY Pillow Cover: If you enjoy sewing, creating your own pillow cover allows for complete control over fabric choice, size, and shape. Opt for durable fabrics like canvas, duck cloth, or a heavy-weight cotton that can withstand the attachment process. This also lets you customize the dimensions to fit a specific space or an existing insert perfectly, ensuring a truly bespoke finish.
Assembling Your Masterpiece: Attaching the Pom-Poms
Once you have a collection of beautiful, fluffy pom-poms and your chosen pillow base, it’s time for the exciting final step: attachment! You have two primary methods, each offering distinct advantages in terms of security and speed:
Method 1: Sewing for Enduring Security
Sewing your pom-poms onto the pillow cover provides the most secure and long-lasting attachment. This method is highly recommended if the pillow will be subject to frequent use, washing, or if you simply prefer the peace of mind that comes with a robust, permanent bond.
- Preparation: Before sewing, arrange your pom-poms on the pillow cover to finalize your design. You might want to mark their exact positions with a disappearing fabric marker or secure them temporarily with pins to ensure precise placement.
- Technique: Using a strong needle and a durable thread (matching the pom-pom or pillow color, or clear nylon thread for invisibility), pass the needle through the central tie of the pom-pom and then firmly through the fabric of the pillow cover. Make several small, secure stitches, often forming an ‘X’ or a small circle around the pom-pom’s tie, pulling tight each time to ensure the pom-pom is snugly and firmly attached. Repeat this process meticulously for all pom-poms.
- Considerations: While this method is more time-consuming and requires basic sewing skills, it offers superior durability. It’s also the preferred method if you anticipate needing to machine wash the pillow cover frequently, as the stitches are far less likely to degrade or detach than glue.
Method 2: Hot Gluing for Speedy Crafting
For a quicker and easier approach, especially if you’re not keen on sewing or are working on this project with children, a hot glue gun is an excellent alternative. This method creates a strong bond quickly and is perfect for decorative pillows that won’t see heavy wear and tear, or for crafters seeking instant gratification.
- Preparation: As with sewing, lay out your pom-poms on the pillow base to confirm your desired design and placement before applying any glue.
- Technique: Apply a generous dab of hot glue to the back (flat side) of each pom-pom, focusing on the center where the tie is. Firmly press the pom-pom onto the pillow cover, holding it in place for a few seconds until the glue sets and forms a strong bond. Work in small sections to ensure the glue remains hot and tacky, allowing for maximum adhesion.
- Considerations: Hot glue provides a strong initial bond, but it may not withstand repeated machine washing as well as sewing. For best results, use a good quality glue gun and high-tack glue sticks designed for fabric or all-purpose crafting. If the pillow needs cleaning, spot cleaning is usually recommended for hot-glued items to preserve the integrity of the adhesive.
Many crafters find great success by combining both methods: using a few dabs of hot glue to initially position and secure the pom-poms, then following up with a few strategic stitches for extra, long-term security, particularly for larger pom-poms or areas of the pillow that might experience more contact.
Supplies Checklist for Your Pom-Pom Pillow Project
Gathering your materials is the first exciting step on your crafting journey. Having everything ready before you begin will ensure a smooth and enjoyable creative process. Here’s what you’ll need to create your own vibrant pom-pom pillow:
- Yarn: Approximately 9-10 skeins for a standard-sized pillow, depending on the desired fullness and size of your pom-poms. The chunkier the yarn, the fewer skeins you might need, and the faster your pom-poms will form. Don’t forget this is an excellent project for utilizing leftover yarn scraps from other projects, promoting sustainability and reducing waste!
- Pillow Base: You’ll need either a plain, sturdy pillow case with a matching pillow insert, or fabric (such as white or a neutral-colored canvas/cotton) if you plan to sew your own pillow cover from scratch.
- Scissors: Sharp, fabric-specific scissors are essential for clean, precise cuts through yarn loops, ensuring perfectly trimmed pom-poms.
- Pom-Pom Maker (Optional but Recommended): For speed and consistency in creating uniformly sized pom-poms, especially when making many. Alternatively, you can use cardboard templates or simply your hands.
- Hot Glue Gun and Glue Sticks: If you opt for the hot glue attachment method, ensure you have plenty of high-quality glue sticks to complete your project without interruption.
- Strong Needle and Thread: If you prefer to sew your pom-poms for maximum durability and a professional finish, select a sturdy needle and thread that complements your yarn and fabric colors.
Embrace the DIY Spirit: More Than Just a Pillow
Creating a pom-pom pillow is more than just a craft project; it’s an opportunity to infuse your home with personality, experiment with color and texture, and enjoy the profound satisfaction of making something beautiful with your own hands. It’s also a fantastic activity to share with family. Involving children in the pom-pom making process can be a fun and educational experience, helping them develop fine motor skills, color recognition, patience, and a wonderful sense of accomplishment. Kids absolutely love contributing to a project, and their enthusiastic help can significantly speed up the production of many pom-poms!
Whether you’re looking to refresh a tired sofa, add a much-needed pop of color to a neutral bedroom, or create a unique, heartfelt gift for a loved one, these colorful pom-pom pillows are a rewarding and relatively simple DIY endeavor. The flexibility to choose any color scheme, yarn type, and attachment method means your finished creation will perfectly complement your unique home decor style and personal preferences. So, gather your supplies, unleash your inner artist, and get ready to craft some seriously charming pom-pom magic that will brighten your home!
For a visual, step-by-step guide on creating these delightful accents, you can refer to the detailed tutorial by Weekly Sewing Bee. While her tutorial specifically demonstrates making a cushion, the core techniques for creating and attaching pom-poms are perfectly transferable to crafting your very own eye-catching pillows. Witness how the process unfolds and get inspired to start your own!
Photo Credit: A Kailo Chic Life