
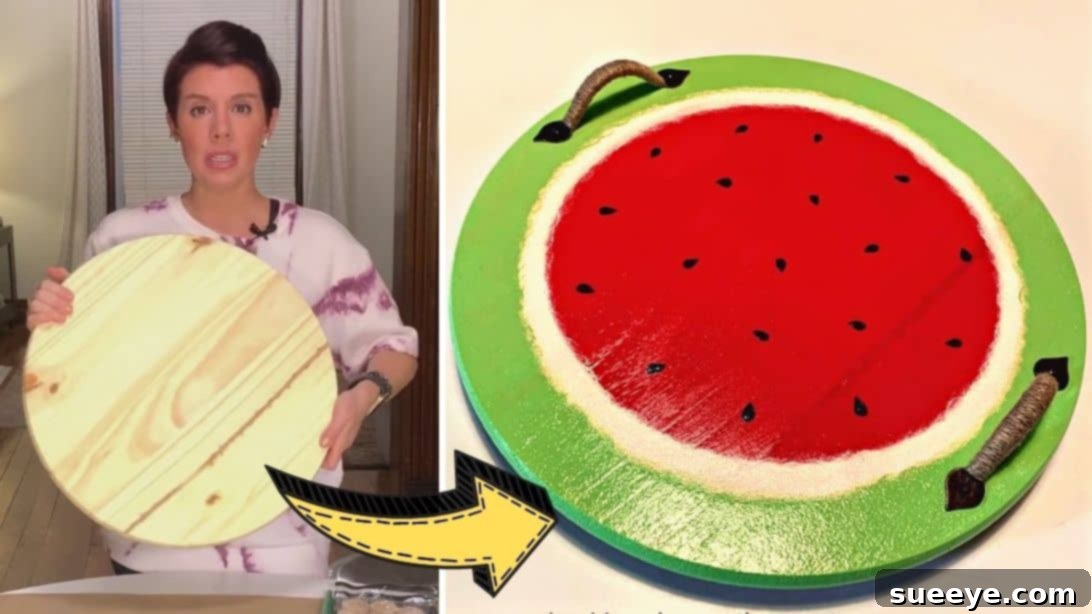
Craft Your Own Delightful DIY Watermelon Serving Tray: A Step-by-Step Guide
Infuse your home and entertaining with a splash of summer joy by crafting your very own DIY watermelon serving tray. This super cute project is not only incredibly satisfying to create but also results in a truly refreshing and eye-catching piece that looks good enough to eat! Whether you’re hosting a backyard barbecue, a casual get-together, or simply want to add a vibrant accent to your kitchen, this handmade tray is fit for any occasion. Best of all, you can bring this charming idea to life using readily available and affordable materials, often found at stores like Hobby Lobby or even the Dollar Store. Follow this detailed, step-by-step guide inspired by the simple yet fun video tutorial by Carolyn Braden on YouTube, and get ready to impress your guests with your crafting prowess.
Why Choose a DIY Watermelon Serving Tray?
There’s an undeniable charm that comes with handmade items, and a DIY serving tray is no exception. Beyond the personal satisfaction of creating something beautiful with your own hands, a custom watermelon tray offers numerous benefits:
- Unique Aesthetic: Stand out from mass-produced items with a one-of-a-kind piece that reflects your personal style.
- Versatile Use: Perfect for serving appetizers, drinks, or desserts, but also doubles as a stunning decorative centerpiece on a coffee table or ottoman.
- Budget-Friendly: Avoid the high costs of designer trays by repurposing a simple wooden platter and adding your creative touch.
- Personalized Gift: A handmade tray makes a thoughtful and unique gift for housewarmings, birthdays, or any special occasion.
- Creative Outlet: Enjoy a relaxing and rewarding craft project that allows you to express your artistic side.
Gather Your Materials: Everything You’ll Need for Your Watermelon Tray
Before you dive into the painting process, it’s crucial to gather all your materials. Having everything organized will make the crafting experience much smoother and more enjoyable. Most of these items are easily accessible, ensuring your project remains both fun and affordable.
- 18-inch Round Wood Platter: Opt for a smooth, sanded wood platter. The 18-inch size offers a generous serving area, perfect for entertaining. Ensure it’s free of splinters or rough patches for the best painting surface. If your platter isn’t perfectly smooth, a light sanding with fine-grit sandpaper (180-220 grit) will prepare it beautifully.
- Tread Wheels (Optional): These small wheels can be attached to the bottom of your tray to create sturdy feet, elevating the tray and adding a touch of sophistication. They also make the tray easier to move around. Look for furniture glides or small caster wheels.
- Felt Pads for the Feet (Optional): If you opt for tread wheels, felt pads can be applied underneath them. These pads protect your surfaces from scratches and also help the tray sit more stably without sliding.
- Paintbrush (Medium Size): A flat or angled paintbrush, about 1-2 inches wide, is ideal for applying the base coats of paint smoothly and evenly across the main surface of the platter.
- Small Foam Brushes: These are excellent for applying paint to edges and for creating crisp lines, especially for the white and green rind sections. They offer good coverage and minimize brush strokes.
- 2 Handles: Choose handles that complement your style and are comfortable to grip. Metal, wood, or even acrylic handles can work. Ensure they come with appropriate screws or select screws that are suitable for wood.
- Screws: To attach the handles and, if using, the tread wheels. Make sure the screw length is appropriate for the thickness of your wood platter to avoid piercing through the top.
- Acrylic Paint:
- Red or Pink: For the vibrant watermelon flesh. Choose a shade you love!
- Green: For the outer rind. A bright or medium green works wonderfully.
- Black: For the iconic watermelon seeds.
- White: To create the transition layer between the flesh and the rind, adding depth and realism.
Acrylic paints are water-based, easy to work with, quick-drying, and offer good coverage.
- Clear Coat (Sealer): A clear acrylic sealant (e.g., Mod Podge Outdoor, clear spray lacquer, or brush-on polyurethane) is essential to protect your painted design from spills, wear, and tear, ensuring your tray lasts for years. Choose a food-safe sealant if you plan to place food directly on the tray, or use it for items in bowls/plates.
- Screwdriver: To securely attach the handles and any feet.
- Small Paintbrush for Drawing Details: A fine-tipped brush is indispensable for painting the small, intricate black seeds with precision.
- Painter’s Tape (Optional but Recommended): For creating crisp, clean lines between different color sections, especially the rind.
- Pencil (Optional): To lightly mark guidelines for your rind sections before painting.
- Clean Cloths or Paper Towels: For cleaning brushes and wiping up any spills.
- Drop Cloth or Newspaper: To protect your workspace from paint spills.
Preparing Your Workspace for Success
A well-prepared workspace is key to a smooth crafting process. Lay down a drop cloth, old newspaper, or plastic sheeting to protect your table or floor from paint. Ensure you have good ventilation, especially when working with paints and clear coats, as some fumes can be strong. Gather all your materials within easy reach to avoid interruptions once you start painting.
Step-by-Step Guide: Crafting Your Watermelon Tray
Now that your materials are ready and your workspace is set, let’s bring your watermelon serving tray to life with these easy-to-follow steps.
Step 1: Laying the Foundation – Red Flesh and White Rind
The first step involves creating the vibrant core of your watermelon tray – the rich red or pink flesh, followed by the essential white layer of the rind.
- Prepare the Platter: If your wood platter isn’t already smooth, give it a quick sanding with fine-grit sandpaper and wipe away any dust with a clean, damp cloth. A clean, smooth surface is crucial for optimal paint adhesion and a professional finish.
- Attach Optional Feet (If Desired): If you plan to use tread wheels or other feet, now is the time to attach them to the underside of the wood platter using screws or nails. Position them evenly to ensure stability. This step can also be done after all painting and sealing, but attaching them early can provide a stable base during the painting process.
- Apply the Red/Pink Base Coat: Using your medium-sized paintbrush, apply an even layer of your chosen red or pink acrylic paint over the entire top surface of the wood platter. Focus on covering only the top, avoiding the sides for now. Apply the paint in smooth, consistent strokes for a uniform finish. Allow this layer to dry completely according to paint instructions (usually 20-30 minutes).
- Second Coat (Optional but Recommended): For a more opaque and vibrant color, apply a second layer of red or pink paint once the first coat is fully dry. Again, ensure even coverage. Let it dry completely.
- Create the White Rind Layer: Grab a small foam brush and your white acrylic paint. Carefully paint a band of white around the outer edge of the platter. Aim for a width of approximately 3 inches (about 7.5 cm) from the outer edge inwards, creating a distinct white border. You can use painter’s tape to achieve a super crisp line, masking off the red section before painting the white. Ensure this white band covers the outer top perimeter of the tray evenly. Let the white paint dry thoroughly.
Step 2: Adding the Green Skin and Distinctive Seeds
Now for the iconic green rind and the charming black seeds that truly bring the watermelon aesthetic to life.
- Paint the Green Rind: Once the white paint is completely dry, take another clean foam brush and your green acrylic paint. Paint over the outer white layer, leaving approximately a 1-inch (2.5 cm) band of white visible on the inner edge (closer to the red “flesh”). This creates the classic white-to-green transition of a watermelon rind. Extend the green paint to cover the entire side of the tray as well, creating a seamless look. Allow the green paint to dry completely. A second coat of green might be necessary for full opacity.
- Add the Watermelon Seeds: With all the base colors dry, it’s time for the details. Dip your small, fine-tipped paintbrush into the black acrylic paint. Carefully paint small, elongated oval shapes onto the red or pink “flesh” of the watermelon. Distribute them randomly, mimicking natural watermelon seeds. Don’t worry about perfection; slight variations add to the handmade charm. Ensure you don’t overload your brush to prevent blobs. Let these details dry completely.
Enhancing Durability and Functionality: Clear Coat & Handles
Protecting your beautiful artwork and adding practical handles are the final steps to complete your serving tray.
- Apply the Clear Coat: Once all paint layers, including the seeds, are completely dry (this might take several hours or even overnight to ensure everything is cured), it’s time to seal your work. Apply an even layer of clear coat over the entire top surface of the tray, including the sides and if you wish, the underneath. The clear coat will protect the paint from moisture, scratches, and fading, ensuring your tray remains vibrant for a long time. Use smooth, even strokes.
- Multiple Coats for Maximum Protection: For optimal durability, especially for a serving tray, it’s highly recommended to apply 2-3 coats of the clear sealant. Ensure each coat dries completely according to the manufacturer’s instructions before applying the next. Lightly sanding with very fine-grit sandpaper (400-600 grit) between coats can create an ultra-smooth finish, but wipe away all dust before the next coat.
- Attach the Handles: Once the final clear coat is completely dry and cured, position your chosen handles evenly on opposite sides of the tray. Mark the screw holes with a pencil. If your wood is thick or you want to prevent splitting, you can pre-drill small pilot holes (slightly smaller than your screw diameter). Then, use your screwdriver to securely attach the handles with the provided screws.
- Add Felt Pads (If Using): If you attached tread wheels or other feet, now is the time to apply the felt pads to the bottom of these feet. These small adhesive pads will prevent any scratching on your furniture surfaces and provide extra stability, making your tray safer to use on delicate tables.
Tips for a Flawless Finish
- Work in Layers: Always apply thin, even coats of paint rather than one thick layer. This prevents drips, ensures faster drying, and results in a smoother finish.
- Allow Ample Drying Time: Patience is key! Rushing the drying process between coats can lead to smudging, peeling, or an uneven finish.
- Clean Brushes Immediately: Wash your paintbrushes thoroughly with soap and water immediately after use to prolong their life.
- Use Painter’s Tape: For perfectly straight lines between colors (especially the rind layers), use good quality painter’s tape. Apply it firmly, paint, and remove it while the paint is still slightly wet for the cleanest edge.
- Practice Seeds: If you’re nervous about painting the seeds directly, practice on a piece of scrap paper first to get a feel for the brush and shape.
- Ventilation: Always work in a well-ventilated area, especially when using paints and clear coats, to ensure proper drying and minimize exposure to fumes.
Customization Ideas for Your Unique Tray
While the watermelon design is undeniably charming, don’t hesitate to let your creativity shine! Here are a few ideas to personalize your serving tray:
- Different Fruit Designs: Instead of watermelon, try a citrus slice (lemon, lime, orange, grapefruit) or even a kiwi. The same principles of concentric circles apply!
- Monograms or Names: Add a personalized touch by painting a monogram or a family name onto the red “flesh” area.
- Stencils: Use stencils to add decorative patterns, quotes, or small images to the tray.
- Varying Handle Styles: Experiment with different handle materials (rope, leather, rustic metal) to match your home’s aesthetic.
- Glitter or Sparkle: For an extra festive touch, incorporate a glitter sealant into one of your clear coats.
- Distressed Look: Lightly sand certain edges after painting for a charming, rustic, distressed finish.
Caring for Your Handmade Serving Tray
To ensure your beautiful DIY watermelon serving tray remains a cherished item for years to come, proper care is essential. Generally, wipe the tray clean with a soft, damp cloth immediately after use. Avoid submerging it in water, using harsh abrasive cleaners, or putting it in the dishwasher, as these can damage the paint and sealant. If your clear coat is not food-safe, always serve food on plates or in bowls placed on the tray, rather than directly on the painted surface.
The Joy of DIY: Benefits Beyond the Project
Embarking on a DIY project like this isn’t just about the final product; it’s also about the process. It offers a wonderful opportunity to unwind, engage your creativity, and develop new skills. The sense of accomplishment you’ll feel when you display or use your handmade watermelon serving tray is truly rewarding. It’s a testament to your effort and a conversation starter that brings a personal touch to your home.
Conclusion: Your New Favorite Serving Piece
With just a few simple materials and a little bit of time, you can transform an ordinary wood platter into an extraordinary, refreshing DIY watermelon serving tray. This project is perfect for crafters of all skill levels and results in a functional piece of art that’s sure to brighten any gathering. So, gather your supplies, follow these steps, and get ready to enjoy your vibrant, handmade creation. We hope you loved this craft and are inspired to create more delightful items for your home. Happy crafting!
*Many thanks to Carolyn Braden via YouTube for providing the inspiration and images for this wonderful DIY project. If you enjoyed this tutorial, we highly recommend visiting her channel for more creative ideas and subscribing to her content!