
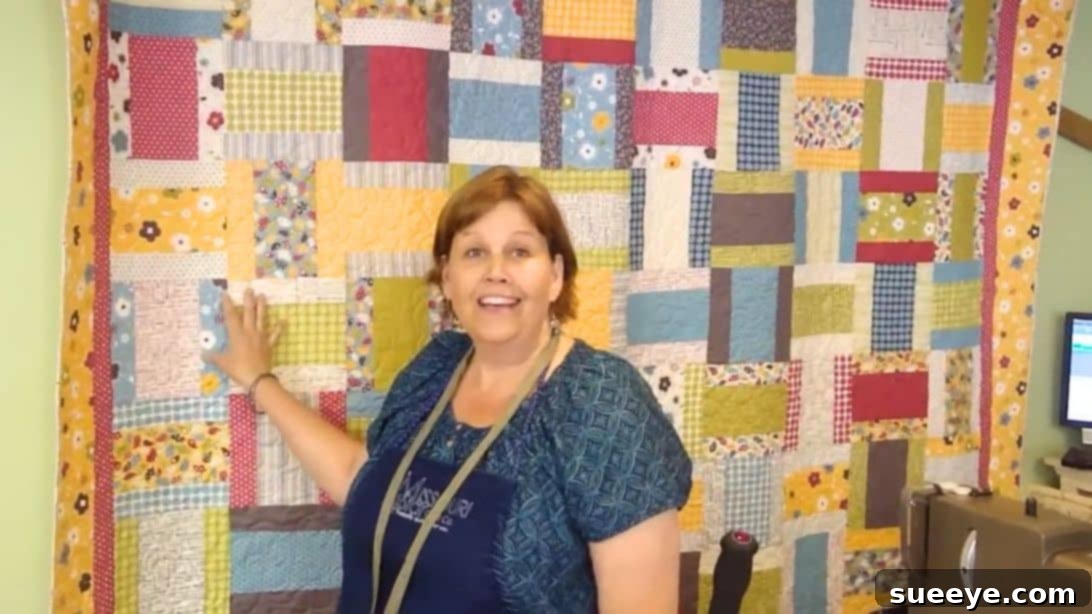
Embark on a delightful quilting adventure with the timeless Jelly Basket Quilt, a cherished pattern brilliantly showcased by Missouri Star Quilt Company. This project is a true gem, especially for those just dipping their toes into the wonderful world of quilting. Renowned for its elegant simplicity and rapid assembly, the Jelly Basket Quilt offers a perfect blend of learning and gratification, making it an ideal starting point for beginners to master fundamental quilting techniques.
The beauty of this pattern lies not only in its stunning finished appearance but also in its incredible efficiency. Requiring just two pre-cut fabric bundles – one layer cake and one jelly roll – you’ll be amazed at how quickly your quilt top comes together. Even better, this design is celebrated for its near-zero fabric waste, ensuring that almost every strip and square finds its place in your beautiful creation. This makes it an economical and satisfying project for any quilter. Follow along with our detailed guide and get ready to stitch up a masterpiece with ease!
Why the Jelly Basket Quilt is Perfect for Beginners
Starting a new hobby can sometimes feel overwhelming, but quilting doesn’t have to be. The Jelly Basket Quilt is specifically lauded as a beginner-friendly project for several compelling reasons:
- Simple Cuts: The pattern relies on straightforward cuts of pre-cut fabrics, eliminating complex measurements and intricate shapes that can challenge novices.
- Repetitive Steps: The block construction is highly repetitive, allowing you to build muscle memory and confidence with each identical piece you create. This repetition helps solidify your understanding of seam allowances and pressing techniques.
- Quick Assembly: Thanks to the pre-cut nature of the fabrics and the efficient design, you’ll see your quilt top materialize in a surprisingly short amount of time, providing quick satisfaction and motivation.
- Minimal Fabric Waste: This project is incredibly fabric-efficient, making the most out of your pre-cuts and teaching you to value every piece of material.
- Classic Design: The basket weave effect created by the alternating blocks is a timeless and versatile design that looks fantastic in any fabric combination, making it a rewarding project that you’ll be proud to display or gift.
By choosing the Jelly Basket Quilt, you’re not just making a quilt; you’re building a strong foundation for a fulfilling quilting journey.
RELATED: Explore another fast project: 45-Minute Jelly Roll Race Quilt With Jenny Doan
Gather Your Supplies: Materials and Tools for Your Jelly Basket Quilt
Before you begin, ensure you have all your materials and tools ready. Having everything organized will make your quilting process smooth and enjoyable.
Essential Fabric Materials:
- One Layer Cake (10″ squares): A layer cake consists of 42 pre-cut 10-inch by 10-inch squares of coordinating fabrics. These convenient bundles save you valuable time on cutting and ensure a cohesive color palette. Choose a layer cake with colors and patterns that inspire you!
- One Jelly Roll: A jelly roll typically contains 40 (or sometimes 42) pre-cut fabric strips, each measuring 2.5 inches wide by 40-42 inches long. These strips are perfect for sashing, borders, and, in this case, forming the “basket” part of our blocks.
Key Quilting Tools:
While the fabric is the star, the right tools make all the difference in achieving precise and beautiful results.
- Rotary Cutter: An indispensable tool for quick, accurate, and straight cuts. Always use it with caution and a self-healing mat.
- Self-Healing Cutting Mat: Protects your work surface and your rotary cutter blade. Ensure it’s large enough for your fabric pieces.
- Quilting Rulers: A long ruler (e.g., 6″ x 24″) and a square ruler (e.g., 9.5″ or 12.5″) are incredibly helpful for precise measuring and squaring up your blocks.
- Sewing Machine: Any basic sewing machine capable of a straight stitch will work perfectly. Ensure it’s in good working order and threaded correctly.
- Iron and Ironing Board: Crucial for pressing seams flat and setting stitches. Good pressing is fundamental to a professional-looking quilt.
- Matching Thread: Choose a high-quality cotton or polyester thread that matches or subtly blends with your fabrics.
- Fabric Scissors or Thread Snips: For quick snips and trimming threads.
- Pins or Fabric Clips: To hold fabric pieces together before sewing, ensuring alignment.
- Seam Ripper: Every quilter needs one! Don’t view it as a failure; view it as a tool for perfection and learning.
With these materials and tools at your side, you’re fully equipped to tackle the Jelly Basket Quilt!
Here’s another fun project you might want to try: How To Make A Jelly Roll Quilt
Step-by-Step Guide: How to Make the Jelly Basket Quilt
Follow these detailed instructions to construct your Jelly Basket Quilt with confidence and precision. Remember, consistent seam allowance and careful pressing are your best friends in quilting.
Step 1: Preparing Your Layer Cake Squares
Begin by taking one of your 10-inch layer cake squares. Lay it flat on your cutting mat. Using your rotary cutter and a long quilting ruler, carefully cut the square directly in half. Since the square measures 10 inches, you will cut it at the 5-inch mark, yielding two perfect rectangles, each measuring 5 inches by 10 inches. Repeat this process for all your layer cake squares. Precision here is key, as these pieces form the central element of your quilt blocks.
Step 2: Cutting Your Jelly Roll Strips
Now, turn your attention to the jelly roll. Each strip typically measures 2.5 inches by 40-42 inches. For this project, you will need 10-inch units from these strips. Lay out a jelly roll strip and cut it into four equal pieces, each 10 inches long. Since a standard jelly roll strip is 40 inches long (2.5″ x 40″), you’ll get exactly four 10-inch units from each strip, with virtually no waste. This smart use of fabric is one of the project’s most satisfying aspects. Continue cutting until you have enough 10-inch jelly roll units for all your layer cake pieces.
Step 3: Assembling Your Quilt Blocks
With your fabric pieces prepared, it’s time to assemble the individual quilt blocks. Take one of the 5-inch by 10-inch layer cake rectangles. Position it horizontally on your workspace. Now, take two of your 2.5-inch by 10-inch jelly roll units. Place one jelly roll unit along one of the long (10-inch) sides of the layer cake rectangle, right sides together. Pin in place. Then, take the second jelly roll unit and place it along the opposite long side of the layer cake rectangle, again right sides together and pinning. Carefully sew both jelly roll strips to the layer cake rectangle using a precise 1/4-inch seam allowance. Consistency in your seam allowance is vital for blocks to fit together perfectly. After sewing, press each seam open or towards the darker fabric, depending on your preference. Pressing well ensures your blocks lay flat and square. Once sewn and pressed, your block will measure approximately 9 inches by 10 inches. To ensure perfect alignment for your quilt top, stack your finished blocks and use a square quilting ruler to trim off one inch from one of the 10-inch sides, squaring them up to a uniform 9-inch by 9-inch square. This squaring-up step is crucial for accurate quilt assembly.
Step 4: Arranging and Assembling Your Quilt Top
This step brings your quilt to life by creating the distinctive basket weave pattern. The key is to alternate the orientation of your 9-inch square blocks as you assemble your rows.
For the first row: Place the first block in a horizontal position (with the jelly roll strips running horizontally). The next block should be placed in a vertical position (jelly roll strips running vertically). Continue this alternating pattern (horizontal, then vertical, then horizontal, etc.) for the entire length of your first row. Once you’re satisfied with the arrangement, sew these blocks together with a 1/4-inch seam allowance.
For the next row: To create the woven effect, you’ll start this row with the opposite orientation. If Row 1 started horizontally, Row 2 will begin with a vertical block. So, place the first block in a vertical position, followed by a horizontal block, and continue this alternation for the rest of the row. This creates a staggered, interlocking design that is visually captivating.
For the third row: Repeat the pattern of the first row (starting horizontally). As you lay out your blocks, try to use different layer cake fabrics and jelly roll strips to ensure a diverse and vibrant color distribution across your quilt. Avoid placing identical blocks or very similar color combinations next to each other to enhance visual interest. Continue this alternating row pattern (Row 1 pattern, then Row 2 pattern, then Row 1 pattern, and so on) until your quilt top reaches your desired size.
Once all your rows are sewn together, give your quilt top a final press to ensure all seams are flat and your top is perfectly square.
Step 5: Adding Inner and Outer Borders
Borders frame your quilt top, giving it a polished look, increasing its size, and often helping to square up any minor imperfections. While the original content briefly mentions borders, let’s elaborate on this crucial step.
Inner Border: This is typically a narrower strip, often in a solid or subtle print that complements the overall color scheme. Measure the length and width of your assembled quilt top. Cut strips of your chosen fabric to the measured lengths, ensuring they are consistent in width (e.g., 2 inches or 2.5 inches). Attach the side borders first, pressing seams towards the border. Then attach the top and bottom borders, again pressing seams. This inner border helps to visually separate your main design from the outer border.
Outer Border: The outer border is usually wider than the inner border and can be a bolder print, a contrasting solid, or a coordinating fabric that ties everything together. Repeat the measuring and attaching process as with the inner border, ensuring your strips are cut accurately and sewn with a consistent 1/4-inch seam allowance. This final border gives your quilt a substantial and finished appearance, ready for the next stages of quilting.
Bringing It All Together: The Final Quilting Steps
Once your quilt top is complete and bordered, it’s time to transform it into a functional and beautiful quilt by adding the batting, backing, and binding.
Choosing Batting and Backing
Batting: This is the middle layer of your quilt, providing warmth, loft, and texture. Batting comes in various materials (cotton, polyester, wool, blends) and lofts (thicknesses). For a beginner-friendly project, a medium-loft cotton or 80/20 cotton-poly blend is a great choice as it’s easy to work with and offers good drape. Ensure your batting is slightly larger than your quilt top (at least 2-3 inches extra on all sides).
Backing: This is the fabric on the underside of your quilt. It should also be a few inches larger than your quilt top. You can choose a single wide-back fabric (specifically designed for quilt backings) or piece together standard quilting cottons to create a backing large enough. Select a fabric that complements your quilt top but doesn’t necessarily have to match perfectly.
Basting Your Quilt Sandwich
Basting is the process of temporarily securing the three layers of your quilt – the backing, batting, and quilt top – together so they don’t shift during quilting. There are several popular methods:
- Pin Basting: Lay your backing fabric wrong side up, smooth it out, and tape it securely to a clean floor or large table. Layer the batting smoothly on top of the backing. Finally, place your quilt top right side up on the batting. Use safety pins (specifically designed for quilting) to secure all three layers, placing pins every 4-6 inches across the entire quilt.
- Spray Basting: Use a temporary fabric adhesive spray. This method is quick and leaves no holes from pins, but ensure good ventilation and follow product instructions carefully.
- Thread Basting: Hand-stitch long, loose running stitches through all three layers to secure them.
Regardless of the method, ensure your quilt sandwich is smooth, flat, and free of wrinkles or puckers before you start quilting.
Quilting Your Layers
Quilting is the process of stitching through all three layers of your quilt sandwich. This secures them permanently, prevents the batting from shifting, and adds texture and design to your quilt. For beginners, simple quilting designs are best:
- Stitch-in-the-Ditch: This involves stitching directly along the seam lines of your quilt blocks. It’s effective, subtle, and helps define the piecing.
- Straight Line Quilting: Quilt parallel lines across your quilt, either horizontally, vertically, or diagonally. You can use your walking foot (highly recommended for quilting) and the edge of your presser foot as a guide, or use a ruler attachment.
- Simple Meander: A free-motion quilting technique where you create an all-over wavy, organic design. This requires practice but can be very forgiving.
Start quilting from the center of your quilt and work outwards to help prevent pushing fabric and batting to the edges, which can cause puckering.
Creating and Attaching Your Binding
The binding is the final edge finish that encases the raw edges of your quilt, providing durability and a professional look.
- Prepare Binding Strips: Cut 2.5-inch wide strips of fabric for your binding. For a standard quilt, you’ll typically need enough strips to go around the entire perimeter of your quilt, plus about 10-12 inches extra. Join these strips together diagonally to form one long continuous strip. Press the strip in half lengthwise, wrong sides together.
- Attach to Quilt Front: Starting along one edge of your quilt (leaving a tail of about 8-10 inches), align the raw edge of your folded binding strip with the raw edge of your quilt top. Sew the binding to the quilt using a 1/4-inch seam allowance. When you reach a corner, stop 1/4 inch from the edge, backstitch, remove the quilt, fold the binding strip up at a 45-degree angle, then fold it back down, aligning it with the next side. Start sewing 1/4 inch from the edge. Continue around the quilt.
- Join Binding Ends: When you’re almost back to where you started, leave another 8-10 inch tail. Join the two binding tails together with a diagonal seam to create a continuous loop. Trim excess and finish sewing the binding to the quilt front.
- Finish Binding: Fold the binding over to the back of the quilt, encasing the raw edges. You can hand-stitch the binding in place for a traditional finish, or machine-stitch it for a quicker, more durable result.
Jelly Basket Quilt with Jenny Doan: Tips for Success
Jenny Doan of Missouri Star Quilt Company always emphasizes enjoyment and simplicity in quilting. Here are some extra tips to ensure your Jelly Basket Quilt experience is as smooth and successful as possible:
- Pressing is Paramount: Don’t underestimate the power of a good press. Pressing seams flat and squaring up blocks makes a tremendous difference in how your quilt top fits together.
- Consistent Seam Allowance: A perfect 1/4-inch seam allowance is crucial. Invest in a 1/4-inch presser foot for your machine if you don’t have one, or draw a guide line on your machine’s throat plate.
- Check Your Tension: Before starting, do a test stitch on a scrap piece of fabric to ensure your sewing machine’s tension is balanced.
- Don’t Be Afraid to Unpick: Even experienced quilters use their seam ripper! If a seam isn’t right, unpick it and re-sew. It’s better to fix it now than regret it later.
- Embrace Your Fabric Choices: The beauty of a jelly roll and layer cake quilt is the variety of fabrics. Don’t stress too much about perfect color placement; the randomness often creates a charming, cohesive look.
- Take Breaks: Quilting should be enjoyable, not stressful. If you feel frustrated, step away for a bit and return with fresh eyes.
- Watch the Video: While this guide provides detailed instructions, watching Jenny Doan’s video from Missouri Star is invaluable for visual learners. Seeing the steps in action can clarify any uncertainties.
Your Quilting Journey Begins Here
Congratulations! You’ve successfully navigated the creation of a beautiful Jelly Basket Quilt. This project, championed by the accessible teachings of Jenny Doan and Missouri Star, serves as an excellent foundation for your quilting journey. You’ve learned essential skills, from precision cutting and accurate piecing to careful pressing and quilt assembly. Each stitch you’ve made adds to the story of your growing expertise and passion for fabric arts.
The Jelly Basket Quilt is more than just a functional item; it’s a testament to your creativity and perseverance. Whether you’ve made it as a cozy throw for your home, a thoughtful gift for a loved one, or simply for the joy of creation, this quilt embodies the warmth and comfort of a handmade treasure.
We encourage you to share your finished Jelly Basket Quilt with the quilting community! Post it online, tag Missouri Star, and inspire others to start their own projects. There’s a vast world of quilting patterns and techniques waiting for you to explore. From here, you can tackle more complex designs, experiment with different fabric combinations, or even try your hand at designing your own quilts. Your quilting journey has just begun, and the possibilities are endless. Happy quilting!