
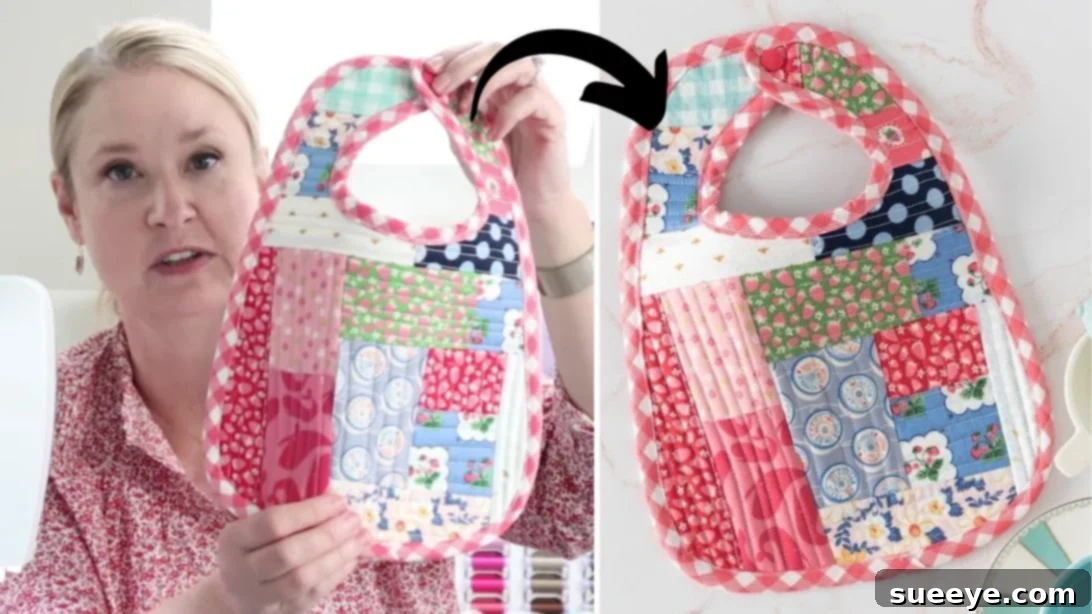
DIY Quilt-As-You-Go Baby Bib: A Heartfelt Handmade Gift Tutorial
Welcoming a new baby into the family or attending a joyful baby shower calls for a gift that’s both thoughtful and practical. What could be more cherished than a handmade item, crafted with love and care? This comprehensive guide will walk you through creating an adorable and functional “Quilt-As-You-Go” baby bib, a sewing project that’s not only incredibly rewarding but also surprisingly beginner-friendly. Imagine the smiles when you present a unique, personalized bib, made with your own hands from an assortment of charming fabric scraps!
The “Quilt-As-You-Go” technique is perfect for those new to quilting or sewing. It allows you to create a beautiful, quilted fabric by sewing small pieces directly onto a batting layer, eliminating the need for separate quilting steps. The result is a durable, absorbent, and utterly charming bib that stands out from store-bought alternatives. This project is a fantastic way to utilize those leftover fabric scraps you’ve been saving, transforming them into a delightful and useful item. We’re inspired by the wonderful creativity demonstrated by Polka Dot Chair on YouTube, whose ingenious methods make this project a true joy.
Whether you’re a seasoned sewer or just starting your journey into the world of fabric crafts, this tutorial is designed to be clear, concise, and encouraging. Gather your materials, prepare your workspace, and let’s dive into creating a truly special gift that will be treasured for years to come.
Materials You’ll Need
Before embarking on your creative journey, ensure you have all the necessary materials at hand. Quality supplies will make your sewing experience smoother and result in a more professional-looking finished bib.
- Fabric Scraps (10-15 pieces): This is where your creativity truly shines! Choose a variety of colors and prints that coordinate beautifully. Think about soft cottons, flannels, or even upcycled baby clothes for a sentimental touch. Each piece should be small enough to work with, roughly 2×3 inches or slightly larger, allowing for variety in your quilted design. This is a perfect project for using up those smaller remnants from previous projects.
- Backing Fabric (1 piece, approx. 11×16 inches): Select a soft, absorbent fabric for the back of the bib. Cotton broadcloth or flannel works wonderfully. This piece will be visible on the back, so choose a color or subtle print that complements your fabric scraps.
- Cotton Batting (1 piece, approx. 11×16 inches): This forms the core of your “quilted” bib, providing absorbency and a plush feel. Choose a thin to medium-weight cotton batting for comfort and ease of sewing.
- Fat Quarter for Binding (1 piece): A fat quarter is a quarter-yard of fabric cut in a specific way (typically 18×22 inches), making it ideal for cutting bias strips for binding. Choose a fabric that harmonizes with your bib’s overall aesthetic, as it will frame your design beautifully.
- Velcro (2 pieces, approx. 1×1 inch each): Opt for soft-sided Velcro to ensure comfort around the baby’s neck. This provides a secure and adjustable closure for the bib.
- 1-inch Bias Tape Maker (Optional, but recommended): While you can make bias tape manually, a bias tape maker streamlines the process, creating perfectly folded strips for a neat finish.
- Scissors or Rotary Cutter and Cutting Mat: For precise fabric cutting. A rotary cutter with a mat offers speed and accuracy, especially for cutting straight edges.
- Marking Pen or Pencil: A fabric-friendly marker to trace your bib pattern onto the batting. Ensure it’s erasable or disappears with heat/water.
- Needle and Thread: Essential for both hand-sewing (if desired) and loading your machine. Choose a good quality polyester thread that matches or blends with your fabrics.
- Iron and Ironing Board: Crucial for pressing seams flat and crisp at various stages, which is key to a professional finish in quilting.
- Sewing Machine: A standard sewing machine with a straight stitch is all you need for this project.
- Baby Bib Pattern: You’ll need a downloadable pattern to get the correct bib shape. Follow the instructions on the linked page to obtain your free pattern piece. This ensures your bib has the ergonomic shape needed for a baby.
Step-by-Step Guide: Crafting Your Quilted Baby Bib
Follow these detailed instructions to create your beautiful and functional Quilt-As-You-Go baby bib. Take your time with each step, and remember that precision leads to a polished final product.
Step 1: Preparing Your Layers and Tracing the Pattern
Begin by selecting your fabric scraps. Sort through about 10 to 15 pieces, ensuring they offer a pleasing mix of colors and prints that will create a cohesive and vibrant design. Once you’re happy with your fabric assortment, print out the free baby bib pattern piece and carefully cut it out along the designated lines. This pattern will serve as your template for the bib’s shape.
Next, prepare your core layers. Lay your 11×16-inch cotton batting flat on your work surface. Directly on top of the batting, place your 11×16-inch backing fabric with its right side facing up. The wrong side of the backing fabric should be against the batting. This layering ensures that when your bib is finished, the backing fabric will be smooth and visually appealing. Now, carefully flip these two layers over so the batting is on top. Place your cut-out bib pattern piece squarely on the batting. Using your marking pen or pencil, meticulously trace the entire outline of the bib shape onto the batting. This traced line will be your guide for quilting and final trimming.
Step 2: Mastering the Quilt-As-You-Go Technique
Now comes the fun part: quilting! Take one of your fabric scraps, trimming it to approximately 2×3 inches or a size that fits comfortably within your bib pattern. Place this first scrap right side up anywhere within the traced bib shape on your batting. This piece will be your foundation. Using your sewing machine, stitch this first scrap down with sewing lines that are approximately ¼-inch apart. You can sew straight lines, or experiment with a slight curve or diagonal for added texture. The key here is to secure the fabric to the batting.
Continue adding fabric scraps, working outwards from your initial piece. For each new scrap, place it right side down on top of the previous scrap, aligning one edge. Sew along that aligned edge using a ¼-inch seam allowance. Then, flip the new scrap open, press it flat with an iron, and stitch it down with ¼-inch parallel lines, similar to how you stitched the first piece. Repeat this process, adding scraps one by one, until the entire traced bib shape on your batting is completely covered with quilted fabric pieces. Ensure your sewing lines are neat and consistent, as these stitches will be visible on the back of your bib, creating a subtle quilting effect.
As you add each scrap, remember to press your seams open or to one side. Pressing is a vital step in quilting that ensures your project lies flat and looks professional. Don’t rush this stage; careful pressing makes a huge difference in the final outcome. You can arrange your fabric scraps in a random, patchwork style, or create a more deliberate pattern, such as stripes or a chevron, depending on your preference.
Step 3: Shaping, Binding, and Finishing Your Bib
Once your batting is fully covered with quilted fabric scraps, it’s time to refine the bib’s shape. Carefully place your original bib pattern piece back on top of the quilted fabric. Align it precisely with your initial traced lines. Now, using your scissors or rotary cutter, meticulously trim around the pattern, cutting through all layers (quilted fabric, batting, and backing fabric). This step creates the final, crisp outline of your baby bib.
Next, you’ll bind the raw edges of your bib for a clean and durable finish. Cut 1-inch wide bias strips from your fat quarter. If you have a bias tape maker, use it to press these strips into perfectly folded bias tape. Alternatively, you can fold and press the edges manually. Attach the bias tape around the entire perimeter of the bib. Start by placing the raw edge of your bias tape against the raw edge of the bib, right sides together. Sew with a ¼-inch seam allowance. Then, fold the bias tape over to the back of the bib, enclosing the raw edge, and stitch it down, either by hand for an invisible finish or by machine for a quicker, visible stitch. Ensure your binding is smooth and even, especially around the curves of the bib.
Finally, attach the Velcro closures. Take your two 1×1-inch pieces of Velcro. On one side of the top strap of the bib, sew the “hook” (rougher) side of the Velcro. On the other side of the top strap, sew the “loop” (softer) side of the Velcro. Position them carefully so they align perfectly when the bib is fastened, creating a secure closure around the baby’s neck. Reinforce the stitching on the Velcro for maximum durability, as it will likely see a lot of use.
Why Choose a Handmade Quilted Baby Bib?
Opting to sew a baby bib, especially one using the quilt-as-you-go method, offers numerous advantages over simply purchasing one. Firstly, the personal touch is unmatched. A handmade gift conveys thoughtfulness, effort, and love, making it a truly special present for baby showers, birthdays, or just because. Each bib will be unique, reflecting your personal style and fabric choices, creating a one-of-a-kind item that can even become a treasured keepsake.
Beyond sentimentality, handmade bibs often boast superior quality and durability. When you sew your own, you control the materials, choosing soft, absorbent cottons and sturdy threads. The “quilt-as-you-go” technique inherently creates a more robust and absorbent bib thanks to the layers of fabric and batting, making it perfect for catching spills and dribbles. This means your bib is likely to withstand countless washes and daily wear far better than many mass-produced alternatives.
Furthermore, this project is wonderfully eco-friendly. It provides an excellent opportunity to reduce fabric waste by using up those smaller scraps you’ve accumulated from other sewing projects. Instead of letting them gather dust, you can transform them into something beautiful and practical, giving new life to textile remnants.
For the sewer, it’s also a fantastic way to hone skills. The quilt-as-you-go method is a gentle introduction to quilting, teaching you layering, piecing, and binding in a manageable, small-scale project. The satisfaction of creating something beautiful and useful with your own hands is truly immeasurable.
Tips for a Perfect Baby Bib
To ensure your Quilt-As-You-Go baby bib turns out beautifully, keep these valuable tips in mind:
- Pre-wash Your Fabrics: Always pre-wash all your cotton fabrics (scraps, backing, and binding) before cutting and sewing. This prevents shrinking and color bleeding after the bib is made, ensuring it maintains its shape and vibrancy.
- Quality Batting Matters: Choose a good quality 100% cotton batting for maximum absorbency and softness. Organic cotton batting is an excellent choice for baby items.
- Press, Press, Press: We can’t stress this enough! Pressing your seams flat after each addition of a fabric scrap makes a significant difference. It creates crisp, neat lines and prevents bulk, leading to a much smoother and professional-looking quilted surface. An iron is your best friend in quilting!
- Consistent Seam Allowance: Strive for a consistent ¼-inch seam allowance throughout the quilting process. This uniformity ensures your pieces fit together well and your stitches on the back are neat.
- Sharp Tools: Use sharp scissors or a fresh blade in your rotary cutter. Dull tools can fray fabric and lead to imprecise cuts, making the rest of the sewing process more challenging.
- Thread Choice: Use a high-quality polyester thread. It’s strong, durable, and less likely to break during washing or wear. You can choose a neutral color that blends with all your scraps or a contrasting color for a more visible quilting effect.
- Pinning is Your Friend: Use plenty of pins to hold your fabric scraps in place before sewing, especially when working with multiple layers. This prevents shifting and ensures accuracy.
- Slow and Steady: Especially for beginners, sewing slowly allows for greater control and more precise stitches. There’s no rush when creating a handmade gift!
- Personalize It: Consider adding an embroidered initial, a small appliqué, or a label with the baby’s name on the back for an extra special touch.
Caring for Your Handmade Quilted Bib
Once your beautiful Quilt-As-You-Go baby bib is complete, proper care will ensure it lasts through countless meals and grows with the baby. Due to the natural fibers and quilting, a little extra attention goes a long way:
- Machine Wash Cold: Always wash your bib in cold water on a gentle cycle. This helps to preserve the fabric colors and prevents excessive shrinking, especially if you didn’t pre-wash all materials.
- Use Mild Detergent: Opt for a mild, baby-safe detergent that is free from harsh chemicals, dyes, and perfumes. This is important for a baby’s sensitive skin.
- Tumble Dry Low or Air Dry: For best results and to minimize wear on the quilting, tumble dry on a low setting or, even better, lay flat to air dry. If tumble drying, you might add a dryer ball to help fluff up the batting. Avoid high heat, which can damage the fabric and cause the bib to lose its shape.
- Iron as Needed: If the bib becomes wrinkled after washing, you can lightly iron it on a cotton setting. Be gentle over the Velcro to avoid melting it.
- Check Velcro Regularly: Over time, lint and threads can accumulate in the Velcro. Periodically clean it out to ensure it maintains its strong grip.
Beginner-Friendly Quilt As You Go Baby Bib Sewing Tutorial: Your Journey into Handmade Gifting
Creating this Quilt-As-You-Go baby bib is more than just a sewing project; it’s an opportunity to create something truly meaningful. It’s a chance to transform simple fabric scraps into a functional work of art, destined to become a beloved item for a little one. The satisfaction of completing a handmade gift that is both beautiful and practical is immense, and the quilt-as-you-go technique offers an approachable entry point into the wonderful world of quilting.
We encourage you to embrace the process, enjoy the creativity of mixing and matching fabrics, and take pride in every stitch. This tutorial, inspired by the fantastic work of Polka Dot Chair via YouTube, aims to empower you to create with confidence. Don’t hesitate to visit her channel for visual guidance and more inspiring projects.
So, why wait? Gather your materials, fire up your sewing machine, and start crafting a unique, charming, and utterly delightful baby bib today. It’s a gift that speaks volumes of love, care, and handmade charm. Happy sewing!
*All images are credited to Polka Dot Chair via YouTube. Give her channel a visit and subscribe for more!