
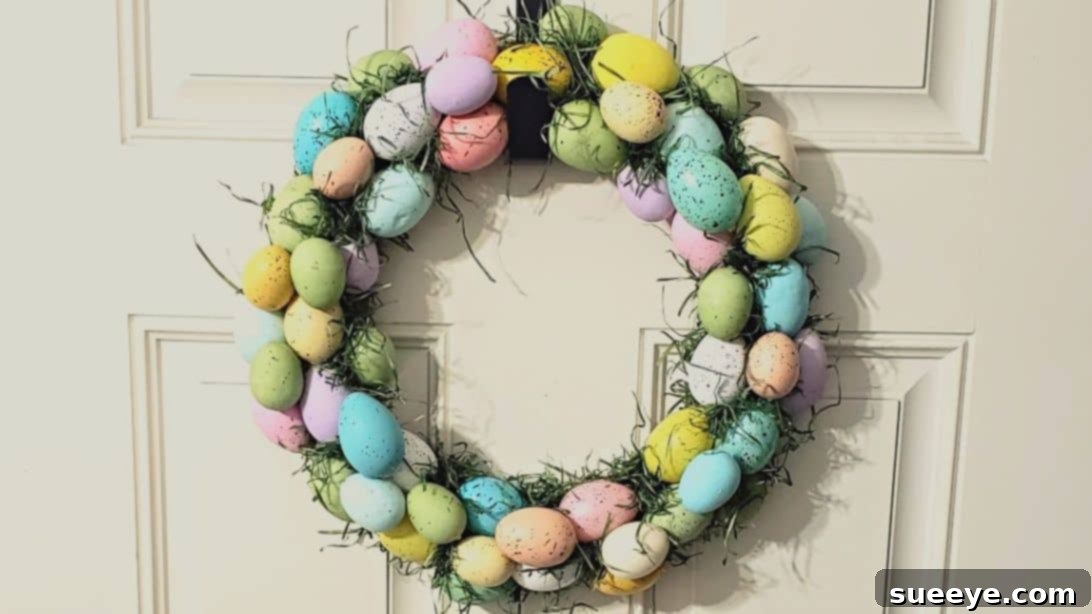
Are you searching for an enchanting yet incredibly simple DIY decoration to brighten your home this Easter season? Do you love the idea of crafting but often find yourself short on time or intimidated by complex tutorials? If so, you’re in the perfect place! We’re about to unveil a delightful project that will allow you to create a stunning Easter egg wreath in as little as 30 minutes. Imagine transforming a few inexpensive dollar store finds into a charming centerpiece for your front door or mantel – it’s entirely possible, even for crafting novices!
This tutorial focuses on an accessible, budget-friendly, and remarkably quick method to craft a beautiful Easter-themed decoration that truly stands out. Say goodbye to the stress of intricate steps and welcome the joy of effortless creation. We’ll guide you through each stage, ensuring a smooth and enjoyable crafting experience from start to finish. You’ll be amazed at how easily you can achieve a professional-looking result with minimal effort and cost.
Inspired by the brilliant and easy-to-follow instructions from diywithsusy Z on YouTube, this guide elaborates on her simple technique, providing extended tips and insights to help you perfect your own festive wreath. Her original video tutorial is a fantastic visual aid, and we encourage you to watch it for a comprehensive understanding. Get ready to embark on a fun, creative journey that culminates in a charming, handcrafted Easter decoration that will impress your guests and bring a smile to your face throughout the spring season. Let’s dive into the full instructions below and discover how wonderfully simple it is to bring this project to life!
Why Craft Your Own Easter Wreath: The Joy of DIY Decor
There’s something uniquely satisfying about adorning your home with decorations you’ve made yourself. DIY projects like this Easter egg wreath offer numerous benefits beyond just saving money. Firstly, they allow for unparalleled personalization. While store-bought wreaths can be beautiful, they often lack that unique touch that reflects your personal style and taste. By crafting your own, you have complete control over the color scheme, texture, and overall aesthetic, ensuring it perfectly complements your existing home decor.
Secondly, crafting is a fantastic stress-reliever. Engaging in a simple, repetitive task like wrapping a wreath form or gluing eggs can be incredibly meditative and rewarding. It provides a wonderful opportunity to unwind, tap into your creativity, and enjoy a sense of accomplishment once your masterpiece is complete. For busy individuals, finding a project that delivers maximum impact with minimal time commitment, like this 30-minute Easter wreath, is a true gem.
Finally, a handmade wreath becomes more than just a decoration; it’s a conversation starter and a source of pride. Guests will undoubtedly admire your creativity and effort, and you’ll cherish the memories of making it. This particular wreath, utilizing readily available and affordable materials, exemplifies how beautiful and impactful DIY decor can be without breaking the bank. It’s an accessible project that empowers anyone to add a touch of handmade charm to their holiday celebrations.
Gathering Your Materials: Budget-Friendly and Readily Available
One of the most appealing aspects of this Easter egg wreath project is its reliance on incredibly affordable materials, many of which can be found at your local dollar store or craft supply shop. Opting for budget-friendly supplies doesn’t mean compromising on quality or aesthetics; rather, it’s about smart shopping and creative utilization. Here’s a detailed look at what you’ll need to gather:
- Wire Wreath Form: Choose a sturdy, round wire wreath form. These are a staple at dollar stores and craft shops. The wire provides an excellent base for wrapping and gluing, ensuring your wreath maintains its shape. Consider the size of your desired wreath – a standard 12-inch or 14-inch form is ideal for most doors and spaces.
- Burlap Ribbon: A wide roll of burlap ribbon is essential for creating a rustic yet elegant base for your eggs. Look for a roll that’s at least 2-3 inches wide to ensure good coverage. Burlap adds a lovely texture and neutral backdrop, allowing the vibrant Easter eggs to truly pop. You might need one or two rolls depending on the width and length.
- Dollar Tree Easter Eggs: This is where the magic happens! Dollar Tree offers a fantastic assortment of plastic Easter eggs in various sizes and cheerful spring colors. Purchase several packs to ensure you have a good mix of sizes and plenty of eggs to fill your wreath densely. Look for eggs that are lightweight and have a relatively smooth surface for easy gluing.
- Artificial Grass: Also readily available at dollar stores or craft stores, artificial grass (or craft moss) is perfect for filling in gaps and adding a natural, nest-like touch to your wreath. A small bag or sheet should suffice. This element adds depth and completes the “Easter nest” aesthetic.
- Hot Glue Gun and Glue Sticks: An absolute must-have for any crafter! A reliable hot glue gun will ensure your materials adhere securely and quickly. Make sure you have an ample supply of glue sticks, as you’ll be using quite a bit for wrapping the ribbon and attaching the eggs and grass.
- Scissors: A sharp pair of scissors will be needed for cutting the burlap ribbon and any excess artificial grass.
- Skewer: A simple wooden skewer (or a craft stick, pencil, or even a chopstick) will be incredibly helpful for pushing and positioning the artificial grass into tight spaces without getting hot glue on your fingers.
When selecting your materials, don’t be afraid to mix and match colors of Easter eggs to create a vibrant, multi-hued display. Consider if you want a monochromatic look with eggs in varying shades of one color, or a rainbow of pastel hues. The beauty of this project lies in its flexibility, allowing you to tailor it perfectly to your aesthetic preferences.
Step-by-Step Guide: Crafting Your Easy Easter Egg Wreath
Now that you’ve gathered all your supplies, let’s dive into the fun part: assembling your beautiful Easter egg wreath. Follow these detailed instructions carefully to ensure a smooth and successful crafting experience.
Step 1: Preparing Your Wreath Base – The Burlap Foundation
The first crucial step in creating your stunning Easter wreath is to establish a solid and aesthetically pleasing base. This involves transforming a simple wire frame into a charming rustic foundation using burlap ribbon.
Begin by taking your round wire wreath form. Secure the end of your burlap ribbon to the wire frame with a generous dab of hot glue. Hold it firmly for a few seconds until it’s set. Once secured, begin tightly wrapping the burlap ribbon around the entire wire frame. The goal is to completely cover the wire, leaving no gaps. As you wrap, intermittently apply small dabs of hot glue to the wire frame, pressing the burlap down firmly to ensure it stays in place. This prevents the ribbon from sliding or unraveling over time. Maintain a consistent tension as you wrap to achieve a smooth, even surface.
Continue this process until the entire wire wreath form is thoroughly concealed by the burlap ribbon. Once you’ve reached the starting point or have covered the entire frame, cut off any excess burlap ribbon, leaving a small overlap. Secure this end firmly to the wreath form with another dab of hot glue, ensuring it’s neat and won’t fray. Take a moment to inspect your burlap-wrapped base, making sure it feels secure and looks uniform. This sturdy foundation is vital for supporting the weight of your Easter eggs.
Next, it’s time to prepare your Dollar Tree Easter eggs. Open all packages and gently separate the egg halves if they come apart easily. This isn’t strictly necessary, but it can make them slightly lighter and easier to glue. The most important part here is to sort your eggs by size. Having a distinct pile of larger eggs and smaller eggs will be immensely helpful in the next step when you begin the arrangement process, ensuring a balanced and visually appealing distribution on your wreath.
Step 2: Decorating with Eggs and Grass – Creating a Vibrant Display
With your burlap base ready and eggs sorted, it’s time to bring your wreath to life with color and texture. This step involves carefully arranging and securing the Easter eggs, followed by adding the whimsical touch of artificial grass.
Begin by taking your larger Easter eggs. Apply a generous amount of hot glue to one side of an egg, then firmly press it onto the burlap-wrapped wreath form. Start arranging these larger eggs around the outer and inner edges of the wreath, creating a foundational layer. Space them somewhat evenly, but don’t worry about perfect symmetry at this stage. The goal is to establish the main structure of your egg arrangement. Work your way around the entire wreath, ensuring each large egg is securely attached. Hold each egg in place for a few seconds after gluing to allow the hot glue to cool and set properly.
Once the larger eggs are in place, it’s time to fill in the gaps with the smaller eggs. These smaller eggs are perfect for nestling between the larger ones, creating a full and lush appearance. Apply hot glue to the smaller eggs and strategically place them in any noticeable empty spaces. Continue this process, rotating your wreath and stepping back occasionally to assess the overall balance and coverage. The more densely you pack the eggs, the fuller and more luxurious your wreath will look. Don’t be afraid to overlap eggs slightly or place them at different angles to add dimension and visual interest. Ensure every egg is firmly secured with hot glue; a shaky egg can easily detach later.
After all the eggs are meticulously placed and secured, you’ll likely notice small crevices and openings between them. This is where the artificial grass comes into play, adding a wonderful natural texture and completing the “Easter nest” aesthetic. Grab your artificial grass and begin inserting small tufts into these remaining empty spaces. For particularly tight spots, this is where your skewer becomes invaluable. Use it to gently push the grass into place, ensuring it’s nestled snugly. Before inserting each piece of grass, dab a small amount of hot glue onto the tip of the grass or directly into the crevice. This crucial step prevents the grass from falling out, keeping your wreath looking fresh and intact for the entire season. Work methodically around the wreath, filling every last visible gap to create a seamless and organic look. The artificial grass not only adds visual appeal but also helps to conceal any visible glue or gaps in the burlap.
Personalizing Your Easter Egg Wreath: Adding Your Unique Flair
While the basic Easter egg wreath is charming on its own, one of the greatest joys of DIY is the opportunity to infuse your creation with your personal style. Here are a few ideas to customize your wreath and make it truly unique:
- Color Schemes: Instead of a mix of colors, consider a specific palette. Pastel blues and pinks, vibrant jewel tones, or even a sophisticated white and gold theme can dramatically alter the wreath’s overall feel.
- Ribbon Variations: While burlap provides a wonderful rustic base, you could add a secondary ribbon. A satin bow at the top, a patterned spring-themed ribbon woven through the eggs, or even a lace ribbon can add elegance or playfulness.
- Floral Embellishments: Small artificial spring flowers, like tulips, daisies, or cherry blossoms, can be hot-glued among the eggs and grass for an extra touch of natural beauty.
- Miniature Accents: Tiny birds, bunnies, or chicks can be nestled into the grass to enhance the Easter theme. Small wooden cutouts or glittery foam shapes also make lovely additions.
- Lights: For an evening glow, consider weaving a delicate strand of battery-operated fairy lights through the eggs and grass. This creates a magical ambiance, especially if displayed indoors.
- Monogram: A small wooden or metal initial placed in the center or slightly off-center of the wreath can add a personalized touch, especially if it’s a gift.
Experiment with different textures and elements that speak to your aesthetic. Remember, there are no strict rules in crafting – let your imagination be your guide!
Displaying and Caring for Your DIY Easter Masterpiece
Once your Easter egg wreath is complete and the glue has fully dried, it’s time to showcase your beautiful creation! Here are some popular places to display your new decor:
- Front Door: This is a classic spot for a wreath, welcoming guests with a festive touch. Ensure it’s hung securely using a wreath hanger.
- Over a Mantelpiece: A wreath above the fireplace adds a cozy and elegant focal point to your living room.
- On a Wall: Brighten up any blank wall in your entryway, dining room, or kitchen. It can even be hung against a mirror to amplify its beauty.
- As a Table Centerpiece: Lay the wreath flat on a dining table or coffee table, and place a pillar candle or a small vase of fresh flowers in the center for a stunning arrangement.
To ensure your wreath remains vibrant and beautiful for many Easters to come, here are a few care tips:
- Indoor Display Preferred: While it can withstand short periods outdoors in good weather, prolonged exposure to direct sunlight, heavy rain, or extreme temperatures can fade colors and degrade glue. For maximum longevity, an indoor display is recommended.
- Dusting: Gently dust your wreath with a soft brush or a can of compressed air every now and then to keep it looking fresh.
- Storage: When Easter is over, store your wreath in a sturdy box in a cool, dry place. You can wrap it loosely in tissue paper or plastic to protect it from dust and potential damage.
Conclusion: Your Charming Easter Creation Awaits!
And there you have it – a magnificent, handcrafted Easter egg wreath, created with ease, speed, and budget-friendly materials! This project beautifully demonstrates that stunning holiday decor doesn’t require endless hours or an expensive shopping spree. With just a few simple supplies from your local dollar store and about 30 minutes of your time, you can transform ordinary items into an extraordinary display of spring joy.
We hope this expanded guide, building upon the excellent foundation provided by diywithsusy Z, has inspired you to pick up a glue gun and bring your own vision to life. The satisfaction of displaying a decoration you’ve made yourself is truly unmatched. This wreath is not just a pretty ornament; it’s a testament to your creativity and a warm welcome to the vibrant spirit of Easter.
Don’t forget to visit diywithsusy Z on YouTube for her fantastic video tutorial and to explore her other wonderful DIY projects. Her channel is a treasure trove of inspiration for crafters of all levels. We encourage you to share your finished wreath creations with us – we’d love to see how you’ve personalized your own Easter masterpiece!
*A heartfelt thank you to diywithsusy Z via YouTube for her inspiring tutorial and for all images used in this guide. Her creativity truly empowers others to craft beautiful things.